-
CDST_LT-M1:Basics of TB and NTEP
Fullscreen-
CDST_LT: Epidemiology and burden of TB
FullscreenTuberculosis
Content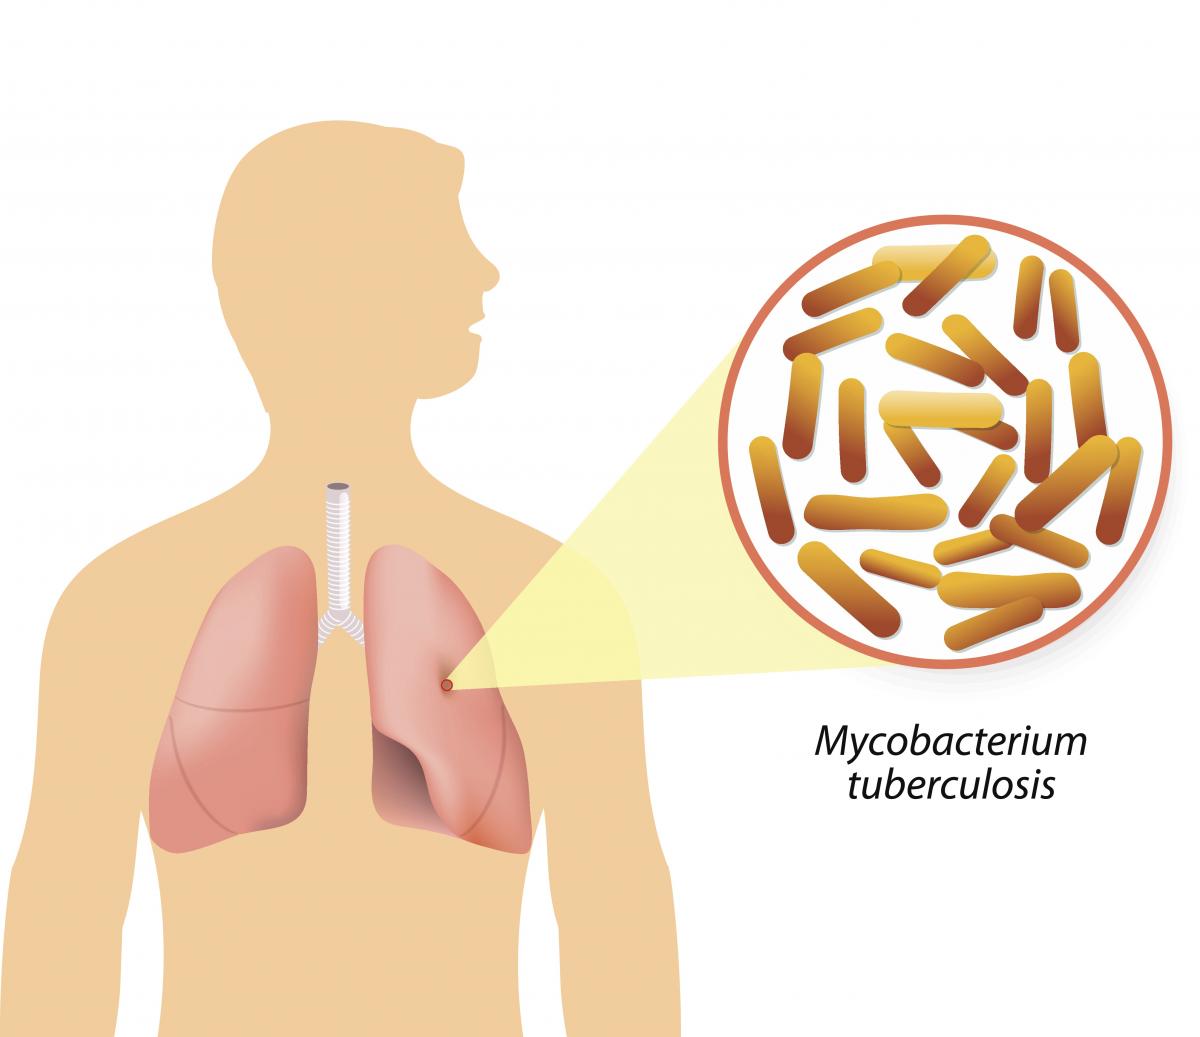
Figure: Causative agent for Tuberculosis is Bacillus: Mycobacterium tuberculosis (M.tb)
-
Tuberculosis (TB) is a communicable disease that is a major cause of ill health.
-
TB is caused by the bacillus Mycobacterium tuberculosis (M.tb)
-
TB disease typically affects the lungs (pulmonary TB) (80%) but can also affect other parts of the body (extra pulmonary TB) (20%)
-
It spreads when people who are sick with TB expel bacteria into the air (for example by coughing, sneezing, shouting or singing)
-
It is one of the top 10 causes of death worldwide and the leading cause of death from a single infectious agent
Resources
- Global Tuberculosis Report, 2020; Geneva: World Health Organization, 2020
- Training Modules (1-4) for Programme Managers and Medical Officers India: Central TB Division, MoHFW, Government of India,July 2020
-
TB Causative organism
Content
Figure Mycobacterium tuberculosis
TB is caused due to the infection by a bacterium called Mycobacterium tuberculosis.

Figure: Extra-Pulmonary Tuberculosis
It often affects the lungs, and in such cases it is called Pulmonary Tuberculosis. But, it can affect almost any part of the body (except the hair and the nails), in which it is known as Extra-Pulmonary Tuberculosis.
Resources:
Mode of TB Transmission
ContentTuberculosis is transmitted mainly through the air via droplet nuclei generated when a TB patient coughs or sneezes.
It is estimated that every sputum smear-positive patient spreads the infection to 10 – 15 persons annually, if untreated..

Figure: Transmission of TB bacteria through air via droplet
Resources:
- Technical and Operational Guidelines for TB Control in India 2016
- WHO - Fact sheet details on Tuberculosis
Kindly provide your valuable feedback on the page to the link provided HERE
Exposure to TB Bacilli
ContentPatients suffering from microbiologically confirmed pulmonary TB (PTB) constitutes the most important source of infection.
- The infection occurs most commonly through droplet nuclei generated by coughing, sneezing etc., inhaled via the respiratory route.
- M. tuberculosis spreads from the respiratory tract in small respiratory droplets or within dust particles that can travel long distances in the air.

Figure: How Exposure to TB Bacilli Happens
The chances of getting exposed and infected depend on the:
- Duration of exposure to an active TB patient
- Frequency of exposure
- Bacterial load of the TB patient
- Virulence of TB bacilli
- Immune status of the exposed individual
- Other factors (air circulation, overcrowding, temperature and humidity etc.)
Resources
- Robbin's Basic Pathology, 10th Edition, 2018.
- Training Module (1-4) for Program Managers and Medical Officer, NTEP, MoHFW, 2020.
Kindly provide your valuable feedback on the page to the link provided HERE
Risk Factors for TB Disease
ContentFollowing are the risk factors that increase the chances of developing TB disease in an individual:

Figure: Risk factors for developing active TB
Resources:
Kindly provide your valuable feedback on the page to the link provided HERE
TB Infection
Content-
TB Infection (or previously known as Latent TB infection) is a stage in between uninfected and having active TB. In this stage the person has no symptoms and can only be identified using laboratory tests.
-
The vast majority of infected people may never develop TB disease. However, to achieve TB elimination, it is important to treat TB infection in people at risk of developing active TB disease.
-
It is a state of persistent immune response to stimulation by Mycobacterium tuberculosis antigens with no evidence of clinically manifested active TB.
-
There is no single acceptable/reliable test for direct identification of Mycobacterium tuberculosis infection in humans. Tuberculin Skin Test (TST) and Interferon-gamma release assay (IGRA) are commonly used tests for identifying TB infection.
Resources:
-
Global Burden of TB
Content- Globally, an estimated 11 million people fell ill with TB (incidence) in 2021.
- Historically, it has been the top infectious disease killer. In 2021, there were an estimated 1.4 million TB deaths and an additional 187 000 deaths among HIV-positive people.
- Three countries accounted for 42% of global cases in 2021: India (26%), the Russian Federation (8.5%) and Pakistan (7.9%).
Image
Figure: Estimated TB incidence in 2021, for countries with at least 100 000 incident cases; Source: Global TB Report, 2022.
Resources
Burden of TB in India
ContentTB is one of the top burdensome infectious diseases in India. It is estimated that, around 1/4th (26%) of the world's TB cases are in India, translating to about 30 Lakhs new TB cases emerging each year (TB incidence). Against this estimated incidence the National TB Elimination program reported around 19 lakh new and relapse cases in the year 2021.
An estimated 5 Lakhs deaths occur due to TB each year in the country, translating to about 1 case of TB death every one-two minutes. Compared to this, there are only about 60 thousand deaths due to HIV and about 77 deaths due to Malaria each year.
TB diagnosis and treatment services although provided free of cost in the public sector, the cost of accessing these services and related loss of wages drive the affected people with poverty (catastrophic costs). TB also has a huge impact on the world's and the country's economy because of loss of workdays (100 million workdays per year).
Assessment
Question Answer 1 Answer 2 Answer 3 Answer 4 Correct answer Correct explanation Page id Part of Pre-test Part of Post-test What is the estimated number of incident TB cases that emerge each year in India? 35 Lakh cases 26 Lakh Cases 26% of the Global Burden 19 Lakh Cases 2 The estimated number of new and relapse (incident) cases in India that emerge each year is about 26 Lakh Yes Yes How many cases of deaths are estimated to be caused by TB in India Approximately One death every 2-3 minutes Approximately 5 Lakh deaths 60 Thousand deaths each year 1 and 2 4 In India it is estimated that there is around one death caused due to TB every one to two minutes, translating to about 5Lakh deaths each year in India Yes Yes Resources:
Stages in TB Patient's Lifecycle
ContentThose who are suspected of having TB disease are first screened for symptoms like cough and fever for more than 2 weeks, blood stained sputum and weight-loss. If found positive on screening, then TB patients are referred for testing to the nearest health facility. If diagnosed with TB, then they are subsequently initiated on treatment. The TB patients initiated on treatment are regularly monitored with the help of field staff or digital interventions like 99DOTS and MERM (Medication Event Reminder Monitor) technology. NTEP staff also ensures that the TB patients are regularly followed up on monthly basis till their treatment completion.

Figure: Patient Flow
Kindly provide your valuable feedback on the page to the link provided HERE
-
CDST_LT: Introduction to NTEP
FullscreenIndia's commitment to End TB
ContentThe Government of India has committed to achieving the Sustainable Development Goals(SDG) targets related to ending TB by 2025 (5 years ahead of the global target). This would mean that in 2025, the 2030 target of achieving 80% reduction in incidence, 90% reduction in deaths due to TB compared to that of 2015, is to be achieved.
Parameter 2015 Value SDG 2030 Target Commitment for 2025 Estimated annual Incidence 217 cases/Lakh 80% reduction 44 cases/lakh Estimated annual Mortality 4.5 lakh 90% reduction 45,000 Table: India's commitment to End TB by 2025.
Resources:
National Strategic Plan [NSP] for TB Elimination 2017-25
ContentThe National Strategic Plan (NSP) for TB elimination 2017–25 is a bold strategic framework to drive the acceleration of progress toward TB Elimination, and achieving the Sustainable Development Goal (SDG) and End TB targets for India. It expects to guide the activities of all stakeholders including the national and state governments, development partners, civil society organizations, international agencies, research institutions, private sector, and many others whose work is relevant to TB elimination in India. It is adopts strategies under four groups DETECT, TREAT, PREVENT, BUILD.
VISION: TB-Free India with zero deaths, disease and poverty due to tuberculosis
GOAL: To achieve a rapid decline in burden of TB, morbidity and mortality while working towards elimination of TB in India by 2025.The results framework of the NSP outlines the various targets (impact and outcomes) to be achieved.
IMPACT INDICATORS 2015
(Baseline)2020 2023 2025 1. To reduce estimated TB Incidence rate (per 100,000) 217
(112-355)142
(76-255)77
(49-185)44
(36-158)2. To reduce estimated TB prevalence rate (per 100,000)
320
(280-380)170
(159-217)90
(81-125)65
(56-93)3. To reduce estimated mortality due to TB (per 100,000)
32 (29-35) 15 (13-16) 6 (5-7) 3 (3-4) 4. To achieve zero catastrophic cost for affected families due to TB 35% 0% 0% 0% Resources
Assessment Questions
Question Answer 1 Answer 2 Answer 3 Answer 4 Correct Answer Explanation Part of pre-test Part of post-test Which are the groups under which strategies for National Strategic Plan (NSP) for TB elimination 2017–25 were developed? DETECT, TREAT, PREVENT DETECT, TREAT, PREVENT, BUILD DETECT, TREAT, PREVENT, REHABILITATE DETECT, TREAT, REHABILITATE DETECT, TREAT, PREVENT, BUILD The National Strategic Plan (NSP) for TB elimination 2017–25 adopts strategies under four groups: DETECT, TREAT, PREVENT, BUILD. Yes Yes Which of the following does the National Strategic Plan (NSP) for TB elimination 2017–25 aim to bring down to 0% by 2025? Incidence rate Prevalence rate Mortality rate Catastrophic cost for affected families Catastrophic cost for affected families The target of the National Strategic Plan (NSP) for TB elimination 2017–25 is to achieve zero catastrophic cost for affected families due to TB Yes Yes Evolution of TB Elimination Programme in India
ContentThe National Tuberculosis Control Program (NTP) of India was launched in 1962. It relied on BCG, X-ray based diagnosis and Streptomycin and INH based treatment centralized at district level.
Based on a review of the NTP, and WHO recommendations of the DOTS Strategy, Government of India then revised the NTP and launched new program with the title Revised National Tuberculosis Control Program (RNTCP) in 1997. It used Sputum microscopy at DMC(Designated Microscopy Centres) for diagnosis, and multi-drug Short Course Anti-TB Therapy, decentralized to the TU (TB Unit) level.
In recognition of the rising drug resistance problem the DOTS Plus/ PMDT (Programmatic Management of Drug Resistant TB) was launched in 2006 and scaled up to the entire country by 2012.
Further to strengthen the monitoring and supervision system - a case based notification system - Nikshay was introduced in 2012. The same year Tuberculosis was added as a notifiable disease at the point of diagnosis by all health care providers.
Other key milestones from 2012 to 2020 were the availability of the Standards of TB Care in India (STCI) in 2014, introduction of the Daily weight band wise Fixed Dose combination (FDC) in 2016 and new drugs like Bedaquilline and Delaminid were started in 2017 and 2018 respectively.
To emphasise the commitment of the Government of India and to accelerate the efforts towards TB elimination, RNTCP was renamed as "National Tuberculosis Elimination Programme (NTEP)" in 2020.

Figure: Key milestones under NTEP
Resources:
Organizational Structure of NTEP
ContentNational Tuberculosis Elimination Programme (NTEP) is a centrally sponsored programme being implemented under the aegis of National Health Mission.
National Level: Managed by Central TB Division (CTD), the technical arm of the Ministry of Health and Family Welfare (MOHFW)
State Level: State TB Cell coordinates the overall TB elimination programme in state under the guidance of State Health Society. The training ,supervision, monitoring and evaluation NTEP at state level are looked after by STDC (State TB Training and Demonstration Centre).
District TB Centre (DTC) is the nodal point for all TB elimination activities in the district under the guidance of the District Health Society.
Tuberculosis Unit (TU) Level: NTEP activities at block/sub-district level are implemented through TU which comprises Designated Medical Officer (MO) supported by two full-time NTEP staff - STS (Senior Treatment Supervisor) & STLS (Senior TB Lab Supervisor).
PHI (Peripheral Health Institute): PHI is a health facility manned by a Medical Officer (MO). Some of the PHIs are also the Tuberculosis Diagnostic Centres, which are the most peripheral level laboratories in the NTEP structure. All the Private Health Facilities like Private Practitioners / Private Hospitals / Clinics / Nursing Homes are also PHI.

Figure: Organisational structure of NTEP
Resources:
-
CDST_LT: General concepts in TB care in India
FullscreenMandatory Notification of TB Diagnosis
ContentTB is a notifiable disease in India, and TB notification has been made mandatory at the point of diagnosis since May 2012. This means that when a case of TB is diagnosed and/or put on treatment it is to be reported to the NTEP.
- Every healthcare provider, i.e., clinical establishments run or managed by the Government (including local authorities), private or NGO sectors and/or individual practitioners, need to notify diagnosed or treated TB patient’s.
- Reporting is to be done on the online reporting system called Nikshay and should include details of patient identification, and TB diagnosis.
- This, apart from enabling essential public health actions such as Treatment initiation, and Contact Tracing, chemoprophylaxis, but also enables provisions of Direct beneficiary transfer for Nikshay Poshan Yojana
Points to Note:
As per MCI code of ethics a registered medical practitioner giving incorrect information on his name and authority about notification amounts to misconduct and such a medical practitioner is liable for deregistration. It is the duty of the registered medical to divulge this information to the authorized notification official as regards communicable and notifiable diseases.
Resources
Nikshay
ContentNikshay is an Integrated ICT system for TB patient management and care in India. Nikshay was launched in 2012 and since then, various improvements have been made in the system.
Nikshay provides-
- A Unified interface for public and private sector health care providers
- Different types of Logins such as State, District, TU, PHI, Staff logins, Private providers, Chemist, Labs and PPSA/JEET Logins
- Integration of all adherence technologies such as 99DOTS and MERM
- Unified DSTB and DRTB data entry forms
- Mobile friendly website with mobile app
Nikshay is accessible either via web browser(https://Nikshay.in ) or mobile App called ‘Nikshay’ that can be downloaded from Google Play Store(Android).
Figure: Nikshay Login Pages
TB Case classification in NTEP
ContentTB cases are generally classified on the basis of previous history of TB treatment into New and previously treated cases.
New case - A TB patient who has never had treatment for TB or has taken anti-TB drugs for less than one month is considered as a new case.
Previously treated patients have received 1 month or more of anti-TB drugs in the past. They could be further classified as:
- Recurrent TB case - A TB patient previously declared as successfully treated (cured/treatment completed) and is subsequently found to be microbiologically confirmed TB case is a recurrent TB case.
- Treatment After failure patients are those who have previously been treated for TB and whose treatment failed at the end of their most recent course of treatment.
- Treatment after loss to follow-up - A TB patient previously treated for TB for 1 month or more and was declared lost to follow-up in their most recent course of treatment and subsequently found microbiologically confirmed TB case
- Other previously treated patients are those who have previously been treated for TB but whose outcome after their most recent course of treatment is unknown or undocumented.
Resources:
Kindly provide your valuable feedback on the page to the link provided HERE
Classification of TB on the basis of Drug Resistance
ContentResistant Sensitive Unknown / Sensitive Types of Drug Resistance TB (DR TB) Resistant to Isoniazid (H) Rifampicin (R) Fluroquinolones (FQ) =
Ofloxacin, Levofloxacin,
MoxifloxacinGroup A Drugs =
Bedaquiline/ LinezolidH Mono / Poly Drug Resistance Resistant Sensitive Unknown/ Sensitive Unknown/ Sensitive Rifampicin Resistance (RR) Unknown/ Sensitive Resistant Unknown/ Sensitive Unknown/ Sensitive Multi Drug Resistance TB (MDR TB Resistant Resistant Unknown/ Sensitive Unknown/ Sensitive Pre-Extensive Drug Resistance (Pre -XDR) Resistant Resistant Resistant Unknown/ Sensitive Extensive Drug Resistance (XDR) Resistant
Resistant Resistant Resistant Resources:
Development of Drug Resistance in Mtb.
ContentDrug resistance in Mycobacterium tuberculosis occurs when there is acquisition of mutations in genes that code for anti-TB drug targets or drug-activating enzymes.
Drug resistance in Tuberculosis (TB) occurs through two main mechanisms shown in the figure below.
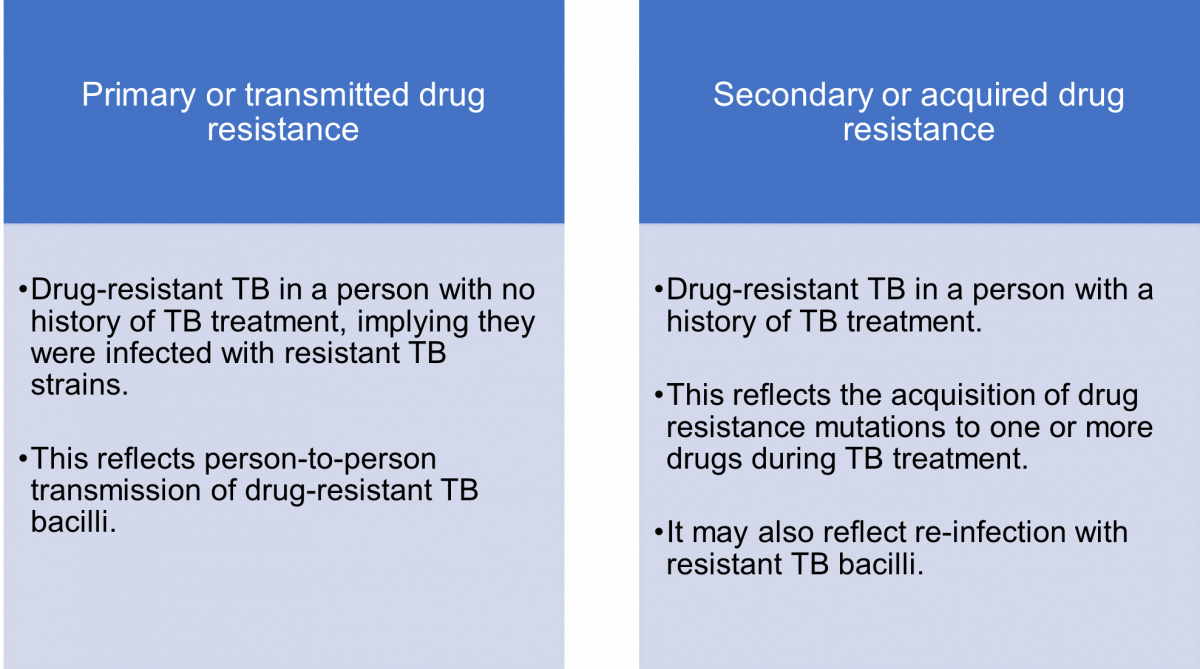
Figure: Mechanisms or Types of Drug Resistance in TB
The mechanism of transmission of drug-resistant (DR) and drug-sensitive (DS) TB is the same i.e., via infectious aerosols.
Acquired drug resistance is multi-factorial, and may be due to:
- Lack of access to quality-assured anti-TB drugs for proper treatment
- Lack of adherence to the regimen or interrupted therapy which could be due to complex dosing strategies, serious adverse drug reactions and drug–drug interactions
- Inappropriate regimens
- Sub-therapeutic dosing
- Use of expired or substandard anti-TB drugs
- Malabsorption of oral anti-TB drugs which can be seen, for example, in HIV patients.
Resources
- Navisha Dookie et al. Evolution of Drug Resistance in Mycobacterium tuberculosis: A Review on the Molecular Determinants of Resistance and Implications for Personalized Care, Journal of Antimicrobial Chemotherapy, Volume 73, Issue 5, May 2018.
- Bento J, Duarte R, Brito MC, et al. Malabsorption of Antimycobacterial Drugs as a Cause of Treatment Failure in Tuberculosis, BMJ, September 2010.
- Biadglegne F, Sack U, Rodloff A. Multidrug-resistant Tuberculosis in Ethiopia: Efforts to Expand Diagnostic Services, Treatment and Care. Antimicrobial Resistance Infection Control, 2014.
Prevention of Drug Resistance
ContentThere are five principal ways to prevent Drug-resistant Tuberculosis (DR-TB), as given in the figure below.
Image
Figure: Five Principal Ways to Prevent DR-TB; Source: Guideline for PMDT in India, 2021.
- Drug resistance cannot be prevented by mere diagnosis and treatment of DR-TB.
- Basic TB diagnostic and treatment services should receive priority for the prevention of drug resistance.
- Systems for early detection and treatment of DR-TB should be integrated into the existing TB services and the general health system.
- Healthcare facilities and congregate settings should be provided with proper infection control measures.
- Transmission should be prevented by addressing non-specific determinants like access to care, comorbidities and awareness.
Resources
- Guidelines for PMDT in India, 2021.
- Companion Handbook to the WHO Guidelines for the Programmatic Management of Drug-resistant Tuberculosis.
Kindly provide your valuable feedback on the page to the link provided HERE
Continuum of TB Care
ContentWhat is the "continuum of TB Care"?
Tuberculosis in contrast to other infectious diseases affects humans over a long period of time. Stages such as uninfected, infected, and disease, do not have clearly demarcated time points and stages blend with each other when a person is converting or transitioning from one to the other. In addition, a person cured from TB may get re-infected and diseased, or still harbor a few dormant TB bacteria which may get reactivated at some future time; this too needs to be cared for. Hence, TB care is visualized as a continuous spectrum of care, with parts that requires varying type and intensity of services throughout a person's lifecycle, called the continuum of care.
Continuum of TB care is a concept that emphasizes that care provision/ TB related health care services exists is in a continuum for an individual's lifetime. It includes services before and after the current episode of TB including vulnerable population, TB infection, post treatment follow-up and recurrence of TB.
NOTE:
- When interacting with a person it is important to locate the person in this continuum of care. This is done by a combination of screening for TB disease, testing for TB infection, asking for the previous history of TB/ checking for existing records in Nikshay using patient identifiers.
- In alignment with the continuum of care concept, Nikshay follows a lifecycle approach. It is able to document and track a patient throughout the continuum using any of the Patient ID or Episode ID or any of the service identifiers(Test ID, Transfer ID etc).
Resources
- Guidelines for Programmatic Management of Tuberculosis Preventive Treatment in India.
- Standards for TB Care in India.
Assessment
Question Answer 1 Answer 2 Answer 3 Answer 4 Correct answer Correct explanation Page id Part of Pre-test Part of Post-test Continuum of care involves a life cycle based approach toward delivering healthcare services for TB. True False 1 Continuum of care means that delivery of services under NTEP is in a continuum for an individual's lifetime and extends beyond the current episode of TB. Symptoms of TB Disease
ContentActive TB disease has 4 major symptoms (the 4 Symptom complex). Presence of any one of these symptoms without any other reason warrants evaluation for TB. These are:

Figure: Signs and Symptoms of TB
People affected with TB may experience other symptoms as well. These may be based on the site that is affected with TB or other more non-specific symptoms of an infection. The physician or doctor would evaluate these symptoms in view of diagnosis of TB.
Resources:
Screening For Tuberculosis Disease
ContentScreening for active tuberculosis (TB) a process to filter out people who are less likely to have TB, from a group. Screened positive people are likely to have TB and are confirmed subsequently using a TB diagnostic test. This will allow finite diagnostic testing resources to be used on the remaining.
Screening in TB may be performed using simple field tools (4 Symptom complex) and tests such as Chest X-ray, or a combination of both. Combination of both is the most effective, but is often not applied due to the practical difficulties in making a chest X-ray conveniently available.
Screening is an integral part of any general case finding effort. It is also applied systematically in specific situations.
- At health care facilities (intensified case finding): Here those visiting are screened using the 4 symptom complex, often at the point of entry to the facility. Those screened positive may be fast-tracked to TB Diagnostic testing.
- In vulnerable populations in active case finding efforts: Here the entire population identified for active case finding are screened using the pre-decided protocols by going door to door.
Resources
Testing for TB diagnosis
ContentNational Tuberculosis Elimination Programme (NTEP) strives for all presumptive TB patients to be microbiologically confirmed. Under NTEP, the acceptable methods for microbiological diagnosis of TB are:
Sputum Smear Microscopy (for Acid Fast Bacilli - AFB): Sputum Smear microscopy is the primary tool which is reliable, inexpensive, easily accessible and rapid method of diagnosing PTB, where in the bacilli are demonstrated in the sputum. Two types:
-
Ziehl-Neelsen Staining
-
Fluorescence staining
Rapid diagnostic molecular test: Rapid molecular tests that use techniques like NAAT are very specific. They amplify the genomic material in the patient sample and hence enhances detection
-
Nucleic Acid Amplification Test (NAAT) e.g., GeneXpert, TrueNat
Figure: Genxpert Machine for CBNAAT
Figure: Truenat Machine
- Line Probe Assay
Culture and DST: A culture test involves studying bacteria by growing the bacteria on different substances. This is to find out if particular bacteria are present. In the case of the TB culture test, the test is to see if the TB bacteria Mycobacterium tuberculosis, are present.
Two types:
-
Solid (Lowenstein Jensen) media
-
Liquid media (Middlebrook) e.g., Bactec MGIT etc.
-
-
CDST_LT: Nikshay The NTEP Information System
FullscreenUser roles managing patient data in Nikshay
ContentNikshay being the final updated repository of information of TB patient services, different roles perform various actions on the patient and TB service information in Nikshay and keep it updated. These roles range from health volunteers and treatment supporters on the field to health providers and doctors at health facilities. Each role acts on or inputs information based on the services he/she provides. The information is required to updated when it is generated by the person generating it (eg by the CBNAAT LT once the results of a CBNAAT test is available).
- Laboratory Technician (LT): This role encompasses LTs at all labs performing all types of TB related tests including those at District Microscopy Centre (DMCs), Cartridge Based Nucleic Acid Amplification Test (CBNAAT) and Culture and Drug Sensitivity Test (CDST) laboratories. The LT is responsible for adding and updating test records (Test request and test result) in Nikshay that he/she performs. Nikshay in-turn provides the LT with the electronic register of tests performed at the PHI and also shares the updated information with other relevant stakeholders.
- Treatment Supporters and Health Volunteers: These field level volunteers (such as ASHAs) may enroll presumptive TB cases and refer them to the nearest PHI. Once a TB case is identified and linked to them for treatment support they can record and monitor TB patient adherence. Nikshay in-turn provides them with updated information of the patient and automatically calculates Treatment Supporters honorarium and enables its processing by the relevant authorities.
- Patients: Patients may view their updated TB health records including adherence information and status of DBT benefits processing in Nikshay through the TB Arogya Saathi Application.
- Pharmacist/ Storekeeper: These ensure drug dispensation records of patients are updated along with related supply chain information in Nikshay and Nikshay Aushadhi.
- Health Staff: This is a group of roles posted to various PHIs(Peripheral Health Institutions) and their catchment geographies, ranging from CHOs and MPHWs to Medical officers of the PHI. They are responsible for ensuring that all records related to all patients in their catchment area, encompassing all functions from enrollment to post treatment follow-up. The Medical Officer/ Doctor in-charge apart from being the final accountable authority for ensuring updated and correct information is present in Nikshay, he/she needs to review and record treatment initiation (along with treatment regimen) and clinical decision in Nikshay with support from his/he health staff.
- Senior Treatment Supervisor (STS)/ Senior TB Lab Supervisor (STLS)/ TB Health Visitor: These roles train and support the above staff in ensuring that the information in Nikshay is up-to-date. They also review reports and coordinate feedback to the other staff to ensure optimum patient services.
The overall responsibility of ensuring completion of real-time updating of information/ data in Nikshay lies with the District TB Officer (DTO). The DTO is responsible for ensuring that the relevant staff are trained in the use of Nikshay.
Resources
Assessment
Question Answer 1 Answer 2 Answer 3 Answer 4 Correct answer Correct explanation Page id Part of Pre-test Part of Post-test When and by whom are the results of a laboratory test updated? By the LT at the end of the month By the LT at the end of the day By the LT once the test result is available By the STLS when he/she visits the lab 3 The information is required to be updated when it is generated by the person generating it. Yes Yes Patient and Process identifiers in Nikshay
ContentPatient Identifiers are key for identifying a patient in the Nikshay. Ideally, there should be only one identifier for each patient which identifies patient as well as processes for lifetime. However, during the continuum of care, one identifier may not be appropriate to represent the episodes and other processes. Hence there are various ids which are tagged to one patient in Nikshay. Knowing each ID and its purpose is therefore important. The various IDs that are present in Nikshay and their purpose are described below:
- Patient ID: In Nikshay, a TB patient can be identified by their Name, Patient ID and Nikshay ID. Since, patients might get enrolled at one primary health institute (PHI), diagnosed at another and initiated on treatment at a different PHI, the ID has been simplified to a unique number.
- Episode ID: In a life cycle approach, a person needs to be tracked across episodes of TB known as the Episode ID. In the first episode, the Patient ID = Episode ID (will be numerically equal), the patient is notified and completes one treatment cycle (Diagnosis to outcome). However, the patient may continue to have TB or have TB again at a later point in time. This is recorded as a second notification and becomes the second Episode of TB. A patient may be identified in Nikshay using a global search by both Episode ID and Patient ID.
- Test ID: When request for a laboratory test and test result for a patient is added under Nikshay, it generates a unique Test ID. For multiple tests added a new Test ID is generated for a patient.
- Transfer ID: In Nikshay, a transfer request of patients between health facilities across the country feature is enabled. Users make requests of two types - “Transfer In” and “Transfer Out”. This process generates a unique Transfer ID for the patient. The details of Transfer In and Transfer Out with Transfer ID are available in Nikshay’s Transfer Management feature.
- Sample ID: It is essential that patient samples are registered in Nikshay. While “Adding Test(s)” when sample details are added, Sample IDs are auto-generated. Sample IDs help to track samples in Nikshay using this unique ID.
- Benefit ID: A “Benefit” defined in the Nikshay-PFMS (Public Finance Management System) is a payment due to a beneficiary under a particular scheme. For example, in Nikshay Poshan Yojana (TB Patient Nutritional Support Scheme), the beneficiary is a case of Tuberculosis, notified to Nikshay. This beneficiary under the scheme is eligible for Rs 500 for each treatment month. Thus Nikshay generates a Benefit ID that identifies the patient eligible for benefits @ Rs. 500 for each treatment month.
- Beneficiary ID: A beneficiary is a person/ citizen who is eligible to get benefits (financial or in kind) under any government scheme. Whenever Nikshay identifies a potential beneficiary, it issues a unique beneficiary ID to it. All the benefits processed or paid to a beneficiary are tracked using the Nikshay Beneficiary ID. For example, if a patient has multiple episodes, all the benefits of the patient across episodes are managed using the Beneficiary ID. This information is available in the Beneficiary register exported from Nikshay.
- Ayushman Bharat Health Account (ABHA) ID: The Ayushman Bharat Digital Mission (ABDM) aims to develop the backbone necessary to support the integrated digital health infrastructure of the country. Ayushman Bharat Health Account (ABHA) ID is a 14-digit number which can uniquely identify persons and authenticate them (previously known as Health ID). It can be used to access and digitally share one's health records, with consent. ABHA is integrated into Nikshay and addresses ABHA creation, capture and verification for seamless patient registration in Nikshay. Nikshay uses the Aadhaar verification services provided by NDHM (National Digital Health Mission) to generate ABHA.
Resources
- Nikshay-search for a patient, how to identify Nikshay ID/Patient ID, how to register a patient, Adding a new Episode, how to generate Test ID, Transfer Management, Sample ID generation_Diagnostics, Direct Benefit Transfer Manual, Training Video on Direct Benefit Transfer, ABHA Workflow
Assessment:
Question Answer 1 Answer 2 Answer 3 Answer 4 Correct answer Correct explanation Page id Part of Pre-test Part of Post-test Which of the following is NOT a patient or process identifier on Nikshay? Ayushman Bharat Health Account (ABHA) ID Patient ID Mother’s ID Benefit ID 3 Mother’s ID is not a patient or process identifier on Nikshay. Yes Yes Nikshay interfaces- Web and Mobile application
ContentFigure: Nikshay Home Page
After login in Nikshay, using the login credential shared by NTEP Health Staff, Treatment Supporter will be able to access the following button:
- New Enrolment: Allows to enrol new cases in Nikshay
- Search Patient: Allows to search for patients that are mapped to him /her, using Patient Name, Nikshay ID and Old Nikshay ID
- Add Patient Test: Allows to add tests for all the patients.
- Diagnosis Pending: View the list of the patients that are pending for diagnosis
- Not on Treatment: View the list of the patients that are diagnosed but pending to be initiated on treatment
- On Treatment Patients: Gives the list of on treatment patients
- Outcome assigned: Gives the list of the patients that have completed their treatment
- Training Material; Access the training content available on Nikshay
- Patient Summary: Gives a brief overview on the Presumptive cases registered, Diagnosed and patients that are initiated on treatment
- Task List: Allows to view the list of pending activities pertaining to adherence, Treatment Outcome and Bank details missing for mapped patient
- Latest Updates: New updates of features that are released on Nikshay
TB Arogya Saathi Application
ContentTB Aarogya Sathi empowers Citizens (including TB Patients under NTEP) and to serve as a Direct interface with the national TB program.
Citizen: The App is aimed at increasing awareness among the citizens. It is available for all Citizens using the App (no login required to access this content)
- Information on TB (Symptoms, Side Effects)
- Health Facility Search
- BMI Assessment
- Nikshay Sampark Helpline
- Nutritional Advice
Patient: Patients registered with Nikshay will have access to the Adherence, Treatment Progress and DBT Details.
- Patients registered under Nikshay get access to their TB health record additional information (after login)
- Adherence Details
- Treatment Progress Details
- DBT Details
TB Aarogya Sathi App is available in Google play store and can be download using this QR Code


Figure: TB Aarogya Sathi Application snapshot
Resources:
Enrolling a patient in Nikshay
ContentVideo file
-
-
CDST_LT-M2: TB diagnosis and case finding in NTEP
Fullscreen-
CDST_LT: Diagnostic technologies in NTEP
FullscreenMicroscopy
ContentMicroscopy is a TB diagnostic technology that utilizes the acid-fastness property of Mycobacterium tuberculosis to visualize it under a microscope. Results of sputum smear microscopy can either be smear-negative, or smear-positive (with various grades).
Advantages:
- It is currently the most accessible and cheapest TB diagnostic test available under National TB Elimination Programme (NTEP) in India.
- It has the shortest turnaround time for diagnosis.
- It has high specificity.
Limitations:
- Low sensitivity. It becomes positive only when more than 5000 bacilli/ml of sample are present. Hence, cases would be missed in early disease, or when an inappropriate biological specimen is provided, where bacterial load in sputum is less.
- It is unable to differentiate between M. tuberculosis and Non-tuberculous Mycobacteria (NTM). This is predominantly an issue in geographies with lower burden.
There are two types of microscopies used in NTEP: Ziehl-Neelsen (ZN) Microscopy and Fluorescence Microscopy (FM). These vary in the type of stain and microscope used. FM is newer of the two types and is currently recommended for use over ZN.
Resources
Ziehl–Neelsen Microscopy
ContentIn Ziehl-Neelsen microscopy, the carbol fuchsin fuchsin stain is heated to enable the dye to penetrate and bind the waxy mycobacterial cell wall. Following acid-decolourisation, the sputum smear is counterstained with methylene blue which stains the background material, providing a contrast blue colour against which the red AFB can be seen.
On observation under a microscope with oil immersion at 100X magnification, AFB appears as red, straight, or slightly curved rods, occurring singly or in small groups, while the rest of the background, mucoid and pus cells are stained blue in colour.
The method was initially developed by Paul Ehrlich and later modified by afterwards the Franz Ziehl and Friedrich Neelsen after whom the method is named.
Video fileResources
- Laboratory Diagnosis by Sputum Smear Microscopy - The Handbook, GLI, 2013.
- Module for Laboratory Technicians, CTD, 2005.
Assessment
Question Answer 1 Answer 2 Answer 3 Answer 4 Correct answer Correct explanation Page id Part of Pre-test Part of Post-test In ZN microcopy what is the stain used Auramine Carbol fucshin Methylene blue Potassium Permanganate 2 The stain used in ZN microscopy is Carbol Fucshin responsible for the reddish color of the bacteria. Yes Yes Fluorescence Microscopy Using LED Microscope
Content
Fluorescence Microscopy is a newer and better type of microscopy where the TB bacteria are stained using a fluorescent dye using the property of Acid Fastness. The dye will fluoresce when illuminated by UV light. When the UV light source is an LED Lamp, it is called LED fluorescent microscopy.
Here the bacilli appear as slender bright yellow fluorescent rods, standing out clearly against a dark background, as can be seen in the figure below.
Figure: AFB as seen under an LED Fluorescence Microscope:
Principle of Fluorescence Microscopy
- Cell walls of Acid-fast Bacilli (AFB) is made up of Mycolic Acid. The mycolic acid creates a waxy layer, making the cell wall impermeable to acids and alkalis.

- The primary stain, a fluorescent dye called Auramine-O, binds to the cell wall of the bacilli.

- Intense decolorization by acid alcohol does not release the primary stain. Thus, the AFB retain the colour of the primary stain, while other bacteria lose the stain
- The counterstain, Potassium Permanganate provides a contrasting background and is useful to quench background fluorescence.
Advantages of LED-FM:
- Fluorescence LED microscopy is more sensitive (10%) than conventional ZN microscopy.
- It may be placed in existing DMCs and does not require any additional infrastructure.
- Examination of fluorochrome-stained smears takes less time.
Video fileResources
- Cell walls of Acid-fast Bacilli (AFB) is made up of Mycolic Acid. The mycolic acid creates a waxy layer, making the cell wall impermeable to acids and alkalis.
Cartridge Based Nucleic Acid Amplification Test [CBNAAT]
ContentCartridge Based Nucleic Acid Amplification Test (CBNAAT) is a rapid molecular diagnostic test. It is used for diagnosis of Tuberculosis (TB) and Rif-resistant Tuberculosis (RR-TB) in NTEP. Results are obtained from unprocessed sputum samples in about 2hours which helps in early detection and treatment of TB patients.
India has vast number of CBNAAT laboratories which are utilized for TB/RR-TB detection and Universal Drug Susceptibility Testing (UDST) under the National TB Elimination Program (NTEP).
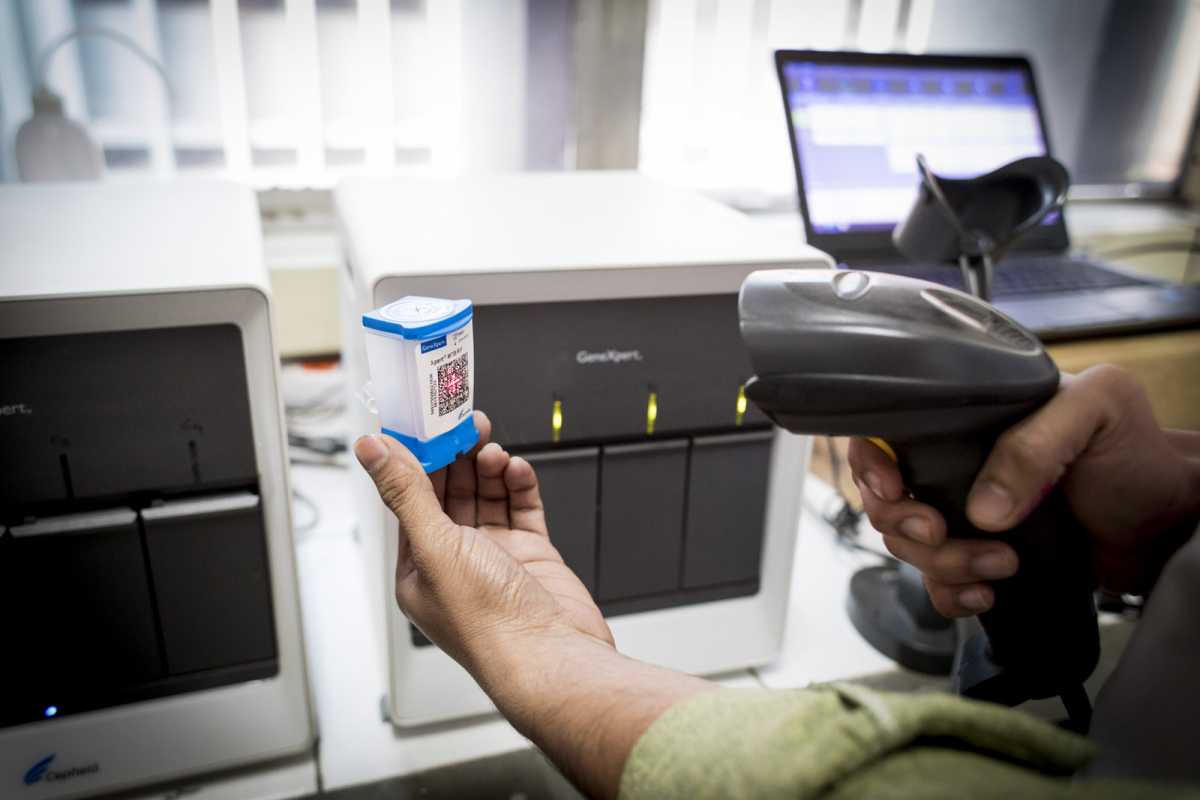
Figure: CBNAAT Cartridge and Machine in Use (Image courtesy: USAID supported Challenge TB Project)
The CB-NAAT system detects DNA sequences specific for Mycobacterium tuberculosis complex and rifampicin resistance by Polymerase Chain Reaction (PCR). It concentrates Mycobacterium tuberculosis bacilli from sputum samples, isolates genomic material from the captured bacteria by sonication and subsequently amplifies the genomic DNA by PCR. The process identifies clinically relevant rifampicin resistance-inducing mutations in the RNA polymerase beta (rpoB) gene in the Mycobacterium tuberculosis genome in a real-time format using fluorescent probes called molecular beacons.
Video fileVideo: Cartridge-Based Nucleic Acid Amplification Test [CBNAAT] - GeneXpert Technology
Resources
- Training Module (1-4) for Program Managers and Medical Officers, NTEP, MoHFW, 2020.
- India TB Report 2021, National TB Elimination Program (NTEP), MoHFW, 2021.
Assessment Questions
Question
Answer 1
Answer 2
Answer3
Answer 4
Correct Answer
Correct explanation
Part of pre-test
Part of post-test
Under NTEP, CBNAAT is offered upfront for which of these categories?
PLHIV
Paediatric presumptive TB
Presumptive DR-TB
All of the above
4
Under NTEP, CBNAAT is recommended upfront for People living with HIV, Paediatric Presumptive TB patients, Presumptive DR-TB patients and patients notified from the Private sector.
Yes
Yes
CBNAAT requires the processing of sputum samples before testing
True
False
2
Results are obtained from unprocessed sputum samples in about 2hours from a CBNAAT machine
Yes
Yes
Truenat
ContentTruenat is an indigenous rapid molecular test platform that is currently under use in NTEP for diagnosis of TB and Rif Resistance. It is a platform utilising real-time Polymerase Chain Reaction (PCR) technology built into micro-PCR chips.
Testing on Truenat involves three components:
- Workstation (consisting of 2 devices)
- Trueprep AUTO Universal Cartridge-based Sample Prep Device for the automated extraction and purification of DNA
- Truelab Real-time micro PCR Analyzer for performing real-time PCR. It is available as 1 (Uno), 2 (Duo) or 4 (Quattro) chip ports.
- Cartridge and Chip
- Reagent kits (Sample Pre-treatment and Prep kits)

Figure: Truenat Source: MolBio Products.
Test results for MTB detection and Rif Resistance has a turn around time of 1-2 hours. Depending on the micro-PCR chips used various tests can be performed using Truenat. Truenat MTB micro-PCR chips detect Mycobacterium tuberculosis bacteria for TB diagnosis. Truenat MTB RIF micro-PCR chip is used as a reflex test to detect resistance to Rifampicin (RIF), the first-line drug for TB treatment
Truenat has many advantages. Truenat is designed to be mobile and is battery operated (~8 hours on full charge). It can be deployed in peripheral laboratories and microscopy centres with minimal or no added facilities and hence it is more point-of-care. Biosafety requirements are similar to smear microscopy. However, it is multi staged and partially automated, requiring the presence of a Lab Technician through out the test.
Resources
- Truenat MTB Kit Insert.
- Trueprep AUTO Universal Cartridge-based Sample Prep Device.
- Practical Guide to Implementation of Truenat Tests for the Detection of TB and Rifampicin-resistance, 2021.
Assessment
Question
Answer 1
Answer 2
Answer 3
Answer 4
Correct answer
Correct explanation
Page id
Part of Pre-test
Part of Post-test
Truenat is used in NTEP for: MTB detection Rif Resistance Detection INH resistance Detection MTB and Rif Resistance Detection 4 Truenat is used for MTB and Rif Resistance detection in NTEP Yes Yes The Truelab Analyzer is available in how many chip ports?
2 (Duo)
1 (Uno), 2 (Duo) and 4 (Quattro)
1 (Uno)
4 (Quattro)
2
The Truelab Analyzer is available as 1 (Uno), 2 (Duo) and 4 (Quattro) chip ports.
Yes Yes - Workstation (consisting of 2 devices)
Line Probe Assay [LPA]
ContentLine Probe Assay (LPA) is a rapid molecular test available at centralised laboratories.
The assay is based on Polymerase Chain Reaction (PCR) that can simultaneously detect Mycobacterium tuberculosis complex as well as drug sensitivity to anti-TB drugs.

Figure 1: The GenoType MTBDRplus Molecular LPA Procedure; Source: Molecular Detection of Drug-resistant Tuberculosis by Line Probe Assay.
Advantages of LPA
- Rapid molecular test. (Turnaround time: 3-5 days)
- Highly sensitive and specific.
- Performed directly from sputum smear-positive specimens and on isolates of M. tuberculosis complex grown from smear-negative and smear-positive specimens.
- Detects multiple gene mutations in anti-TB drugs.
- First-line LPA detects mutations to rifampicin and isoniazid
- Second-line LPA detects mutations to fluoroquinolones and aminoglycosides.
- Suitable for low and high-throughput labs.
Disadvantages of LPA
- Cannot be used as a point-of-care test.
- Requires appropriate laboratory infrastructure, equipment and biosafety precautions.
- Different rooms (DNA extraction, pre-amplification, amplification, post-amplification/ hybridization) are required to perform different steps (Figure 2).
- Requires trained manpower to perform tests and interpret test results.
- Stringent internal quality control is required to prevent contamination.

Figure 2: Amplification (A) and Post-amplification Laboratory (B) for LPA; Source: Molecular Detection of Drug-resistant Tuberculosis by Line Probe Assay.
Resources
- Guidelines for PMDT in India, 2021.
- Molecular Detection of Drug-resistant Tuberculosis by Line Probe Assay.
Assessment
Question Answer 1 Answer 2 Answer 3 Answer 4 Correct answer Correct explanation Page id Part of Pre-test Part of Post-test LPA can be used as a point-of-care test. True False 2 LPA cannot be used as a point-of-care test. Yes Yes Solid and Liquid Culture in TB
ContentCulturing TB Bacilli is well known and historic method for detection/ confirmation of Tuberculosis. It is a highly sensitive and specific phenotypic test; it can detect even a few viable bacilli in the sample (Upto 10 Colony Forming Units- CFUs). TB bacilli multiply in the culture and form colonies of TB bacilli which can are easily be identified.
Based on the growth media used Culture is divided in to two types, Solid and Liquid Culture methods. Types Culture:
- Solid Culture on Lowenstein Jensen media : Historic gold standard culture test. Results take usually upto 2 months (60 days).
- Modern Liquid culture systems: (e.g. BACTEC MGIT 960, BacT Alert or Versatrek etc.) Results take usually up to 42 days.
Uses
- Solid culture is the gold standard diagnostic test for TB. But it is not used for the purpose of TB diagnosis due to the long turn around time of 2 months. It is largely used for research purposes where it is used as the baseline test on which the sensitivity and specificity of other tests are calculated.
- Liquid Culture is being used for follow-up monitoring of patients on drug resistant TB treatment to detect treatment failure. Liquid culture is also used for long term follow up patients who have successfully completed treatment to detect recurrence.
- Liquid culture is used as a previous step to grow bacilli and obtain isolates prior to Drug Susceptibility Testing.
- Liquid cultures are also used in TB prevalence surveys for its high sensitivity and specificity
Resources
Kindly provide your valuable feedback on the page to the link provided HERE
Culture Drug Susceptibility Testing [CDST]
ContentCulture Drug Susceptibility Testing (CDST) is a growth-based phenotypic method used to check the susceptibility of Mycobacterium tuberculosis strains to various first and second line anti-TB drugs. Mycobacterial resistance to a particular drug is identified if there is growth observed in culture in presence of that drug.

In NTEP CDST is the standard method to detect resistance in samples of patients who have tested positive on followup. While CDST is possible on both Solid and Liquid culture, currently, the NTEP utilizes only liquid culture as a method for DST, due to faster Turn around times.
CDST testing services are available under NTEP in designated, specialized laboratories called CDST Labs both in public and private sector. Currently there are 80 such laboratories (60 certified for First Line and 49 for Second line drugs). Such designated laboratories are subject to regular external quality assessment, often by the National Reference Laboratory at that region.
Quality assured DST to R, H, Z, Mfx, Lfx, Lzd, Am, Km and Cm are available across the country.
Resources
Monitoring of Treatment by Smear and Culture
ContentSmear microscopy and culture play an important role in monitoring the response to TB treatment. In NTEP, smear microscopy and culture has been prescribed to monitor the treatment response and at specific time points based on different treatment regimens. The programme also explains the actions that need to be taken based on the follow-up results.
Monitoring of tuberculosis treatment is shown in the table below.
Table: Monitoring of TB treatment by smear and culture
TYPE OF TREATMENT
MONITORING BY SMEAR
MONITORING BY CULTURE
ACTION TO BE TAKEN FOR FOLLOW UP
Drug Sensitive Pulmonary TB
One sputum smear examination at time of completion of the intensive phase (IP) of treatment and at the end of treatment
-
If sputum is positive anytime during treatment, then drug susceptibility testing (DST) is to be done. Further treatment is guided by the DST pattern.
H mono/poly DR-TB
Monthly from month 3 onwards till the end of treatment. Conduct smear microscopy within 7 days, if the smear at month 4 or later is positive to rapidly ascertain bacteriological conversion/reversion
At the end of month 3, end of treatment (month 6 and/or 9 if applicable)
If the culture results of month 3 are positive, the culture is repeated to rapidly ascertain bacteriological conversion/ reversion. If the repeat specimen is culture negative, culture is done at the end of treatment
Shorter oral Bedaquiline-containing MDR/RR-TB regimen
Monthly from 3rd month onwards till end of IP monthly in extended IP only if previous month is smear positive ( S+ve). Conduct SM within 7 days, if the smear at 6 months is positive to rapidly ascertain bacteriological conversion/reversion.
At the end of month 3, end of month 6 and/or end of treatment.
If the culture results of month 6 is positive, collect one repeat sample immediately to rapidly ascertain the bacteriological conversion/reversion. If the repeat sample is culture negative, then conduct an end of treatment specimen collection.
Longer Oral M/XDR-TB Regimen
Examine sputum smear within 7 days and every time C&DST is done.
Monthly from month 3 onwards to end of 6 months or 7 or 8 if the previous month’s culture is positive; Quarterly month 6 or 7 or 8 onwards based on previous month’s culture results
If the smear/culture results of month 6 or any of the quarterly culture is positive, repeat culture is done to ascertain bacteriological conversion/reversion and if the repeat specimen is culture negative, then culture is done the subsequent quarter or end of treatment
Resource
Kindly provide your valuable feedback on the page to the link provided HERE
Culture Conversion
ContentSputum culture conversion - The transition in sputum culture results from a positive sample growing Mycobacterium tuberculosis to two consecutive negative cultures separated by at least 30 days.
Time to culture conversion is the interval between treatment initiation to date of specimen collection of the first (of the two) negative culture.
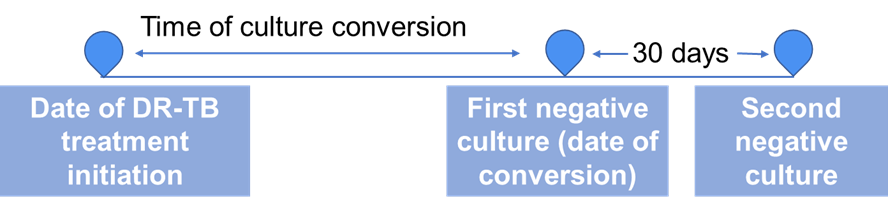
Culture conversion is important indicator to assess the effectiveness of a treatment regimen for Drug-resistant Tuberculosis (DR-TB).
All DR-TB cases are followed up periodically for culture after initiation of the treatment. Based on the culture results and other parameters, the course of treatment is decided.
Resources
- Time to Culture Conversion and Regimen Composition in Multidrug-resistant Tuberculosis Treatment; Tierney D. Harvard Library
- Guidelines for Programmatic Management of Drug-resistant Tuberculosis in India, 2021.
Kindly provide your valuable feedback on the page to the link provided HERE
-
CDST_LT: Diagnostic network and hierarchy in NTEP
FullscreenLaboratory Hierarchy and Network
ContentNTEP laboratory network is comprising of National Reference Laboratories (NRLs), state level Intermediate reference laboratories (IRLs), Culture & Drug Susceptibility Testing (C & DST) laboratories and peripheral level laboratories. Peripheral level laboratories consist of designated microscopy centres (DMCs) and NAAT labs.
NTEP has a quality assured laboratory network for bacteriological examination of sputum in a 3-tiered system.
Figure: Laboratory network of NTEP
Resources:
Kindly provide your valuable feedback on the page to the link provided HERE
National Reference Laboratories [NRL]
ContentThe National Reference Laboratories (NRLs) constitute the third tier of the National Tuberculosis Elimination Programme (NTEP) laboratory network hierarchy.
They provide quality assurance and certification services for the Culture and Drug Susceptibility Testing (C&DST) labs and coordinate with the World Health Organisation (WHO) Supranational Reference Laboratory (SNRL) network.
There are six designated NRLs which are delineated in the figure below.
Image
Figure: Six National Reference Laboratories under NTEP in India
NIRT, Chennai, in addition to being one of the NRLs is also one of the WHO designated SNRLs for the Southeast Asia Region.
Resources
- Guidelines for Programmatic Management of Drug-resistant TB in India, 2021.
- NTEP Laboratory Network: Overview.
Question
Answer 1
Answer 2
Answer3
Answer 4
Correct Answer
Correct explanation
Part of pre-test
Part of post-test
How many designated NRLs are there in India?
8
6
4
2
2
There are 6 designated NRLs in India.
Yes
Yes
Who is responsible for quality assurance and certification services for the C&DST labs?
IRLs
State TB Cell
NRLs
Central TB Division
3
NRLs provide quality assurance and certification services for the Culture and Drug Susceptibility Testing (C&DST) labs and coordinate with the World Health Organisation (WHO) Supranational Reference Laboratory (SNRL) network.
Yes
Yes
Roles of NRLs
Content- National Reference Laboratories (NRLs) conducts annual on-site evaluation/supervisory visits to laboratories for assessing the quality of microscopy, culture and drug susceptibility test (C&DST), and for improvement of the overall laboratory quality.
- NRLs also assist Central TB Division (CTD), in developing laboratory guidelines, standard operating procedures (SOPs), and conduct training to state-level Intermediate reference laboratories (IRLs) and other technical issues.
- NRLs conduct C&DST training to the IRLs, and develop SOPs for the technical procedures, equipment maintenance, infection control and recording and reporting.
- NRLs are also responsible for offering second-line drug susceptibility tests (DST) for multi-drug resistant TB (MDR-TB) treatment failures.
- NRLs are responsible for the accreditation of the mycobacteriology laboratory for culture and drug sensitivity testing under the National Tuberculosis Elimination Program (NTEP).
- In addition, NRLs are also responsible for the conduct of research for the programme and evaluation of newer tools for the diagnosis of TB.
- The National Institute for Research in Tuberculosis (NIRT) Chennai, the Supranational Reference Laboratory (SRL) of the region is responsible for the external quality assurance of the other 5 NRLs. NIRT is in turn quality-assured through the SRL coordinating laboratory at Antwerp, Belgium.
Assessment Questions
Question
Answer 1
Answer 2
Answer3
Answer 4
Correct Answer
Correct explanation
Part of pre-test
Part of post-test
What are the functions of National Reference Laboratories?
Providing Culture and DST training to the IRLs
Developing SOPs for the technical procedures
Offering second-line DST
All of the above
4
All the functions stated are performed by the National Reference Laboratories.
Yes
Yes
Which institute is responsible for the external quality assurance of NRLs?
SRL
CTD
National Institute for Research in Tuberculosis, Chennai
National Tuberculosis Institute, Bangalore
3
The National Institute for Research in Tuberculosis (NIRT) Chennai, the Supranational Reference Laboratory (SRL) of the region is responsible for the external quality assurance of the other 5 NRLs. NIRT is in turn quality-assured through the SRL coordinating laboratory at Antwerp, Belgium.
Yes
Yes
Intermediate Reference Laboratories [IRL] and their role
ContentSome Culture and Drug Susceptibility Test (C&DST) laboratories host an Intermediate Reference Laboratory (IRL) under the National TB Elimination Programme (NTEP).
There is at least one IRL per state at an identified location, usually in a secondary or tertiary level public health facility. There are 34 IRLs in India.
The IRLs are responsible for:
- Undertaking training on laboratory technologies for district and field level staffs
- Conducting on-site evaluation visits to districts for sputum microscopy at least once a year
- Undertaking panel testing of Senior TB Laboratory Supervisors (STLS) at each district linked to it
- Ensuring the proficiency of staff performing National Tuberculosis Elimination Programme (NTEP) smear microscopy activities by providing training to laboratory technicians and STLS
Resources
- Guidelines for Programmatic Management of Drug-resistant TB in India, 2021.
- NTEP Laboratory Network: Overview.
Kindly provide your valuable feedback on the page to the link provided HERE
CDST labs and their role
ContentUnder the National Tuberculosis Elimination Programme (NTEP), many labs are established at the regional level within states for providing Culture and Drug Susceptibility Testing (C&DST) facilities for presumptive TB/DRTB and for TB/DRTB patients.
- C&DST laboratories are mostly located in intermediate reference laboratories (IRLs) or medical colleges.
- There are 42 C&DST laboratories established under the programme in different geographies.
- Dedicated human resources are provided for the laboratories under the programme.
- Districts are linked with laboratories for providing facilities for Culture and DST using:
- Phenotypic Methods (Solid – Lowenstein Jensen (LJ), and Liquid Culture – Mycobacteria Growth Indicator Tube (MGIT))
- Genotypic technology (Line Probe Assay (LPA) and Cartridge Based Nucleic Acid Amplification Test (CBNAAT))

Figure: Culture and Drug Susceptibility Testing (C&DST) facility,
Source: The Foundation For Innovative New Diagnostics (FIND)Resources
- Guidelines for Programmatic Management of Drug Resistant TB in India, 2021
- Training Modules (1-4) for Programme Managers and Medical Officers; New Delhi, India: Central TB Division, July 2020
Kindly provide your valuable feedback on the page to the link provided HERE
NAAT Labs and their role
ContentThe National Tuberculosis (TB) Elimination Program (NTEP) has a network of Nucleic Acid Amplification Tests (NAAT) laboratories coupled with Designated Microscopy Centers (DMCs) to form the backbone of the diagnostic component of TB services.
Nucleic Acid Amplification Tests (NAAT) laboratories includes Cartridge-based NAAT (CBNAAT) and TrueNat tests. These tests detect tuberculosis as well as rifampicin resistance and are more sensitive than smear microscopy.
Functions of Nucleic Acid Amplification Test (NAAT) Laboratories:
- Acting as a hub for collection of samples from public and private health facilities (spokes)
- Universal Drug Susceptibility Testing (UDST) to rule out rifampicin resistance among confirmed TB patients
- Timely provision of NAAT test result to the TB patient, medical officer of the concerned health facility and NTEP staff for related actions
- Acting as a sample dispatch center for the Culture DST laboratory for subsequent processing of samples for first-line line probe assay (LPA) and second-line drug resistance testing utilizing second line LPA and liquid culture DST
- Recording and reporting including digitization of diagnostic process from collection to test result in NTEP Nikshay portal and Laboratory Information Management System
- Management of supplies and logistic associated with laboratory logistic (CBNAAT cartridges and TrueNAT chips) and reporting any additional requirement thereof
- Supporting the quality assurance activities undertaken by District or Intermediate Reference Laboratory under NTEP
- Support health system in carrying out special drives for vulnerable and at-risk population and their testing directly by CBNAAT (slum population, diabetic population, smoker, malnourished people, patients of silicosis and kidney dialysis etc.)
Resources
- RNTCP Technical and Operational Guidelines for TB Control in India, 2016.
- Guidelines for Programmatic Management of Drug Resistant Tuberculosis in India, 2021.
Kindly provide your valuable feedback on the page to the link provided HERE
Designated Microscopy Centre [DMC]
ContentSputum microscopy diagnostic services under the National TB Elimination Programme (NTEP) are provided by the Designated Microscopy Centres (DMCs) established at the Peripheral Health Institution (PHI) level, where a functional binocular microscope and a trained Laboratory Technician (LT) is available. Light Emission Diode Fluorescent microscopes are provided to high-load PHI-DMCs such as that of the medical colleges.
Based on latest directives, a DMCs may be established at all PHIs (Public and Private) of the country as needed. It is mandatory to have a DMC at all medical colleges in the country.
As molecular technologies like Truenat are also used in DMCs, NTEP has planned to rename DMCs as TB Diagnosis Centres (TDCs).
Criteria to be a DMC
The DMCs should satisfy the following criteria:
- NTEP-trained Laboratory Technician (LT) should be present.
- A functional binocular microscope should be present in the laboratory.
- Physical infrastructure in the laboratory should meet NTEP guidelines.
- Daily new adult outpatient cases of at least 60-100 and/or workload of at least 3-5 sputum smears per day for the LT in the laboratory.
DMCs in the public sector, at the onset of the programme, are provided with funds to undertake minor civil works to build up their physical infrastructure and are provided with binocular microscopes.
Human Resources Norms
- For the purpose of NTEP, a PHI is a health facility which is manned by at least a Medical Officer (MO).
- In addition to the MO and LT, there is 1 TB Health Visitor (TBHV) per one lakh urban population to support the urban TB control activities.
Other Criteria
Microscopy Centres may be established beyond population norms in medical colleges, corporate hospitals, Employee State Insurance Corporation (ESIC), railways, Non-government organisations (NGOs), private hospitals, Ayushman Bharat - Health and Wellness Centres (AB-HWCs), etc.
Before designating a DMC in other sectors, there should be a formal agreement by the hospital/ laboratory to take part in the External Quality Assurance (EQA) and to allow the concerned NTEP staff to supervise as per the NTEP guidelines.
If the above criteria are met by any private laboratory, the lab is considered for establishing a DMC.
- To provide better access for diagnosis of TB, all PHIs, wherever LTs and binocular microscopes are available, can be upgraded to a DMC irrespective of the population norms or OPD attendance.
- All DMCs should comply with the Quality Assurance (QA) mechanisms as per the EQA guidelines.
Resources
- NTEP Training Modules 1-4 for Programme Managers & Medical Officers, 2020.
- Operational Guidelines for TB Services at Ayushman Bharat Health and Wellness Centres.
Assessment Questions
Question
Answer 1
Answer 2
Answer3
Answer 4
Correct Answer
Correct explanation
Part of pre-test
Part of post-test
The DMC is an NTEP diagnostic facility at the PHI level
TRUE
FALSE
1
The DMC is an NTEP diagnostic facility at the PHI level
Yes
Yes
DMCs are established only in a public sector facility
True
False
2
If a lab/facility meets the criteria of DMC, the facility is considered for establishing a DMC
Yes
Yes
Kindly provide your valuable feedback on the page to the link provided HERE
Functions of a Designated Microscopy Centres [DMC]
ContentFunctions and Integrated Services of the DMC
- Testing of Sputum samples by Microscopy.
- Request/ referral for microscopy or Nucleic Acid Amplification Test (NAAT) or Culture and Drug Susceptibility Test (C&DST) or Chest X-ray (CXR) or Tuberculin Skin Test (TST) is generated at the PHI-DMC, as well as follow-up tests.
- Maintain consumables and logistics required for testing/ packaging and transport.
- Maintain TB laboratory registers for recording and reporting.
- Notify every TB patient in Nikshay at the earliest and update information of patients on comorbidity, treatment adherence, treatment outcome, contact investigation and TB Preventive Treatment (TPT).
- Biomedical waste management for the waste generated at DMCs.
- A DMC is required to participate in the External Quality Assurance system(EQA) of NTEP to ensure standardized quality diagnostic testing.
Resources
Kindly provide your valuable feedback on the page to the link provided HERE
Sputum Collection centres
ContentTo increase access to diagnostic services, NTEP has a provision for sputum collection centres in areas where the health facility is not equipped with key requirements to conduct sputum microscopy, molecular tests, drug susceptibility testing or follow up examinations.
Sputum collection centres are dedicated locations where sputum samples are collected, packaged and then transported to nearby TB diagnostic centres. It could be attached to any near-by health-facility as well.
Requirements of a Sputum Collection Centre
To function as sputum collection centres, the following is essential:
- Linkage/ mapping (time and distance) to testing laboratory
- Availability of adequate number of sputum cups and falcon tubes, logistics for sample packaging and transport
- Identification of open areas for sputum collection
- Staff trained in NTEP guidelines on sputum collection, sample packaging and transport, complete and correct documentation of laboratory request form, and infection control practices
- Feasibility and financial measures required for sample transport
- Inclusion of local volunteers, courier services, sample transportation under National Health Mission Free Diagnostic Services or other mechanisms as decided by the state/district
- Availability of Information, Education and Communication (IEC) material, training modules, and job-aids
Sputum collection centres are established in:
- Ayushman Bharat Health and Wellness Centres/Sub-centres
- Urban primary health centres
- Tribal, hilly, desert and difficult-to-reach areas of the country
Resources
- Training Modules for Programme Managers and Medical Officers
- Operational Guidelines for TB Services at Ayushman Bharat Health and Wellness Centres
- Mycobacteriology Laboratory Manual, GLI Initiative, 2014
Assessment:
Question Answer 1 Answer 2 Answer 3 Answer 4 Correct answer Correct explanation Page id Part of Pre-test Part of Post-test Under NTEP, where are sputum collection centres established to increase access to diagnostic services? Tribal areas Ayushman Bharat health and wellness centres Difficult-to-reach areas All of the above 4 To increase access to diagnostic services, sputum collection centres are established in Ayushman Bharat health and wellness centres, Urban health centres, tribal, hilly, desert and difficult-to-reach areas of the country. Yes Yes
-
CDST_LT: TB diagnosis
FullscreenPresumptive TB
ContentPresumptive TB case refers to a patient who presents with symptoms or signs suggestive of TB disease (previously known as a TB suspect) and where further diagnostic workup including bacteriological investigation is required.
Presumptive TB can be categorized into
-
Presumptive Pulmonary TB (P TB) - Symptoms are directly related to lungs (Cough, hemoptysis)
-
Presumptive Extra Pulmonary TB (EP TB) - Symptoms/ signs are specific to an extra pulmonary site (example: Lymph node swelling)
-
Presumptive Pediatric TB - Symptoms of TB in young children are more difficult to identify and can be more general (fever, weight loss)
Resources:
- Technical and Operational Guidelines for TB Control in India 2016
- Definitions and reporting framework for tuberculosis
Kindly provide your valuable feedback on the page to the link provided HERE
-
Principles of TB Diagnosis under NTEP
ContentThe National TB Elimination Program (NTEP), promotes the following principles to diagnose TB:
- Try to establish the microbiological confirmation for all cases
- Use rapid molecular diagnostics upfront wherever possible for diagnosis of TB and early identification of resistance to treating drugs.
- Focus more on quality sample collection and timely transportation for a better microbiological confirmation
Microbiological Confirmation for All Cases
Microbiologically confirmed TB refers to a presumptive TB case from whom a biological specimen is positive for acid fast bacilli smear microscopy, or positive for Mycobacterium tuberculosis on culture, or positive for TB through Rapid Diagnostic molecular tests - Nucleic Acid Amplification Test (NAAT) and Line Probe Assay (LPA). Establishing microbiological confirmation is key for all TB cases. Clinically diagnosing TB should be limited only to very few patients where, in-spite of high suspicion, microbiological confirmation could not be established, even after all possible efforts. The entire diagnostic algorithm puts utmost efforts to establish the microbiological evidence in a case of TB.
Upfront Rapid Molecular Diagnostics
Knowing the drug resistance pattern at the earliest is key for success of the treatment. Hence, the current policy highlights the importance of using molecular diagnostic test upfront wherever possible.
Complete diagnosis of TB is achieved by:
- Offering NAAT (CBNAAT/ Truenat) to all notified new patients and to test for resistance to Rifampicin. This is termed as Universal Drug Sensitivity Test (DST) for Rifampicin. Efforts are being made to collect specimen from all TB patients for NAAT at baseline.
- Testing individuals belonging to key population groups (clinically, socially vulnerable), those with extra pulmonary TB, people living with HIV and paediatric patients (after X-ray screening). They are directly referred for TB testing by NAAT
- For upfront NAAT, one specimen is tested using NAAT and if TB is detected, the other sample is used for further cascade testing by LPA and liquid culture
Quality Sample Collection and Transport
For TB diagnosis, it is essential that a good sputum sample is collected. A good specimen consists of recently discharged material from the bronchial tree with minimum amount of oral or nasopharyngeal material, presence of mucoid or mucopurulent material and should be 2-5 ml in volume. The specimen is collected in a sterile container after rinsing of the oral cavity with clean water. The collected specimens should be packaged and transported to the laboratory as soon as possible after collection.
Resources
- Guidelines for Programmatic Management of Tuberculosis Preventive Treatment, Central TB Division, MoHFW 2021
- Training Modules for Programme Managers and Medical Officers,Central TB Division, MoHFW 2020
- Guidelines on Airborne Infection Control, Directorate General of Health Services, MoHFW 2010
Assessment
Question Answer 1 Answer 2 Answer 3 Answer 4 Correct answer Correct explanation Page id Part of Pre-test Part of Post-test What are the key principles of TB diagnosis under NTEP?
Upfront testing for vulnerable groups Microbiological confirmation of all cases Good sample collection and transport All of the above
4 The key principles of TB diagnosis under NTEP are: microbiological confirmation for all cases, use upfront NAAT, quality sample collection and transport, and practicing universal precautions and AIC measures.
Biological Specimen for Diagnosis of TB
ContentFor laboratory diagnosis of TB, different biological specimens are used.
Pulmonary TB: Sputum sample is used. Sputum is a thick fluid produced in the lungs and in the adjacent airways. Normally, a spot sample and a fresh morning sample is preferred for the bacteriological examination of sputum.
Extra Pulmonary TB:
Resources:
Kindly provide your valuable feedback on the page to the link provided HERE
General process flow for testing in NTEP
ContentThe process for testing is initiated with a request for test and ends with the reporting of test results. In built into the process of testing is also the process of specimen collection and transportation.

1. Request for a test: This is the first step initiated when the requirement for a test is identified. This event is at the time of identification of presumptive TB/ DRTB, follow-up point (end of IP/CP, post treatment follow-up). The request may be initiated by the medical officer (MO) or the health staff at the Peripheral Health Institute (PHI) citing the reason for testing and the type of test required. The request is directed towards a laboratory where the required test is available. The request for test can be performed in Nikshay for any case that is already enrolled with an existing Patient ID. Requesting for test in Nikshay is analogous to filling up the physical request form Annexure 15A and generates a Test ID/ Test Request ID.
2. Patient Referral/ Sample collection and transportation: Following the request for test, the next step is to physically refer the patient to the corresponding laboratory, or collecting the appropriate biological sample and initiating its transportation to the lab. If biological sample is collected, the details of the sample need to be added under the request for test in Nikshay and the sample needs to be appropriately labelled and the corresponding details of the request test attached.
3. Performing the test: Once the sample has been received successfully at the destination laboratory, the lab technician (LT) updates the sample/ test record in Nikshay and initiates the relevant protocol for testing and follows through till results availability.
4. Reporting results: Once the results are available it needs to be updated against the corresponding request for a test and it is visible to all relevant stakeholders in Nikshay. If only Annexure 15A is available, the results need to be updated there and needs to be manually communicated to the personnel initiating the request for test.
Resources
- Training Modules for Programme Managers and Medical Officers
- Guidelines for Programmatic Management of Tuberculosis Preventive Treatment
Assessment
Question
Answer 1
Answer 2
Answer 3
Answer 4
Correct answer
Correct explanation
Page id
Part of Pre-test
Part of Post-test
Which of the following statements are correct?
Under NTEP, the process for testing is initiated with a request for test on only Nikshay.
Test requests for presumptive DR-TB cases are initiated only by specialists.
Test requests for all presumptive cases are initiated by the medical officer and/or other health staff at the Peripheral Health Institute (PHI).
All of the above
3
Test requests for all presumptive cases are initiated by the medical officer and/or other health staff at the Peripheral Health Institute (PHI).
Yes Yes Requesting a Test on Nikshay
ContentOnce a presumptive TB patient is identified, the patient is enrolled online by a healthcare worker or doctor in Nikshay online portal. For diagnosis of Tuberculosis, the treating physician can request a test utilizing the request test option of Nikshay online portal. The step-by-step approach for test request is as follows:
Step 0: Go to the Patients Page.
Step 1: Select the “Tests” tab.
Step 2: Click the “Add Test” button.
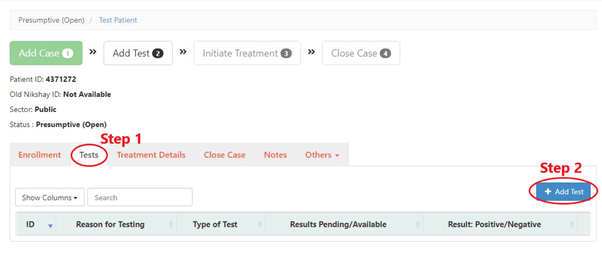
Step 3: Fill the form.
Step 4: Select the “Test Status” as “Results Pending”.
Step 5: Click the “Add Test” button by selecting the appropriate test for the patient.
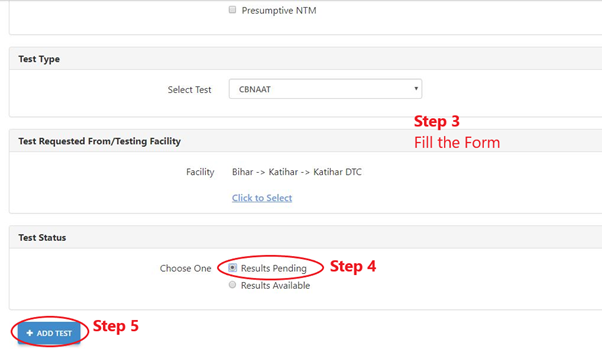
In a situation where the patient is referred to another health facility for TB testing, one needs to select the test requested along with the facility name where the patient will visit for undergoing the TB test. the results are added by the concerned healthcare worker only after the test is conducted and the result is available.
In the absence of such results, it will show ‘Result pending’ instead of ‘Result available’ status.
Video fileVideo: Process to add tests on Ni-kshay
Resources
Kindly provide your valuable feedback on the page to the link provided HERE
-
CDST_LT: Case finding methods under NTEP
FullscreenApproaches to TB Case Finding
ContentPeople who have been exposed to patients with infectious TB are known as TB contacts; they constitute a high-risk group for TB. Case finding investigation contributes to the early detection of TB cases, and results in identifying a significant number of additional patients.
Figure: Approaches to Tuberculosis Case Finding
Active case-finding requires systematic screening and clinical evaluation of populations who are at high risk of developing TB, such as people living in slums, tribal areas, congregate settings, persons who are household contacts of TB cases
Resources:
Kindly provide your valuable feedback on the page to the link provided HERE
Passive Case Finding
ContentPassive case finding is essentially where the patient self reports to the health care provider with symptoms. This requires that affected individuals are aware of their symptoms, have access to health facilities, and are evaluated by health workers or volunteers who recognise the symptoms of TB and link those individuals for TB testing services.
This approach to case finding has the least effort and cost and is a minimum expectation. In a Peripheral Health Institution (PHI), it is estimated that about 2-3% of new adult outpatients are symptomatic that require referral for TB diagnosis (presumptive TB cases).
Passive case finding may miss TB patients if :
- The disease is mild/ transient.
- Access to healthcare is poor.
- Health providers do not have an adequate index of suspicion and are unable to reliably link respiratory symptoms to TB.
Resources
Assessment
Question Answer 1 Answer 2 Answer 3 Answer 4 Correct answer Correct explanation Page id Part of Pre-test Part of Post-test Which of the following can be considered a passive case finding? TB case finding for all patients attending an HIV clinic. TB case finding in all inmates of an elderly home. Patients attending a PHC with symptoms are referred for testing by the doctor. TB case finding among household contacts of a TB case. 3 All other examples except those attending PHC referred for TB testing are cases of active or intensified case finding effort. Yes Yes What may cause a passive case finding to miss cases? Healthcare providers fail to notify the case. Healthcare providers do not refer cases for TB testing. There are no health facilities in the area. Both 2 and 3 4 Healthcare providers failing to notify cases is missing notification and not related to passive case finding. Yes Yes Active Case Finding
ContentSystematic screening of all individuals of a defined population is known as active case finding. It is applied outside of health facilities at the community level by the health system.
Objective of ACF is to:
- identify cases early, initiate prompt treatment, reduce risk of poor treatment outcomes and reduce risk of further transmission of TB
- to provide access to diagnosis services to populations that would have been otherwise unreached
It is effort intensive and is recommended only in population groups where there is estimated high case load. In NTEP, ACF is recommended only to be performed in Key / vulnerable population.
ACF can also be clubbed with suitable ACSM campaigns to create awareness about the signs and symptoms and about TB in the target population/ community. It can also be combined with other health activities/ campaigns (such as Pulse Polio/ Leprosy screening/ population based screening for NCDs) for increased efficiency.
Resources
- Training Modules for Programme Managers and Medical Officers.
- Active TB Case Finding, Guidance Document.
- WHO recommendations for Systematic Screening for Active Tuberculosis
Assessment
Question Answer 1 Answer 2 Answer 3 Answer 4 Correct answer Correct explanation Page id Part of Pre-test Part of Post-test Which of the following is not a primary objective of ACF? Increase TB notification Early identification of cases. Reduce the risk of transmission of TB. Reduce the risk of poor treatment outcomes. 1 Notification is not a primary objective of ACF. Yes Yes Intensified Case Finding
ContentIntensified Case Finding (ICF) is a case finding approach between Active and Passive approaches. Here individuals coming in contact with the health system through any activity are screened actively for symptoms of TB and referred for testing.
This approach brings the benefit of active case finding approach by active screening for TB symptoms, but does limit the extensive effort required by restricting to only those people who has some or the other healthcare problem. This approach is considered for people attending a healthcare facility.
Some examples of ICF are screening for TB symptoms and referral for testing in:
- all cases attending an HIV clinic.
- among children with malnourishment who attend a nutrition clinic.
- all mothers attending the antenatal clinics
Resources
Assessment
Question Answer 1 Answer 2 Answer 3 Answer 4 Correct answer Correct explanation Page id Part of Pre-test Part of Post-test Which of the following is an example of an intensified case finding?
Systematic screening for TB of all contacts of TB cases. Screening all cases attending an OPD with respiratory symptoms for TB testing. Referring cases that report more than 2 weeks of cough from an OPD for TB testing. Screening all people belonging to a slum for TB symptoms. 2 Systematic screening of TB contacts and those belonging to a slum population are examples of active case finding.
Referring to cases that report TB symptoms is a passive case finding.
Yes Yes Bidirectional Screening
ContentBidirectional screening is a method to identify cases in diseases which have predisposition to each other or has a significant influence on each other. For example TB and HIV, where having HIV increases risk of developing TB and cases with TB would have poor outcomes if co-infected with HIV.
Screening for TB is done through four-symptoms complex based screening or through Chest X-ray. Screening for the linked disease is carried out as per the policies of the corresponding health program.
Bi-directional screening policies are implemented by various disease control programs. For example, with NTEP the following disease control efforts implement a bidirectional screening policy:
- HIV through NACO
- COVID19
- Diabetes Mellitus (DM) through NPCDCS
- Tobacco through National Tobacco Control Program
Both programs monitor bidirectional screening, referral and testing as per their own policies.
Resources
Assessment
Question Answer 1 Answer 2 Answer 3 Answer 4 Correct answer Correct explanation Page id Part of Pre-test Part of Post-test Bidirectional screening for TB is not done in which of the following conditions? Diabetes Tobacco abuse/ addiction Pregnancy COVID-19 3 Although pregnant mothers may be screened for TB as a part of intensified case finding, all TB cases are not actively/ routinely screened for pregnancy. Yes Yes
-
CDST_LT: Role of the senior LT and related stakeholders in TB Care
FullscreenDuties and responsibilities of the LT at the DMC
ContentThe major duties and responsibilities of the Laboratory Technician at the Designated Microscopy Centre (DMC) are to:
- Follow the standard operating procedures for sample collection, sputum smear microscopy and Nucleic Acid Amplification Test (NAAT)
- Maintain the Tuberculosis (TB) Laboratory Register and early submission of the results to the medical officer managing the patient, which should also be updated in the Nikshay online portal in real-time
- Coordinate with other staff to ensure that presumptive TB cases and symptomatic contacts of TB patients receive sputum containers with the necessary instructions to undergo sputum examination/NAAT
- Assist the medical officer of the peripheral health institution (MO-PHI) in the identification of presumptive drug-resistant TB patients and ensure the collection and transportation of sputum specimens for NAAT/culture and drug susceptibility test according to the guidelines
- Organize and supervise the disposal practices of contaminated lab material as detailed in the Laboratory Manual
- Assist the Senior Tuberculosis Laboratory Supervisor (STLS) in the implementation of the National Tuberculosis Elimination Programme (NTEP) Lab Quality Assurance
- Assist in the implementation of new TB diagnostic tools in NTEP
- Facilitate change management with respect to use of Information and Communications Technology (ICT) and Nikshay tool for concerned data entry, validation, and its use for public health actions
- Any other jobs assigned by the reporting officer
Resources
- DO letter - TOR and need norms for NTEP staff, 2021.
- Training Module (1-4) for Program Managers and Medical Officer, NTEP, MoHFW, 2020.
Kindly provide your valuable feedback on the page to the link provided HERE
Role of Medical Officer at and around a DMC in TB Diagnosis
ContentThe Medical Officer Designated Microscopy Centre (MO-DMC) at a Primary Health Facility is appointed from the General Health System. The MO-DMC is responsible for activities at DMC under the National TB Elimination Programme (NTEP).
Key Responsibilities of MO-DMC include
1. Screening and diagnosis
· Clinical examination of all TB cases should be done by the MO.
· The MO should screen/refer:
o All identified presumptive pulmonary TB cases for sputum smear microscopy, chest X-ray and presumptive Extra-pulmonary Tuberculosis (EPTB) cases for appropriate investigations
o Presumptive TB cases with a negative sputum result to be referred for chest X-ray, followed by Cartridge-based Nucleic Acid Amplification Test (CBNAAT) as per diagnostic algorithm to ensure no TB case is missed
o All diagnosed TB patients for Nucleic Acid Amplification Test (NAAT) for early diagnosis of resistance to Rifampicin (Rif)
o All Rif-sensitive TB patients for first-line LPA testing
o All presumptive TB patients for HIV testing
o All diagnosed TB patients for HIV testing
o HIV positive patients for TB by four symptom complex screening
o All HIV positive TB patients to Antiretroviral Therapy (ART) centre for initiation of ART and Co-trimoxazole Prophylaxis Therapy (CPT).
2. Treatment initiation, follow up and treatment outcome
· The MO should fill the original treatment card with details of treatment regimen according to weight-band and Drug Susceptibility Testing (DST) pattern.
· It is the responsibility of the MO to ensure that all the diagnosed smear-positive patients start treatment or are referred for treatment.
o All patients who are sensitive to Isoniazid (H) & Rifampicin (R) and all patients whose H & R status is not known should be initiated on first line anti-TB treatment.
· The MO is responsible for clinically following-up the patient once in a month to:
o Identify any ADR early
o Assess clinical improvement
o Support follow-up by laboratory investigations, whenever necessary
o Control comorbid conditions like HIV and diabetes by appropriate treatment
o Screen all patients for presence of symptoms of TB at the end of 6th, 12th, 18th and 24th month after completion of treatment and do a sputum culture in the presence of symptoms to diagnose recurrent TB.
3. Recording, reporting and TB notification
· The NTEP Request Form for examination of biological specimens should be filled up completely by the MO.
· The MO should coordinate with the STLS to ensure that tuberculosis-related laboratory services are properly performed and recorded by the laboratory technician.
· Results recorded in the laboratory register, treatment cards and the TB Notification Register should be verified and ensured that they are consistent.
· The MO should maintain TB Notification Register for patients diagnosed and transferred-in.
· The MO should ensure that the treatment details are entered in Nikshay immediately.
· Detailed description of symptoms and signs of ADRs to anti-TB drug should be recorded in TB Treatment Card by the MO.
· The treatment outcome has to be recorded on the Treatment Card, Nikshay and the TB Notification register within one month of the event. Declaration of the treatment outcome has to be decided upon and signed with date by the MO.
· The MO should ensure updating of Notification Register and Nikshay entry by the designated staff:
o If any smear-positive patients are not entered in the TB Notification Register and are on treatment
o For patients who have not been put on treatment after tracing them and putting them on treatment immediately
o After collecting the bank account details of the patient for Direct Benefit Transfer of Nikshay Poshan Yojana.
4. Monitoring and supervision
· Every week, the MO of the DMC should review the TB Laboratory Register to ensure that correct number of sputum smear examinations (two per presumptive TB case) are being performed for diagnosis.
· The MO of the DMC should cross-check the results of the sputum examination in the TB Register with that of TB Laboratory Register and the TB Treatment Card.
· The MO of the DMC should check the Tuberculosis Laboratory Register to make sure that all the columns have been completed.
o The MO of DMC is responsible for determining the amount of reagents and consumables the DMC needs every month.
o The MO should ensure uninterrupted supply of drugs; monitor monthly replenishment of stock to treatment supporter if drugs are not already
given and update in drug stock register and in Nikshay Aushadhi through designated staff.· The District TB Officer (DTO) conducts Random Blinded Rechecking (RBRC) of sputum smear microscopy and gives feedback and corrective actions to Lab technicians through MO-DMC.
Resources
Training Modules for Programme Managers and Medical Officers.
Assessment
Question
Answer 1
Answer 2
Answer 3
Answer 4
Correct answer
Correct explanation
Page id
Part of Pre-test
Part of Post-test
What are the key duties of a Medical Officer at DMC?
Screening and diagnosis
Advocacy and support to private practitioners
Treatment initiation, follow-up, treatment outcome
All the above
4
The Medical Officer (MO) at the DMC is responsible for screening, diagnosis, treatment initiation, follow-up, treatment outcome, monitoring and supervision, recording, reporting, TB notification, advocacy and support to private practitioners.
Yes
Yes
Role of Peripheral Health Care workers around a DMC in TB Care
ContentPeripheral Health Care Workers (PHWs) including Community Health Officer (CHO), Auxiliary Nurse Midwife (ANM) and Multi-purpose health worker (MPHW) are central to primary health care and service delivery. They play important an role in TB care at Peripheral Health Institutes (PHIs) and Designated Microscopy Centres (DMCs).
Their responsibilities include:
1. Vulnerable population mapping: vulnerability assessment and mapping of vulnerable population (diabetic patients, patients on immunosuppressants, alcoholics and smokers etc) in communities is done by PHWs.
2. Screening and referral for testing:
PHWs are involved in:
- screening of household/workplace contacts and other contacts of TB patients as eligible in the local context
- periodic active case finding among identified vulnerable population for TB/Latent TB Infection
- referring presumptive TB patients promptly to the nearest microscopy or molecular laboratory through laboratory request forms
- registration of referred cases in Nikshay as presumptive TB patient
- providing sputum container to persons with symptoms of TB and counselling for collection of good quality sputum in the morning
- sample packaging and transport to TB laboratories for testing
- follow-up sputum examination
CHO is responsible to ensure availability of adequate sputum collection containers (sputum cups and falcon tubes), logistics for sample packaging and transportation.
3. Treatment initiation: It is the responsibility of the PHWs in coordination with NTEP staff to organize and ensure treatment initiation for the patient. They decide upon a convenient location for drug administration, identification of treatment supporter and supply of drugs to treatment supporter
4. Coordinating treatment support:
- PHWs act as a treatment supporter or identify treatment supporter who is accessible and acceptable to the patient to provide TB treatment
- support for adherence to treatment and monitoring of TB patients at the community level
- update the original treatment card at the PHI on a fortnightly basis and Nikshay entries in coordination with NTEP staff
5. Ensuring public health action:
The PHW visits the house of the patient within a week of TB diagnosis to:
- verify the residential address so that in case of interruption, retrieval action can be taken
- counsel the patient and family members regarding the disease, treatment and its adherence
- screening of contacts, providing TB Preventive Therapy (TPT) to all eligible
- advise patient on balanced diet, taking the food they can afford and also about nutritional support systems available for the eligible patients
- collect the bank account number of the patient or one of the household members; or facilitate getting the bank account opened, if not having one
- mobilize/refer for HIV testing
- sample collection and transportation for Dug Susceptibility Testing
6. Awareness generation/advocacy in community
PHWs generate awareness/advocacy in the community. The activities include:
- awareness on health promotion and health seeking behaviour
- awareness on symptoms of TB, good cough etiquettes, available services for screening, diagnosis and treatment of TB
- awareness on patient support and benefit schemes including Nikshay Poshan Yojana
- mobilize community, community leaders (religious leaders, school principals, women’s Self-Help Groups, etc) and Panchayati Raj Institution (PRI) members for TB sensitization activities
- identify TB survivors to volunteer for the community engagement activities
Resource
Training Modules for Programme Managers and Medical Officers, Central TB Division, MoHFW 2020
Assessment
Question
Answer 1
Answer 2
Answer 3
Answer 4
Correct answer
Correct explanation
Page id
Part of Pre-test
Part of Post-test
What is the key role of the Peripheral Healthcare Worker?
Vulnerable population mapping
Home visits, counselling and contact tracing
Awareness generation/ advocacy in community
All of the above
4
Peripheral Healthcare Workers' (PHW) role is in vulnerable population mapping, screening and referral for testing, treatment initiation, coordinating treatment support, ensuring public health action, and awareness generation/ advocacy in the community.
Yes
Yes
Role of STLS at a DMC
ContentThe Senior TB Laboratory Supervisor (STLS) is the person responsible for monitoring the day-to-day activities of all the microscopy centres and nucleic acid amplification test (NAAT) sites and is thus essential to the success of the National TB Elimination Programme (NTEP). They also ensure the quality of TB diagnostic services.
Roles of STLS at the DMC
- Program management
The STLS is responsible for ensuring that microscopy services in the district are well organized and the locations of the designated microscopy centres (DMCs) are known to all the medical officers in all peripheral health institutions (MO-PHI).
The STLS also ensures that there are:
- Uninterrupted staffing of DMCs, including coverage for laboratory technicians (LTs) that might be on leave, so that there is regular and uninterrupted availability of smear examination at the DMC.
- Uninterrupted supply of reagents and logistics required for the microscopy.
- Quality assurance and accuracy guarantee for the microscopic activities carried out.
- Regular training and continuing education of LTs.
The STLS reports to the district TB officer (DTO) in collaboration with the senior treatment supervisor (STS) regarding implementation, quality control (QC), supervision and management of laboratory supplies.
- Monitor documentation related to microscopy
STLS ensures that all documentation related to sputum smear examinations is accurate and reports of examinations are given to the treating physician promptly. This includes:
- Each LT has a TB lab register which is filled completely and accurately.
- LTs understand the importance of limiting administrative errors (for example, keeping the sputum specimens with the proper lab forms for sputum examination and slides) and accurately recording the results of sputum smear examinations.
- LTs keep examined slides for review and on-site evaluation (OSE) visit by the STLS.
- There is an accurate recording of the results of the sputum smear examination.
STLS must explain to LTs that patients are diagnosed and placed on appropriate treatment regimens based on the smear results.
- Ensure appropriate number and schedule of sputum examinations
- Presumptive TB persons should have their sputum examined the correct number of times for tubercle bacilli, at least 2 sputum samples should be examined.
- Follow-up cases should have 2 sputum samples examined and should be done according to the follow-up schedule.
- Perform laboratory QC
This is done via OSE visits. The visit includes a comprehensive assessment of the laboratory safety including infection control measures; conditions of the equipment, adequacy of supplies as well as the technical components of acid-fast bacilli (AFB) smear microscopy employing a simple “Yes” and “No” checklist.
- The STLS visits every DMC under their supervision at least once every 4 weeks, and more often if possible.
- During these visits, at least 5 positive and 5 negative slides must be re-checked by the STLS.
- Staff at the DMC is supervised, evaluated and trained during these visits.
- The STLS maintains a diary, recording the details of these field visits.
At the end of each QC visit, detailed feedback is given by the STLS for continuous internal quality improvements. The STLS also ensures that centres maintain proper storage and transport of sputum specimens, the safety of lab staff and the maintenance of microscopes.
5. Waste disposal checks: STLS ensures that contaminated material is disposed of safely to ensure infection control. Sputum containers with sputum must either be incinerated, disinfected and autoclaved, or burnt in a pit and the burnt material buried.
6. Maintain an adequate supply of all materials necessary for microscopic examination
The STLS ensures that LTs have an adequate supply of reagents, sputum containers, slides and other materials including boxes for storing slides. This includes:
- Calculating the required volume of material (slides, sputum containers, etc.) required.
- Ordering supplies during the first week of the quarter to ensure uninterrupted supply at all DMCs.
- Distribution of sputum containers to all sputum collection centres/ DMCs in the area.
- Estimating and ensuring maintenance of adequate reserve stock at DMCs.
Resources
- NTEP Training Modules 1-4 for Programme Managers & Medical Officers, 2020.
- Module for Senior Tuberculosis Laboratory Supervisors, NTEP, 1999.
- Module for Laboratory Technicians, NTEP, 2005.
Assessment
Question
Answer 1
Answer 2
Answer 3
Answer 4
Correct answer
Correct explanation
Page id
Part of Pre-test
Part of Post-test
What is the role of the STLS in the DMC?
Conduct an on-site evaluation visit.
Make sure that LTs fill the TB lab register properly.
Ensure adequate supply of lab material, like slides, at the DMC.
All of the above
4
The STLS conducts an on-site evaluation visit at the DMC, ensures proper documentation of smear results and ensures an adequate supply of lab materials at the DMC.
Yes
Yes
How often should the STLS visit the DMC?
Every 2 weeks
Every month
Every quarter
Every 6 months
2
The STLS visits every DMC under their supervision at least once every 4 weeks, and more often if possible.
Yes
Yes
Role of STS at a DMC
ContentAt a DMC, the STS primarily ensures that
1. All patient services from enrolment to outcomes for a TB patient are completed optimally. This is done by monitoring information submitted by the DMC such as referral for testing, no of people tested, no of people diagnosed with TB, initiated on treatment.
2. All the patients started on treatment are tested promptly using the appropriate follow-up testing schedule( i.e. at the end of IP and CP).
3. Maintain profile of the DMC in the Nikshay such as tagging the PHI as DMC, name of contact person and other particulars
4. Ensure data quality in the various records, both in physical and electronic records. This includes patient data, referral data and testing data.
-
-
CDST_LT-M3: Specimen collection and transportation
Fullscreen-
CDST_LT: General concepts
FullscreenNeed for Specimen Collection and Transportation [SCT]
ContentThe National TB Elimination Programme (NTEP) has strengthened sputum collection and transport for laboratory testing by building capacity for decentralised collection.
- The provision for sputum collection and transport is used to establish linkages for giving diagnostic access to patients who cannot reach the health facilities.
- To increase access and coverage of services, designated sputum collection centres are also established for collecting and transporting sputum to the nearby laboratory.
Presumptive TB patients attending Peripheral Health Institutions (PHIs) other than Designated Microscopic Centres (DMCs) are either referred to the nearest DMC for sputum examination or their sputum specimens are collected and transported to the DMC as per guidelines.
- The patient is given these options as per their convenience to minimise the possible delay in diagnosis and initiation of treatment or avoid repeated visits by the patient.
- In case the patient is not able to travel to the DMC, then the spot sample is collected at the nearest health facility/ sputum collection centre/ sputum collection booths and transported to the DMC.
The need for sample collection can be categorized broadly into two categories:
1. When samples are sent to the DMC
- Some PHI/ sub-centres/ health and wellness centres function as sample collection centres.
- Sputum collected from referring health facilities needs to be transported to the nearest DMC.
2. When DMC has to collect and transport samples for testing/ follow-up/ resistance testing to higher laboratories
- If the Nucleic Acid Amplification Testing (NAAT) facility is not available at the health facility, the DMC may also need to collect and send the sample to the nearest linked facility for NAAT testing.
- If NAAT is available at DMC and Mycobacterium tuberculosis (MTB) is detected, the second sample needs to be transported to the Culture and Drug Susceptibility Testing (C&DST) lab. If the NAAT result suggests rifampicin-sensitive, a second sample is sent for First-line Line Probe Assay (FL-LPA) to look for H-mono/ poly resistance.
- Extrapulmonary samples have to be appropriately collected at the PHI/HF and transported for testing to NAAT/ culture facilities.
Resources
Assessment
Question
Answer 1
Answer 2
Answer 3
Answer 4
Correct answer
Correct explanation
Page id
Part of Pre-test
Part of Post-test
Specimen collection and transportation system minimises patient inconveniences and diagnostic delays.
True
False
1
Specimen collection and transportation system minimises patient inconveniences and diagnostic delays.
Yes Yes Process of SCT
Content- Good quality sputum collection is of paramount importance in tuberculosis diagnosis.
- Once a person is identified as presumptive TB, s/he is referred to the Designated Microscopy Centre (DMC) for sputum collection.
- For TB diagnosis two sputum samples are collected - one is the supervised ‘spot’ sample collected at the DMC (labelled Specimen A) and the other is the early morning sample collected by patient themselves at his/her home (labelled Specimen B).
- If the patient is coming from a long distance or s/he is unlikely to return to give the second specimen, two spot specimens may be collected with a gap of at least one hour.

Figure: Flowchart for Sputum Collection and Transport
Sputum Collection
- The (NTEP) request form required for the biological specimen examination need to be filled.
- The Lab Technician (LT) should instruct the patient to thoroughly rinse the mouth with clean water and demonstrate to inhale deeply 2-3 times and cough out the sputum from the depth of the chest into a sterile 50 ml sputum container, in a well-ventilated space.
- After collecting the sputum, close the lid of the containers and wipe the surface of the tube with 5% phenol to disinfect and allow it to air dry.
- Label the tubes with patient details, date and time of collection, specimen identification, lab no. using a permanent marker.
Sputum Transport
- The sputum collected should be transported immediately to the Nucleic Acid Amplification Testing (NAAT)/ Culture and Drug Susceptibility Testing (C&DST) laboratory. In case of any unavoidable delays, the sample should be refrigerated.
- The programme mandates triple layer packaging for the transport of the sputum specimens.
- Firstly, seal the joint between the cap and neck of the sputum containers with a parafilm strip (primary receptacle package).
- Wrap the sputum containers individually in absorbent cotton, place them in a zip lock pouch and secure them with a rubber band (secondary receptacle package).
- Fold and place the NTEP request form in another zip lock pouch.
- Place the zip lock pouch with sputum containers in a thermocol box along with two pre-frozen coolant gel packs and the zip lock pouch with the NTEP request form is placed on top.
- The dimensions of the thermocol box used for sputum transport are: thickness - 2.5 cm; Outer dimensions: length - 18.5 cm, breadth - 13 cm, height - 12 cm (without lid), height -14 cm (with lid); Inner dimensions: length - 14.5 cm, breadth - 8 cm, height - 12 cm (without lid), height - 13 cm (with inner part of lid).
- The coolant gel packs should be conditioned in the deep freezer in a temperature between -20 to -15o C for a minimum 48 hours to a maximum 72 hours before use so that they can maintain a temperature between 12-20o C for up to approximately 48 hours in tightly packed thermocol boxes while the average outside temperature is 35o C.
- Seal the thermocol box with duct tape and affix ‘To’ and ‘From’ address, biohazard sticker on the box (tertiary receptacle package).
- Weight of the fully packed consignment box should be up to 400 grams and the thermocol boxes and gel packs should not be reused.
- Transport the box through NTEP identified courier/ speed post service.
Resources
- Training Module (1-4) for Programme Managers and Medical Officers, NTEP, MoHFW, 2020.
- Guidelines for Programmatic Management of Drug-resistant TB in India, 2021.
- Module for Laboratory Technician, CTD, MoHFW, India, 2005.
Assessment
Question Answer 1 Answer 2 Answer 3 Answer 4 Correct answer Correct explanation Page id Part of Pre-test Part of Post-test After collecting the specimen, the falcon tubes should be wiped and disinfected with which solution? 5% Iodine 5% Glycerine 5% Phenol 5% Sodium 3 After collecting the specimen, the falcon tubes should be wiped and disinfected with 5% phenol solution. Yes Yes NTEP mandates triple layer packaging for the transport of the sputum specimens
True False 1 Triple layer packaging prevents spills and leakages during transportation of sample. Yes Yes
-
CDST_LT: Good quality specimen collection
FullscreenAccepting the request for testing
ContentThree things are received by the Lab Technician- Sample for testing, request form, and request for test in Nikshay.
Accepting the request for testing includes the following steps:
1. The LT verifies details on the request form that has eleven parts.
- The first part contains details on the name of referring facility, name of the patient, complete address, age & gender of the patient, date of referral, type of presumptive TB, the key population to which the patient belongs and site of disease.
- The second part contains details of referring facilities, Nikshay ID, and the names of State, district and TB units.
- The third portion is for the diagnosis and follow-up of TB.
- The fourth portion is for the diagnosis and follow-up of drug-resistant TB.
- The fifth portion is to indicate the required tests with the details of the person requesting the test.
- Parts six to eleven are used for reporting test results.
2. The LT verifies the quality of the sample received.
3. LT captures details on the patient, reasons for testing, test requested, and the visual appearance of the sample in the TB Laboratory register.
4. LT verifies the test request generated in Nikshay against the test ID requested (Figure).

Figure: Test Details Added in Nikshay by the Referring Health Facility; Source: Guidelines for PMDT in India, 2021.
5. LT initiates the test requested.
Resources
- Guidelines for PMDT in India, NTEP, 2021.
- Training Modules (1-4) for Programme Managers and Medical Officers, NTEP, 2020.
Assessment
Question
Answer 1
Answer 2
Answer 3
Answer 4
Correct answer
Correct explanation
Page id
Part of Pre-test
Part of Post-test
For all new presumptive TB cases, Nikshay ID is generated by the referring facility.
True
False
1
For all new presumptive TB cases, Nikshay ID is generated by the referring facility.
Yes
Yes
Spot and early morning sputum sample
ContentPresumptive pulmonary TB patients are subjected to sputum smear microscopy (Ziehl Neelsen (ZN)/ Florescence Microscopy (FM)). Two consecutive sputum specimens will identify the vast majority (95–98%) of smear-positive TB patients
Two specimens are collected:
- One Spot and one early morning sample OR
- Two supervised spot specimens collected at least one hour apart, and smears made from both the samples.
If one or both smears are positive, the patient is diagnosed as a microbiologically confirmed pulmonary TB case.
- The spot specimen collected is labelled as 'a'.
- While the patient is given a labelled container with instructions to cough out sputum into the container early in the morning after rinsing the mouth with water. This is the early morning specimen. This is labelled as specimen 'b'.
- If the health facility is not a Designated Microscopy Centre (DMC), then the patient is given a sputum container with the instructions to collect an early morning specimen and go with the sputum specimen to the DMC where the spot specimen can be collected.
- In case the patient is not able to travel to the DMC, then the spot specimen could be collected at the nearest health facility or sputum collection centre and transported to the DMC.
- These two samples should be collected within a day or two consecutive days.
- Two supervised spot samples may be collected one hour apart if patient is too sick, coming from a long distance or likelihood of not giving a second sample is significant.
- Collection of early morning specimens is preferred because of the overnight accumulation of secretions. However, spot samples collected at any time for patients is also suitable if productive sputum is expectorated after deep cough.
Resources
Assessment
Question
Answer 1
Answer 2
Answer 3
Answer 4
Correct answer
Correct explanation
Page id
Part of Pre-test
Part of Post-test
The spot specimen collected for sputum microscopy is labelled as 'a'.
True
False
1
The spot specimen collected for sputum microscopy is labelled as 'a'.
Yes
Yes
Educating patient on Sputum collection and dispensing Sputum cup
ContentEducating patients on collection is essential to have good quality sputum. The healthcare worker (HCW)/ medical officer (MO) or the laboratory technician (LT) can educate patients on how to collect and dispense sputum.
The HCW/MO/LT provides a new sputum cup with the Laboratory Serial Number written on its side to the patient. They should explain that sputum should be collected in an open place or in a well-ventilated room; it should not be collected in closed rooms, toilets and ill-ventilated rooms
A specimen collected under supervision is likely to yield better results. Supervising person has to demonstrate how to collect good sputum and dispensing it:
- Using a laboratory sputum cup, demonstrate how to open the lid of the specimen container and place it conveniently within their reach, so they can close it immediately after collecting sputum and also how to screw the cap on the cup tightly so it doesn't leak.
- Demonstrate how to bring up sputum, beginning with rinsing their mouth as food particles may give false positive results.
- Demonstrate deep inhalation (2–3 times) and let the patient know that this will initiate the cough reflex in most individuals.
- Demonstrate how individuals can place their palms on the waist, squat or sit and continue deep breathing again. Tapping or thumping of the back
may encourage expectoration (Sitting and placing hands on the waist fixes the shoulder and pelvic muscles and brings the intercostal muscles of ribcage and diaphragm into action) - After deep inhalation and coughing deeply, the sputum should come up in their mouth. The sputum is retained in the mouth and allowed to fall from their tongue into the pre-labeled container. Patient should be encouraged not to spit into the container. The patient can also be encouraged to cough directly into the cup.
- The patient’s mouth should not touch the container and the patient must ensure that sputum does not touch the outside of the container.
- The patient should not open the sputum cup till they are ready to use it
- They should not rub off the number written on the side of the container
- They should not touch the inside of the container with their fingers or tongue while collecting sputum
The person collecting the specimen should make sure that no one stands in front of the individual who is trying to cough up the sputum. When an individual has only coughed up saliva or has not coughed up at least 2 ml of sputum, they should be encouraged to give good specimen that is of appropriate quantity.
Resources
Assessment
Question
Answer 1
Answer 2
Answer 3
Answer 4
Correct answer
Correct explanation
Page id
Part of Pre-test
Part of Post-test
When collecting sputum into containers, which of the following should not be done?
Cough deeply and directly into the sputum cup.
Sputum can sometimes touch the outside of the container.
Always close the lid tightly, after putting the sputum into the cup.
None of the above
2
When dispensing sputum into the sputum container, sputum must never touch the outside of the container.
Yes
Yes
Steps to Ensure a Good Quality Sputum Sample
ContentThe Healthcare Worker (HCW) needs to carefully explain how to collect a good quality sputum specimen. He/she needs to demonstrate how to bring up sputum from the chest, what a good sputum specimen looks like, and the quantity of sputum required.
Characteristics of a Good Sputum Sample
- Thick (semi-solid) muco-purulent (yellowish) in consistency, coughed out deeply from the lungs
- Sufficient in amount i.e., 2 to 5 ml (or enough to cover the size of a fingernail at the bottom of the container)
- It should not be blood-stained (brownish colour) as far as possible.
Steps to Ensure Good Quality Sputum Sample
- Explain to the patient the characteristics of sputum - that it is thick and mucoid as compared to saliva which is thin and watery.
- The patient should preferably rinse his/her mouth to get rid of any food particles which may give false-positive results.
- One should demonstrate to the patient by action how s/he should take deep breaths and bring up the sputum.
- The patient is instructed to inhale deeply (2–3 times), which will initiate the cough reflex in most patients.
- The sputum is retained in the mouth and spit into the pre-labelled container without spilling.
- Some patients may not be able to expectorate with deep breathing, in which case HCW should demonstrate to them how they should place their palms on the waist, squat or sit and continue deep breathing again.
- Tapping or thumping of the back may encourage expectoration. (Sitting and placing hands on the waist fixes the shoulder and pelvic muscles and brings the intercostal muscles of the ribcage and diaphragm into action).
- When a patient has only coughed up saliva or has coughed up less than 2 ml (the size of a fingernail at the bottom of the container) of sputum, the patient should be encouraged to provide a better specimen.
Resources
-
CDST_LT: Specimen transport
FullscreenTransportation of Biological Specimens
ContentAll efforts must be made to have decentralized local arrangements for transporting the specimens to the Designated Microscopy Centre (DMC)/ Culture Drug Susceptibility Test (CDST) and molecular Nucleic Acid Amplification Test (NAAT) and Line probe assay (LPA) labs through human volunteers/courier/speed post. The specimens collected should be carefully packed in a box to avoid any spillage or contamination.
The following points must be considered for the transportation of biological specimens:
- Samples need to be transported to DMC or CDST laboratory within 72 hours (in a cold chain if sent to CDST and molecular laboratories)
- The health care worker must inform and coordinate with the sample transportation agency to transport the sample to the necessary laboratory
- The accompanying dispatch list present along with the biological specimen must tally with the total number of sputum specimens collected, and must specify the details of the referring health facility collecting the specimen
- The Specimen Identification Number on the specimen container and the accompanying dispatch list must match
- For each patient, one biological requisition form is required and all necessary details should be filled
- All specimens transported to the laboratory must be accompanied by the request form in hard and soft copy formats
- Triple packing system should be utilized for transportation
- The box containing the specimen samples to be transported to the National TB Elimination Program (NTEP) certified laboratory should be labelled with a “BIO-HAZARD” sticker
- The date of dispatch must be marked by the health worker on the dispatch list and the same must be attached outside the box containing the specimen
Triple Layer Packaging
As per NTEP guidelines, the sputum specimen is packaged in triple layers for transportation to avoid spills and leakage and pose no hazard to the transporter. This includes:
1. Primary Container: This is a watertight, leak-proof, unbreakable tube containing the specimen. The tube is packaged with enough absorbent material to absorb all fluid in case of breakage or leakage.

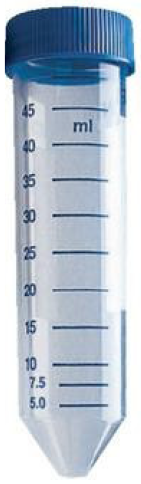
Figure 1: Primary container; Source: PMDT Guidelines, 2021
2. Secondary Packaging: This is watertight, leak-proof packaging to enclose and protect the primary container. Several primary containers may be placed in one secondary packaging.

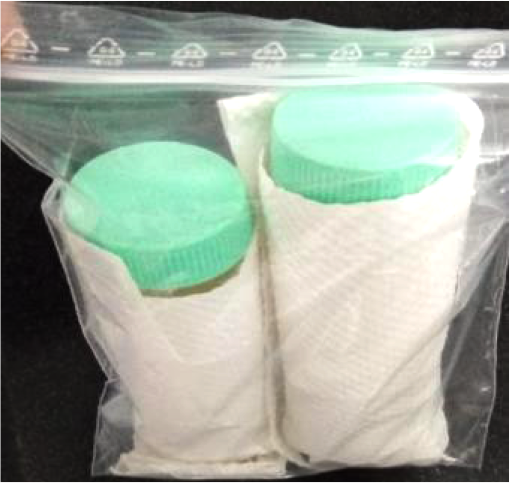
Figure 2: Secondary Packaging; Source: PMDT Guidelines, 2021
3. Outer Packaging: Secondary packaging is placed in rigid outer packaging to protect the contents from physical damage during transport. Gel packs should be kept inside the box to maintain temperature along with suitable absorbent/ cushioning material
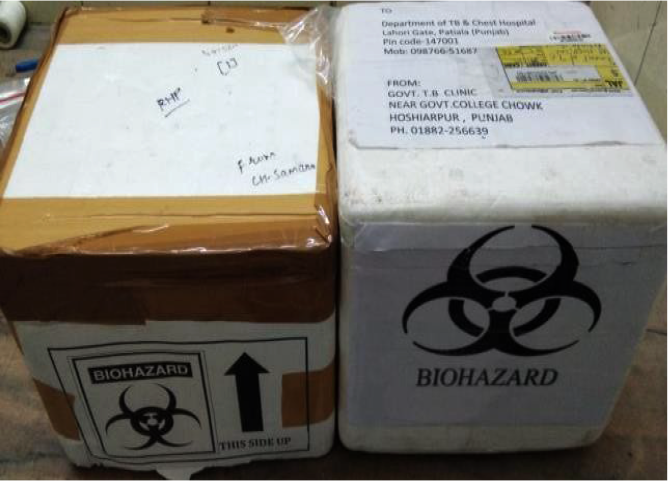
Figure 3: Outer Packaging; Source: PMDT Guidelines, 2021
The transporter needs to ensure the following:
- The outer packaging is not damaged and is properly sealed
- Biohazard label is pasted on the outer packaging
- “From” and “To” addresses are clearly labelled
- Contact details (name, phone no.) of the receiver is pasted
- Upright symbol (

 ) is pasted appropriately
 - The temperature is maintained at 2-80 C for the entire transportation period
- Transport at the earliest (to reach the destination within 72 hours)
Resources
Kindly provide your valuable feedback on the page to the link provided HERE
Modes of Transportation in SCT
ContentAll efforts must be made to have decentralised local arrangements for transporting the specimens to the TB detection centre (TDC). If a proper transport mechanism for collected specimen is in place, it spares the patients from travelling to the laboratory.
The sputum sample is packaged in triple layers in such a manner that it arrives at the destination in good condition and presents no hazard to the transporter.
Transporter/ personnel transporting the sample should be sensitized by the National TB Elimination Programme (NTEP) staff prior to engagement.
- Sensitisation would be provided on Symptoms of TB disease and its transmission, precautions to be taken to prevent exposure, hand hygiene requirements and spill management.
The different modes of sample transport include:
1. Post: Postal department services available pan-district can be engaged to transport sputum samples.
2. Courier: Local logistics courier companies can also be identified and hired to transport samples.
3. Volunteers/ human carriers: Community volunteers/members of NGOs can be trained as human carriers to collect and transport samples.
District TB Centre or Medical Officer TB Control (MO-TC) should ensure feasibility and financial measures required for .such arrangements for sputum transport.
Systems can be established for transportation of various biological samples (not only TB) from referring centre/peripheral centre to laboratories in a hub and spoke model in a integrated manner.
Resources
- Specimen Transportation - A How-to Guide.
- Health and Safety Guidelines for Staff/ Workers involved in Sputum Transportation, CTD.
Assessment
Question
Answer 1
Answer 2
Answer 3
Answer 4
Correct answer
Correct explanation
Page id
Part of Pre-test
Part of Post-test
Sputum can be transported through post/ courier/ human carriers.
True
False
1
Sputum can be transported through post/ courier/ human carriers.
Yes Yes Requirements for Packaging a biological Specimen
ContentPeripheral Laboratories in the NTEP need to send biological samples (such as sputum) to nearby Culture and Drug Susceptibility Testing (CDST) laboratories for advanced testing (eg Drug Resistance Testing). The samples need to be safely packaged and transported such that there is no spillage or contamination.
The items required for safe packaging biological specimens are:
- Falcon tubes
- Three-layer packing materials like thermocol box
- Ice gel pack (pre-frozen at -20oC for 48 hours)
- Request for CDST forms
- Polythene bags
- Tissue paper roll for absorbent packing
- Parafilm tapes
- Brown tape for packing the thermocol box
- Permanent marker pen
- Labels with 'To' and 'From' address and blank labels for sample details
- Biohazard sticker
- Scissors
- Spirit swab
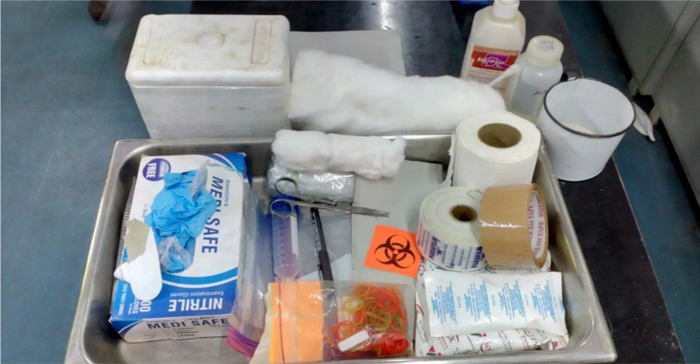
Figure: Items needed for packaging of biological specimens for CDST laboratory; Source: Guidelines for Programmatic Management of Drug Resistant TB in India, 2021
Video fileResources
SOP for Packaging Specimens during the Transportation of Biological Specimens for TB Diagnosis
ContentStandard Operating Procedure (SOP) for Packaging Specimen during the transportation of biological specimens for TB diagnosis, also known as Triple Layer Packaging, is as follows:
The Lab Technicians (LTs) at the Designated Microscopy Centres (DMCs) should be trained to carefully pack the sputum samples in the cold box to avoid spillage of the samples. Before packing, personal protection measures such as wearing hand gloves (double gloves preferred), goggles and masks are to be followed by the LTs to prevent contracting the infection.
Table: Steps in Standard Operating Procedure (SOP) for Packaging Specimen during Transportation for TB Diagnosis

- Step 1. Make sure that the specimen collection tube is tightly closed after the sample has been collected from the patient.
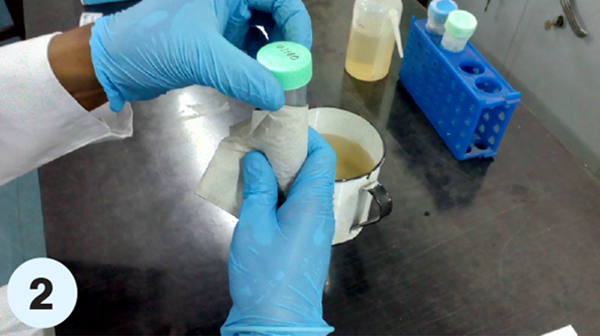
- Step 2. Wipe the outer surface of the 50 ml conical tube with 5% phenol followed by absorbent tissues and allow it to air dry.

- Step 3. Write the patient details on the opaque area (white area) of the specimen collection tube using a permanent marker pen, clearly in capital letters.
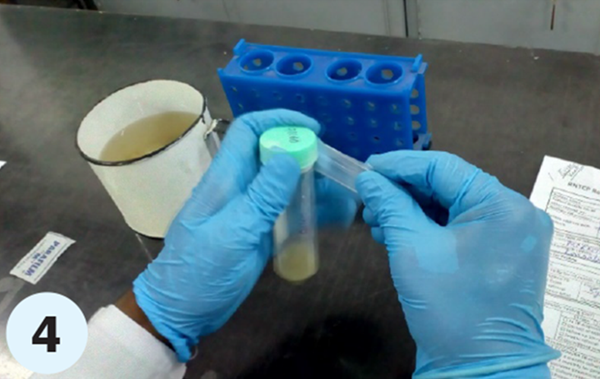
- Step 4. Cut the parafilm strip and wrap one of the strips at the joint between the cap and the neck of the specimen collection tube such that a secured seal is formed. (Primary receptacle/ package

- Step 5. Open the absorbent cotton roll and spread it out on the workbench; separate the cotton into two equal layers. Roll the specimen collection tube containing the sample tightly in the absorbent cotton such that the tube is covered completely.
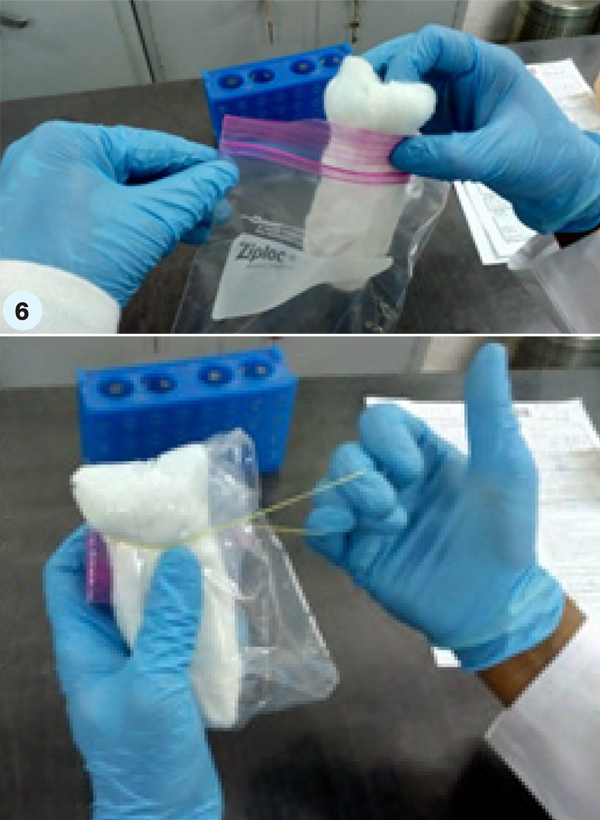
- Step 6. Put this roll containing the specimen collection tube into the ziplock pouch. Roll the whole into a tight bundle, ensuring that there is no air in the pouch. This bundle should be secured with rubber bands. (Secondary receptacle/ package)
- Step 7. Repeat steps 5–7 for the second sample of the patient.
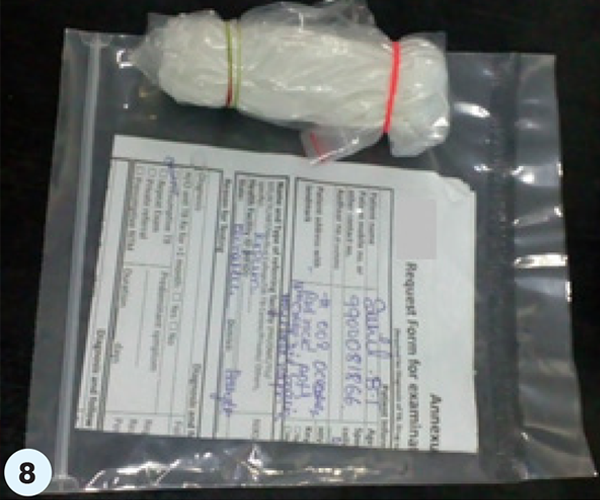
- Step 8. Insert the Test Request form printed from Nikshay into the ziplock pouch after ensuring that the details on the form and the sample tubes match, with the writing facing outside (details visible through the package). Seal the ziplock on the pouch.
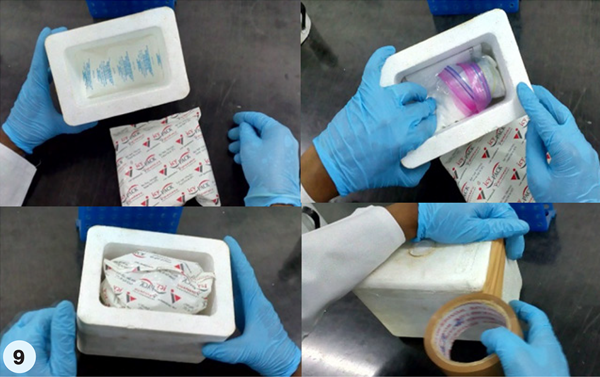
- Step 9. Place the cooled gel packs into the thermocol box, place the sample tubes packed in ziplock pouches on the frozen gel packs (frozen for 48 hours at -40°C) and also keep the pouch containing the Test Request form printed from Nikshay on top. Stick the BIOHAZARD sign over the lid and “To and From” stickers on the exterior of the thermocol box or box used to pack the specimen. Close the lid of the box and wrap it tightly with brown duct tape. (Tertiary receptacle/ package)
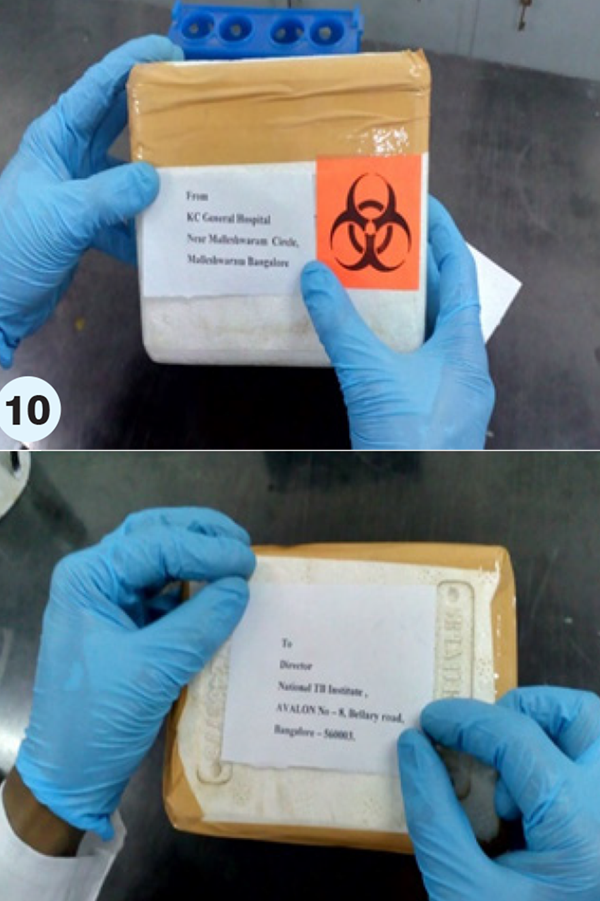
- Step 10. Complete the ‘From’ and ‘To’ addresses on the stickers, using a permanent marker pen.
The LT of the DMC should promptly inform the sample transport agency like a courier/ speed post service, or a human carrier to collect and transport the samples.
Video fileResources
- Training Module (1-4) for Program Managers and Medical Officers, NTEP, MoHFW, 2020.
- Guidelines for Programmatic Management of Drug-resistant TB in India, 2021.
Kindly provide your valuable feedback on the page to the link provided HERE
Specimen Carriers
ContentTechnical specifications for TB diagnosis specimen carriers are as follows:
Thermocol Box:
- Thickness of box - 2.5 cm
- Outer dimensions: Length - 18.5 cm, breadth - 13 cm, height - 12 cm (without lid), height - 14 cm (with lid); Inner dimensions: Length - 14.5 cm, breadth - 8 cm, height - 12 cm (without lid), height - 13 cm (with inner part of lid).
Gel Pack:
- Number of gel packs required: 2
- Weight of fully packed consignment box: 400 grams
- Gel packs maintain a temperature between 12-20ºC for up to approximately 48 hours in tightly packed thermocol boxes (average outside temperature 35ºC)
- Conditioning in the deep freezer (temperature between -20 to -15ºC) for a minimum 48 hours to a maximum 72 hours before use, is required.
This is a one-time use carrier since the thermocol boxes and the gel packs are not reused.
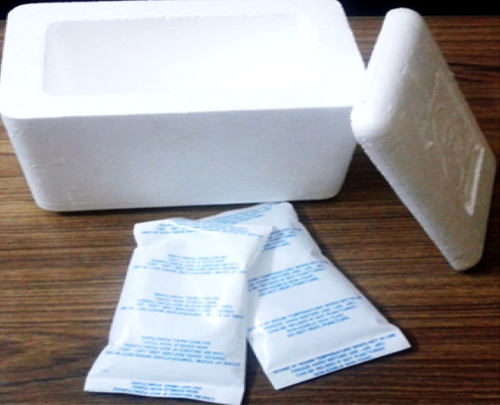
Figure: TB Diagnostic Specimen Carrier - Thermocol Box with Gel Packs; Source: NTEP Guidelines for Programmatic Management of Drug Resistant TB in India, 2021
Resources
- Training Module (1-4) for Program Managers and Medical Officer, NTEP, MoHFW, 2020.
- Guidelines for Programmatic Management of Drug Resistant TB in India, 2021.
Kindly provide your valuable feedback on the page to the link provided HERE
Technical Specifications for Labelling Specimen Transport Carriers
ContentThese are the technical specifications for labelling specimen transport carriers:
- Specimen containers need to be labelled legibly with details such as the patients’ name, date and time of specimen collection, TB detection centre/ District Tuberculosis Centre (DTC), lab no., specimen A or B.

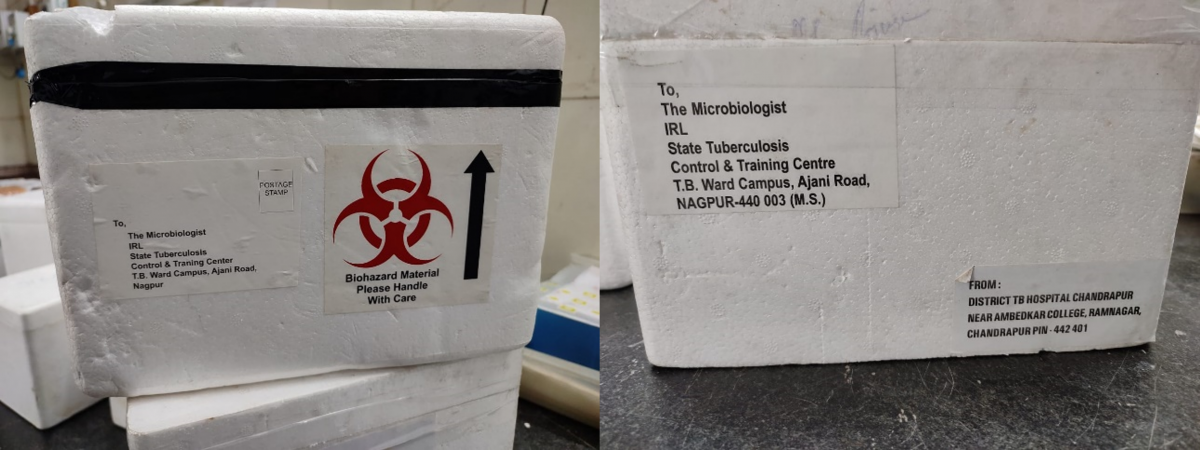
Figure: Details to be filled on the specimen containers

- Dispatch list with details of each specimen transported and the request form for examination of biological specimen for each specimen should be put in an envelope and attached to the outside box.
- As per the national guidelines for biomedical waste management, the containers used for transporting specimen samples to the National TB Elimination Programme (NTEP) - certified laboratory should be labelled with a “BIOHAZARD” sticker.
- Other than the Biohazard sticker it is mandatory to add 'To' and 'From' stickers on the specimen transportation carrier and fill in the necessary details.
- Specimen transport carriers should be labelled legibly with all the necessary details as listed above.
- A specimen may be rejected at the receiving laboratory if the specimen transport carriers are unlabelled or mislabelled.
Resources
Kindly provide your valuable feedback on the page to the link provided HERE
Cold Chain Requirement for the Transport of TB Diagnostic Specimens
ContentA cold chain is a system of transporting and storing TB specimens at optimum temperature while being transported from the peripheral health institutions to the diagnostic labs to reduce the growth of contaminating endogenous respiratory organisms.
Cold chain requirements for transportation of TB diagnostic specimens are (Figure 1):
- A thick thermocol box (one-time use box), which has a thickness of about 2.5 cm. Outer dimensions of the box - Length: 18.5 cm, Breadth: 13 cm, Height: 12 cm. Inner dimensions of the box - Length: 14.5 cm, Breadth: 8 cm, Height: 10 cm.
- Two gel packs to maintain a temperature between 12-20°C for up to approximately 48 hours in tightly packed thermocol boxes (average outside temperature 35°C). Gel packs to be conditioned in the deep freezer (temperature between -20 to -15°C) for a minimum of 48-72 hours before use.

Figure 1: Technical specifications of transport box for sputum specimen transportation in cold chain
Specimen Transport Steps - Cold Chain (Figure 2)
- Place the gel pack into the thermocol box.
- Place the sample tubes (in zip-lock pouches) on the frozen gel packs.
- Keep the pouch containing the Test Request form on top before placing another gel pack on top.
- Close the lid of the box and wrap tightly with brown duct tape to maintain the cold chain.
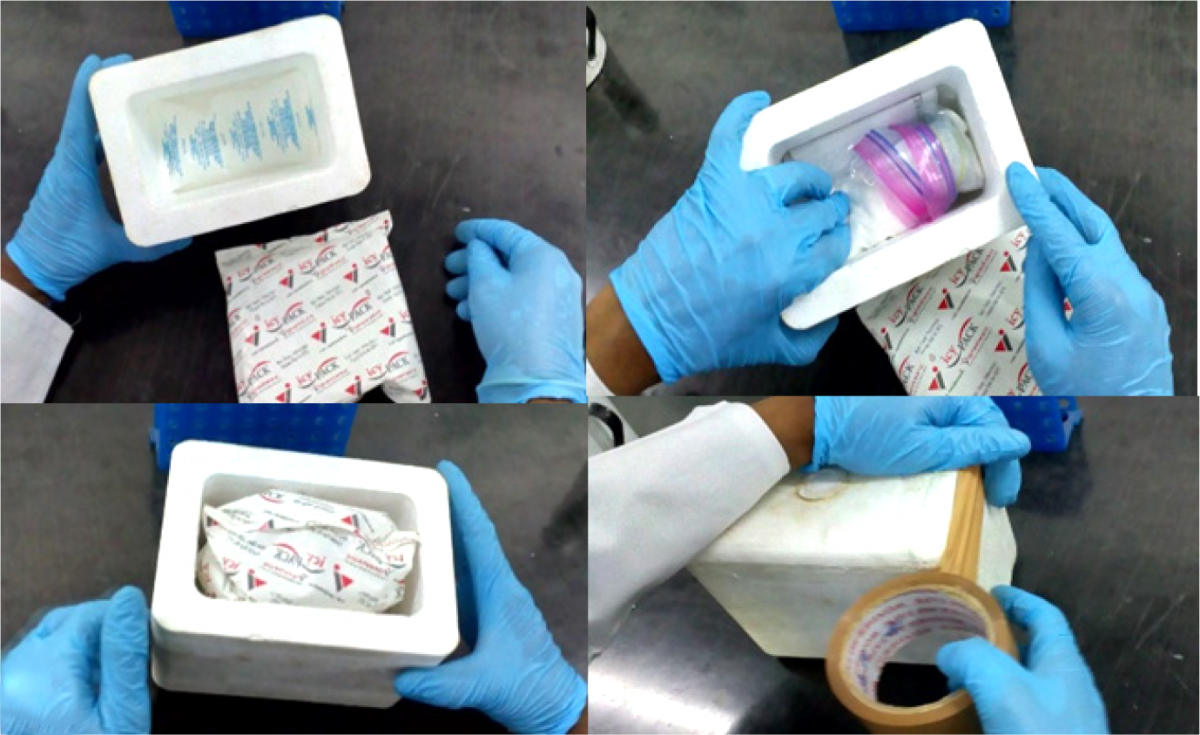
Figure 2: Steps for specimen transportation in cold chain
Resources
Kindly provide your valuable feedback on the page to the link provided HERE
Dispatching the sample to a C&DST Lab
ContentFor presumptive Drug-resistant TB (DR-TB) patients’, the health facility staff arranges for specimen collection from patient, packs samples as per the Standard Operating Procedure (SOP) for triple layer packaging and dispatches it for transportation in cool chain to the linked Culture and Drug Susceptibility Testing (C&DST) laboratory.
All necessary materials for specimen collection and modality for transportation need to be made available/ arranged at the Designated Microscopy Centre (DMC)/ Peripheral Health Institute (PHI) by the District TB Officer (DTO).
Steps in sample dispatch include:
- Add test details in Nikshay (Figure) to generate test requests (Test ID) for the patient’s episode ID in Nikshay.
- This will enable instant online intimation about the upcoming specimen to the C&DST laboratory.
- Complete test request form for biological specimen by adding:
- Patient information
- Details on name and type of referring facility
- Health establishment ID
- Reason for testing and test requested
- Patient ID and Test ID
- Put the appropriate address of receiving C&DST laboratory and address of health facility form where samples are dispatched on the transportation box.
- Lab Technician (LT) of the health facility should promptly inform the transport agency (courier/ speed post service) or human volunteers to collect and transport the samples.

Figure: Adding Test Details in Nikshay for Diagnosis of DR-TB; Source: Nikshay Diagnostics Training Content.
Resources
- Training Modules (1-4) for Programme Managers and Medical Officers, NTEP, 2020.
- Guidelines for PMDT in India, 2021.
- Nikshay Zendesk, Nikshay Knowledge Base, Diagnostics.
Assessment
Question
Answer 1
Answer 2
Answer 3
Answer 4
Correct answer
Correct explanation
Page id
Part of Pre-test
Part of Post-test
Test details are added in Nikshay to generate test requests (Test ID) for the patient’s episode ID in Nikshay.
True
False
1
Test details are added in Nikshay to generate test requests (Test ID) for the patient’s episode ID in Nikshay.
Yes
Yes
- Add test details in Nikshay (Figure) to generate test requests (Test ID) for the patient’s episode ID in Nikshay.
-
CDST_LT: Specimen receipt
FullscreenProcess of Specimen Receipt at the NTEP Laboratory
ContentThere is a specific procedure prescribed under the National TB Elimination Program (NTEP) during receipt of the specimen for NTEP Laboratory.
At the laboratory, all specimens need to be received in the registration area.
To minimize the risk of infection, the following procedures should be applied:
- The specimen box received needs to be opened only in a biosafety cabinet inside the laboratory. (Do not open on an open bench at the lab reception).
- Before opening the package, one should inspect the delivery box for signs of breakage or leakage; if there is gross leakage evident, one needs to discard the package following biomedical waste management.
- If on gross inspection there is no leakage, one needs to proceed with opening the sample.
- One needs to open the package carefully and re-check for any leakage. In case of leakage, again it should be discarded (the entire contents) following biosafety precautions. The laboratory needs to inform about rejection/ leakage of samples to the respective District TB Officers immediately to enable re-collection of specimens.
- Laboratory needs to check the labelling of specimens in the specimen container and the test request form.
- It should register the samples in Laboratory Information Management System (LIMS) and proceed for processing by the appropriate method.
- Each laboratory needs to document the date of the receipt of the specimen, patient name, age, sex and address, the name of the referring health centre, the reason for testing and volume of the specimen in the Culture & Drug Susceptibility Testing lab register.
Resources
Kindly provide your valuable feedback on the page to the link provided HERE
Criteria for Acceptance and Rejection of TB Specimens at TB Diagnostic Laboratories
ContentThe criteria for acceptance and rejection of TB specimens at TB Diagnostic Laboratories are listed below:
Acceptance Criteria:
- Sample received in triple layer with no leakage
- Sample is without any blood and food particles
- Sample is received within 48 hours expected timeline after collection in a cool chain
- Adequate label and information about the specimen
- Identical name on the specimen and in the test request
- Sample is in adequate quantity
Rejection Criteria:
- Unlabeled or mislabeled specimens
- Specimen sent without the test request ID in Nikshay
- Mismatch in the name on the specimen and the test request in Nikshay
- If the container is full up to the lid with the specimen
- Sample is not collected in an appropriate container
- Specimen container is broken
- Leakage of specimen
- Sample received after two days of collection
Resources
- Training Module (1-4) for Program Managers and Medical Officer, NTEP, MoHFW, 2020.
- Guidelines for Programmatic Management of Drug Resistant TB in India, 2021.
Kindly provide your valuable feedback on the page to the link provided HERE
Precautions to be Undertaken for TB Diagnostic Specimen Collection, Transport and Receipt
ContentAll healthcare workers need to take the following precautions while undertaking the TB diagnostic specimen collection, transportation and receipt of samples as TB is an airborne infection:
- There is the risk of transmission of tuberculosis infection occurring in health care facilities, including the laboratory when patients remain undiagnosed and untreated for tuberculosis.
- The specimen needs to be collected in an aseptic environment, preferably in open space.
- The collection area should be well-ventilated with adequate air exchanges (>12 per hour).
- The Information, Education and Communication (IEC) material related with cough etiquette needs to be displayed in all TB related setting including Designated Microscopy Centres/ Nucleic Acid Amplification Testing Centres/ Culture Drug Susceptibility Testing laboratories.
- Use of closed room, toilet and Outpatient Department area should be avoided while collection of sputum sample by a patient.
- The slides once used should not be reused; same is applicable for thermocol boxes.
- The contaminated materials should be safely disposed off.
- The Triple Layer Packaging needs to be monitored at all levels; at point of exit and point of reception.
- Leakage and broken thermocol boxes should be avoided and samples should be discarded in case of leakage.
- While transportation, cold chain needs to be maintained.
- The sample handlers should use proper personal protection equipment, including gloves, masks and gowns.
- Use of mask, preferably N95, while receipt of samples and during processing in laboratories.
- Healthcare workers should be provided with adequate waste disposal bins as per Biomedical Waste Guidelines and it should be utilized on regular basis.
- Soap, sanitizer and handwash should be available to all dealing with collection, transportation and receipt of samples.
- Those with symptoms suggestive of TB should not be involved in these key activities and should undergo a complete diagnostic workout.
Resources
Kindly provide your valuable feedback on the page to the link provided HERE
Receiving a biological specimen at the Laboratory
ContentBiological specimen/ samples collected on reaching a TB testing laboratory needs to be formally received. The sample may be handed over by agents(couriers, health staff/ volunteers, patient representatives) or by patients themselves. The formal receipt of sample enables further processes such as testing and communication of results back to the patient. If the sample is successfully received, the appropriate testing process is initiated using the sample, else it is rejected and a fresh sample requested.
The designated Lab Technician (LT) at the Laboratory is responsible for receiving the sample. To initiate the receipt, the sample along with the patient, or the sample along with accompanying test request is required. If it is available, following are the steps to complete sample receipt:
- Compare patient information (Patient Name and Patient ID / Sample ID/ Test ID) to the test request that has been made.
- This is performed by searching the patient ID in Nikshay under the Diagnostics menu and comparing and matching the patient details and the label on the sample.
- If a physical form (Request for examination of Biological specimen for TB) is available, the details on the sample label and form needs to be compared and matched as well.
- If the details are matched the LT then checks the quality (mucopurulent, non-blood stained), quantity (adequate to perform the requested test) of the sample and ensures that there is no leakage.
- If the above checks are passed, then the LT Accepts sample. If not the LT rejects sample with a request to get a new sample. The rejection of the sample and request to obtain a new sample is recorded on Nikshay and is communicated to the patient and the person who requested the test.
- To register the receipt by accepting/Check in the sample for testing in Nikshay. The relevant information may also be captured in the TB Laboratory Register. Ensure that the Test ID (if not already present) / Lab serial number from the Lab register is labelled on the sample container.
Sample receiving in Nikshay

Figure: Sample Journey Tracking in Nikshay; Source: Nikshay Diagnostic Training Content.
Resources
- Training Modules (1-4) for Programme Managers and Medical Officers, NTEP, 2020.
- Nikshay Zendesk, Nikshay Knowledge Base, FAQs.
- Nikshay Zendesk, Nikshay Knowledge Base, Diagnostics.
Assessment
Question
Answer 1
Answer 2
Answer 3
Answer 4
Correct answer
Correct explanation
Page id
Part of Pre-test
Part of Post-test
The process of receiving a sample does not involve the following
Requesting a test
Matching test request information and container label.
Checking in a sample on Nikshay
Rejecting an inappropriate sample. 1 Request for testing and sample transportation to the laboratory has to happen before a sample can be received.
Matching request information and checking in a sample on Nikshay and rejecting inappropriate sample are steps in the receiving process.
Yes Yes - Compare patient information (Patient Name and Patient ID / Sample ID/ Test ID) to the test request that has been made.
Storing a sputum sample
ContentStorage conditions of sputum sample can effect the test results.
- Sputum samples should be transported to the laboratory as soon as possible after collection.
- It is the responsibility of Laboratory Technician (LT) and Senior TB Laboratory Supervisor (STLS) to ensure proper storage and transport of sputum specimens.
- Sputum is stored to preserve the specimen quality.
- The stored sputum samples should not be frozen.
Storage of Sputum Samples
For microscopy
- For smear microscopy, sputum specimens should be examined on the same day and not later than 2 days after collection.
- If delay is unavoidable, the sputum collected should be stored in a cool place/ refrigerated at 4°C to inhibit the growth of unwanted microorganisms.
- Stored sputum samples should be protected from light and heat to prevent liquefaction of the sample, else it makes the selection of mucopurulent part of the sample difficult.
- Samples received over holidays/weekends should be stored in a cool place/ refrigerated at 4°C.
For liquid culture
- Sputum should be stored in a cool place/ refrigerated at 4°C to inhibit the growth of unwanted microorganisms; not later than 3 days after collection.
For molecular tests - Nucleic Acid Amplification Test (NAAT) and Line Probe Assay (LPA)
- Sputum must be stored by refrigerating at 4°C to inhibit the growth of unwanted microorganisms and transported in cool chain to the nearest molecular laboratory. It should not be stored beyond one week at 4°C.
Resources
Technical and Operational Guidelines; Chapter 3: Case finding and diagnosis strategy
Assessment
Question
Answer 1
Answer 2
Answer 3
Answer 4
Correct answer
Correct explanation
Page id
Part of Pre-test
Part of Post-test
The sputum collected expecting a time delay for processing should be stored in cool place/ refrigerated at 4°C.
True
False
1
The sputum collected expecting a time delay for processing should be stored in cool place/ refrigerated at 4°C.
Yes
Yes
-
-
CDST_LT-M4: Smear microscopy
Fullscreen-
CDST_LT: Basics of microscopy
FullscreenComparing AFB and LED-Fluorescence Microscopy
ContentThe comparison of the Acid-Fast Bacilli (AFB) and Light Emission Diode (LED) Fluorescence Microscopy is tabulated below:
Direct Microscopy for Acid Fast Bacilli (AFB)

Figure 1: Bright Field Microscope used in Ziehl–Neelsen (ZN) staining of AFB
Light Emission Diode (LED)
Fluorescence Microscopy
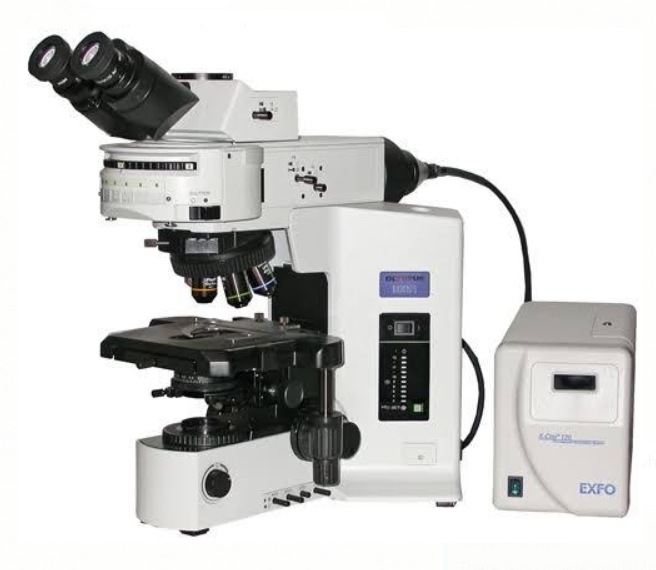
Figure 2: LED-Fluorescent Microscope used in fluorescent staining of AFB
Figure 3: ZN-stained slide used in direct microscopy

Figure 4: Auramine-O-stained slide used in fluorescent microscopy
Method used widely for the diagnosis and confirmation of pulmonary tuberculosis
Method used less commonly for the diagnosis and confirmation of pulmonary tuberculosis
Staining procedure complex
Staining procedure simpler
Examination at lower magnification is NOT possible
Examination at lower magnification is possible
Takes more time than LED-FM
Takes 75% less time than ZN and chances to lose scanty slides are also minimized.
Low durability
High durability
Less sensitive
10% more sensitivity than Bright Field ZN microscopy
As specific as LED-FM
Equally as specific as ZN microscopy
No need for an experienced lab technician
Needs an experienced lab technician
Technical errors are common
Technical errors are less common
Misses the paucibacillary TB cases, especially when the patient is co-infected with HIV
Identifies the paucibacillary TB cases especially when the patient is co-infected with HIV
Resources
- WHO Policy Statement - Fluorescence Light Emitted Microscope for the Diagnosis of TB, 2010.
- A Comparative Study of Auramine Staining using LED Fluorescent Microscopy with Ziehl- Neelsen Staining in the Diagnosis of Pulmonary Tuberculosis, Journal of Evolution of Medical and Dental Sciences, Volume 2, Issue 20, May 2013.
- Comparison of Direct versus Concentrated Smear Microscopy in Detection of Pulmonary Tuberculosis, BMC Res Notes, 2013; 6 : 291.
Kindly provide your valuable feedback on the page to the link provided HERE
Ideal Infrastructure Required for Microscopy Centers
ContentUnder the National Tuberculosis Elimination Program (NTEP) network, the most peripheral laboratories are the Designated Microscopy Centres (DMC) which serve a population of around 100,000 each (50,000 population norm in tribal and hilly areas).
The basic requirements for microscopy centres include (Figure):
- Good ventilation by exhaust fan and open windows
- A table/ work bench to prepare smears
- A sink to stain smears
- A table/ bench to examine smears
- A table/ bench for documentation
- Basin for hand washing with supply of water
- Good lighting
- Non-slip flooring
- Sample receiving area
Figure: Ideal Infrastructure required for Microscopy Centres
Laboratory Diagnosis of Tuberculosis by Sputum Microscopy
ESTABLISHMENT
PROVISIONS UNDER NTEP FOR DMC FACILITIES
Infrastructure development
Normative amount as per “Norms and basis of costing” for NTEP. Unit cost for initial establishment/ refurbishment/ upgradation/ maintenance of civil work to be carried out as per rates prescribed by Public Works Department (PWD) or cell/ division/ corporation/ wing for infrastructure development
Human resources
NTEP trained Lab Technician (LT)
Diagnosis
- Provision for sputum collection in the presence or absence of an LT
- Adequate space for storing and using binocular microscope, essential lab consumables, space for recording and reporting
- Availability of running water
- Availability of electricity
- Availability of biomedical waste management facilities
Equipment
Binocular microscope with a light source
Location of DMC
Ideally, the DMC should be located in a peripheral health facility that has at least 50 new adult OPD/day.
Resources
- Technical and Operational Guidelines for TB Control in India, 2016.
- Laboratory Diagnosis of Tuberculosis by Sputum Microscopy, GLI Initiative.
Kindly provide your valuable feedback on the page to the link provided HERE
Microscopy
ContentMicroscopy is a TB diagnostic technology that utilizes the acid-fastness property of Mycobacterium tuberculosis to visualize it under a microscope. Results of sputum smear microscopy can either be smear-negative, or smear-positive (with various grades).
Advantages:
- It is currently the most accessible and cheapest TB diagnostic test available under National TB Elimination Programme (NTEP) in India.
- It has the shortest turnaround time for diagnosis.
- It has high specificity.
Limitations:
- Low sensitivity. It becomes positive only when more than 5000 bacilli/ml of sample are present. Hence, cases would be missed in early disease, or when an inappropriate biological specimen is provided, where bacterial load in sputum is less.
- It is unable to differentiate between M. tuberculosis and Non-tuberculous Mycobacteria (NTM). This is predominantly an issue in geographies with lower burden.
There are two types of microscopies used in NTEP: Ziehl-Neelsen (ZN) Microscopy and Fluorescence Microscopy (FM). These vary in the type of stain and microscope used. FM is newer of the two types and is currently recommended for use over ZN.
Resources
Parts of a Microscope
ContentVideo fileWorking with a Microscope
ContentVideo file
-
CDST_LT: Sputum smear preparation
FullscreenSteps involved in Smear Microscopy
ContentSputum smears must be prepared promptly after samples are collected or received in the laboratory.
Steps in smear preparation are as follows:
- Cleaning and Labelling of slide (No 1)
- Making the smear (No 2-3)
- Drying and Heat fixing the smear (No 4-5)
- Staining and counterstaining the smear (No 6- 12)
- Examination of slide/Reading the Smear (No 13-14)
- Reporting and recording the observations (Digitally and TB Lab register)
- Storage of slides (as per Laboratory Numbers in closed box) (No 15)


Figure: Steps in Smear Preparation; 1- Labelling of the slide, 2- Using a broomstick to pick up purulent portion (A) while avoiding the salivary portion (B), 3- Spreading sample on a glass slide, 4- Air-drying the slides, 5- Heat-fixing the smeared slides,6- Staining with 1% Carbol fuchsin, 7- Heating of stained smear, 8- Decolorize with 25% Sulphuric acid, 9- Rinse off decolourizer, 10- Counter stain with 0.1% Methylene blue, 11-Rinse off counter stain, 12-Drying the prepared slide, 13-14 Examination of smears , reporting of observations, 15-Storage of slides; Source: Laboratory Diagnosis by Sputum Smear Microscopy.
Resources
- Laboratory Diagnosis by Sputum Smear Microscopy - The Handbook, GLI, 2013.
- Module for Laboratory Technicians, CTD, 2005.
Question Answer 1 Answer 2 Answer 3 Answer 4 Correct answer Correct explanation Page id Part of Pre-test Part of Post-test Sputum smears should be dried by heating. True False 2 Sputum smears should be air-dried. Yes Yes Clean, fresh, unscratched slides should be used for smear preparation.
True False 1 Prevents deposits on stained smear. Yes Yes Cleaning and Labelling Slide
ContentA Laboratory Serial Number is assigned to each presumptive TB patient who is examined at the microscopy centre.
Each Laboratory Technician (LT) needs to ensure that all the slides are labelled using the Laboratory Serial Number. This is essential for recording as well as for the review of the slide during the supervisory visit as well as during the quality assurance exercise.
For every test, a new slide needs to be used. It is essential that there are no fingerprints or any scratches on the side of the slide (see figure 1).

Figure 1: Always select new, clean, grease-free and unscratched slides
Once the LT is ready to prepare a smear, he/she needs to write the Laboratory Serial Number on the left side of the slide with a diamond marker or a grease pencil only (see figure 2). Avoid multiple labelling (see figure 3).
Figure 2: The laboratory serial number is written on one end of the slide using a diamond marker

Figure 3: Avoid Multiple Labelling; a grease pencil has been used to label the slide.
Labelling of slides needs to be monitored and supported by the concerned Senior TB Laboratory Supervisor (STLS) during External Quality Assessment (EQA) visits.
Resources
Kindly provide your valuable feedback on the page to the link provided HERE
Making the smear
ContentThe National TB Elimination Programme (NTEP) has a standard procedure for sputum smear preparation, the steps for which are listed below:
The tools required for smear preparation include a clean work surface, new and clean glass slides, a discard bucket or a foot-operated bin with a plastic liner, bamboo or wooden applicator sticks or sterile wire loop, spirit lamp and a rack for drying smears.
- Use new, clean, unscratched glass slides and label the slide with the laboratory serial number.
- Prepare the smear in the centre of the slide covering 3 cm X 2 cm
The smear is prepared by using either a wooden stick (Figure 2) or a sterile wire loop (Figure 3).
Figure 2: Wooden stick used in smear preparation
Figure 3: Sterile wire loop used in smear preparation
Steps for Smear Preparation Using a Wooden Stick
- Break the wooden stick into two halves with uneven ends.
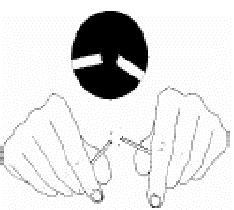
- Using the uneven end, select and pick purulent portions of the sputum specimen and transfer onto a new, clean, labelled, glass slide.
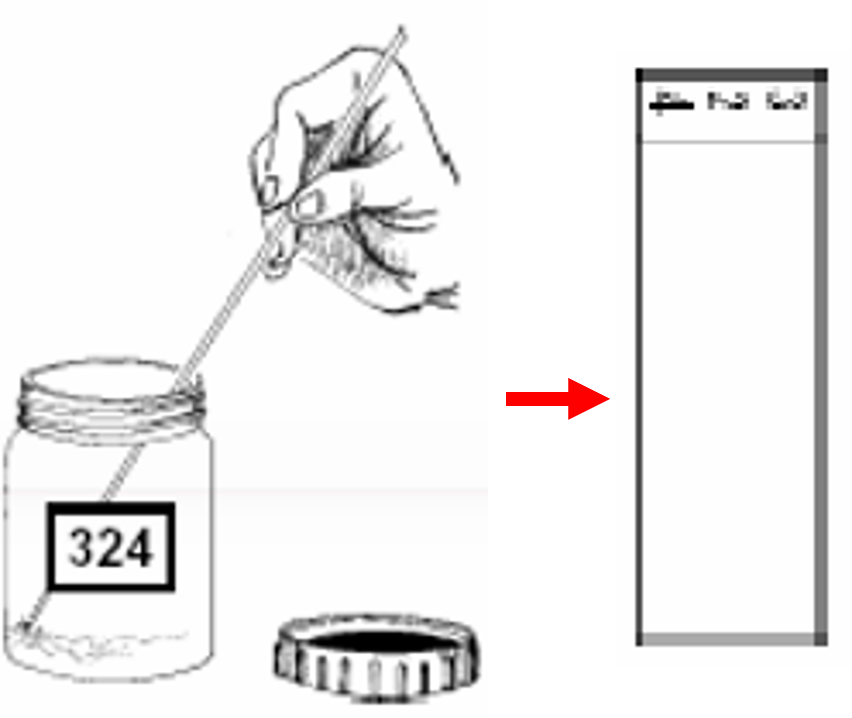
- Using the wooden stick, spread the sputum evenly, in a continuous rotational movement, to cover two-thirds of the central portion of the slide. Smear preparation should be done near a flame. This is required as approximately 6 inches around the flame is considered as a sterile zone which coagulates the aerosols raised during smear preparation.
- Discard the used wooden sticks in the discard bucket or a foot-operated bin with a liner and disinfectant. A different broomstick is used for each smear so that one patient's sputum is not mixed with another patient's sputum.
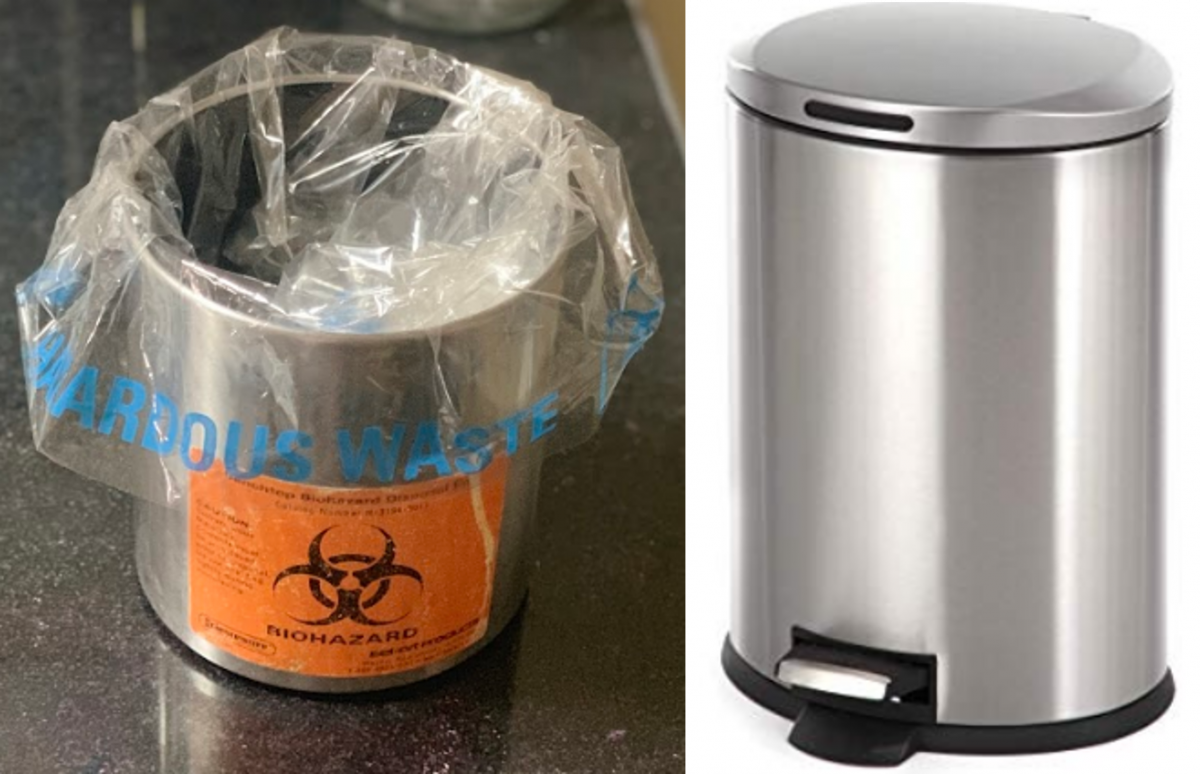
- Air-dry the smear slide on the rack for 30 minutes
- After air-drying, heat-fix the smear, using a lighted spirit lamp.
Steps for Smear Preparation Using a Wire Loop
- Take a nichrome wire loop or a disposable loop.
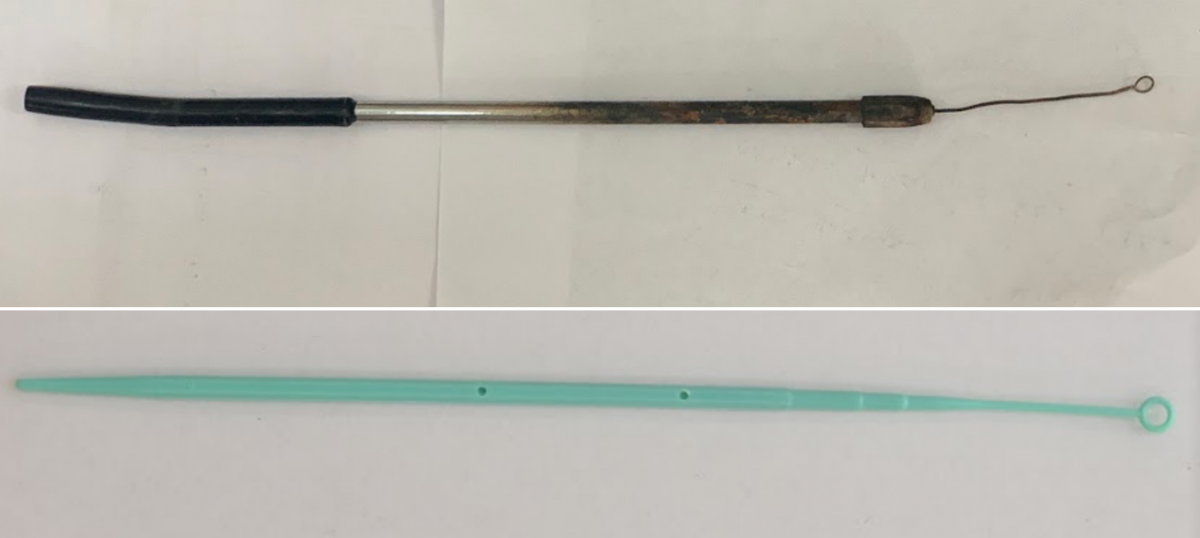
- Using the loop, select and pick purulent portions of the sputum specimen and transfer onto a new, clean, labelled, glass slide.
- Using the loop, spread the sputum evenly, in a continuous rotational movement, to cover two-thirds of the central portion of the slide.
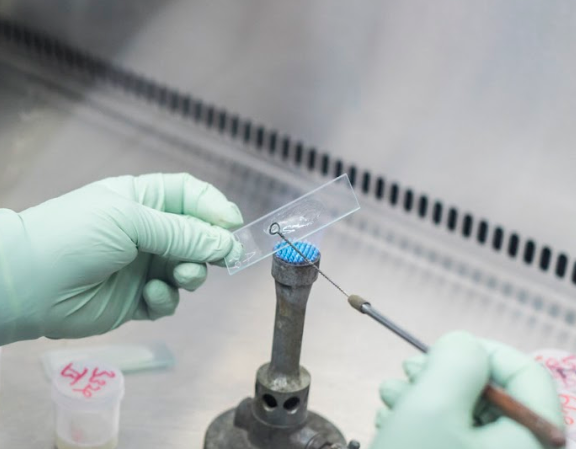
- After use, sterilize the loop in an electric loop sterilizer or flame the loop to red-hot.
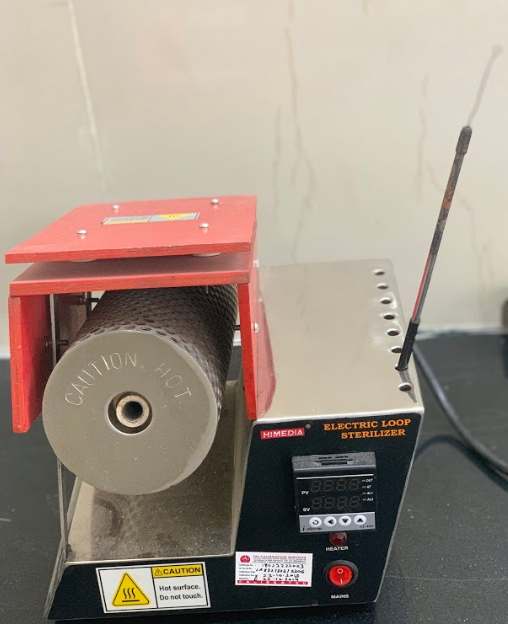

- Air-dry the smear slide on the rack for 30 minutes.
- After air-drying, heat-fix the smear using a lighted spirit lamp.
Resources
- Module for Laboratory Technicians (RNTCP), Central TB Division, MoHFW, 2005.
- Laboratory Diagnosis of Tuberculosis by Sputum Microscopy, GLI Initiative.
Kindly provide your valuable feedback on the page to the link provided HERE
Air drying and heat fixing
ContentFor sputum smear microscopy, the slides should be air-dried as heating the slide while the smear is wet can result in bubbling of TB bacilli into the air.
Fixation makes the sputum stick to glass slide and preserves the shape of the bacilli.
The procedure for air-drying and heat-fixing the slide is as follows:
- A smear prepared on a clean glass slide from mucopurulent portion of the specimen is air dried for 15-30 minutes on a rack (see Figure 1)

Figure 1: Rack for air-drying slides
- When dry, the smear facing upwards is fixed by heat from below. This can be achieved by passing the slide 2-3 times over the flame of a spirit lamp (as shown in Figures 2 and 3) for 3-4 seconds each time.

Figure 2: Fixing the Smear by Heat Fixation; Source: Laboratory Diagnosis by Sputum Smear Microscopy

Figure 3: Spirit lamp used to heat-fix smears
Important points to consider when fixing smears
- Heat fixing does not always kill Mycobacteria, exercise care when handling slides.
- Flame fixing may aerosolize bacilli from the smear.
- Overheating can damage the bacilli, burn the smear or break the slide.
- Insufficient heat or time can lead to smear washing off during staining steps.
- Heating for too short a period can result in a false-negative result because the TB bacilli will not be well preserved on the slide.
After the smears are fixed, they can be stained for examination or stored, or used in proficiency testing panel and quality control slides for staining.
Resources
Laboratory diagnosis by sputum smear microscopy
Assessment
Question
Answer 1
Answer 2
Answer 3
Answer 4
Correct answer
Correct explanation
Page id
Part of Pre-test
Part of Post-test
Heat fixing does not always kill mycobacteria.
True
False
1
Heat fixing does not always kill mycobacteria.
Yes
Yes
Qualities of a good sputum smear
ContentGood quality smears are essential for accurate examination and results. A good quality sputum smear is one that is of uniform thickness and made from the mucopurulent portion of the sample in the center of the slide (Figure 1).
Do’s and Don’ts of a Good Quality Smear
- Do ensure that the smear size is 3 cm by 2 cm
- Do ensure there are no fingerprints on the prepared smear

Figure 1: Uniform spread of smear, not too thick or thin, and covering an area of 3cm by 2cm
- The smear should not be very thick, but it should be thin enough to visualize a newsprint as can be seen in Figure 2
Figure 2: Smear thin enough to visualise a print through it
- All smears should be air-dried for 30 minutes, before heat fixing to ensure that the smear is not washed off during staining
Common Mistakes to Be Avoided
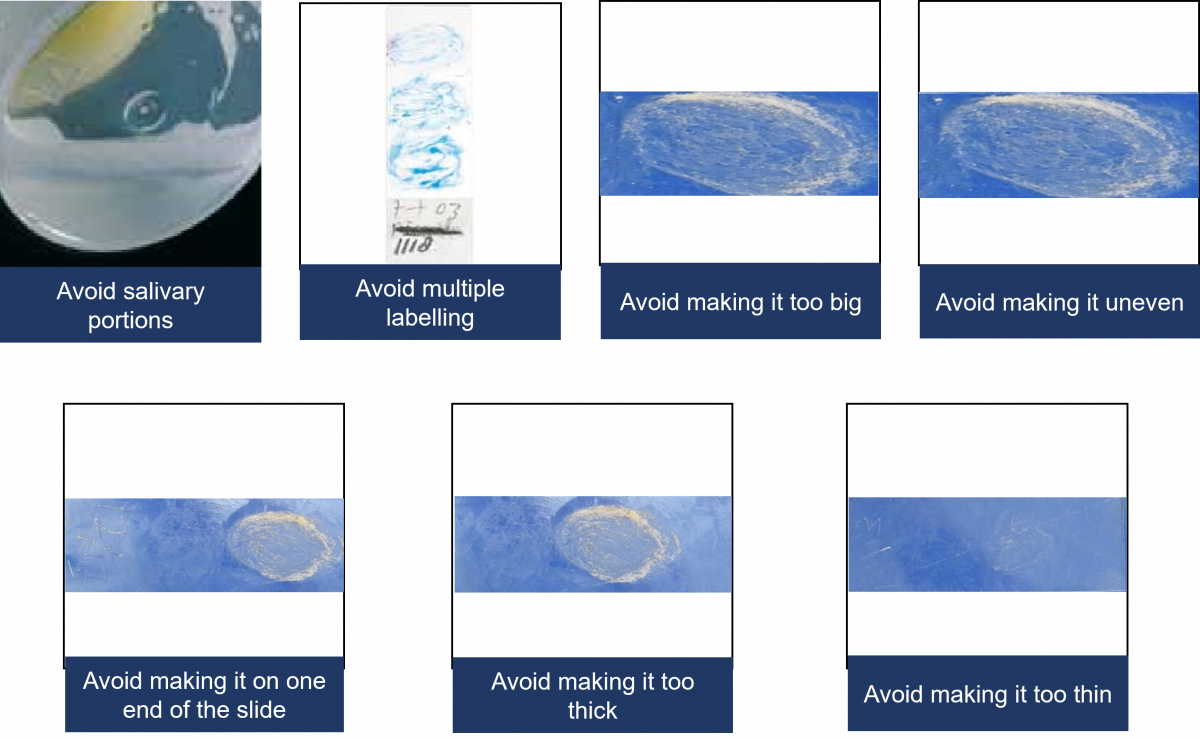
Resources
- The Handbook - Laboratory Diagnosis of Tuberculosis by Sputum Microscopy, 2013
- Module for Laboratory Technicians – RNTCP, 2005
- Manual for Sputum Smear Fluorescence Microscopy- RNTCP
Kindly provide your valuable feedback on the page to the link provided HERE
-
CDST_LT: Staining sputum smears
FullscreenZN Microscopy: Staining Process
ContentAfter air drying and heat-fixing of the smear, it needs to be stained for the identification of MTB during microscopy.
The reagents required for the ZN staining procedure are shown in Figure 1. The steps involved in the staining procedure are shown in Figure 2.

Figure 1: Reagents Required for ZN Staining

Figure 2: Steps involved in ZN staining procedure
For a visual representation of the above-mentioned steps, please click the video below.
Video fileResources
Laboratory Diagnosis by Sputum Smear Microscopy, GLI Initiative
Assessment
Question Answer 1 Answer 2 Answer 3 Answer 4 Correct answer Correct explanation Page id Part of Pre-test Part of Post-test When staining ZN slides, it is important to heat the slides until it begins to boil. True False 2 When staining ZN slides, it is important to heat the slides gently until you see vapours, but do not boil. Yes Yes ZN Microscopy: Properties of a well stained slide
ContentCharacteristics of a Well-stained Slide
- Staining and appearance of Mycobacterium species in ZN staining.
- The primary dye - carbol-fuschin stains all cells pink in sputum samples.
- The bacilli retain the primary pink carbol-fuschin on decolourisation with acid-alcohol.
- Epithelial, pus and mucous cells in the sputum decolourise on the addition of the acid-alcohol and take up the counterstain dye of methylene blue.
- Thus, Mycobacterium species appears pink against a background of epithelial, pus and mucous cells that appear blue.
- ZN-stained Mycobacterium species are visible as pink, long, slender rods with granules or V-shaped or in clumps.
- Mycobacterium species should not be stained too dark or pale pink.
- Possible reasons:
- Smear thickness is not appropriate
- Insufficient decolourisation
- Low acid concentration
- Carbol-fuchsin dries on smear
- Primary staining/ decolourisation time not appropriate
- Expired reagents used
- Possible solutions:
- Internal quality control of prepared smears and stains
- Use a stopwatch to time staining steps.
- Do not overheat carol-fuchsin.
- Possible reasons:
- The counter-stained cells should not be dark blue.
- Possible reasons:
- Smear thickness is not appropriate
- Excessive counterstaining time
- Inadequate washing after counterstaining
- Methylene blue concentration is not appropriate
- Possible solutions:
- Internal quality control of prepared smears and stains
- Use a stopwatch to time staining steps
- Possible reasons:
- There should not be any deposits on stained smears.
- Possible reasons:
- Stains not filtered
- Slides not clean
- Possible solutions:
- Internal quality control of prepared stains
- Filter stains
- Use clean, fresh, unscratched slides for smear preparation.
- Possible reasons:
Resources
- Laboratory Diagnosis of Tuberculosis by Sputum Smear Microscopy - The Handbook, GLI, 2013.
- Module for Laboratory Technicians, RNTCP, CTD, 2005.
Assessment
Question Answer 1 Answer 2 Answer 3 Answer 4 Correct answer Correct explanation Page id Part of Pre-test Part of Post-test Which of these is/are the characteristic/s of a well-stained slide? Mycobacterium species should not be stained too dark or pale pink. Mycobacterium species are visible as pink long slender rods with granules or V-shaped or in clumps. The counter-stained cells should not be dark blue. All the above 4 ZN-stained Mycobacterium species are visible as pink, long, slender rods with granules or V-shaped or in clumps. The bacilli should not be stained too dark or pale pink. The counter-stained cells should not be dark blue. Yes Yes - Staining and appearance of Mycobacterium species in ZN staining.
Fluorescent Microscopy: Staining Process
ContentAfter air drying and heat-fixing of the smear, it needs to be stained.
Fluorescence microscopy (FM) staining should always be carried out in a designated area. The reagents required for the FM staining procedure are shown in Figure 1. The steps involved in the staining procedure are shown in Figure 2.

Figure 1: Reagents Required for FM Staining


Figure 2: Steps involved in FM staining procedure
For a visual representation of the above-mentioned steps, please click the video below:
Video fileResources
Laboratory Diagnosis by Sputum Smear Microscopy, GLI Initiative
Assessment
Question
Answer 1
Answer 2
Answer 3
Answer 4
Correct answer
Correct explanation
Page id
Part of Pre-test
Part of Post-test
What is the counterstain used in FM staining?
Acid Alcohol
Potassium Permanganate
Phenol
Auramine-O
2
In FM staining, Potassium Permanganate is used as the counterstain.
Yes
Yes
Fluorescent Microscopy: Properties of a well stained slide
ContentLight-emitting Diode Fluorescence Microscopy (LED-FM) utilises the fluorescent dye Auramine-O to stain and detect Mycobacterium species in clinical samples.
Characteristics of a Well-stained Slide
- Auramine-O stained Mycobacterium species are visible as bright yellow/ green long slender rods, slightly curved, with variable lengths, single or in clumps, with uniform staining or granular appearance against a dark background (Figure A).
-
Slides stained with Auramine-O should not have too much background fluorescence (Figure B)
Possible reasons:
- Smear thickness is not appropriate
- Insufficient decolourisation
- Counterstain too weak
- Auramine-O dries on the smear
-
Auramine-O not filtered
Possible solutions:
- Internal quality control of prepared smears and stains
- Use a stopwatch to time-staining steps
- Filter Auramine-O before use
- Add a sufficient quantity of stains to cover the smear
-
Slides stained with Auramine-O should not have pale fluorescence (Figure C)
Possible reasons:
- Smear thickness is not appropriate
- Low Auramine-O concentration
- Excessive decolourisation time
-
Stained smears exposed to daylight
Possible solutions:
- Internal quality control of prepared smears and stains
- Use a stopwatch to time-staining steps
- Store Auramine-O and stained slides in the dark
- Read stained slides as early as possible
- Non-fluorescent yellow/ green coloured bacillary shapes should not be considered as Mycobacterium species.
-
Slides stained with Auramine-O may contain stained artefacts/ background debris which are not Mycobacterium species.

Figure: Slides stained with Auramine-O showing bright yellow/ green slender rods (A); slide with too much background fluorescence (B); slide with pale fluorescence (C); Source: Laboratory Diagnosis by Sputum Smear Microscopy
Resources
- Laboratory Diagnosis of Tuberculosis by Sputum Smear Microscopy - The Handbook, GLI, 2013.
- Manual for Sputum Smear Fluorescence Microscopy, RNTCP, CTD.
Assessment
Question Answer 1 Answer 2 Answer 3 Answer 4 Correct answer Correct explanation Page id Part of Pre-test Part of Post-test Which of these is/are the characteristic/s of a well-stained FM slide? Mycobacterium species are visible as bright yellow/ green long slender rods against a dark background. Mycobacterium species are visible as pink, long slender rods.
Mycobacterium species are visible as pale yellow/ green long slender rods against a dark background. Mycobacterium species are visible as non-fluorescent yellow/ green coloured bacillary shapes. 1 Mycobacterium species are visible as bright yellow/ green long slender rods against a dark background. Yes Yes
-
CDST_LT: Reading smears and reporting microscopy results
FullscreenProcess of Reading a Smear
ContentThe manner and quality of smear reading has a major impact on the result of sputum smear microscopy and case detection. Each slide needs to be examined for at least 5 full minutes or 100 fields need to be examined.
The overall process of reading a smear is outlined in the figure below:

Figure: Process of reading a smear
Resources:
- AFB Smear Microscopy, Trainer Notes.
- Module for Laboratory Technicians.
- Laboratory Diagnosis of Tuberculosis by Sputum Microscopy.
Assessment
Question
Answer 1
Answer 2
Answer 3
Answer 4
Correct answer
Correct explanation
Page id
Part of Pre-test
Part of Post-test
What is the minimum time to be spent by an LT when examining a smear under the microscope?
30 minutes
5 minutes
2 minutes
30 seconds
2
Even the most experienced microscopist needs to examine each slide for at least 5 full minutes.
Oil immersion and focusing
ContentThe following are the measures to be kept in mind when adding immersion oil to the slide:
- Before adding immersion oil to the slide, ensure that the smear is facing upwards (Figure 1).
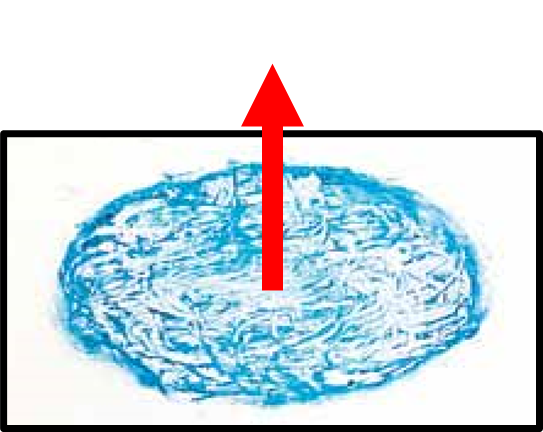
Figure 1: Slide should Face Upwards when Mounted on the Microscope Stage
- Add a drop of immersion oil, using the applicator (dropper bottle).
- The drop must fall freely onto the smear, so that the oil applicator does not touch the slide and get contaminated (Figure 2).
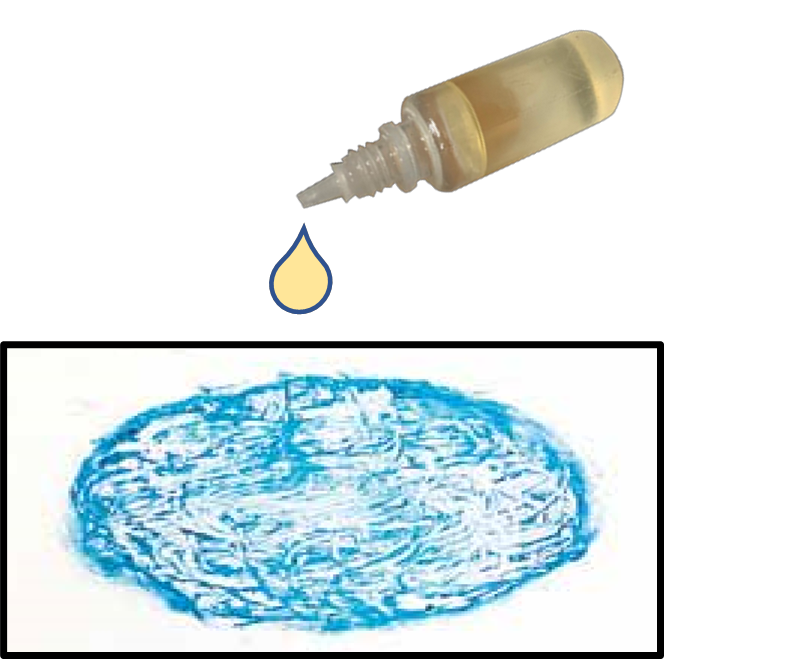
Figure 2: Oil Dropped onto Slide with an Applicator
- Mount the slide on the microscope and use the 10X objective lens to focus the smear, scan and look for mucoid material.
- Carefully rotate the 100X objective lens over the slide, adjust, sharp focus and observe under immersion oil.
Do’s and Don’ts:
- The 100X objective is the only lens requiring immersion oil.
- Keep the immersion oil away from other lenses.
- Use a good quality immersion oil.
- The immersion oil must have a medium viscosity and a refractive index (RI) greater than 1.5.
- Never allow the oil applicator to touch the slide.
- Do not use cedar wood oil diluted with xylene as it leaves a sticky residue on the lens and destroys the lens over time.
Resources
- Guidelines for Laboratory Consumables, Central TB Division, 2019.
- Laboratory Diagnosis of Tuberculosis by Sputum Microscopy, GLI Initiative.
Kindly provide your valuable feedback on the page to the link provided HERE
Reading a ZN stained smear
ContentImage
Resources
- AFB Microscopy Trainer Notes
- Module for Laboratory Technicians
- Laboratory diagnosis by sputum smear microscopy
Kindly provide your valuable feedback on the page to the link provided HERE
Reading a Fluorescent Stained slide
ContentSmears stained with the fluorescent dye, Auramine, are read with a Light Emitting Diode Fluorescence Microscope (LED-FM).
- The fluorescent-stained smears are to be read within 24 hours of staining in a dark room as the fluorescent stain fades on exposure to light.
- The slides are to be stored in the slide box to avoid exposure to light. Alternatively, they may be stored wrapped in brown or black paper and kept away from light.
- The slides should not be stored in a fridge as 4°C does not prevent or delay fading of fluorescent dye.
After fluorescent staining, smears are examined at much lower magnifications (typically 200x) than used for Ziehl Neelsen (ZN)-stained smears (1000x). Each field examined under fluorescence microscopy, therefore, has a larger area than that seen with bright field microscopy.
Examination Procedure
The steps include:
1. Switch on the LED-FM in a dark room.
2. Focus the stained slide using a 20x or 40x objective lens and view through the 10x eyepiece (magnification of 200x or 400x).
- Does not require the use of oil immersion.
3. Read smear in a linear pattern.
4. Count bacilli that appear as slender bright yellow fluorescent rods against a dark background in 30-50 fields. Rule out any artefact.
- For a trained and experienced Lab Technician (LT), each smear would take approximately 2 minutes for 30-50 fields or three horizontal sweeps.
Reporting Procedure
The smears are reported as negative/ scanty/ 1+/ 2+/ 3+ per the grading scale (Table).
Table: A Comparison between ZN (1000x) and FM (400x and 200x) for Grading of Smears at Different Magnifications
Result
1000 x magnification
1 length=100 HPF
400x magnification
1 length= 40 fields= 200 HPF
200x magnification
1 length=30 fields=300 HPF
Negative
Zero AFB/1 length
Zero AFB/1 length
Zero AFB/1 length
Scanty
1-9 AFB/1 length or 100 HPF
1-19 AFB/1 length
1-29 AFB/1 length
1+
10-99 AFB/1 length or 100 HPF
20-199 AFB/1 length
30-299 AFB/1 length
2+
1-10 AFB/1 HPF on average
5-50 AFB/1 HPF on average
10-100 AFB/1 field on average
3+
>10 AFB/1 HPF on average
>50 AFB/1 HPF on average
>100 AFB/1 field on average
Abbr: AFB: Acid Fast Bacilli; HPF: High Power Field
Resources
- Training Module (1-4) for Programme Managers and Medical Officers, NTEP, MoHFW, 2020.
- Manual for Sputum Smear Fluorescence Microscopy, RNTCP, MoHFW, 2007.
- Fading of Auramine-stained Mycobacterial Smears and Implications for External Quality Assurance.
Assessment
Question
Answer 1
Answer 2
Answer 3
Answer 4
Correct answer
Correct explanation
Page id
Part of Pre-test
Part of Post-test
Immersion oil is used to view fluorescent-stained smears.
True
False
2
Immersion oil is not required to view fluorescent-stained smears as they are observed with 20x or 40x objective lens.
Yes Yes Reporting and Recording results of Smear Microscopy (On paper)
ContentEach Designated Microscopic Center (DMC) needs to maintain a National TB Elimination Program TB (NTEP) Laboratory Register which collects information of all presumptive TB patients who undergo tests or confirmed patients who undergo follow-up tests.
- After doing the Acid-fast Bacilli (AFB) test, the laboratory technician needs to ensure that all the microscopy test results are entered against the name and the serial number of the presumptive/ confirmed TB patients.
- The result needs to be mentioned in terms of positive or negative test results along with the AFB grading.
- It is expected that the positive results are written in RED and negative in BLUE point pens.
- The AFB results can be mentioned for newly diagnosed TB patients for both spot as well as morning sample and must include the Nikshay ID of the patient as well as the test date and result.
- In case, the sample is repeated, the same is also mentioned.
- All the information also needs to be entered into NTEP Nikshay online application using a tablet or mobile phone.
- In a setting where Nucleic Acid Amplification Test (NAAT) is co-located, another sample needs to be tested for Rifampicin (Rif)-resistance and the same result also needs to be noted into the TB laboratory register.
- The performance of each laboratory is also entered into the monthly DMC extract called Annexure M which is consolidated for all DMCs by the concerned Senior TB Laboratory Supervisor (STLS).
- HIV and diabetes tests are also offered to each confirmed TB case and the details of the same are also part of the TB laboratory register.
- Patients who have been tested also need to be provided with the test results in a hard copy apart from the provision of information to the treating clinician of the health facility.
Resources
Kindly provide your valuable feedback on the page to the link provided HERE
Reporting results of Microscopy (Digitally)
ContentResults of Ziehl–Neelsen (ZN) and Fluorescence Microscopy (FM) are added to Nikshay Diagnostic Module. After a patient is registered, test details are added which then leads to the page to add details on sample type, facility and test results (Figures 1-6).
Features of Nikshay Diagnostic Module
- A simplified user workflow for adding and updating test requests and results.
- Tests can be added and all the added tests’ history is available.
- Ability to map samples to one or more tests within Nikshay.
- A “Workbench” view is available to provide a single interface to view/ print/ copy the Test Summary, Add/ View Sample Details and Update/ View Result details.

Figure 1: Nikshay Screenshot to Add Tests under Diagnostics Module.
To add results for ZN/FM, the test types either Microscopy ZN or Microscopy Fluorescence should be selected from the drop-down menu (Figure 2).

Figure 2: Nikshay Screenshot to Add Reasons for Test under Diagnostics Module.
In case of follow-up with ZN/FM Microscopy, the reason for follow-up should be selected (Figure 3).

Figure 3: Nikshay Screenshot to add Follow-up ZN/FM Microscopy Test under Diagnostics Module.

Figure 4: Nikshay Screenshot to add Test Type for ZN/FM Microscopy and Facility Details under Diagnostics Module.
Details on sample type and sample description (mucopurulent/ blood-stained/ saliva) are added (Figure 5).

Figure 5: Nikshay Screenshot to add Sample Details and Description for ZN/FM Microscopy under Diagnostics Module.
Under test results, as shown in Figure 6, details of lab serial number, sample number, test date, test reported date and final interpretation of results are added based on the selection from a drop-down menu that includes options for:
- Negative
- Positive (1+, 2+, 3+)
- Positive (Scanty 1-9)
Figure 6: Nikshay Screenshot to add Test Results for ZN/FM Microscopy under Diagnostics Module.
Resources
Assessment
Question
Answer 1
Answer 2
Answer 3
Answer 4
Correct answer
Correct explanation
Page id
Part of Pre-test
Part of Post-test
What sample descriptions are added in Nikshay for ZN/FM Microscopy under Diagnostics Module?
Mucopurulent
Blood-stained
Saliva
All of the above
4
Sample descriptions (mucopurulent/ blood-stained/ saliva) are added in Nikshay for ZN/FM Microscopy under Diagnostics Module.
Yes
Yes
Generating the DMC Laboratory Register from Nikshay
ContentThe DMC lab register can be generated from Nikshay as a spreadsheet and stored electronically or printed for paper records.
Steps for generating DMC Register from Nikshay:
- Login to Nikshay Reports using your login ID and password.
- Under Reports, click on ‘Patient wise List’ and select the option for ‘DMC Register’ (see screenshot below)


Figure: Screenshot of Nikshay Reports to generate DMC Register
A few filters need to be selected to generate the register.
- First is the geographic location (State/ District/ TU/PHI); most of these are preselected.
- This is followed by a selection of the period for which the register has to be generated. This includes selection of ‘Frequency’ (either monthly or annually)of the report and the month or quarter for which the report is required.
- Click on the ‘Generate Excel’ button and it will lead you to a page from which you can download the register.
Things to remember:
- You can generate a DMC register for facilities below your login level (e.g., a district can generate a DMC register of a TB Unit or DMC of the same district. and a State can generate a register for any District under it)
- The data included in the register is based on the "Date reported" of a test.
Video fileVideo: Steps to access the DMC Register in Ni-kshay
Resource
Assessment
Question Answer 1 Answer 2 Answer 3 Answer 4 Correct answer Correct explanation Page id Part of Pre-test Part of Post-test Where do you find the option to generate a DMC Register? In Nikshay under the "Admin" tab In Nikshay under the Others tab In Nikshay Reports under the "Patient wise List" tab In Nikshay Reports under the "Reports" tab 3 The option to generate a DMC Register is available under the Nikshay reports tab under the "Patient wise List" tab. Yes Yes Tuberculosis Laboratory Register
ContentThe Tuberculosis (TB) Laboratory Register is a paper-based recording register kept in all National TB Elimination Programme (NTEP) laboratories for recording details of diagnostic services offered to TB patients referred from both private and public health facilities.
The register is maintained in the Designated Microscopy Centre (DMC). It is the only register used for recording the details of specimen smear examinations. The Laboratory Technician (LT) is responsible for maintaining and updating the laboratory register.
There are two portions in the TB lab register and the table below shows the details captured in each portion.
Table: Pages and Information Covered in the TB Laboratory Register; Source: NTEP Training Module 2 for Programme Managers & Medical Officers
PORTION
DETAILS CONTAINED
Left-hand Portion
Lab serial number assigned by the LT
Date of the sample collection
Patient details such as name, sex, age, address, and contact number
Information on if the patient is from a key population
Referring health facility details
Reasons for examination
Right-hand Portion
Details on the type of specimen
Visual appearance results along with dates
Comorbidity status (HIV and Diabetes)
Details of drug susceptibility testing
Nikshay ID / Notification
Treatment initiation details
The last two columns are for the LT’s signature and remarks by the LT or supervisor
Important Points to Note
- Duplicate registers should not be maintained.
- LTs should ensure that the correct laboratory serial number is recorded.
- Laboratory serial number is given to the patient and not to the sample. A new number should be assigned to every presumptive TB case whose sputum is to be examined.
- All smear-positive (including scanty) results should be recorded in red ink.
- No over writing or manipulation in already entered data should be done.
The figure below shows the left-hand portion of the TB lab register. Click here to access the full form in the NTEP Training Module 2 for Programme Managers & Medical Officers, p. 219.
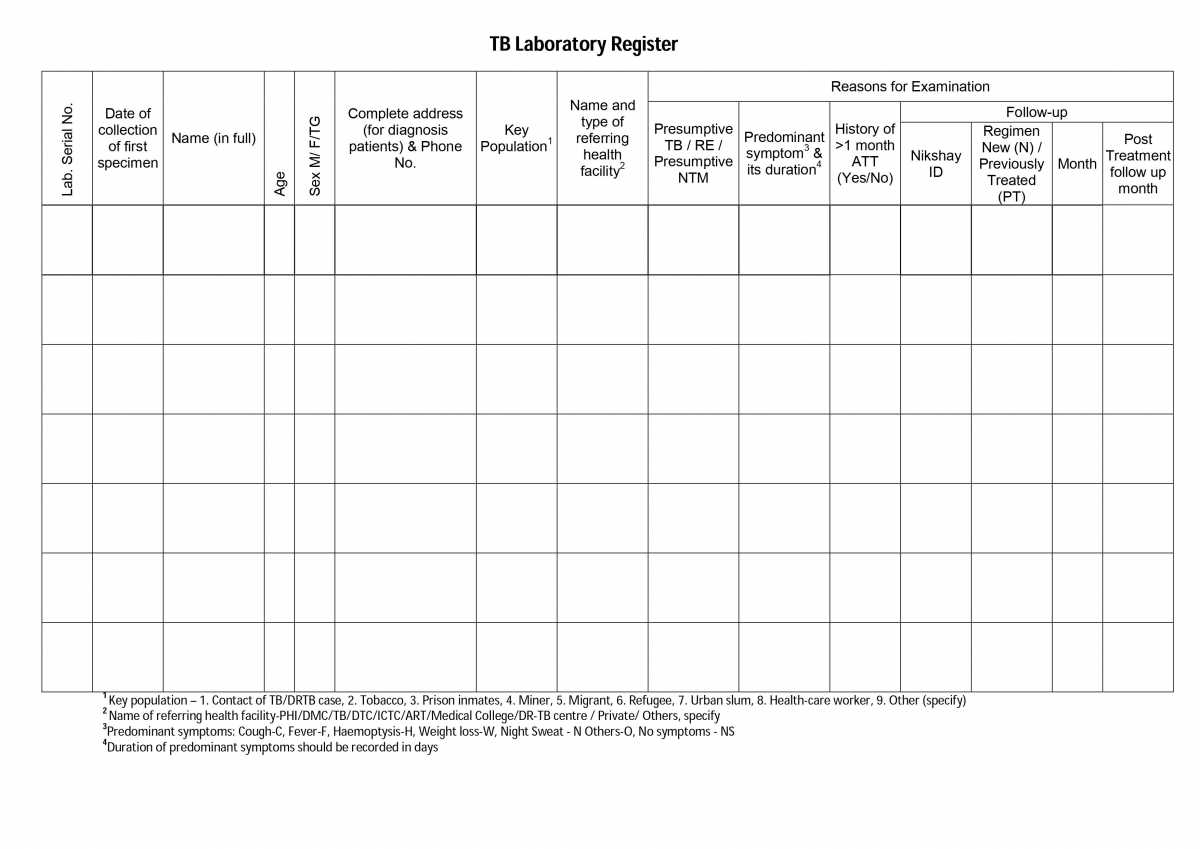
Figure: First Page of the TB Laboratory Register; Source: NTEP Training Modules 1-4 for Programme Managers & Medical Officers, p. 219
Resources
Kindly provide your valuable feedback on the page to the link provided HERE
-
CDST_LT: Maintenance of the microscope
FullscreenCleaning a Microscope
ContentRegular cleaning of microscope is essential to ensure that it is optimally functioning. Cleaning is important to remove dirt, lens immersion oil and ensure disinfection. It involves cleaning the lenses, the body, the stage of the microscope and the light source. The microscope needs to be cleaned daily and the lenses need to be cleaned after each use.
Materials used for cleaning:
- Lint free cloth
- Lens paper
- Lens cleaning solution
- 70% ethanol
- Detergent solution
Procedure for Cleaning Different Parts of the Microscope
- The eyepiece shades, stage, focusing knob and nose piece are commonly touched during microscope operation, so these parts and the body of the microscope must be cleaned first to remove any stains with a neutral detergent /solution recommended by the manufacturer.
- To clean the microscope eyepiece, objective lens, surfaces of the condenser and the light exit glass, moisten a lens paper with 1 to 2 drops of lens cleaning solution and clean the lens/ glass with a circular/spiral motion (as shown in the figure below).
- Dry with a clean, dry piece of lens paper.
- Use the Spiral Wiping Technique: Wipe from the center to the periphery in a circular motion.
- The oil immersion lens should be cleaned after each use to ensure that immersion oil is not left on the surface.
- The microscope surface and parts (except the lenses) need to be disinfected using 70% ethanol.

Figure: Cleaning of Lenses using the Spiral Wiping Technique. Source: How to Clean the Microscope
Important Considerations for Cleaning Microscopes
- Do not blow air to remove the dirt.
- Do not wipe the lens with an ordinary cloth. All the lenses should be cleaned with dry lens paper/lint-free cloth.
- Never use spirit or alcohol or xylene to clean the lenses as these can damage them.
- Avoid using organic solvents that may damage plastic parts.
- Whenever possible, use the cleaning fluid recommended by the manufacturer.
Video fileResources
- Laboratory Diagnosis of Tuberculosis by Sputum Smear Microscopy, GLI, 2013.
- Module for Laboratory Technicians, CTD, 2005.
- How to Clean and Sterilise Your Microscope, Olympus, Life Science Solutions, 2020.
Assessment
Question
Answer 1
Answer 2
Answer 3
Answer 4
Correct answer
Correct explanation
Page id
Part of Pre-test
Part of Post-test
The lenses of the microscope should be cleaned with 70% alcoholic solution.
True
False
2
Lenses should never be cleaned with alcoholic solution and should always be cleaned with lens solution and lens paper.
Yes
Yes
At what frequency should the lenses of a microscope be cleaned? After each use Daily Weekly Monthly 1 The oil immersion lens should be cleaned after each use to ensure that the immersion oil is not left on the surface. Yes Yes Storing a Microscope
ContentProper handling, maintenance and storage of the microscope are essential for proper functioning and life of the microscope.
The microscope should be placed and stored preferably in a box in a dry, dust-free and vibration-free environment, which is specially built in the laboratory (as shown in the figure below).

Figure: Storage of microscope in a wooden box; Source: Laboratory diagnosis by sputum smear microscopy
Important considerations for the storage of microscope
- When the microscope is not being used/ stored overnight, it should be covered or kept in a storage cupboard/box to keep it free from dust.
- Avoid exposing the microscope to direct sunlight.
- Avoid exposing the microscope to moisture as humidity may allow fungus to grow on the lens and cause rusting of the metal parts.
- The stored microscope must be kept warm with a light source to prevent growth of fungus. A bulb holder for a 15-watt bulb should be fixed on the rear wall of the storage cupboard, such that the microscope does not contact the bulb while storing or removing the microscope. The bulb should remain on when the microscope is stored inside the box
- An alternative may be to place plenty of dry blue silica gel into a shallow plate and place it in the box when the microscope is kept in it. Silica gel is blue in colour when it is dry, but when it becomes wet /absorbs moisture it turns pinkish. As soon as the silica gel becomes pink, it should be changed or heated until it turns blue again and then be reused.
Resources
Assessment
Question
Answer 1
Answer 2
Answer 3
Answer 4
Correct answer
Correct explanation
Page id
Part of Pre-test
Part of Post-test
Silica gel is blue in colour when it is dry.
True
False
1
Silica gel is blue in colour when it is dry.
Yes
Yes
Common issues with Microscope that require technical support
ContentRemovable parts in a microscope that need replacement include objectives, eyepieces, light bulbs, fuses. In case of repair/ technical support, only competent agency that handles maintenance of instruments should be contacted. Laboratory personnel should never attempt to dismantle any part of the microscope for repair.
Some of the common technical problems encountered, their likely causes and solutions are given in the table below.
Problems
Likely causes
Solutions
The viewing field is too dim
Condenser is too low
Condenser iris diaphragm is closedRaise condenser to correct its position
Open the diaphragm properlyDark shadows in the field that move as you turn the eyepiece
Surface of eyepiece is scratched
Eyepiece is dirtyReplace the eyepiece
Clean the eyepieceImage with the high-power objective is not clear
Slide is upside down
There is an air bubble in the oil
There is dirt on the objectiveTurn the slide over.
Move 100x lens quickly from side to side
Clean the lensImage with the low-power objective is not clear
There is oil on the lens
There is a layer of dust on the upper surface of the objectiveClean the lens
Mechanical stage is not moving, too stiff or does not stay up
Poor tension adjustment on the mechanical stage
Solidified lubricantsAdjust tension with adjustment knob
Needs serviceIn case, the viewing field is still dim and cloudy, consider the following possible causes and contact the competent personnel for cleaning/ repair:
- Massive growth of fungus on the lenses or prisms due to storage in a high-humidity environment
- Penetration of immersion oil between the lenses of the objective
- A damaged objective (as a result of careless focusing, dropping, rough changing of slides).
Video fileResources
1.
Module for Laboratory Technicians
2.
Laboratory diagnosis by sputum smear microscopy
Assessment
Question
Answer 1
Answer 2
Answer 3
Answer 4
Correct answer
Correct explanation
Page id
Part of Pre-test
Part of Post-test
What is the possible cause for dark shadows in the field?
The scratched eyepiece or dirty eyepiece
Broken lens
Solidified lubricants
Stage stuck
1
Dark shadows in field appear due to a scratched eyepiece or dirty eyepiece.
Yes
Yes
Annual Maintenance [AMC] of a Microscope
ContentThe binocular microscope requires considerable care in its use, regular cleaning, and protection from dust and fungal growth.
Annual maintenance of a microscope includes:
- Checking for broken or damaged parts and ensuring that the lenses, mirrors and other light-conducting surfaces are clean.
- Cleaning the lenses first for dirt with a blower brush, then wiping with lens solution on a lens paper/ 70% alcohol on the lens paper.
- Removing eyepieces or objectives from their fixation holes for cleaning.
- Properly cleaning the lower lens of the condenser after removal from its fixing.
- Cleaning the slide holder after removing from the mechanical stage.
- Cleaning for any deposition of immersion oil and fungal growth on the prisms in the binocular tube and eyepieces
- Changing electrical services including bulbs and fuses.
- Greasing/ lubrication of movable parts.
National Tuberculosis Elimination Programme (NTEP) has earmarked INR 2000 for Annual Maintenance [AMC] per binocular microscope including spare parts and repairs.
Resources
- Module for Laboratory Technicians.
- Laboratory diagnosis by sputum smear microscopy.
- Norms and Basis of Costing.
Assessment
Question
Answer 1
Answer 2
Answer 3
Answer 4
Correct answer
Correct explanation
Page id
Part of Pre-test
Part of Post-test
What is the AMC cost for each binocular microscope under NTEP?
INR 1000
INR 5000
INR 3000
INR 2000
4
NTEP has earmarked INR 2000 for Annual Maintenance (AMC) per binocular microscope, including spare parts and repairs.
Yes
Yes
-
CDST_LT: Maintaining supplies of lab consumables at the DMC
FullscreenConsumables required at a DMC
Content- Designated Microscopy Centres (DMCs) are the most peripheral laboratory under the National TB Elimination Programme (NTEP) network.
- Any person identified to be a presumptive TB patient is first referred to the nearest DMC for sputum examination or their sputum specimens are collected and transported to the DMC. Therefore, it is very important for the DMCs to maintain an adequate stock of reagents and other consumables.
- The Medical Officer (MO) of DMC is responsible for determining the number of reagents and other materials the DMC needs every month.
- The Senior Tuberculosis Laboratory Supervisor (STLS) ensures these supplies are distributed in a timely manner, as and when required.
- The Lab Technician (LT) is responsible for exhausting the old supplies before the new ones.
The consumables required at the DMC can be broadly categorised as:
- Consumables required for sputum collection
- Consumables required for slide preparation
- Consumables required for smear examination
- Consumables stationery
- Other
Table: List of Items with Technical Specifications of Laboratory Consumables Required for DMCs Sl. No. Name of the item Technical Specifications - For Sputum collection
Sputum containers Cups made of Special Medical Grade Polypropylene, thin plastic, translucent, diameter - 4 cm, capacity - 30 ml, the screwable cap should also be made of Special Medical Grade Polypropylene and should be airtight and leak-proof. Absorbent cotton 500 gms/roll Phenolic compound 5% phenol/ 40% phenolic compound (proprietary Phenyl) diluted to 5% Adhesive labels for sputum containers Sputum specimen transport box Insulated box, made of plastic 10” x 10” x 10”, thickness 1” with lid, handle and nylon belt 1” width 2.5 feet length, nylon strap of 1” width 2 feet length with velcro to strap the lid of the box from side to side. - For slide preparation
Slides for Microscopes Glass slides plain, size = 76mm x 26mm x 1.3mm, clean, scratch-free with smooth edges, uniform refractive index, pack of 50. Broomstick 10 cms in length and thick enough to make good smears. Diamond marker pencil 6" (15.24 cm.) holder with artificial diamond (hard stone) embedded at one end with a screw cap, to mark on microscope glass slides. Grease marking pencil Marking pencil MPS, blue or red coloured, 8" length, to write on glassware/ metal surfaces. Staining racks For drying the slides. Slide boxes for storing slides Glass (or metal) rods For holding slides during the staining process. Forceps, Chitel forceps Stainless steel for slides, 15 cm. Scissors 25 cm, stainless steel Ziehl Neelsen stain Auramine O fluorescent dye for Fluorescence Microscopy (FM) Wherever FM is being done Whatman filter paper No 1 3 ) For smear examination Binocular Microscope With 10x, 40x and oil immersion objective (100x) eyepieces (10x) and spare bulbs and fuses. Immersion oil Filter paper To drain the oil from the slides. Fine Silk and Lint cloth Lens paper For wiping the oil immersion lens after examination of each slide 4) Consumables - Stationery Request form for examination of biological specimen for sputum examination TB Laboratory Register Referral/ Transfer form for treatment Stock register – laboratory Marker pen 5 ) Other Plastic tumblers/ mugs Time (stop-watch) Spirit lamp or Bunsen burner Silica gel Hygroscopic agent to maintain the microscope in a moisture-free environment (to be placed in the cabinet for Binocular Microscope). Alcohol (absolute) Ethanol Cotton, full sleeves Aprons Disposable gloves 6 and 8 inches Methylated spirit Resources
- Training Module (1-4) for Program Managers and Medical Officers, NTEP, MoHFW, 2020.
- Guidelines for Quality Assurance of Smear Microscopy for Diagnosing Tuberculosis, RNTCP Lab Network, CTD, MoHFW, India, 2005.
- Module for Laboratory Technicians, CTD, MoHFW, India, 2005.
Assessment
Question Answer 1 Answer 2 Answer 3 Answer 4 Correct answer Correct explanation Page id Part of Pre-test Part of Post-test Sputum containers and their screwable cap used for sputum collection at the DMC should be made of Special Medical Grade Polypropylene and should be air-tight. True False 1 Sputum containers and their screwable cap used for sputum collection at the DMC should be made of Special Medical Grade Polypropylene and should be air-tight and leakproof. Yes Yes Who ensures that supplies are distributed in a timely manner at DMCs? Treatment Supporter Medical Officer Senior Tuberculosis Laboratory Supervisor (STLS) Lab Technician (LT) 3 The Senior Tuberculosis Laboratory Supervisor (STLS) ensures these supplies are distributed in a timely manner, as and when required.
Yes Yes Stock Register at a DMC
Content- Designated Microscopy Centres (DMCs) are the most peripheral laboratory under the National TB Elimination Programme (NTEP) network. Therefore, it is very important for the DMCs to maintain an adequate stock of all consumables.
- A paper-based stock register is maintained at the DMC and submitted as a part of the ‘Monthly report on programme management, logistics and microscopy’.
- All the DMCs as well as Peripheral Health Institute (PHI) that are a DMC need to fill the second part of this monthly report format for reporting the status of laboratory consumables and equipment (Figure below).

Figure: Monthly report format for reporting status of laboratory consumables and equipment, to be filled by PHI that is DMC.
- The stock register for consumables at the DMC has the provision to enter the information about the stock of consumables that are available at the DMC on the first day of the month, stock received and consumed during the month and stock remaining on the last day of the month along with the requested quantity of new stock.
- The Lab Technician (LT) of the DMC is responsible for exhausting the old supplies before the new ones.
- The Medical Officer (MO) of the DMC is responsible for determining the stocks and the Senior Tuberculosis Lab Supervisor (STLS) should ensure these supplies are distributed in a timely manner, as and when required.
Table: Calculation of Stocks Required at the DMC
Sputum containers For diagnosis:
- During the first week of each quarter, the number of new smear-positive cases registered and treated during the last quarter should be determined and this number should be multiplied by 10.
- Ten is the average number of symptomatic required to be examined for detecting one case of new pulmonary smear-positive tuberculosis.
- Since two sputum specimens are taken for each symptomatic patient, further multiply the number obtained above by 2.
For follow-up:
- Two follow-up specimens are taken for the majority of patients - one at the end of the intensive phase and the other at the end of treatment. One sputum container is needed for each follow-up.
- Once the number of sputum containers required has been calculated, allow sufficient reserve stock for three months, add 10% to account for wastage of sputum containers, and account for the sputum containers in stock.
- On the last working day of the quarter, count the number of sputum containers in stock and subtract from that needed for diagnosis and follow-up examinations as calculated above.
Slides - Once the number of sputum containers needed for the next quarter is determined, order a slightly higher number of slides than the required no. of sputum containers to account for unavoidable breakage of slides.
Reagents - Reagents are supplied to the DMCs on monthly basis by the District TB Centre (DTC).
- The stock register should have the mention of expiry dates of the reagents and the first expiring reagents must be exhausted first based on the First Expiry First Out (FEFO) principle.
- The reagents should not be used beyond three months from the date of preparation.
CBNAAT/ Truenat Machines and Cartridges/ Chips
- These are procured centrally and supplied to state/ district/ sites based on their requirement.
- Recording, reporting and monitoring of cartridges/ chips is done through Nikshay-Aushadhi and they are supplied based on the stock availability, consumption and expected case load.
Binocular Microscopes (BM) and LED Fluorescence Microscopes (FM) - 1 BM is required for every DMC.
- The no. of BM in place and no. of BM in working condition should be reported in the stock register.
- LED FM is supplied to the high case load facilities where the workload is more than 25 slides per day.
Tuberculosis Laboratory Register - Each TB lab register allows for the registration of at least 2000 patients.
- For each lakh population, 75 smear-positive patients are projected, requiring the examination of 750 patients (thrice each). Additional follow-up examinations will bring the number of registers needed to approximately one lab register/ lakh.
- If there are blank pages in the register at the end of a year, it can be used the following year. However, every year should be started on a new page.
Laboratory Form for Sputum Examination - For diagnosis, approximately 10 laboratory forms for sputum examination are needed. (10 is the average number of symptomatic for each case of pulmonary smear-positive tuberculosis identified).
- For follow-up, approximately 0.2 laboratory forms for sputum examination are needed for each pulmonary tuberculosis case. (1 out of 10 examined will be smear-positive, each needs two forms for follow-up. When calculated, out of 10 it will be 0.2)
Resources
- Training Modules (1-4) for Programme Managers and Medical Officers, CTD, MoHFW, GoI, 2020.
- Module for STS Part 2: Ensuring Proper Registration and Reporting. CTD, MoHFW, India.
Assessment
Question Answer 1 Answer 2 Answer 3 Answer 4 Correct answer Correct explanation Page id Part of Pre-test Part of Post-test How many TB Laboratory Register/s is/are required in one year for each DMC? 1 2 3 4 1 Each Tuberculosis Laboratory Register allows for the registration of at least 2000 patients. For each lakh, 75 smear-positive patients are projected, requiring the examination of 750 patients (thrice each). Additional follow-up examinations will bring the number of registers needed to approximately one lab register/ DMC. Yes Yes For follow-up, approximately 0.2 laboratory forms for sputum examination are needed for each pulmonary tuberculosis case.
True False 1 For diagnosis, approximately 10 laboratory forms for sputum examination are needed. 10 is the average number of symptomatic for each case of pulmonary smear-positive tuberculosis identified. 1 out of 10 examined will be smear-positive, each needs two forms for follow-up. When calculated, out of 10 it will be 0.2
Yes
Yes
Indenting Supplies at a DMC
ContentThe Medical Officer (MO) of Designated Microscopy Centre (DMC) is responsible for determining the amount of reagents and other materials the DMC needs every month.
The Senior TB Laboratory Supervisor (STLS) will make sure these supplies are distributed in a timely manner, usually on a monthly basis or as and when required.
- STLS place an order for DMC reagents and consumable four times a year based on the approximate number of sputum specimens the laboratory examined in the previous quarter.
- The STLS should order the sputum containers during the first week of the quarter so that the health units and microscopy laboratories have enough sputum containers to collect sputum specimens and the microscopy laboratories have enough slides to conduct sputum smear examinations.
The calculation of reagents/ consumables required for examination of 3000 smears is shown in Table 1.
Reagents/ Equipment for staining
Quantity
Binocular microscope with 10x, 40x and oil immersion objective (100x) eyepieces (10x) and spare bulbs and fuses
At least 1 per DMC
Plastic disposable sputum containers
3,300
Slides for microscope, 25*75 mm, 1.1 mm-1.3 mm Thick
3,300
Broom stick 10 cms length
3,300
Diamond marker pencil
3 number
Timer, 30 or 60 minutes
1 number
Forceps, Chitel forceps stainless steel for slides 15 cm
1 number
Scissors, 25 cm stainless steel
1 number
Slide rack, Staining slide rod of metal or plastic or glass for 12 slides
2 numbers
Slide boxes, For 100 slides
33 boxes + 2 per DMC for RBRC
Tissue rolls
4 numbers
Marker pen
12
Absorbent cotton, 500 gms/ roll
4 numbers (2 k.g)
Pressure cooker, For disposal by autoclaving
Optional
Phenol with concentration mentioned on the bottle
80 litres
Methylated spirit
3 litres
Cotton, full sleeves aprons
2
Disposable gloves, 6 and 8 inches (box of 25 pairs)
12 boxes
Spirit lamp with wicks
1 number
Metal wire, for swab for heating Carbol fuchsin
1 number
Sputum specimen transport box, Insulated box, made of plastic 10” x 10” x 10”, thickness 1” with lid, handle and nylon belt 1” width 2.5 feet length, nylon strap of 1” width 2 feet length with Velcro to strap the lid of the box from side to side.
2 numbers
Table 1: Calculation of Consumables Required at DMC for Examination of 3000 Smears; Source: Training Modules for Programme Managers and Medical Officers
- The monthly report on Programme Management, Logistics and Microscopy at the Peripheral Health Institution (PHI) level are filled by DMCs which are PHI as shown in Table 2.
Laboratory Consumables (To be filled in by only PHIs which are a DMC)
Item
Unit of Measurement
Stock on first day of Month
Stock received during Month
Consumption during Month
Stock on last day of Month
Quantity requested
Sputum containers*
Nos.
Universal containers for C & DST
Nos
Slides
Nos.
Carbol Fuchsin (1% solution)
Litres
Methylene Blue (0.1% solution)
Litres
Sulphuric Acid (25% solution)
Litres
Phenolic solution(for disinfection-~40% pure solution)
Litres
Immersion oil/Liquid Paraffin (Heavy)
mL
Methylated Spirit
Litres
* PHIs that are not a DMC, but have been supplied with sputum containers, should complete this row.
Table 2: Request for Laboratory Consumables and Reagents in monthly reports from PHI which are DMCs; Source: Monthly Report on Programme Management, Logistics and Microscopy Peripheral Health Institution Level
- The DMC reagents and consumables are budgeted in the District Annual Action Plan under laboratory materials as per the amount permissible based on District Performance in the last four quarters.
- Procurement planned during a financial year is based on last year’s specimen processed/ slides examined and amount spent for purchase of lab material for smear microscopy.
Resources
- Training Modules for Programme Managers and Medical Officers.
- Monthly Report on Programme Management, Logistics and Microscopy
Peripheral Health Institution Level (https://tbcindia.gov.in/showfile.php?lid=3055)
Assessment
Question
Answer 1
Answer 2
Answer 3
Answer 4
Correct answer
Correct explanation
Page id
Part of Pre-test
Part of Post-test
The MO of the DMC is responsible for determining the amount of reagents and other materials the DMC needs every month.
True
False
1
The MO of DMC is responsible for determining the amount of reagents and other materials the DMC needs every month.
Yes
Yes
Preparation of Reagents for ZN Microscopy
ContentThe National TB Elimination Program (NTEP) recommends freshly preparing reagents from commercial procured products, at the District TB units to be used for microscopy. Chemicals need to be carefully monitored for potency and the calculation needs to be accurate while preparing reagents for smear microscopy.
For Preparing 1% Carbol Fuchsin (500ml): The required chemicals and materials for preparing 500 ml Carbol Fuchsin are:
1. Basic Fuchsin
- Chemical name: Pararosaniline hydrochloride
- Chemical structure: C19H18N3Cl
- Molecular Wt: 323.8
- Colour: Metallic green
Potency correction factor: Note down the dye content – this should be available on the container. The dye content should be approximately 85% - 88%. To calculate the required amount of basic fuchsin, divide the actual amount required by the dye content. For example: dye content = 85%, actual amount required = 5gms, required amount of dye = 5/0.85 = 5.88 gms.
2. Ethyl Alcohol: 50 ml (Absolute alcohol, purity must be 98-100%)
3. Carbolic acid crystals (Phenol): 25 gms
- Chemical name: Phenol
- Chemical structure: C6H5OH
- Molecular Wt: 94.11
- Melting point: 40°C+2.5
4. Distilled purified water: 500 ml
Steps for Preparing 1% Carbol Fuchsin (500ml)
- Add 25 gms of phenolic crystals to a conical flask
- Add 50ml ethanol
- Mix well until the crystals completely dissolves. Add 50 ml distilled water if required.
- Conical flask should be kept in water bath set at 60°C or in a trough containing warm water
- Weigh required amount of basic fuchsin powder and transfer it into a conical flask
- Mix well until the crystals dissolve well.
- Make the total volume to 500ml by adding distilled water
- Filter using Whattman filter paper and transfer into a bottle
- Label as 1% Carbol Fuchsin - Primary stain
- Date of preparation, date of expiry, batch no. and the name of the technician or STLS who has prepared the stain should be clearly mentioned on the bottle.
- Store it in cool place, away from direct sunlight
- Any time particles start to form in the Carbol Fuchsin solution, the solution must be filtered again
For Preparing 25% Sulphuric Acid (500ml):
- Chemical structure: H2SO4
- Molecular wt: 98.08
- Purity: 95-97%
- Colour: Clear
- Measure 375ml distil water into a 1L flask
- In a glass cylinder, measure 125ml concentrated Sulphuric Acid. Pour it slowly and gently into the conical flask containing distilled water. Note: Always add acid to water. Never add water to acid
- To dissipate the heat generated, place the flask in a trough of water
- Mix well
- Allow to cool
- Transfer into a bottle
- Label as 25% Sulphuric Acid - Decolorizing Solution
- Date of preparation, date of expiry, batch no. and the name of the technician or STLS who has prepared the solution should be clearly mentioned on the bottle.
For preparing 0.1% Methylene Blue (500ml):
- Chemical name: Methylthionine chloride
- Chemical structure: C16H18ClN3S
- Molecular Wt: 319.9
Potency correction factor: Note down the dye content – this should be available on the container. The dye content should be approximately 82%. To calculate the required amount of methylene blue, divide the actual amount by the dye content. For example: dye content = 82%, actual amount required = 0.5gms, required amount of dye = 0.5/0.82 = 0.61 gms.
- Weigh the required amount of Methylene Blue
- Dissolve it in 500ml distilled water
- Transfer into a bottle
- Label as 0.1% Methylene Blue
- Date of preparation, date of expiry, batch no. and the name of the person who prepared the solution should be clearly written on the bottle.
Table: Preparation of different volumes of stains for ZN microscopy
Ziehl-Neelsen method
Quantity of reagent for 5L
Quantity of reagent for 1L
Quantity of reagent for 500 ml
Quantity of regent for 100 ml
Basic fuchsin (dye content/purity if 85%)
58.8 g
11.76 g
5.88 g
1.17 g
Alcohol
500 ml
100 ml
50 ml
10 ml
Phenol crystals
250 g
50 g
25 g
5 g
Distilled water
To make final volume 5000 ml
To make final volume 1000 ml
To make final volume 500 ml
To make final volume 100 ml
Carbol-fuchsin 1%
Sulfuric acid
1250 ml
250 ml
125 ml
25 ml
Distilled water
3750 ml
750 ml
375 ml
75 ml
H2SO4 25%
Methylene blue (dye content if 82%)
6.1 g
1.22 g
0.61 g
0.12 g
Distilled water
5000 ml
1000 ml
500 ml
100 ml
Methylene blue 0.1%
Always perform a quality check of the reagents prepared by using Quality Control Positive and Quality Control Negative. If purity is not available on the reagent bottle, then search the website of the company of which the reagent was procured or ask the company about the certificate mentioning about the purity of reagent
Please watch the video below for more information:
Video fileResources
- Module for Laboratory Technicians (RNTCP), Central TB Division, MoHFW, 2005
- TB Lab Consumables Specifications 2019
- SoP for preparation of Laboratory Reagents - WHO
- Laboratory Diagnosis of Tuberculosis by Sputum Microscopy, GLI Initiative
Kindly provide your valuable feedback on the page to the link provided HERE
Preparation of Reagents for FM Microscopy
ContentReagent preparation is an important activity and it’s essential to use certified chemicals and reagents. One should always check the potency of the chemicals used and calculate the amount to be weighed accordingly.
The following are the steps for reagent (primary stain and counter stain) preparation for Florescence Microscopy:
0.1% Auramine–O (1 L), the primary stain
- Weigh 1 gm Auramine–O and transfer to conical flask.
- Add 30 gm Phenolic crystals (99.5% purity) and mix well.
- Add 100 ml absolute Ethanol (98-100% purity) and mix well.
- Add 870 ml distilled water to make up final volume of 1 L.
- Filter and transfer to amber bottle.
- Label the bottle as 0.1% Auramine–O.
- Date of preparation, date of expiry, batch no. and name of the Senior TB Lab Supervisor (STLS) who has prepared the stain should be clearly mentioned on the bottle.
1% Acid Alcohol (1 L) to decolorize
- Dissolve 5 gm Sodium chloride in 250 ml distilled water.
- Add 5 ml concentrated hydrochloric acid.
- Mix with 750 ml absolute alcohol.
- Always add acid slowly to alcohol, not vice-versa.
- Store in amber coloured bottle.
- Label the bottle as 1% Acid Alcohol.
- Date of preparation, date of expiry, batch no. and name of the STLS who has prepared the stain should be clearly mentioned on the bottle.
0.5% Potassium Permanganate, KMnO₄ (1 L), the counter stain
- Weigh 5 gm of Potassium permanganate (99.5% purity).
- Transfer to a conical flask.
- Take 1 L of distilled water.
- Add small amounts of distilled water tothe conical flask containing KMnO₄ and mix well.
- Add the remaining distilled water to make up final volume of 1 L.
- Filter and transfer to a bottle.
- Label the bottle as 0.5% Potassium permanganate.
- Date of preparation, date of expiry, batch no. and name of the STLS who has prepared the stain should be clearly mentioned on the bottle.
Table: Preparation of Different Volumes of Stains for FM Microscopy
AURAMINE METHOD
QUANTITY OF REAGENT FOR 5 L
QUANTITY OF REAGENT FOR 1 L
QUANTITY OF REAGENT FOR 500 ML
QUANTITY OF REAGENT FOR 100 ML
Auramine
Ethanol
Phenol
Distilled water
0.1% Auramine
5.0 g
500 ml
150.0 g
To make final volume 5000 ml
1.0 g
100 ml
30.0 g
To make final volume 1000 ml
0.5 g
50 ml
15.0 g
To make final volume 500 ml
0.1 g
10 ml
3.0 g
To make final volume 100 ml
Hydrochloric acid
Sodium chloride
Ethanol
Distilled water
1% Acid–alcohol
25 ml
25.0 g
3750 ml
1250 ml
5 ml
5.0 g
750 ml
250 ml
2.5 ml
2.5 g
375 ml
125 ml
0.5 ml
0.5 g
75 ml
25 ml
Potassium permanganate
Distilled water
0.1% Potassium permanganate
25.0 g
5000 ml
5.0 g
1000 ml
2.5 g
500 ml
0.5 g
100 ml
Video fileResources
Kindly provide your valuable feedback on the page to the link provided HERE
-
-
CDST_LT-M5: Ensuring quality microscopy
Fullscreen-
CDST_LT: General concepts in quality assurance
FullscreenStoring slides at a DMC for QA
ContentIt is important to store slides, after reading as these will be required for Quality assurance - internal rechecking by the supervisor, and for External Quality Assurance (EQA) as per National TB Elimination Programme (NTEP) guidelines.
- Prior to storage slides need to be dried by gently placing the slide gently face down on the tissue paper or by wrapping it in the tissue paper and leaving it overnight to remove excess oil (Figure 1).
Figure 1: Using Tissue Paper to Drain Oil
- The slides are to be stored in the slide box in the same order as they are listed in the laboratory register (Figure 2).
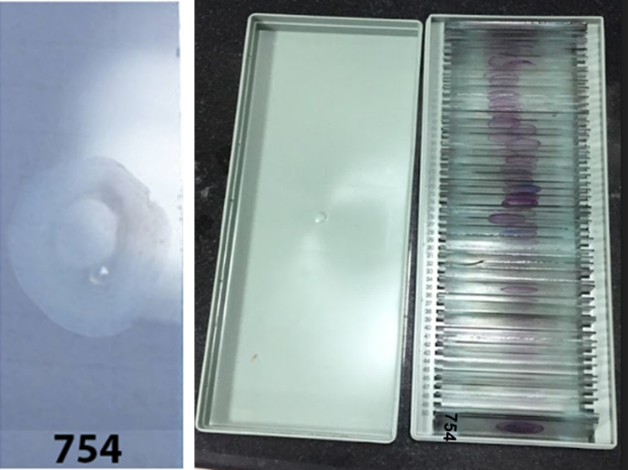
Figure 2: Keeping the Slides in Same Order as Listed in the Laboratory Register
- One blank place must be left behind the first slide from a patient suspected with TB this allows the second slide of the same patient to be added after reading. This process will keep results consistent with the laboratory register (Figure 3).
Figure 3: Keeping Blank Spaces Between Slides for Consistency
- Always store slides in closed slide boxes away from sunlight (Figure 4).
Figure 4: Storing Slides in Closed Slide Boxes

Resources
- Manual for Sputum Smear Fluorescence Microscopy, RNTCP, MoHFW, 2007.
- Laboratory Diagnosis of Tuberculosis by Sputum Microscopy, GLI Initiative.
Kindly provide your valuable feedback on the page to the link provided HERE
False Positivity and False Negativity in Microscopy
ContentFalse result: It’s a situation where the test result is different from the truth.
Types of False Results
- False Positive: When the test result is positive but the patient does not have TB.
- False Negative: When the test result is negative but the patient has TB.
Both cases will lead to wrong categorization and incorrect treatment. The consequences of false results are shown in the figure below:
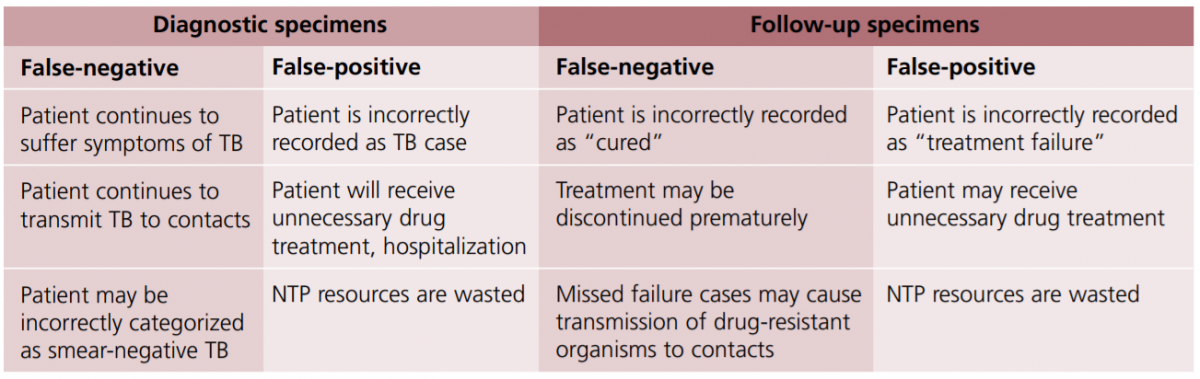
Figure: Consequences of False Results in Sputum Smear Microscopy; Source: Quality Assurance of Sputum Microscopy in DOTS Programmes.
Resources
- RNTCP Module for Laboratory Technicians, CTD, MoHFW, 2005.
- Quality Assurance of Sputum Microscopy in DOTS Programmes Regional Guidelines for Countries in the Western Pacific, WHO, 2003.
Kindly provide your valuable feedback on the page to the link provided HERE
Prevention of False Positive Results During Smear Microscopy
ContentFalse positive results can be prevented by using the following measures:
- Always use new, unscratched slides.
- Use a separate broomstick for each sample.
- Always use filtered Carbol fuchsin.
- Do not allow the Carbol fuchsin to dry during staining.
- Decolorize adequately with Sulphuric acid.
- Make sure that there are no food particles or fibers in the sputum sample.
- Never allow the oil immersion applicator to touch a slide.
- Label sputum containers, slides and laboratory forms accurately.
- Cross-check the number on the laboratory form and sputum container before recording.
- Record and report the results accurately.
Resources
Kindly provide your valuable feedback on the page to the link provided HERE
Prevention of False Negative Results During Smear Microscopy
ContentTo prevent false negative results during smear microscopy, each laboratory technician needs to:
- Make sure that the sample contains sputum, not just saliva.
- Make sure there is enough sputum (at least 2-5 ml).
- Select thick, purulent particles to make the smear.
- Prepare smears correctly - not too thick, not too thin or not too little material.
- Fix the slide for the correct length of the time, not too short or too long.
- Stain with Carbol fuchsin for full five minutes.
- Do not decolorize with Sulphuric acid too intensively.
- Examine every smear for at least five minutes and full 100 fields before recording it as negative.
- Label the sputum containers, slides and laboratory forms carefully.
- Cross check the number on the laboratory form and sputum container before recording.
- Record and report the results accurately.
Resources
Kindly provide your valuable feedback on the page to the link provided HERE
Need for Quality Testing and Control
ContentQuality Assurance (QA) is a systematic process used to determine the quality standards of TB laboratories.
Poor quality diagnosis may results in failure to diagnose TB or unnecessary treatment of non-TB case. Thus an effective QA mechanism is important for reliability of laboratory diagnosis.
QA in National Tuberculosis Elimination Programme (NTEP) consists of:
- Internal Quality Control (QC)
- External Quality Assessment (EQA)
- Continuous Quality Improvement (QI)
QC or Internal Quality Assurance is a systematic internal monitoring of working practices, technical procedures, checking equipment, new lot of reagents, smear preparation, grading etc
EQA is a process to assess laboratory performance by comparing laboratory results with a laboratory in higher tier i.e.Intermediate Reference Laboratory (IRL)/ National Reference Laboratory (NRL) through on-site evaluation, panel testing and random blinded rechecking of slides. Figure 1 depicts an eg of on-site evaluation with roles of various stakeholders and frequency of this activity.

Figure 1: On-site evaluation (RNTCP Laboratory Network Guidelines)
QI is continuous monitoring of laboratory performance, finding non compliance and taking remedial measures to prevent recurrence of problems
Resources
Assessment
Question
Answer 1
Answer 2
Answer 3
Answer 4
Correct answer
Correct explanation
Page id
Part of Pre-test
Part of Post-test
Quality Improvement mostly relies on effective on-site evaluation visits?
True
False
1
Quality Improvement mostly relies on effective on-site evaluation visits.
Yes
Yes
Measures for Quality Assurance in Microscopy
ContentSputum smear microscopy is an integral part of the National TB Elimination Programme's (NTEP’s) diagnostic services and can majorly impact the success of the programme.
It is essential to have a credible and well-established quality assurance system to assess the performance of the microscopy service.
NTEP has implemented a multi-level quality assurance network system of sputum smear microscopy in the country consisting of:
- Internal Quality Control (IQC)
- External Quality Assessment (EQA)
- Quality Improvement (QI)
- Internal Quality Control is a process of effective and systematic internal monitoring of the working practices.
- It includes technical procedures, checking instruments, quality of new batches of staining solution, smear preparation, grading, equipment infection control measures, waste management, etc.
- For the purpose of IQC, it should be ensured that all staining reagents’ dye content is mentioned on the bottle, concentrated acids are stored carefully in separate containers and stains are filtered before use.
- Further, after each new batch of reagents is made, Quality Control Positive (QCP) and Quality Control Negative (QCN) slides should be prepared by the Senior TB Lab Supervisor (STLS) for quality control.
- QCP slides should be prepared by pooling 3+ grade sputum samples, while QCN slides are to be prepared by pooling negative sputum samples with an adequate number of pus cells (≥10 pus cells/ field).
- One set of QCP-QCN slides should be stained by STLS and another set should be given to the Designated Microscopic Centre (DMC) Lab Technician (LT) along with the reagent, and the results of both should be entered in the batch register/ IQC document.
- All quality control slides should be stored for a maximum period of Four months. For the microscope, the lens should be cleaned with tissue paper after examining each slide and stored inside a microscope box at the end of the day.
- The microscope box should contain silica gel and an electric bulb of 10-15 watts for desiccation to prevent fungal growth on the lens. The silica gel should be dehydrated periodically under direct sunlight. All microscopes should be covered under the Annual Maintenance Contract (AMC) with routine preventive maintenance.
- External Quality Assessment (EQA) is a process to assess the performance of the peripheral laboratories by a more competent laboratory, like the intermediate or the national reference laboratory.
- EQA has 3 components:
1) Onsite evaluation of peripheral laboratories by the supervisors from the reference laboratory under actual working conditions, in order to review the internal quality control mechanisms in place.
2) Panel testing of the slides (unstained and stained) received from the reference laboratory by the peripheral laboratory LT to evaluate the smear microscopy process. This helps to determine whether the LT can adequately perform Acid-fast Bacilli (AFB) smear microscopy.
3) Random blinded re-checking of a small sample of routine slides (both positive and negative) in the peripheral laboratory by the reference laboratory to assess the accuracy of the reading.
- Quality Improvement (QI) is a process by which all components of smear microscopy diagnostic services are continuously monitored and carefully analysed with the aim to identify the problems and implement corrective actions (including retraining) to prevent the recurrence of the problems.
Resources
- Training Module (1-4) for Program Managers and Medical Officers, NTEP, MoHFW, 2020.
- Guidelines for Quality Assurance of Smear Microscopy for Diagnosing Tuberculosis, RNTCP Lab Network, CTD, MoHFW, India, 2005.
Assessment
Question Answer 1 Answer 2 Answer 3 Answer 4 Correct answer Correct explanation Page id Part of Pre-test Part of Post-test Which of these is systematic internal monitoring of working practices that includes technical procedures, staining solution, smear preparation, grading, equipment infection control measures and waste management? Onsite evaluative (OSE) External Quality Assessment (EQA) Internal Quality Control (IQC) Quality Improvement (QI) Internal Quality Control (IQC) Internal Quality Control (IQC) is systematic internal monitoring of working practices that includes technical procedures, staining solution, smear preparation, grading, equipment infection control measures and waste management. Yes Yes Quality control slides should be stored for a maximum period of how many months? 3 6 5 2 1 All quality control slides should be stored for a maximum period of three months.
Yes
Yes
-
CDST_LT: External quality assurance
FullscreenExternal Quality Assurance [EQA] for Microscopy
ContentEnsuring accurate sputum microscopy results is paramount to maintain optimal sensitivity and specificity of sputum microscopy.
In this regard, External Quality Assurance (EQA) is an important aspect of the National TB Elimination Programme (NTEP) Laboratory Network. Different levels of EQA activities are undertaken to ensure that the system follows a standard protocol and remains efficient. The timely completion of EQA activities is important.
The EQA activities are interlinked and together (from National Reference Laboratory (NRL) to Tuberculosis Units (TUs)) give a proper output adequately ensuring accurate microscopic examination of sputum at the Designated Microscopy Centres (DMCs).
- The EQA related activities of NRLs: This EQA ensures that the Intermediate Reference Laboratory (IRL) team maintains proficiency to carry on EQA of districts.
- On-site evaluation of State TB Training and Demonstration Center (STDC)/ Intermediate Reference Laboratory (IRL)
- Manufacture of panel testing slides and panel testing of STDC/ IRL lab staff
- Training of STDC supervisory staff in:
- On-site evaluation of Senior TB Laboratory Supervisors (STLS)
- Manufacture of panel slides
- Assessment of blinded re-checking of DMC slides at District TB Center (DTC)
- Facilitating the training of STLS for EQA
- Re-training of STDC/ IRL supervisory staff, if required
- Prompt reporting of the results of activities and feedback to State TB Officer/ Deputy Director General TB
- The EQA related activities of STDC/ IRL labs: This is an ongoing process to train/retrain and maintain proficiencies of STLSs, District TB Officers (DTO) and Medical Officer - TB Control (MO-TC) to carry on EQA of DMCs.
- Training of EQA for STLS, DTO, MO-TC
- On-site evaluation of DTC labs and a sample DMCs
- Manufacture of Panel testing slides and panel testing of DTC lab supervisors, including all STLS of the district
- Re-training of DTC LT/ STLS, if required
- Prompt reporting the results of activities by Director STDC/ IRL to STO, Central TB Division (CTD) & NRL
- The EQA related activities of the DTC/ TB Unit: This is an ongoing monthly activity, to ensure proper proficiency of Laboratory Technicians (LTs) at DMCs to carry out sputum microscopy.
- On-site evaluation of DMC labs
- Unblinded re-checking of DMC slides at DMC
- Random Blinded Re-checking (RBRC) of DMC slides at DTC
- Prompt reporting of the results of activities to LT and Medical Officer of DMC as well as STDC/ IRL
- Panel testing and re-training of DMC LTs, if required
Data collection, analysis and problem-solving are key components of this process.
Figure: Structure and Functions of EQA
Resources
Kindly provide your valuable feedback on the page to the link provided HERE
- The EQA related activities of NRLs: This EQA ensures that the Intermediate Reference Laboratory (IRL) team maintains proficiency to carry on EQA of districts.
EQA for Fluorescent Microscopy [FM]
ContentThe External Quality Assessment (EQA) for Fluorescent Microscopy (FM) follows the same basic principles as for sputum smear microscopy using Ziehl-Neelsen (ZN) staining:
- On-site Evaluation (OSE)
- Panel Testing
- Random Blinded Re-checking
Differences between EQA for FM and sputum smear stained by ZN method:
- The stained slides for FM are stored in the dark as fluorescence is prone to fading over time.
- The slides for FM are viewed under 40X without use of immersion oil.
- Acid-fast bacilli appear bright yellow against the dark background in FM.
During the OSE visit, the Senior Laboratory Supervisor (STLS) will cross check all positive smears and selected negative smears.
Resources
Kindly provide your valuable feedback on the page to the link provided HERE
Sputum Smear Microscopy: Use of Quality Control Slide- QCP and QCN
ContentOne of the methods for internal monitoring of the quality of the microscopy process is the use of Quality Control (QC) slides.
QC is a systematic internal monitoring of working practices, technical procedures, equipment and materials, including quality of stains.
Quality Control Positive (QCP) and Quality Control Negative (QCN) slides are used for sputum smear microscopy quality monitoring.
Process for quality control using QCP and QCN is as follows:
- Senior Tuberculosis Laboratory Supervisor (STLS) prepares QCP & QCN slides.
- Preparation of QCP - QCP slides have to be prepared by pooling 3+ grade sputum samples.
- Preparation of QCN - QCN slides have to be prepared by pooling Negative sputum samples with an adequate number of pus cells (approximately 20 cells/field).
- While preparing each new batch of staining reagent, STLS has to use one set of QCP & QCN and its entry needs to be made in the batch register (an Internal Quality Control (IQC) document).
- STLS will supply one set of QCP & QCN to the Designated Microscopy Centre (DMC) Laboratory Technician (LT) along with each batch of reagent. The DMC LT has to stain and examine the QCP & QCN slides and enter the results in the IQC document.
- All QC slides needs to be stored for three months.
QC slides are used in the following ways:
- A set of one QCP and one QCN is used for monitoring the quality of a new batch of reagents prepared by the STLS.
- A set of one QCP and one QCN is used for a new batch of reagents prepared, by the LT at the Culture and Drug Sensitivity Testing (C&DST) laboratory.
- A set of one QCP and one QCN is also supplied to DMCs along with the new batch of reagents for QC testing at microscopic centres.
The results of QCP and QCN examination are to be documented in separate registers meant for QC.
Any discordant results require discarding the reagents prepared/ supplied.
Resources
- Training Module (1-4) for Program Managers and Medical Officer, NTEP, MoHFW, 2020.
- WHO: Regional Guidelines for Countries in the Western Pacific: Quality Assurance of Sputum Microscopy in DOTS Programs.
Kindly provide your valuable feedback on the page to the link provided HERE
Panel Testing
ContentPanel testing is a method of External Quality Assurance (EQA) that is used to determine the adequacy of a laboratory technician to perform Acid-fast Bacillus (AFB) smear microscopy. This method evaluates individual performance in staining and reading and not the other laboratory activities.
- Panel testing under National TB Elimination Programme (NTEP) is used for Intermediate Reference Laboratories (IRLs) and District TB Centres (DTCs) during on-site evaluation, because these institutions do not have routine slides for blinded rechecking.
- A panel consists of a batch of stained and/or unstained smears that are sent out by the higher-level reference laboratory to the peripheral laboratories for processing, reading, and reporting of results
- Panel testing is not performed as a routine in DMCs, as they will have regular on-site evaluation and blinded rechecking.
Uses of Panel Testing
- Supplement re-checking programmes
- Provide information on the capabilities of the peripheral laboratories prior to
implementing a re-checking program - Assess status level of performance or to quickly detect problems associated with very poor performance
- Evaluate proficiency of laboratory technicians following training
- Monitor performance of individuals when adequate resources are not available to implement a re-checking program.
Resources
Assessment
Question
Answer 1
Answer 2
Answer 3
Answer 4
Correct answer
Correct explanation
Page id
Part of Pre-test
Part of Post-test
Panel testing is useful to evaluate the proficiency of laboratory technicians following training.
True
False
1
Panel Testing is useful to evaluate the proficiency of laboratory technicians following training.
Yes
Yes
Onsite Evaluation[OSE]
ContentA field visit is an ideal way to obtain a realistic assessment of the conditions and skills practiced in the laboratory. Under National TB Elimination Programme (NTEP), On-site Evaluation (OSE) of Intermediate Reference Laboratories (IRLs) and District TB Centres (DTCs)/ Designated Microscopy Centres (DMCs) is therefore an essential component of a meaningful Quality Assurance (QA) programme.
OSE should be performed a tleast once a year by personnel from a higher-level laboratory (IRL/ National Reference Laboratory (NRL)) in order to evaluate the overall operational conditions in the microscopy centers.
Laboratory Supervisors must be knowledgeable in all operational and technical elements of AFB smear microscopy and have sufficient expertise to observe technicians performing routine tasks.
Importance of OSE
- Ensures that Standard Operating Procedures (SOPs) are in place and are displayed in all DMCs, internal Quality Check (QC) as per RNTCP is performed, and a functional binocular microscope is available
- Provides an opportunity for immediate problem-solving corrective action and on-site retraining.
Frequency of OSE (Figure)
- At least once a month visit by Senior TB Lab Supervisor (STLS) to the DMC, is required with re-checking of five positive and five negative slides.
- Regular on-site evaluation by District TB Officer (DTO) is important to assure recording and reporting of results; assessing operational conditions, safety, supplies, equipment and total workload.
- At least once a year visit by laboratory supervisors is recommended for IRLs by NRLs and for DTCs by IRLs.
- When poor performance has been identified through OSE, blinded rechecking or panel testing, additional visits by trained laboratory personnel from a higher-level laboratory (the IRL or NRL laboratory) supervisor are mandatory to perform a comprehensive evaluation of all laboratory procedures, implement corrective action, and provide training.
Components of OSE (Figure)
The visit includes:
- Comprehensive assessment of laboratory safety including infection control measures; conditions of equipment, adequacy of supplies as well as the technical components of Acid-fast Bacillus (AFB) smear microscopy. Sufficient time must be allotted for the visit to include observation of all the work associated with AFB smear microscopy, including preparing smears, staining and reading of smears.
- Examining a few stained positive and negative smears to observe the quality of smearing and staining as well as condition of the microscope
- Facilitating quality improvement through on the spot problem solving and suggestions for corrective action, wherever needed.
The NRLs provide training to all IRL personnel responsible for OSE. Additionally, non-laboratory personnel (e.g., DTOs) should acquire working knowledge of routine laboratory operations, including proper NTEP procedures, appropriate supplies, laboratory safety, basic microscope operations, and requirements of panel testing or rechecking programmes.

Figure: Frequency and Components of On-site Evaluation; Source: RNTCP Laboratory Network Guidelines
Checklist for IRL OSE and NRL OSE
On-site quarterly evaluation report of DTCs visited by IRL team to be given to concerned State TB Officer (STO), IRL and NRL using an IRL OSE Checklist while OSE checklist for NRL Laboratory Personnel to IRL is prepared using a NRL OSE Checklist.
Resources
RNTCP Laboratory Network Guidelines.
Assessment
Question
Answer 1
Answer 2
Answer 3
Answer 4
Correct answer
Correct explanation
Page id
Part of Pre-test
Part of Post-test
On-site Evaluation provides an opportunity for immediate problem solving, corrective action and on-site retraining.
True
False
1
On-site Evaluation provides an opportunity for immediate problem solving, corrective action and on-site retraining.
Yes
Yes
OSE Feedback and action required
ContentDocumentation of any significant problems (technical, operational, others) and feedback for corrective action during On-site Evaluation (OSE) is necessary to formulate plans with the District TB Officer (DTO), Senior TB Laboratory Supervisor (STLS), Medical Officer (MO), Intermediate Reference Laboratory (IRL), National Reference Laboratory (NRL) and Laboratory Technician (LT) to improve the quality of smear microscopy.
Checklists for OSE
- OSE is done through comprehensive checklists.
- The checklist must be used by NRL, IRL and District TB Center (DTC) STLS and a shorter version by DTO/ Medical Officer TB Center (MOTC) during each OSE visit to document observations and corrective action.
- The checklists contain open, non-leading questions and recommended observations along with objective criteria for acceptable practices so that the supervisor can assess how well the technician understands proper procedures.
Feedback
Feedback is the process of communicating results of External Quality Assurance (EQA) to the original laboratory, including suggestions for possible causes of errors and remedies.
TB Unit On-site Evaluation (TU-OSE) Checklist and Feedback
The observations in TU-OSE Checklist, including observation of five positive and negative slides must be documented (Figure 1). Corrective actions must be discussed by the STLS with LT and checklist should be signed by MO of DMC.

1: Write smear and grade
2: Tick appropriate column
3: Tick if good; write ‘U’ if under-decolourized, ‘O’ if over-decolourized
4: Tick if good; write ‘B’ if too big, ‘S’ if too small
5: Tick if good; write ‘K’ if too thick, ‘N’ if too thin
6: Tick appropriate columnFigure 1: Review of five positive and five negative slides by STLS and instructions to fill observations in TU-OSE Checklist; Source: RNTCP Laboratory Network Guidelines
Action Required based on TU-OSE Checklist
The STLS should:
- Enter the summary of ‘action required’ in the Supervision Register before leaving the DMC
- Submit the summary report of DMCs under him to DTO on a monthly basis
- Maintain separate files for checklists including summary reports of each DMC in respective TU and submitted for review by higher level supervisors including on-site evaluation visits by the IRL to the district.
The DTO should:
- Give monthly feedback to the MO in-charge of the respective DMC
- Send summary of results of checklists for each DMC in the district once every quarter for analysis by the respective CMO/ DMO and IRL.
Checklist IRL OSE and NRL OSE and Feedback
- On-site quarterly evaluation report of DTCs visited by IRL team should be given to concerned State TB Officer (STO), IRL and NRL using an IRL OSE Checklist.
- OSE Checklist for NRL Laboratory Personnel to IRL is prepared using a NRL OSE Checklist.
- The IRLs will submit a consolidated quarterly report to the concerned STO and NRL. In turn, the NRL will submit a consolidated quarterly report to the Central TB Division.
- A comprehensive list of all operational elements to be observed will help to ensure consistency in laboratory evaluations and provide immediate feedback to the technicians to facilitate rapid corrective action, as well as serve as documentation of the visit and record of current conditions and actions needed.
- All potential sources of error should be investigated, including quality of stains and staining procedure, quality of microscopes, and administrative procedures that may contribute to recording errors and corrective actions provided (Figure 2).
- All problems contributing to errors must be resolved.
- Possible causes of errors, and suggested evaluation steps are provided in Annexure K.
- Remedial training must be provided for technicians unable to properly identify AFB in smears.

Figure 2: Documentation of corrective actions in IRL-OSE Checklist )RNTCP Laboratory Network Guidelines)
Action Required for IRL/NRL-OSE Checklist
A state level consolidated summary will be prepared by the respective IRL every quarter from the district summaries for submission to STO and NRL. The DTO/ CMO of the district is to submit an action taken report on the team’s recommendations to the STO within a month of the IRL visit.
Resources
RNTCP Laboratory Network Guidelines.
Assessment
Question
Answer 1
Answer 2
Answer 3
Answer 4
Correct answer
Correct explanation
Page id
Part of Pre-test
Part of Post-test
The IRLs submit a consolidated quarterly report of on-site visits to the concerned State TB Officer and NRL.
True
False
1
The IRLs submit a consolidated quarterly report of on-site visits to the concerned State TB Officer and NRL.
Yes
Yes
Random Blinded ReChecking [RBRC] Concept
ContentRandom Blinded Rechecking (RBRC) is an External Quality Assurance (EQA) method that provides reliable assurance that a district has an efficient Acid-fast Bacillus (AFB) microscopy laboratory network to support National TB Elimination Programme (NTEP) (Figure).
Blinded rechecking is a process of re-reading a statistically valid sample of slides from a laboratory to assess whether that laboratory has an acceptable level of performance.

Figure: Overview of Random Blinded Rechecking (RBRC) under NTEP;
Source: RNTCP Laboratory Network GuidelinesKey Components of RBRC
- The sample contains a sufficient number of randomly selected slides to be representative.
- A system utilizing Lot Quality Assurance Sampling (LQAS) method is in use for RBRC.
- The supervisor of the laboratory (controller) must be unaware of the original result of peripheral laboratory technician to prevent bias, i.e. is “blinded”.
- Discrepant results are resolved by a second controller.
- There must be a system to provide timely feedback and improvements to the laboratories that are supervised.
Resources
RNTCP Laboratory Network Guidelines.
Assessment
Question
Answer 1
Answer 2
Answer 3
Answer 4
Correct answer
Correct explanation
Page id
Part of Pre-test
Part of Post-test
A system utilizing Lot Quality Assurance Sampling (LQAS) method is in use for Random Blinded Rechecking (RBRC).
True
False
1
A system utilizing Lot Quality Assurance Sampling (LQAS) method is in use for Random Blinded Rechecking (RBRC) under NTEP.
Yes
Yes
Random Blinded ReChecking [RBRC] Process
ContentAnnual slide sample and the monthly sample for Random Blinded Rechecking (RBRC) is determined by the District TB Officer (DTO), assisted by the Intermediate Reference Laboratory (IRL), Statistical Assistant (SA) or Data Entry Operator (DEO) based on Lot Quality Assurance Sampling (LQAS) method.
Under the LQAS method, sample size depends on 3 components:
- Annual Negative Slide Volume (ANSV)
- Slide Positivity Rate (SPR)
- Sensitivity of picking up lower bacili count in microscopy
Process of RBRC (Figure 1)
- The LT at each DMC stores slides for RBRC in slide boxes.
- The laboratory must store slides in a way that allows for easy retrieval of every slide identified for the rechecking sample. Therefore, all slides are to be stored in the provided slide boxes in the same order as they are listed in the laboratory register. Slides are marked as ‘a’ and ‘b’ along with the lab serial number for first spot and early morning specimen.
- The result of the smear examination must not be written on the slide.
- Removal of immersion oil is to be done using tissue paper before storing slides in a slide boxSenior TB Lab Supervisors (STLS) of the district, informing them of the total number of slides to be collected every month from each DMC.
- The STLS then select the required number of slides from the Laboratory Register and the LT records the results as per Annexure B (Figure 2).
Collection of slides for RBRC explained with an example
-
- If the sample size is calculated to be 180 smears per year, 15 slides are to be collected during each monthly visit.
- If the STLS observes that the laboratory processed 82 slides since the last monthly visit, they could collect for example every fifth (82/15 = 5.4 or 5th) slide randomly to obtain the required 15 slides and may begin with any number between 1 to 5, say 3.
- The first random number may be selected by choosing last digit on any available currency note.
- The remaining slides are chosen by adding serially 5 till 15 slides are selected.
- In this example, the 3rd, 8th, 13th, 18th, 23rd, 28th, 33rd, 38th, 43rd, 48th, 53rd, 58th, 63rd, 68th and 73rd slides are selected to obtain 15 slides required for that month.
- Annexure B (Figure 2) is then put into an envelope and sealed. The number of slides packed is written on the top of the envelope.
- Both the slide box and the envelope are marked with the name of the respective DMC, the name of the TB Unit and district, and the month and year.
- The slide box and the sealed envelope are then taken by the STLS for handing over to the DTO.

Figure 1: Process of random blinded rechecking (RBRC) performed by (1) STLS during on-site visit to DMC and (2) at DTC (RNTCP Laboratory Network Guidelines)

Figure 2: Annexure B to document Smear Results Sheet for Blinded Rechecking (RNTCP Laboratory Network Guidelines)
The DTO is responsible for ensuring that the blinding process is strictly followed.
Resources
RNTCP Laboratory Network Guidelines.
Assessment
Question
Answer 1
Answer 2
Answer 3
Answer 4
Correct answer
Correct explanation
Page id
Part of Pre-test
Part of Post-test
Who is responsible for ensuring that the blinding process is strictly followed?
LT
DTO
STS
STLS
2
The DTO is responsible for ensuring that the blinding process is strictly followed.
Yes
Yes
Random Blinded ReChecking [RBRC] Process at DTC
ContentRandom Blinded Rechecking (RBRC) is the process of re-reading a statistically valid sample of routine slides from a designated microscopy centre (DMC) based on lot quality assurance strategy (LQAS) in a blinded manner to assess the laboratory performance.
RBRC Process
- The district TB officer (DTO) sends information to all senior TB lab supervisors (STLS) of the district on the number of slides to be collected every month from each DMC
- The STLS then selects the required number of slides from the TB Laboratory Register and marks the RBRC selected slides in the laboratory register with a circle
- The laboratory technician (LT) fills out Annexure B (Figure 1) for the selected slides
- LT seals the filled Annexure B in an envelope and marks the slide box with the Serial No. of slides, name of the DMC and TB unit (TU), month and year
- The STLS hands over sealed envelopes and the slide box to the DTO

Figure 1: Annexure B for Blinded Rechecking of DMC Slides (RNTCP Laboratory Network Guidelines)
- The DTO with the help of the statistical assistant (SA) removes all the identifying attributes of the selected slides (including the test results). This process is called Blinding.
- Blinded re-examination of selected slides is done by the STLS of another TB Unit (TU) within the respective district. The STLS (controllers) must have demonstrated proficiency with the Ziehl-Neelsen (ZN) staining and reading method (as seen by panel testing done by Intermediate Reference Laboratory (IRL)).
- Smears may be evaluated for specimen quality (sputum versus saliva), appropriate size and thickness, and quality of staining (as per Annexure C, Figure 2).

Figure 2: Worksheet for Blinded Rechecking of DMC Slides as per Annexure C (RNTCP Laboratory Network Guidelines)
- Problems detected by the controller are noted on the form, as this information may be very useful to supervisors responsible for providing feedback to the peripheral technicians, assessing possible reasons for high false positive or false negative results, and implementing plans for retraining and corrective action.
- The DTO with the help of the statistical assistant compares the results provided by the STLS against the original results provided by the LT. This process is called Unblinding.
- The discrepant slides are sent for umpire (second controller) reading.
- All discrepant slides are re-stained and re-examined by the second controller, as there is likelihood of fading of carbol fuchsin. This rechecking of discordant slides by a second controller also acts to evaluate the performance of the first controllers.
Feedback after RBRC
- Regular and timely feedback to the DMC is essential to improve performance
- Feedback and remedial actions are provided at the end of each sampling period i.e., completion of rechecking of the annual sample
- Also, feedback is given on a monthly basis to the respective DMCs using the form in Annexure D (Figure 3) during the monthly on-site evaluation visit by the STLS responsible for the respective DMC
- Feedback includes the return of slides with discordant results to be re-read by the original LT of the respective DMC
- Potential sources of errors are investigated during the on-site evaluation visit
- Appropriate corrective actions and/or remedial training are provided within one month

Figure 3: Quality Assurance Report on Sputum Microscopy as per Annexure D (RNTCP Laboratory Network Guidelines)
Resources
RNTCP Laboratory Network Guidelines
Assessment
Question
Answer 1
Answer 2
Answer 3
Answer 4
Correct answer
Correct explanation
Page id
Part of Pre-test
Part of Post-test
Who is responsible for the blinded re-examination of selected slides?
STLS of another TU
DTO
STS
LT
1
Blinded re-examination of selected slides is done by an STLS of another TU within the respective district.
Yes
Yes
-
-
CDST_LT-M6: Infection prevention and control (IPC)
Fullscreen-
CDST_LT: Good laboratory practices
FullscreenGood Laboratory Practices
ContentGood laboratory practices help to maintain biosafety in TB lab settings. However, it is good to keep in mind that:
- NOTHING can totally eliminate the safety risk associated with the TB laboratory.
- Good laboratory practices with an emphasis on biosafety, significantly reduce the risk of laboratory-acquired infection.
- Specialized equipment aids good laboratory practice but does NOT replace it.
Good Laboratory Practices
- Biohazard signs (Figure 1) should be posted at the entrance to laboratories performing work on infectious agents and hazardous chemicals.
Figure 1: Biohazard Sign
- Laboratory access should be limited to essential staff.
- No eating, drinking, or smoking (Figure 2).
- No mouth pipetting (Figure 2).
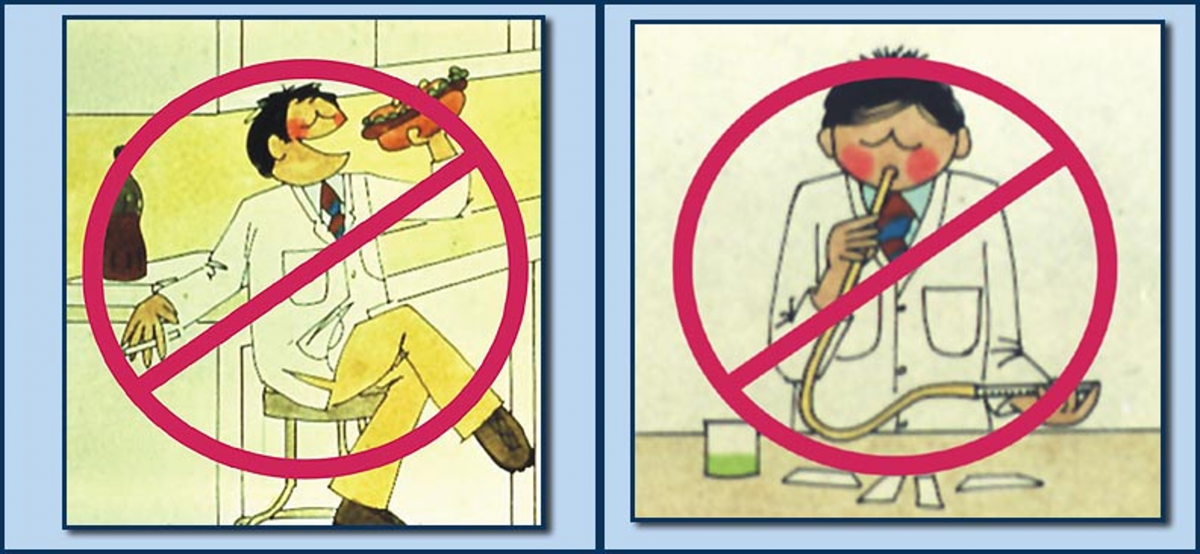
Figure 2: No eating or mouth pipetting in lab
- No placing pencils or pens in the mouth.
- Keep hands away from eyes and face.
- Always wash hands before leaving the lab.
- Remove gloves before handling phones, instruments or computers.
- Minimize the use of mobile phones.
- Lab coats must be decontaminated and laundered regularly (never take them home for laundering!)
Resources
Kindly provide your valuable feedback on the page to the link provided HERE
Safety Precautions to be Followed in TB Laboratory Setting
ContentAs Tuberculosis (TB) infection spread in the form of droplet infection, healthcare workers in the TB laboratory setting need to follow standard safety precautions to prevent themselves from getting the TB infection.
Some of the safety precautions in the TB laboratory setting are as follows:
- Always allow proper ventilation by keeping all the windows open (Try to avoid sliding window doors, as most of the sliding doors open only half).
- Always wear proper Personal Protective Equipment (PPE) - Laboratory coat and gloves.
- Always have separate areas for administration, sample reception, smear preparation, staining and microscopic examination.
- Open the specimen bottle only when preparing slides.
- Avoid shaking or stirring of samples.
- Always spread the sample onto the slide gently in a regular motion.
- Always prepare slides in close proximity to a flame or in the biosafety cabinet to nullify the aerosols generated, if any.
- Always air-dry smears for 30 min before heat fixing.
- Always use wooden stick/ sterile loops for making smears.
- Always manage the laboratory waste correctly.
In case of other TB diagnostic settings like molecular labs, culture labs etc., follow the Standard Operating Procedure (SOP) properly (It is always advisable to display the SOP in all the TB diagnostic laboratories). The detailed SOPs of the procedures followed in the TB diagnostic facility should be displayed or placed wherever required, especially the BioMedical Waste guidelines, and all the SOPs should be updated regularly.
Resources
Kindly provide your valuable feedback on the page to the link provided HERE
-
CDST_LT: General concepts in IPC
FullscreenThe need for IPC
ContentInfection prevention and control (IPC) practices are important in maintaining a safe environment for everyone by reducing the risk of the potential spread of disease.
IPC is a practical, evidence-based approach which prevents patients and health workers from being harmed by avoidable infection. It is relevant to health workers and patients at every single health-care encounter.
Biosafety measures along with Universal Precautions like hand hygiene, personal protective equipment, safe injections, respiratory hygiene and cough etiquette is important in IPC to address the safe handling and containment of infectious microorganisms and hazardous biological materials.
IPC is essential in TB as:
1. specific population groups have a higher risk of acquiring TB infection and progressing to disease once infected; these groups include people living with HIV, health workers and others in settings with a high risk of transmission of M. tuberculosis
2. incident cases of TB among children (aged <15 years) reflect ongoing community transmission
3. primary person-to-person transmission of drug-resistant TB (as opposed to acquired resistance) is the dominant mechanism sustaining the global transmission of drug-resistant TB
4. to prevent TB transmission, interventions are needed that reduce the concentration of infectious particles in the air and the exposure time of susceptible individuals
Resources
1. Guidelines on Airborne Infection Control in Healthcare and Other Settings.
2. WHO guidelines on tuberculosis infection prevention and control 2019 update (https://apps.who.int/iris/bitstream/handle/10665/311259/9789241550512-e…)
Question
Answer 1
Answer 2
Answer 3
All
Correct answer
Correct explanation
Page id
Part of Pre-test
Part of Post-test
Person-to-person transmission of drug-resistant TB is the dominant mechanism for transmission of drug-resistant TB.
True
False
1
Primary person-to-person transmission of drug-resistant TB (as opposed to acquired resistance) is the dominant mechanism for transmission of drug-resistant TB.
Yes
Yes
Standard Precautions for IPC
Content- Standard precautions are a group of infection control practices to reduce the risk of transmission of pathogens.
- These are based on the principle that all blood, body fluids, secretions, excretions except sweat, non-intact skin, and mucous membranes may contain
transmissible infectious agents. - Standard precautions are applicable to all patients in all healthcare settings and combine the major features of universal precautions, body substance isolation, and airborne precautions.
- Implementation of standard precautions is based on risk assessment in all healthcare activities.
Image
Figure: Elements of Standard Precautions; Source: Guidelines on Airborne Infection Control in Healthcare and Other Settings
Resources
- Guidelines on Airborne Infection Control in Healthcare and Other Settings
- Health-care facility recommendations for standard precaution
Question Answer 1 Answer 2 Answer 3 Answer 4 Correct answer Correct explanation Page id Part of Pre-test Part of Post-test Which of the following are features of standard precautions?
Universal precautions Body substance isolation
Airborne precautions All the above 4 Standard precautions combine the major features of universal precautions, body substance isolation, and airborne precautions. Yes Yes Hand Hygiene
ContentHand hygiene is one of the most important elements of infection control. The aim of hand washing is to remove transient micro-organisms, acquired through everyday tasks in the laboratory/ clinical setting, from the surface of the hands.
Good hand hygiene protects both patients and staff.
The World Health Organization (WHO) guidelines on “Hand Hygiene in Healthcare” describe five key situations where hand washing is required:
- Before touching a patient
- Before a clean or aseptic procedure
- After body fluid exposure/risk
- After touching a patient
- After touching patient surroundings
Hand hygiene includes hand washing using soaps or hand rubbing with 70% alcohol-based formulations.
Important Considerations for Hand Hygiene
- Perform hand washing with soap and water if hands are visibly soiled and after using the restroom.
- Availability of running water supply is important for hand washing.
- If resources permit, perform hand rubbing with an alcohol-based preparation.
- Ensure availability of hand hygiene products (clean water, soap, single-use clean towels, alcohol-based hand rub).
- Alcohol-based hand rubs should ideally be available at the point of care.
Technique of Hand Hygiene (Figure)
- Handwashing (40–60 sec): Wet hands and apply soap; rub all surfaces; rinse hands and dry thoroughly with a single-use towel.
- Hand rubbing (20–30 sec): Apply enough product to cover all areas of the hands; rub hands until dry

Figure: Handwashing Technique; Source: WHO Handwashing Poster
Resources
- Guidelines on Airborne Infection Control in Healthcare and Other Settings.
- Health-care facility recommendations for standard precaution.
- WHO Handwashing Poster.
Question Answer 1 Answer 2 Answer 3 Answer 4 Correct answer Correct explanation Page id Part of Pre-test Part of Post-test Hand hygiene includes which of the following? Hand washing using soaps Hand rubbing with 70% alcohol-based formulations Sterilising the hands with hot air 1 and 2 4 Hand hygiene includes hand washing using soaps and hand rubbing with 70% alcohol-based formulations. Yes Yes Respiratory Hygiene
ContentRespiratory hygiene is vital to prevent the spread of TB via aerosols and person-to-person transmission.
Respiratory hygiene includes:
-
Covering the nose/mouth with a tissue when coughing/sneezing and appropriate disposal of used tissues
- If tissues are not available, cough or sneeze into the inner elbow (upper sleeve) rather than into the hand
- Keeping contaminated hands away from the mucous membranes of the eyes and nose.
- Carrying out hand hygiene after contact with respiratory secretions and contaminated objects/materials
- Using appropriate Personal Protective Equipment (PPE) during aerosol generating procedures
- Use PPE including gloves, long-sleeved gowns, eye protection (goggles or face shields), and facial mask (or respirators) during aerosol-generating procedures

Figure: Respiratory hygiene (Ministry of Ayush, https://twitter.com/moayush/status/1243852404640153601)
Resources
- Guidelines on Airborne Infection Control in Healthcare and Other Settings
- Infection Prevention and Control of Epidemic- and Pandemic-Prone Acute Respiratory Infections in Health Care
- Ministry of Ayush, https://twitter.com/moayush/status/1243852404640153601
Assessment
Question
Answer 1
Answer 2
Answer 3
Answer 4
Correct answer
Correct explanation
Page id
Part of Pre-test
Part of Post-test
Which of the following are critical elements in respiratory hygiene?
Covering the nose/ mouth with a tissue when coughing/ sneezing
Throwing tissues used to wipe nasal secretions on the road
Using appropriate Personal Protective Equipment (PPE) during aerosol-generating procedures
None of the above
Options 1 and 3
Covering the nose/ mouth with a tissue when coughing/ sneezing and appropriate disposal of used tissues, as well as appropriate PPE usage during aerosol-generating procedures, are important elements of respiratory hygiene.
Yes
Yes
-
General Cleaning and TB Lab Surface Decontamination
ContentThe cleanliness and regular disinfection of the TB lab and its surfaces play an essential role in the safety of those working in these labs.Guidelines for Laboratory Cleaning
- All personnel should don appropriate Personal Protective Equipment (PPE) prior to cleaning the facility.
- Laboratory personnel should perform all daily housekeeping routines within the TB laboratories, including trash removal. Cleaning staff should only enter the laboratories under the supervision of the laboratory staff.
- All the cleaning and decontamination procedures in the TB containment laboratory should be performed only by trained laboratory staff.
- Work surfaces are decontaminated when work is finished, at the end of every workday, and immediately after any spill of viable material.
- Large equipment, such as incubators and centrifuges, will have inner and outer surfaces damp-wiped with disinfectant on a routine basis.
- Sinks in the laboratories should be cleaned and flushed with agent appropriate disinfectants
- The floor of the TB containment laboratory should be thoroughly and routinely wiped down with a suitable chemical decontaminant, and workspaces that do not get daily attention should be disinfected
- Solid waste should be decontaminated by autoclaving prior to removal from the facility and disposed off by authorized personnel
Unidirectional Flow of Cleaning
- There should be an effective separation of various sections and activities of the lab to prevent cross-contamination.
- Unidirectional flow of cleaning should be maintained in specific areas.
- Cleaning items, such as mops, buckets and brushes, used in dirty areas of the laboratory should never be used in the cleaner areas.
Good Laboratory Practices to Keep Laboratories Clean and Clutter-free
- Floors and work surfaces should be kept as free of clutter as possible.
- Materials should be stored in closed cupboards, where possible.
- Excess reagents should be boxed, labelled and stored in the storeroom.
- Check spill kit contents on a monthly basis. The fresh disinfectant must be prepared each week.
- Record in the 'Laboratory Cleaning and Maintenance Logbook'.
Resources
IPC practices required at a DMC
ContentDirect sputum microscopy performed at Designated Microscopy Centres (DMC) is a relatively low-risk activity as long as safe work practices are implemented properly.The following work practices are recommended to ensure that microscopy laboratory technicians are not exposed to aerosols from sputum specimens.
1. Administrative Control at DMC
- The layout and design of the DMCs should include natural ventilation, mechanical ventilation (exhaust fan) and unidirectional airflow.
- The sputum collection area should be separated from the laboratory.
- Provisions for biomedical waste management in deep burial pits, sharps pits or appropriate disposal via the health facility biomedical waste management system.
2. Environment Control at DMC
- Doors and windows should be kept open for air exchanges.
- Sputum must be collected in a well-ventilated area with direct sunlight. It should not be collected inside the laboratories, toilets, waiting rooms, reception rooms, or any other enclosed space.
3. Personnel Level Control at DMC
- Laboratory technicians should wear laboratory coats, gloves and masks when handling sputum containers and during smear preparation and staining.
- Smears should be prepared in a well-ventilated environment near an open flame.
- Work benches should be cleaned daily with disinfectants.
- Sputum containers, applicator/ broomsticks, and used slides should be disinfected with 5% Phenol overnight before discarding.
Resources
Question Answer 1 Answer 2 Answer 3 All Correct answer Correct explanation Page id Part of Pre-test Part of Post-test Sputum specimens can be collected in toilets.
True False 2 Sputum must be collected in a well-ventilated area with direct sunlight. It should not be collected inside the laboratories, toilets, waiting rooms, reception rooms, or any other enclosed space. Yes Yes Roles of various stakeholders in IPC
ContentCommitment at national, state and district level are required to support and facilitate the implementation of Infection Prevention and Control (IPC) measures.
The important stakeholders in IPC include:
National Airborne Infection Control Committee (NAICC) has been constituted to provide for a multi-lateral national level coordinating body, to develop national guidelines on IPC, and provide technical guidance for their implementation, evaluation, and revisions.
Composition of NAICC
NAICC has representatives from Central TB Division, Medical college, State TB Programme representatives, Directorate General of Health Services, Central Design Bureau, National Institutes, Civil society representatives and other relevant agencies
A State Airborne Infection Control Committee (SAICC) should be established for adoption and integration of the national guidelines on airborne infection control in health care and other settings in the hospital infection control plans of various health care facilities in the states
Composition of SAICC
SAICC has representatives from Mission Director, National Rural Health Mission, Director Health Services (Nodal Officer), Director Medical Education and Research, State TB Officer, Project Director-SACS, State Task Force for Medical Colleges, Representative of IMA (State Body), Architects and Engineers from State PWD, Representative of State Pollution Control Board, NGO / CBO
The airborne infection control activities at the district level should be coordinated and undertaken by the Sub-Committee on Biomedical Waste Management / Infection Control (SC-BMW/IC) under the District Health Society (DHS). They should function under guidance and close coordination with the SAICC, State Health Society and with the TB Sub-Committee under DHS (NRHM).
Composition of SC-BMW/IC
SC-BMW/IC has representatives from Medical College / District Hospital, Representative of Pollution Control Board Office at the district, Director, Nursing Administration and Training or equivalent, Representative of IMA (Local Body) / NGO / CBO
The Hospital infection control committee (HICC) is an integral component of the IPC programme of the health care facility.
The main functions of HICC include:
1. Establish the IPC programme in the health care facility, develop action plan for strengthening IPC measures for the facility and individual units within the facility with priorities based on the risk assessment
2. Constitute an infection control team to oversee IPC implementation in the facility
3. Review and revise annually infection control guidelines with policies, recommendations and working protocols with standard precautions, hand hygiene, cleaning and decontamination, disinfection and sterilization as key components
4. Organize training programmes on recommendations of the guidelines and IPC practices for staff
5. Develop an antibiotic policy and antibiotic stewardship programme
6. Conduct surveillance of antimicrobial resistance, monitor trends in hospital acquired infections (HAI), investigate outbreaks of HAIs
7. Evaluate the effectiveness of interventions for IPC, analyze the surveillance data and identify at-risk patients. Take appropriate action and implement recommendations where necessary
8. Conduct audits and quality control of IPC activities, ensure compliance with recommendations
9. Help control environmental risks for infection by liaising with appropriate departments such as healthcare waste management, provision of safe water (testing of water sources), pharmacy, housekeeping services, laundry and kitchen services
Resources
Guidelines on Airborne Infection Control in Healthcare and Other Settings.
National Guidelines for Infection Prevention and Control in Healthcare Facilities (https://www.mohfw.gov.in/pdf/National%20Guidelines%20for%20IPC%20in%20H…)
Question
Answer 1
Answer 2
Answer 3
All
Correct answer
Correct explanation
Page id
Part of Pre-test
Part of Post-test
Who are the important stakeholders in Infection Prevention and Control?
National Airborne Infection Control Committee (NAICC)
State Airborne Infection Control Committee (SAICC)
Sub-Committee on Biomedical Waste Management/ Infection Control (SC-BMW/IC)
All of the above
4
Commitment at national: National Airborne Infection Control Committee (NAICC); state: State Airborne Infection Control Committee (SAICC); and district: Sub-Committee on Biomedical Waste Management / Infection Control (SC-BMW/IC) levels are required to support and facilitate the implementation of Infection Prevention and Control (IPC) measures.
Preparation of TB Lab Disinfectants
ContentDisinfectants used in lab settings include:
1% Sodium Hypochlorite
- Broad spectrum antimicrobial action
- Used to disinfect surfaces
- Used to disinfect infectious material and disposal of used Truenat consumables (reagent bottles, cartridges, tips, chips)
- Hazardous and corrosive, to be used with care
- Is highly alkaline so can corrode metal
- Waste soaked in Sodium Hypochlorite should not be discarded by autoclaving.
70% Alcohol
- Bactericidal action
- Used for surface decontamination only
- Highly inflammable; keep away from fire
- Used to disinfect biosafety cabinets, laboratory benches and surface of instruments.
5% Phenol
- Used for decontaminating Cartridge-based Nucleic Acid Amplification Testing (CBNAAT) equipment and single-use items like CBNAAT cartridges prior to disposal
- Highly irritating to the skin, eyes and mucous membranes.
Preparation of these disinfectants is described below.
Preparation of 1% Sodium Hypochlorite
- Use commercially available 4% sodium hypochlorite solution.
- Dilute with distilled water to prepare required amount of 1% sodium hypochlorite
- E.g.: To prepare 100 ml of 1% sodium hypochlorite: 75 ml distilled water plus 25 ml 4% sodium hypochlorite solution.
- Sodium hypochlorite solutions (domestic bleach) contain 50 g/l available chlorine, and should therefore be diluted to 1:50 or 1:10 in water to obtain the final concentrations of 1 g/l or 5 g/l when used as a general-purpose disinfectant for TB laboratories.
- To be prepared fresh.
Preparation of 70% Alcohol
- Use commercially available absolute alcohol.
- Dilute with distilled water to prepare the required amount of 70% alcohol
- E.g.: To prepare 100 ml of 70% alcohol: 70 ml absolute alcohol plus 30 ml distilled water.
Preparation of 5% Phenol
- Melt 5 g of phenol by heating it.
- Dissolve in 100 ml distilled water.
Video fileVideo : Preparation of TB Lab Disinfectants
Resources
-
CDST_LT: Airborne infection control
FullscreenAirborne Infection Control [AIC]
ContentMycobacterium tuberculosis is transmitted in airborne particles called droplet nuclei that are expelled when a person with pulmonary TB coughs, sneezes, shouts, or sings. People nearby may breathe in these bacteria and become infected.
Airborne infection control is essential to prevent the spread of TB within a health facility and other settings.
Hierarchy of Controls to Reduce Risk of Transmission of TB (see the Figure)

Figure: Hierarchy of controls to reduce risk of transmission of TB
Environmental factors that influence transmission of M. tuberculosis are elaborated in the table below.
Table: Environmental factors that influence the transmission of M. tuberculosis; Source: Tuberculosis Infection Control Factor Description Concentration of infectious bacilli The more bacilli in the air, the more probable that M. tuberculosis will be transmitted Space Exposure in small, enclosed spaces Ventilation Inadequate local or general ventilation that results in insufficient dilution or removal of infectious droplet nuclei Air circulation Recirculation of air containing infectious droplet nuclei Specimen handling Improper specimen handling procedures that generate infectious droplet nuclei Air pressure Positive air pressure in an infectious patient's room that causes M. tuberculosis organisms to flow to other areas Resources
- Guidelines on Airborne Infection Control in Healthcare and Other Settings.
- Tuberculosis Infection Control.
Question
Answer 1
Answer 2
Answer 3
All
Correct answer
Correct explanation
Page id
Part of Pre-test
Part of Post-test
The hierarchy of controls to reduce the risk of transmission of TB includes which of the following?
Environmental controls
Administrative controls
Personal protective equipment
All of the above
4
The hierarchy of controls to reduce the risk of transmission of TB includes administrative controls, environmental controls and the use of personal protective equipment.
Ventilation as an AIC Measure
ContentVentilation is defined as the supply/ distribution/ exchange or removal of air from spaces by mechanical or natural means.
Airflow is a natural process whenever there is change in temperature or pressure. Air keeps moving displacing the room air, and the time to replace the entire in-room air depends on the size of the room, the openings, and the presence of additional/mechanical force. This air-flow, also called ventilation, will allow the entry of outside air or clean recirculated air to remove extra heat, humidity and infectious aerosols from occupied spaces to meet health and comfort requirements.
When fresh air enters a room, it dilutes the concentration of particles in room air including aerosols responsible for the transmission of TB that can otherwise remain suspended in the air for significant periods of time.
Thus, ventilation is recognized as an important factor influencing the transmission of airborne diseases.
Types of Ventilation at Designated Microscopy Centres (DMCs)
1. Natural Ventilation (Figure below)
- Natural ventilation at DMCs is achieved by designing a laboratory layout that supports the unrestricted flow of natural air.
- Doors and windows should be kept open to bring in fresh air from outside.
- Opening windows and doors on opposite walls will also allow for cross ventilation.
- The placement of furniture, equipment, supplies etc. at DMCs should not block or restrict the opening of doors and windows.

Figure: Natural ventilation achieved by opening doors and windows or using mechanical ventilation using fans and an exhaust fan for air mixing and directional flow (A); the flow of natural air should not be restricted by blocking doors and windows (B); Cross ventilation is not adequate if there is only one entry point for outside air (C); Source: Tuberculosis and HIV Co-Management and Tuberculosis And Airborne Infection Control.
2. Mechanical Ventilation: When the movement of air is driven by a mechanical device, it is called mechanical ventilation.
- DMCs are equipped with fans and exhaust fans as the simplest means of mechanical ventilation for air circulation and directional flow of air. Exhaust fans fitted in windows/ ventilators exchange air from inside the laboratory to the outdoors.
- Ceiling fans/ tabletop fans/ pedestal fans have rotating blades to circulate air inside the room. Tabletop and pedestal fans can be positioned in the room to allow the directional flow of air.
3. Hybrid/ Mixed-mode Ventilation
- In hybrid/ mixed-mode ventilation exhaust and/or fans are used in DMCs in combination with natural ventilation to obtain adequate air dilution when sufficient airflow cannot be achieved by natural ventilation alone.
The table below compares the advantages and disadvantages of the different modes of ventilation.
Table: Summary of Advantages and Disadvantages of Different Types of Ventilation; Source: Guidelines on Airborne Infection Control in Healthcare and Other Settings.
Mechanical Ventilation
Natural Ventilation
Hybrid (mixed-mode) Ventilation
Advantages
Suitable for all climates and weather
Suitable for warm and temperate climates
Suitable for most climates and weather
More controlled and comfortable environment
Lower capital, operational, maintenance costs for simple implementations
Energy-saving relative to mechanical ventilation
Occupants have limited control to affect ventilation
Capable of achieving very high ventilation rates
More flexible
Disadvantages
Expensive to install and maintain
Easily affected by outdoor climate and occupants’ behaviour
May be more costly or difficult to design
Can fail to deliver required ventilation rates through faulty design, maintenance, or operation
May be difficult to plan, design, and predict performance
Noise from equipment
Reduced comfort level of occupants in extreme weather
Cannot achieve directional control of airflow, if required
Resources
- Guidelines on Airborne Infection Control in Healthcare and Other Settings.
- Tuberculosis Infection Control, CDC.
- Tuberculosis and HIV Co-Management.
- Tuberculosis and Airborne Infection Control.
Question
Answer 1
Answer 2
Answer 3
All
Correct answer
Correct explanation
Page id
Part of Pre-test
Part of Post-test
In mixed-mode ventilation, exhaust and/or fans are used in combination with natural ventilation.
True
False
1
In mixed-mode ventilation, exhaust and/or fans are used in combination with natural ventilation.
Yes
Yes
Administrative measures for AIC at a Health Facility
ContentThe administrative measures at a health care facility play an important role in preventing the spread of TB in health care settings. It includes Administrative controls for outpatient and inpatient settings
Administrative measures at Outpatient(OPD) settings
1. Screen for respiratory symptoms as early as possible upon patient’s arrival at the health care facility thereby reducing the overall stay of such patients in the healthcare facility- screening at registration counter itself by asking simple questions related to chronic respiratory symptoms, and those suspected to have TB can be prioritized for further management
- screening when patients are in waiting area- by volunteers/health staff
2. Provide patient education and counseling on cough hygiene and sputum disposal
- paramedical staff or volunteers should educate and reinforce cough etiquette while the patient is in the waiting area
- educate patients on availability of bins with disinfectants for disposal of sputum
- display of posters on cough hygiene and sputum disposal in the waiting areas
3. Segregate patients with respiratory symptoms
- having separate waiting area for chest symptomatics within the overall outpatient area
- implement a patient flow control mechanism so that screened chest symptomatics are diverted to special area rather than the common waiting area
- well ventilated waiting areas to reduce overall risk of airborne transmission
4. Fast-track patients with respiratory symptoms
- fast-track patients for clinical and laboratory evaluation
- fast track chest radiography and sputum examination with priority slips/referrals
Administrative measures at Inpatient (IPD) setting
1. Minimize hospitalization of TB patients- whenever possible, manage patients entirely as outpatients thereby avoiding hospitalization and the risk of exposing other patients and staff
2. Establish separate rooms, wards, or areas within wards for TB patients
- patients with TB should be physically separated in different rooms/wards from other patients so that others are not exposed to the infectious droplet nuclei
- separation of TB patients from vulnerable and immune-compromised patients is essential
3. Educate and counsel inpatients on cough hygiene and provide adequate sputum disposal
- educate and display posters on cough hygiene and safe disposal of sputum in bins with disinfectants
- provide masks to all admitted patients and educate on proper use of masks
4. Establish safe radiology procedures for TB patients
- schedule inpatient chest radiography for non-busy times
- provide priority service to minimize the length of time spent in the department
Resources
- Guidelines on Airborne Infection Control in Healthcare and Other Settings.
- Tuberculosis Infection Control.
Question
Answer 1
Answer 2
Answer 3
Answer 4
Correct answer
Correct explanation
Page id
Part of Pre-test
Part of Post-test
What of these is/are the administrative measures for airborne infection control at a health facility?
Prompt/ fast-track screening
Educating, training, and counselling
Availability of masks
All of the above
4
Administrative measures for airborne infection control at health facilities include prompt/ fast-track screening and diagnosis, education, training, and counselling, and availability of masks.
Yes
Yes
-
CDST_LT: Biomedical waste management
Fullscreencolor coding and type of container
ContentThe National TB Elimination Programme (NTEP) utilizes different coloured bags for the segregation of waste generated in TB laboratory settings as shown in the table below.
Table: Waste Segregated and Collected According to Colour-coded Bags
Yellow bag:
- Broomsticks
- Parafilm tape & plastic bag – contaminated with samples
- Löwenstein-Jensen (LJ) media without the bottle
- Microbial sample/ blood/ body fluids contaminated paper/ cotton/ swab
- Blood bags
- Microbiological cultures Truenat chips (MTB/ Rif)
- Used mask/ gowns
- Expired medicines/ drugs/ antibiotics
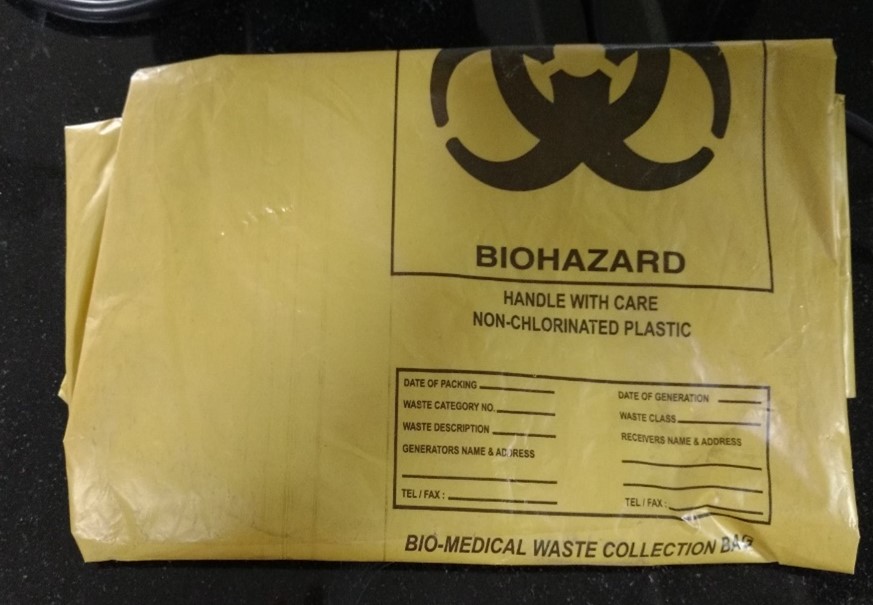
Red bag:
- Specimen collection tubes
- Sputum cups
- Cartridge Based Nucleic Acid Amplification Test (NAAT)/ Truenat cartridges
- Infected plastic
- Contaminated tips
- Pasteur pipettes
- Polymerase Chain Reaction (PCR) tubes
- Mycobacteria Growth Indicator Tube (MGIT) tubes
- Disposable LJ tubes
- Contaminated falcon tubes
- Used gloves
- Contaminated droppers
- Empty Cartridge-based Nucleic Acid Amplification Test (CBNAAT) reagent bottles
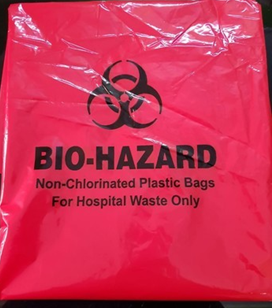
Blue bag:
Glass slide in Truenat machine and used microscopy slides. Slides should not be broken.
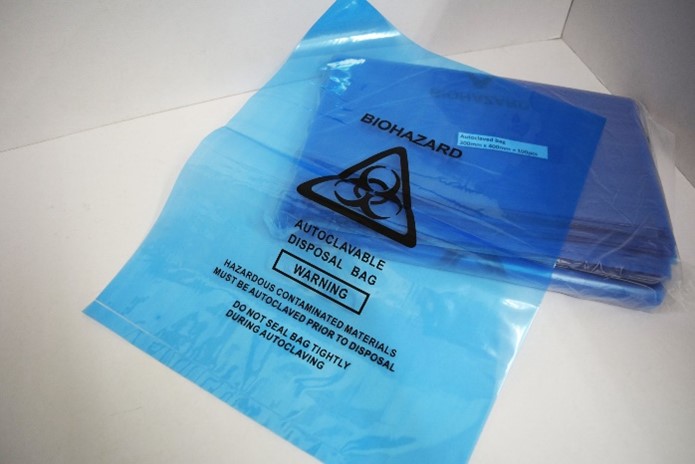
All these bags are to be labelled with the Biohazard logo (figure below) on them.
Figure: Biohazard Logo
- Waste generated in the Culture Drug Susceptibility Testing (CDST) laboratories is autoclaved prior to segregation in colour-coded bags.
- The biohazard materials are collected and handed over to handlers authorized by the pollution control board.
- Personnel handling/segregating biomedical wastes must use appropriate Personal Protective Equipment (PPE) and should be trained in spill management.
Resources
- Guidelines for Programmatic Management of Drug-resistant Tuberculosis in India, 2021.
- Guidelines for Management of Healthcare Waste as per Biomedical Waste Management Rules, 2016.
Kindly provide your valuable feedback on the page to the link provided HERE
Disposing Off Contaminated Material Safely in DMC Laboratory Settings
ContentThe Laboratory Technician (LT) must safely discard contaminated, biohazard waste generated by tuberculosis (TB) laboratories. This waste must be discarded along with the overall waste of the health facility in which TB services are provided.
There are 2 types of waste generated from DMC laboratory settings:
- Sputum containers with specimen and wooden sticks
- Stained slides
Disposal of Sputum Cups with Left-over Specimen, Lids and Wooden Sticks
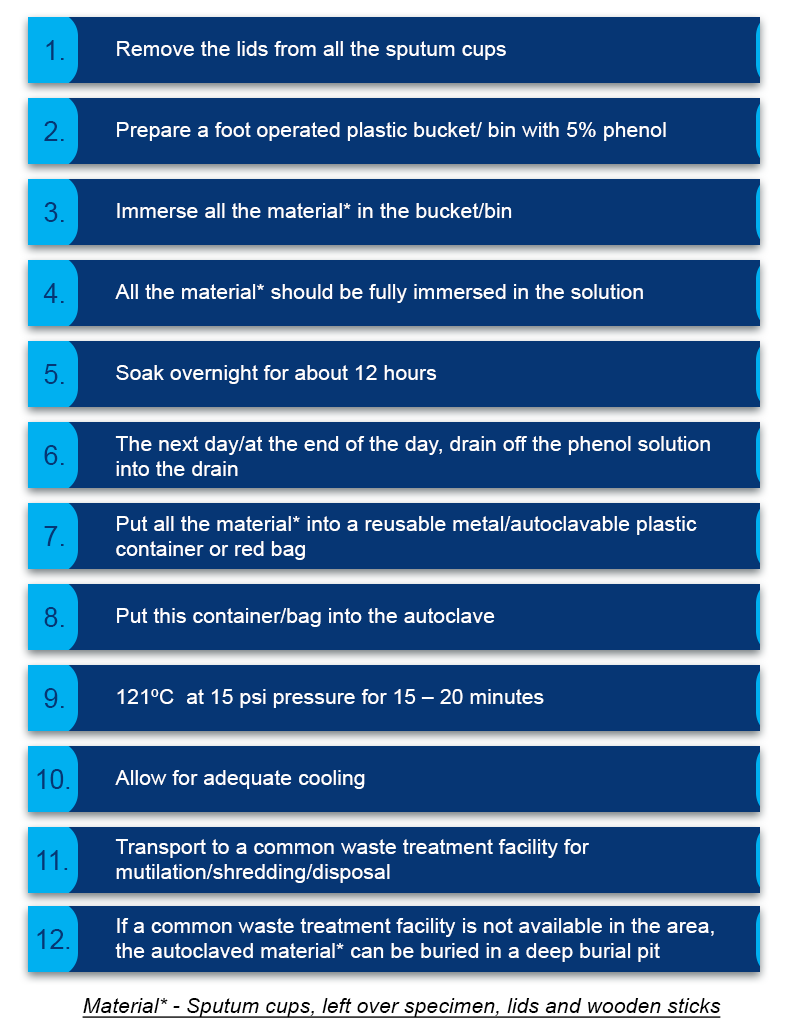
Figure 1: Steps for disposal of sputum cups with specimen, lids and wooden sticks
Important Points to Remember
- If autoclaving is not possible, boil in a pressure cooker of 7 litre capacity with water and submerge the contents for at least 20 minutes
- LTs and support staff handling biological waste need to wear gloves
- The red bag used for autoclaving must:
- Have a biohazard symbol
- Have adequate strength to withstand the load of the waste material
- Be made of non-PVC plastic material
Disposal of Stained Slides
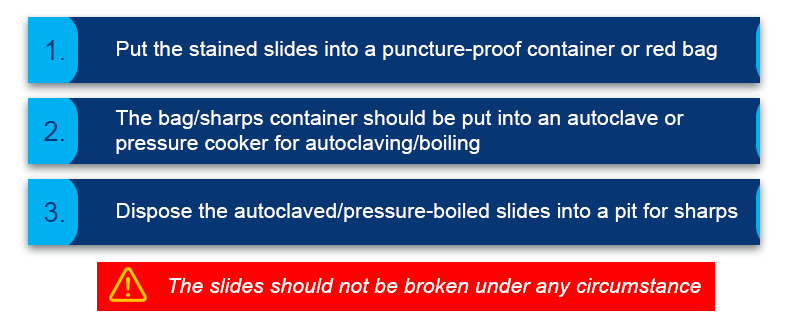
Figure 2: Steps for disposal of stained slides
Resources
Kindly provide your valuable feedback on the page to the link provided HERE
Mercury Spill in TB Lab Settings
ContentMercury is a harmful metal, and accidental spillage of mercury needs to be handled with care.
- Use of mercury thermometer should be avoided in the laboratory.
- A spill kit for mercury must be available if metallic mercury is present in the lab. The directions provided in the kit should be followed
- Spilled metallic mercury forms little spheres that roll into corners and cracks on the floor. If not completely cleaned up, mercury vapor will continue to be released into the air
- DO NOT use mercury thermometers in ovens. If the thermometer breaks, the heat will lead to dangerous concentrations of mercury in the air.
- Exercise additional caution, when placing or storing mercury thermometers to reduce the risk of breakage
- The Standard Operating Procedures (SOP) for Mercury Spill management should be displayed in TB laboratories
Handling Mercury Spill
Items needed:
- Apron
- Gloves
- Two cards/X-ray films
- Masks
- Powdered Sulphur (optional)
Cleaning the Spill
- Collect the mercury, using an index card or X-ray film, to form a pile or globule
- Mercury-absorbing powders, such as sulphur, can be used to amalgamate mercury
- Mercury waste and materials used in spill clean-up must be promptly placed in a sealed bottle
- Store metallic mercury in tightly closed, sturdy containers
- After all visible mercury has been collected, the area should be washed with a detergent solution, rinsed, and allowed to dry before use. This treatment should remove most remaining mercury residue
- Under no circumstances should mercury be swept with a broom or vacuumed with an ordinary vacuum cleaner. These procedures will disperse mercury more quickly into the air and spread the contamination
Resources
Kindly provide your valuable feedback on the page to the link provided HERE
-
-
CDST_LT-M7: Biosafety
Fullscreen-
CDST_LT: Introduction to biosafety
FullscreenBiosafety in TB Laboratories
ContentWhat is Biosafety?
Biosafety is safe handling and containment of infectious microorganisms and hazardous biological materials.
Why Biosafety?
Infections which are obtained through laboratory or laboratory-related activities are known as Laboratory Acquired Infections (LAI). These infections are major occupational health hazards and are a cause of concern for the safety of the staff working in laboratories.
Routes of entry of LAI
There are multiple routes of entry and transfer of toxic material through the body and its transfer to various organs and systems.
The most predominant routes of LAI are:
- Nose - Inhalation of infectious aerosols
- Mouth - Ingestion or exposure through mouth pipetting or touching mouth or eyes with contaminated fingers or contaminated object
- Skin and mucous membrane:
- Spills and splashes onto skin and mucous membranes
- Parenteral inoculations with syringes or other contaminated sharps
- Animal bites and scratches from research laboratories or activities
Biosafety guidelines are prepared to promote:
- Safe microbiological practices
- Safety equipment and facility safeguards for reducing LAIs
- To protect public health and the environment
Biosafety in Tuberculosis TB laboratory (lab)
In a TB lab, the primary risk for infection transmission is the aerosol contaminated with TB bacilli when:
- TB patients walk into the laboratory for specimen collection or other testing and may be a source of droplet infection if they cough during laboratory visits
- Procedures such as centrifugation, vortexing, and vigorous shaking generate significant aerosols that are biohazardous
Key points to consider for M. TB as a biological hazard are given in the table below.
MYCOBACTERIUM TUBERCULOSIS (M. TB) AS BIOLOGICAL HAZARD
RISK FACTORS
Pathogenicity
M.TB exposure may lead to infection
5-10% of infected persons will develop TB disease
Primary route of transmission
Inhalation
Stability
Tubercle bacilli can remain viable for extended periods in the environment
Infectious dose
As little as 10 bacilli can infect humans
Effective Vaccine (for adults)
No vaccine is available for adults
Effective treatment for strain susceptibility to different medicines
Yes
Effective treatment for MUltiple Drug Resistant (MDR), Extensively Drug Resistant (XDR) strains
Yes, but more difficult to treat than susceptible strains
Standards for TB Lab Biosafety
- Standards are prepared based on the recommendations from the WHO expert group in 2012.
- Standards use a procedural approach for the assessment of risk.
- It establishes minimum requirements necessary to ensure biosafety during TB microscopy, culture, drug-susceptibility testing (DST) and molecular testing in different countries and epidemiological settings.
Resources
Kindly provide your valuable feedback on the page to the link provided HERE
Biosafety in TB Laboratory: Risk Assessment Process
ContentRisk assessment is the process that enables the appropriate selection of microbiological practices, safety equipment, and facility safeguards that can prevent laboratory-associated infections (LAIs).
The figure below shows a flowchart that presents the risk assessment process for a biological hazard.
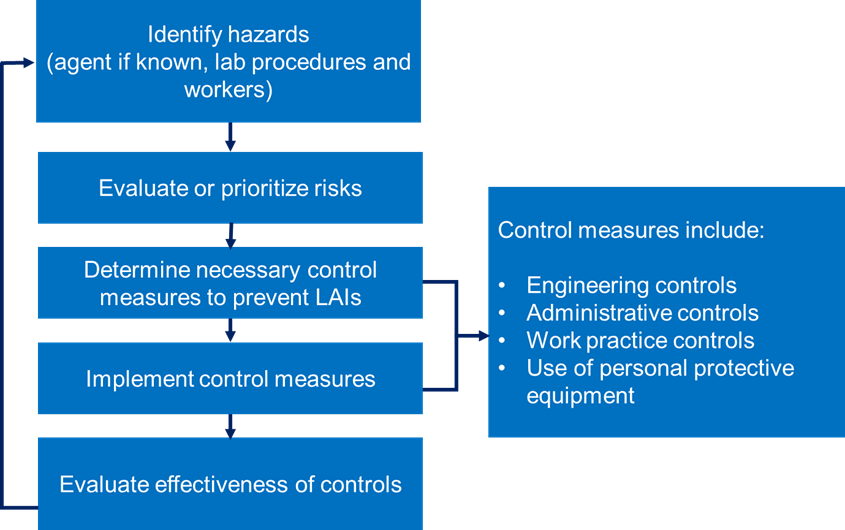
Figure: Risk assessment process for a biological hazard
Risk assessments for TB laboratories should consider:
- Bacterial load of materials (such as specimens and cultures)
- Viability of the bacilli
- Whether the material handled is prone to generate infectious aerosols during different procedures
- Laboratory’s workload and procedures; it is important that laboratories working with drug resistant strains should establish higher level precautions and biosafety measures
- Epidemiology of the disease and the patient population served by the laboratory
- Health/immune status of laboratory workers
- Experience and competency of laboratory staff in using good laboratory practices while handling infectious agents
- Equipment biosafety features required to prevent spill/breakage/aerosol generation when handling potentially infectious material
- Maintenance of equipment
- Biomedical waste management
Resources
Kindly provide your valuable feedback on the page to the link provided HERE
Biosafety in TB Laboratory: Risk Monitoring
ContentRisk monitoring is a regular inspection of the laboratory environment to monitor risks and control measures.
Stages of Risk Monitoring
1. Thorough investigation of lab incidents/lab accidents to understand the reason for such accidents
2. Review of corrective actions taken after the lab incident/lab accident
3. Implementation of preventive measures post-incident to prevent the future occurrence of such events
4. Documenting the process of risk monitoring
Importance of Risk Monitoring
Risk monitoring is important to ensure that selected and implemented biosafety measures are constantly improved.
Development of a new procedural risk assessment/ review of an existing one is required in the following situations:
- If there is an initiation of new work or there is a change in the work environment
- If there are some alterations to the workflow or volume of work done
- Construction of a new lab or modification in the lab structure
- Introduction of new equipment into the lab
- Alterations in staffing arrangements
- Alterations in standard operating procedures or working practices
- Major incidents in the laboratory like a major spill
- Evidence of, or suspicion of, any staff acquiring a Laboratory Acquired Infection
- Emergency responses and contingency planning requirements
Resources
Kindly provide your valuable feedback on the page to the link provided HERE
Biosafety in TB Laboratory: Factors to be Considered in TB Laboratory Risk Assessment
ContentStaff working with patient specimens and live mycobacterial cultures must operate under appropriate biosafety conditions with adequate infection control measures in place, including staff health checks.
For the safety of personnel working in TB labs, the following factors must be considered to avoid the risk associated with pathogenicity and transmission of TB bacilli.
The 4 key factors that must be considered during risk assessment of TB labs include:
1. The organism i.e., M. tuberculosis: Different strains of TB carry different levels of individual and community hazards. The following should be considered:
- Route of transmission (Inhalation of aerosols)
- TB epidemiology and patient population served by the laboratory (drug-sensitive TB, drug-resistant TB, non-TB patient proportions): MDR and XDR strains carry higher risks and cause greater harm to the infected individual as treatments may be limited or less effective.
2. Specimen Handling: Procedures involving generation of aerosols are more hazardous. The following should be considered:
- Bacterial load in the environment
- Viability of bacilli in sputum specimens and cultures
- Manipulations (centrifugation, vortexing, and vigorous shaking) that are likely to generate infectious aerosols
3. Staff and Workload: Individuals in the laboratory differ in their susceptibility to TB, higher-risk individuals may be less experienced, over-worked or have an underlying health condition. The following should be considered:
Level of experience and competency of the laboratory staff:
- Training status of staff to perform laboratory procedures
- Staff’s competency procedures in handling potentially infectious material and response to emergencies
- Ability of the staff to use biosafety equipment properly
- Review of the technical proficiency of staff
- Staff proficiency in using aseptic techniques and Biological Safety Cabinets (BSCs)
- Staff willingness to accept responsibility for protecting themselves and co-workers
Health status of staff: Higher-risk groups include:
- Individuals with reduced immunity which may be caused by certain medications
- HIV-infection or pregnancy may increase the risk of becoming infected with TB
- Diabetic individuals
4. Location of the Laboratory: TB Laboratories are generally located away from the main health facilities in separate building with unrestricted entrance to the building. If the laboratory cannot be located in a separate, dedicated building, separation may be achieved by placing the laboratory at the blind end of a corridor. TB containment laboratories should have access only to authorized staff through an anteroom.
Resources
Kindly provide your valuable feedback on the page to the link provided HERE
-
CDST_LT: Biosafety measures for TB Laboratories
FullscreenTB Laboratory Design and Facilities as a Biosafety Measure
ContentThe basic recommended design features of TB laboratories to ensure appropriate biosafety are:
- Adequate ventilation and directional airflow; 6-12 air exchanges per hour (ACH) is adequate ventilation for TB laboratories.
- Ample space for the safe conduct of laboratory work and for cleaning and maintenance (Figure 1).
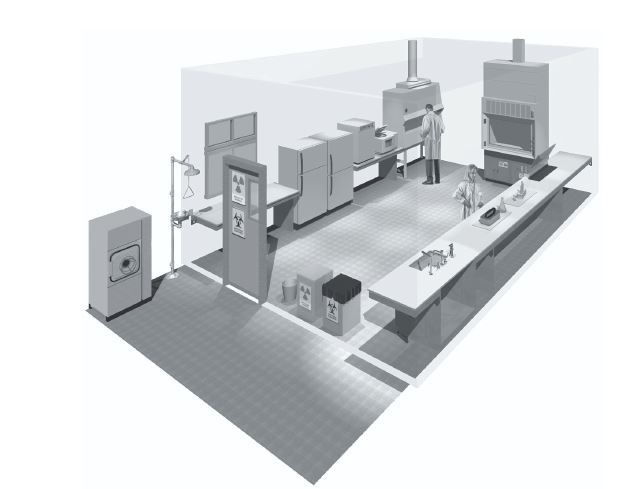
Figure 1: Ample and open spacing in an ideal TB lab

- Walls, ceilings and floors should be smooth and easy to clean.
- Floors should be slip-resistant.
- Benchtops should be resistant to the chemicals and disinfectants normally used in the laboratory.
- Proper and adequate illumination: Undesirable reflections and glare should be avoided; curtains must not be used.
- Open spaces between and under benches, cabinets and equipment to allow access for cleaning.
- Storage spaces should have the following features:
- Adequate to hold supplies for immediate use and prevent clutter on bench tops and in corridors outside the laboratory.
- Provision of additional space for long-term storage conveniently located outside work areas.
- Well-defined and specific area for safe preparation, handling and storage of acids, stains and solvents.
- Facilities for eating, drinking and resting should be provided outside work areas.
- Provisions for adequate handwashing, which includes:
- Sink and soap in every room of the laboratory, preferably located near the exit.
- Automated or hands-free taps are recommended.
- The dispenser for paper towels should be near the sink.
- Laboratory doors should have vision panels and appropriate fire ratings; they should be self-closing (Figure 2).
- There should be a reliable and adequate electricity supply.
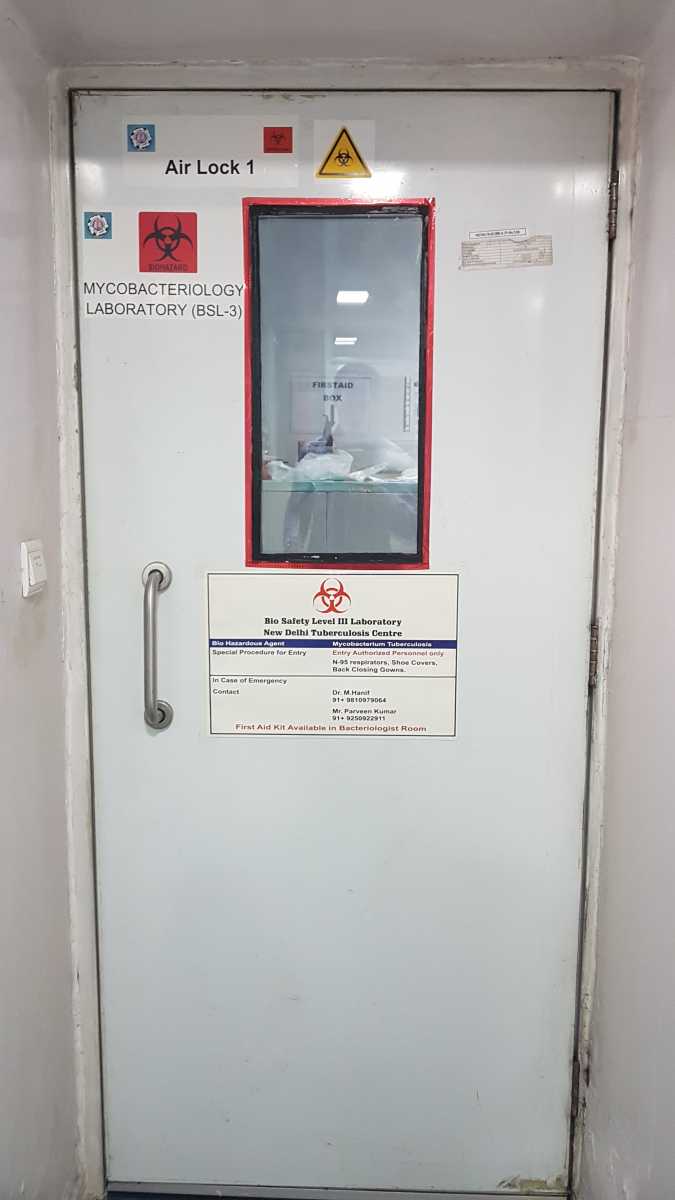
Figure 2: Lab doors with fire rating shown

Laboratory furniture should be sturdy and made of impervious materials. It is important that the furniture can be decontaminated easily. Therefore, cloth-covered furniture should never be used in the laboratory (Figure 3)
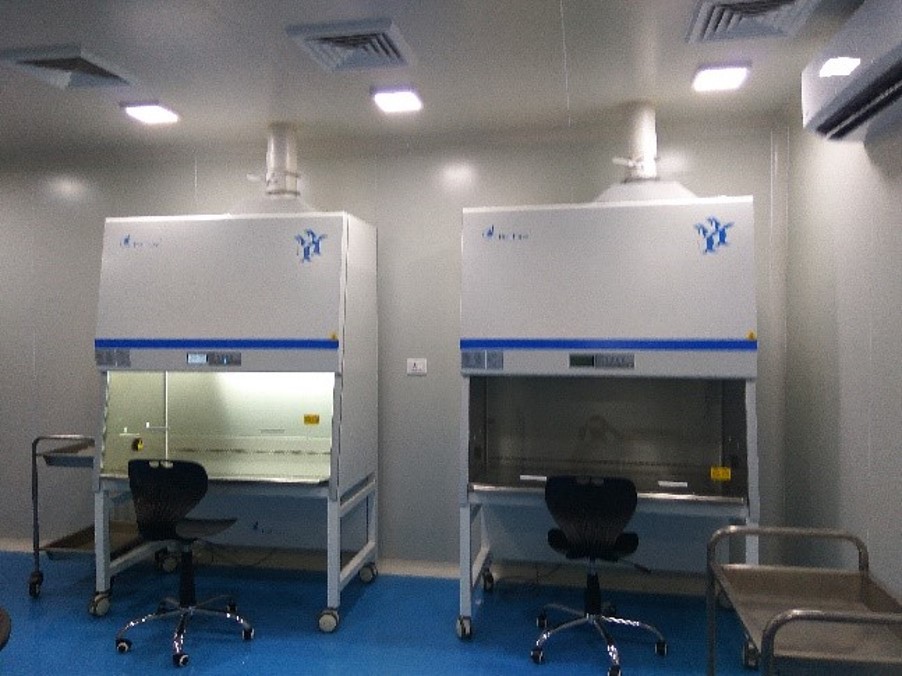
Figure 3: Furniture, like chairs, must not be covered with cloth
Resources
Kindly provide your valuable feedback on the page to the link provided HERE
Ventilation in TB Laboratories as a Biosafety Measure
ContentVentilation is an essential biosafety design feature in a TB lab.
Laboratory ventilation has three basic elements:
1. Ventilation rate
Amount of outdoor air that flows into the laboratory.
2. Airflow direction
Overall direction of air flowing through the laboratory should be from functionally clean areas to dirty areas.
3. Airflow pattern
External air should be delivered to each area of the laboratory and the internal air be removed efficiently.
Adequate ventilation is the most important biosafety feature of a TB laboratory. The figure below shows the main recommendations when considering ventilation in TB labs.

Figure: Expert Group Recommendations for TB Lab Ventilation

Ventilation in TB Containment Laboratories
- A ducted air ventilation system is required.
- This system must provide a sustained negative pressure, which maintains directional airflow by drawing air into the laboratory from “clean” areas toward “potentially contaminated” areas.
- The laboratory should be designed such that, under failure conditions, the airflow will not be reversed.
- Laboratory personnel must be able to verify directional airflow. A visual monitoring device, which confirms directional airflow, must be provided at the laboratory entry.
- Audible alarms should be considered to notify personnel of airflow disruption.
- The laboratory exhaust air must not re-circulate to any other area of the building.
- The laboratory building exhaust air should be dispersed away from occupied areas and from building air intake locations, or the exhaust air must be HEPA filtered.
Resources
Kindly provide your valuable feedback on the page to the link provided HERE
Biosafety Measures for TB Laboratory Equipment
ContentAs part of the biosafety measures in TB labs, there are specific standards that need to be followed for lab equipment.
Key Features of Laboratory Equipment in TB Laboratories
The equipment should be:
- Designed to prevent or limit contact between the operator and infectious material.
- Constructed from materials impermeable to liquids and resistant to corrosion.
- Fabricated to be smooth, and without sharp edges and unguarded moving parts.
- Designed, constructed and installed to:
- Facilitate simple operations.
- Allow easy maintenance, cleaning, decontamination and certification testing.
- Not consisting of glassware and other breakable materials, whenever possible.
- Shock-proof and of standard materials, such as in case of electrical wires, plugs and other accessories.
Resources
Kindly provide your valuable feedback on the page to the link provided HERE
-
CDST_LT: TB laboratory classification
FullscreenClassification of TB Laboratories
ContentBased on 2012 WHO expert group recommendations, TB labs can be classified into three types based on their levels of procedural risk:
- Low TB risk
- Moderate TB risk
- High TB risk (TB Containment Laboratory)
- Recommendations based on minimum requirements needed to limit or reduce risks of infection in laboratories for carrying out specific procedures.
- Additional measures may be deemed necessary following a site-specific risk assessment.
Based on the operational and diagnostic methods adopted, the laboratories can be classified as:
- The Designated Microscopy Centers (for microscopy only)
- The Nucleic Acid Amplification Testing (NAAT) Laboratories or the Molecular Test Laboratories
- The Culture and Drug Sesitivity Testing (C&DST) Laboratories or the Phenotypic Laboratories
Resources
Kindly provide your valuable feedback on the page to the link provided HERE
Low-risk TB Laboratories
ContentDepending on the procedural risk in the TB lab, the lab is classified into low, moderate and high-risk categories.
Low-risk TB laboratories work on sputum specimens for:
- Direct Acid-fast Bacilli (AFB) smear microscopy
- Cartridge-based Nucleic Acid Amplification Test (CBNAAT)/ Truenat

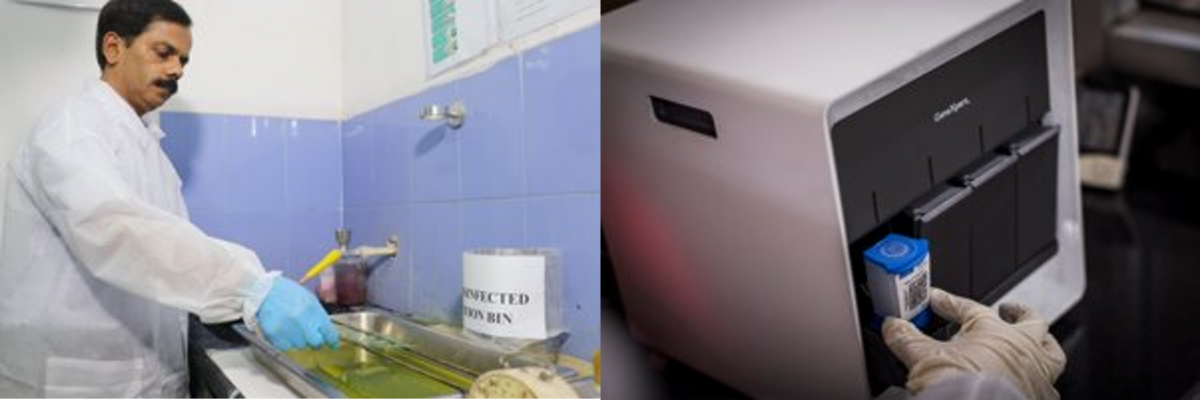
Figure 1: Procedures Conducted in a Low-Risk TB Lab
- Procedures that involve direct microscopy or killing of the mycobacteria before microscopy are taken up in these labs.
- These labs have a low risk of generating infectious aerosols from specimens and a low concentration of infectious particles.
Features and Essential Minimum Biosafety Measures of Low-risk TB Labs
1. Space requirements
- Bench spaces should be separated from areas used to receive specimens and administrative areas used for paperwork and telephones.
- Ensure adequate ventilation; it is important to maintain natural or mechanical, directional airflow with 6-12 air changes per hour (ACH). Workstations are optional solutions.
2. Procedural requirements
To minimize the generation of aerosols:
- Carefully open specimen containers.
- Air-dry smears and use a flame to fix them.
- Use disposable wooden sticks or transfer loops.
For the handling of leaking specimen containers: Discard and request a fresh sample.
3. Personal Protective Equipment (PPE) requirements
- Protective laboratory coats should be worn at all times in the laboratory.
- Gloves must be worn for all procedures that involve direct contact with potentially infectious materials.
- Gloves should not be reused.
- Staff should always wash their hands before leaving the laboratory.
- Respirators are optional.

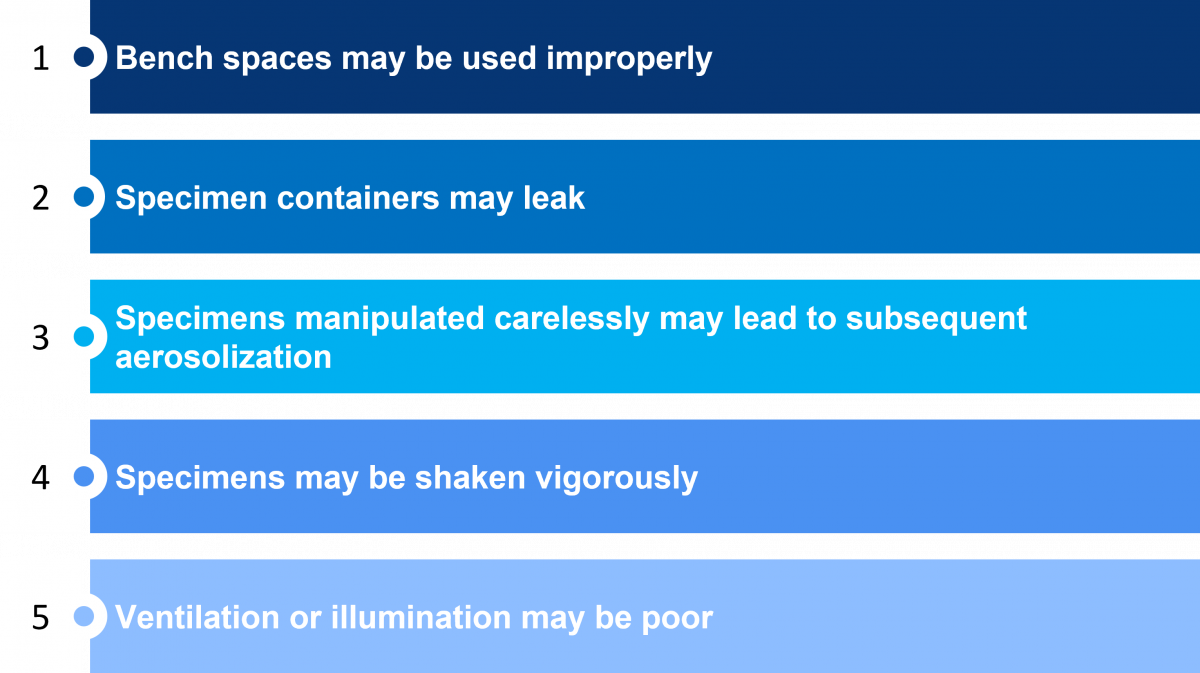
Figure 2: Challenges in a Low-risk TB Lab that Increase the Risk of Infection
Resources
Kindly provide your valuable feedback on the page to the link provided HERE
Moderate-risk TB Laboratories
ContentModerate-risk TB Laboratories can:
- Process specimens for inoculation on primary solid-culture media
- Perform direct line-probe assays and direct Drug Sensitivity Testing (DST)
Essential Minimum Biosafety Measures
- Biological Safety Cabinets (BSCs): Class I or II
- Ventilation: 6-12 ACH
- Personal Protective Equipment: Laboratory gowns and gloves
- Laboratory design: Restricted traffic area
- Decontamination and waste disposal
- Procedures optimized for minimizing the generation of aerosols
Challenges of Moderate-risk TB Laboratories
- Staff may work in areas with poor ventilation and/ or poor illumination.
- BSCs may be poorly maintained and not certified or not be properly ducted.
- Careless manipulation of specimens may lead to aerosolization.
- Specimen containers may break or leak during centrifuging.
- Adequate warnings of biohazards may be lacking, and information on who should be contacted during an emergency may be inadequate.
- Cooling or heating systems may not work properly.
Resources
Kindly provide your valuable feedback on the page to the link provided HERE
-
CDST_LT: Personal Protective Equipment (PPE)
FullscreenPersonal Protective Equipment [PPE] Use in TB Lab Settings
ContentWhat is Personal Protective Equipment (PPE)?PPE refers to physical barriers which are used alone or in combination to protect an individual's mucous membranes, airways, skin and clothing from contact with infectious agents, hazardous material, conditions or processes.
Components of PPE
- Protective clothing: Surgical gowns and laboratory (lab) coats
- Respiratory devices: N95 respirators
- Hand protection: Gloves
- Head protection: Headgear/ hair covers/ caps
- Foot protection: Shoe cover, safety shoes/ closed-toe shoes
- Eye protection: Safety glasses/ goggles, shields
PPE Hazard Assessment
- Evaluation of the PPE requirements for a specific activity or work environment is carried out by the lab director.
- For TB labs it is based on the risk assessment. PPE requirements will thus differ according to whether activities are classified as low risk, medium risk or high risk.
PPE Usage in Different Sections of the TB Laboratory
The table below lists the different PPE requirements for different sections of the TB lab.
Table: PPE usage in different sections of TB labs Section/ RoomPPE used/ preferredSample collection/ reception roomLab coat, gloves Smear microscopy section/ room/ Designated Microscopy Centre (DMC)Lab coat, glovesCartridge-based Nucleic Acid Amplification Test (CBNAAT) sample processing sectionLab coat, gloves, Surgical maskSample opening area(in a higher laboratory) Surgical gown, gloves and N95 respirator Media preparation room Designated lab coat, gloves, hair cover, shoe covers/ closed-toe shoes Culture reading roomLab coat, gloves, N95 respiratorLine Probe Assay (LPA) clean roomsDesignated lab coat, gloves, hair cover, shoe covers/ closed-toe shoesWalk-in cold roomLab coat, insulating gloves, shoe covers/ closed-toe shoesWalk-in incubatorLab coat, respirator and gloves, shoe covers/ closed-toe shoesCorridor inside the labLab coat, shoe cover/ closed-toe shoesDeep freezersLab coat, cryo glovesDisinfection, washing and sterilisation roomLab coat, gloves (heavy duty), insulating gloves, closed-toe shoesResources
- National Guidelines for Infection Prevention and Control in Healthcare Facilities, 2020, MoHFW, GoI.
Resources
Use of a PPE in a DMC
ContentThe use of appropriate Personal Protective Equipment (PPE) in a TB laboratory is determined by risk assessment (according to the procedure and suspected pathogen).
Designated Microscopy Centres (DMCs) are low-risk TB laboratories, hence PPE should be used as follows:
- Laboratory coats should be worn at all times by the Laboratory Technician (LT) while working in the laboratory.
- Gloves and long-sleeved laboratory coats should be used during sample collection, opening sample transport boxes, handling leaky specimen containers, smear preparation and staining smears.
- Masks are not required for use during the preparation of sputum smears in well-ventilated areas.
- LTs and support staff handling biological waste should wear gloves.
- Patients that visit DMC to provide sputum samples should be advised to wear masks.
It is advised that the laboratory should maintain adequate ventilation by keeping the windows open all the time or installing exhaust for the personal protection of the laboratory staff.
Resources
- Guidelines on Airborne Infection Control in Healthcare and Other Settings, MoHFW, 2010.
- Infection Prevention and Control of Epidemic- and Pandemic-Prone Acute Respiratory Infections in Health Care, WHO, 2014.
- Training Modules (1-4) for Programme Managers and Medical Officers, NTEP, 2020.
Assessment
Question
Answer 1
Answer 2
Answer 3
Answer 4
Correct answer
Correct explanation
Page id
Part of Pre-test
Part of Post-test
LTs and support staff handling biological waste should not wear gloves.
True
False
2
LTs and support staff handling biological waste should wear gloves.
Yes Yes Laboratory Gowns for Use by Lab Personnel
ContentLaboratory Gowns (Figure 1)
- Protect the skin and clothing from large droplets of infectious or hazardous materials that may be splattered in the laboratory.
- Gowns must be worn for specimen processing, tuberculosis (TB) culture and drug sensitivity testing (DST).
- The gown must have a solid front and close and tie in the back.
- The gown must have long-sleeves and cuffs.
- For maximum protection, gloves must be pulled over the cuff.
Figure 1: Laboratory Gowns
Laboratory Coats (Apron) (Figure 2)
- Lab coats must be worn when working on specimens and acid-fast bacilli (AFB) smears and not during TB culture work.
- Lab coats must be made from washable and autoclavable cloth or disposable materials.
- It must be closed up in the front (with snaps, buttons or velcro) and must have long sleeves.
- It must be buttoned till the top at all times in the lab.

Figure 2: Laboratory Coat
Do’s and Don’ts for Laboratory Gowns and Coats
- The laboratory gown must be laundered once a week and immediately after being overtly contaminated.
- If staff is using a reusable gown, it must be laundered and sterilized as required before reuse.
- Used gowns must be stored in separate cupboards or lockers.
- Hang the gown on designated hooks in the lab.
- Lab gowns must not be worn outside the laboratory, e.g., in communal areas, toilets, offices, etc.
- Staff must wear appropriately sized gowns and coats.
- Lab coats must not be taken home for washing. Laboratory personnel in-charge must arrange for cleaning from the worksite only. Before laundering, the gowns and lab coats must be disinfected or autoclaved.
Resources
Kindly provide your valuable feedback on the page to the link provided HERE
Donning and Doffing of PPE
ContentSequence of Donning of Personal Protective Equipment (PPE): (How to put on PPE)
- Footwear
- Gown
- N-95 respirator
- Goggles and face shield
- Gloves
Donning must be done before entering the patient/ laboratory area.
Sequence of Doffing of PPE: (How to safely remove PPE)
- Gown and gloves
- Footwear
- Goggles and face shield
- N-95 respirator
- Wash hands or use an alcohol-based hand sanitizer immediately after removing all PPE.
Where to remove PPE?
- PPE must be removed at doorway, before leaving the patient room or in the anteroom.
- Staff must remove respirator outside the room, after the door has been closed.
Four Key Points to Remember about PPE Use
- Staff must don the PPE before any contact with the patient, generally before entering the room.
- After wearing the PPE on, staff must remain careful to prevent spreading contamination.
- After completing the tasks, staff must remove the PPE carefully and discard it in the receptacles provided.
- After removing the PPE, immediately hand hygiene must be performed before going on to the next patient.
Click the video below to see the donning and doffing of PPE.
Resources
- Manual for Donning and Doffing of PPE by Center for Disease Control and Prevention (CDC).
- Steps to put on Personal Protective Equipment (PPE), WHO Poster.
Kindly provide your valuable feedback on the page to the link provided HERE
N95 Respirators for TB Lab Personnel
ContentN95 respirators are Personal Protective Equipment (PPE) used as a biosafety measure in clinical and laboratory settings.
N95 Respirators
- N95 filtering facepiece respirators are air-purifying respirators.
- Certified to have a filter efficiency level of 95% or greater against particulate aerosols free of oil and 0.3 microns in size.
- N95 (United States Standard NIOSH N95) or program-specific guidelines should be followed in the selection of these respirators.
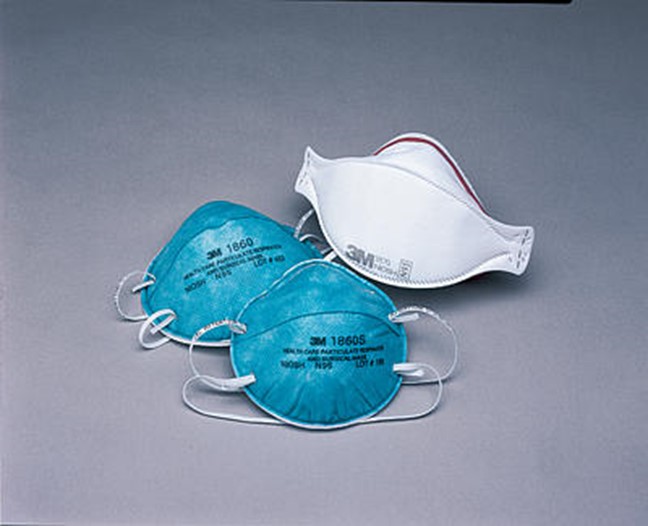
Figure: N95 Respirators
Use of N95 Respirators in TB Laboratories
- Not required in low- and moderate-risk TB laboratories but are required in high-risk TB laboratories
- Must be available in laboratories where culture manipulations are performed
- Should be included as part of a laboratory’s spill clean-up kit
- Should never be used as a substitute for a properly maintained and functioning Biosafety Cabinet (BSC) and other PPE
Approval Required for N95 Use
Personnel who are required to wear respirators, shall be approved for N95 use after completing the following:
- Medical Evaluation/ Clearance: To determine if users are physically fit to wear a respirator.
- Training: To ensure users are familiar with N95 respirators, their proper use and protective limitations.
- Fit-testing: To determine which respirator model/ size provides the proper fit for the user. Such a fit-test is required on an annual basis and when a different model is being used or there are changes in facial characteristics.
Table: Showing the difference between user seal check and fit-test
USER SEAL CHECK
FIT-TEST
Should be conducted each time a respirator is put on, to determine if it is properly sealed to the face.
- Evaluation of how a respirator fits, conducted by trained personnel. (Includes the use of a scented solution and the determination of whether the employee can detect the odour/ taste).
- Should be conducted prior to the use of a respirator and annually thereafter OR when a new respirator is being introduced.
Limitations of N95 Respirators
- N95 respirators ONLY filter out particulate contaminants. N95 respirators do not protect from chemical vapours/ gases, high-risk exposures such as those created by aerosol-generating procedures (i.e., bronchoscopy, autopsy) and asbestos handling.
- N95 respirators are generally single-use disposable. Considering the funding constraints for TB labs, the availability of N95 can pose a challenge.
Comparison between the Surgical Mask and N95 Respirators
- The purpose of a surgical mask is to protect the environment or the community from the wearer of the mask. It is usually worn by a patient infected with TB or other infectious diseases to protect others.
- Unlike the N-95 respirator, a surgical mask offers less protection to the wearer from aerosolized TB and is unable to form a tight seal; thus aerosols are able to come in through the gaps.
Disposal of N95 Respirators
- TB lab personnel must remove the mask using the appropriate technique (i.e., must not touch the front but remove the lace from behind), only after coming out of the laboratory.
- Staff must clean their hands by using an alcohol-based hand rub or soap and water, after removal or whenever inadvertently touching a used mask.
- N-95 mask must be discarded and collected in separate 'yellow colour-coded plastic bags' (suitable for biomedical waste collection).
Resources
- National Guidelines for Infection Prevention and Control in Healthcare Facilities, 2020. Ministry of Health and Family Welfare, Government of India.
- Importance of a User Seal Check, Manual from 3M Science.
- Frequently Asked Questions about Respiratory Protection by Center for Disease Control and Prevention (CDC).
Kindly provide your valuable feedback on the page to the link provided HERE
Gloves for TB Lab Personnel
Content- Gloves are made for protecting the hands of health professionals from contaminated and infectious surfaces.
- Lab staff must wear gloves for all the procedures that involve direct or accidental contact with infectious material.
- Gloves are made for single-use (disposable gloves) and should not be re-used (see Figure 1)
- Gloves are made from vinyl, latex or nitrile.
- For the staff who are allergic to latex and when performing PCR, nitrile gloves should be available for use.

Figure 1: Disposable Gloves
Do’s when using gloves
- Staff must select and use the right kind of glove for the job they are going to perform.
- Always use the correct size of gloves. Staff regularly need to check the fitness and size suitable for them.
- Gloves must be resistant to the chemical used during the procedure.
- Staff must inspect their gloves before using them.
- Before wearing gloves, staff must remove any rings, watches, or bracelets that might cut or tear the gloves.
- If gloves are torn during a procedure, replace them immediately (Figure 2).
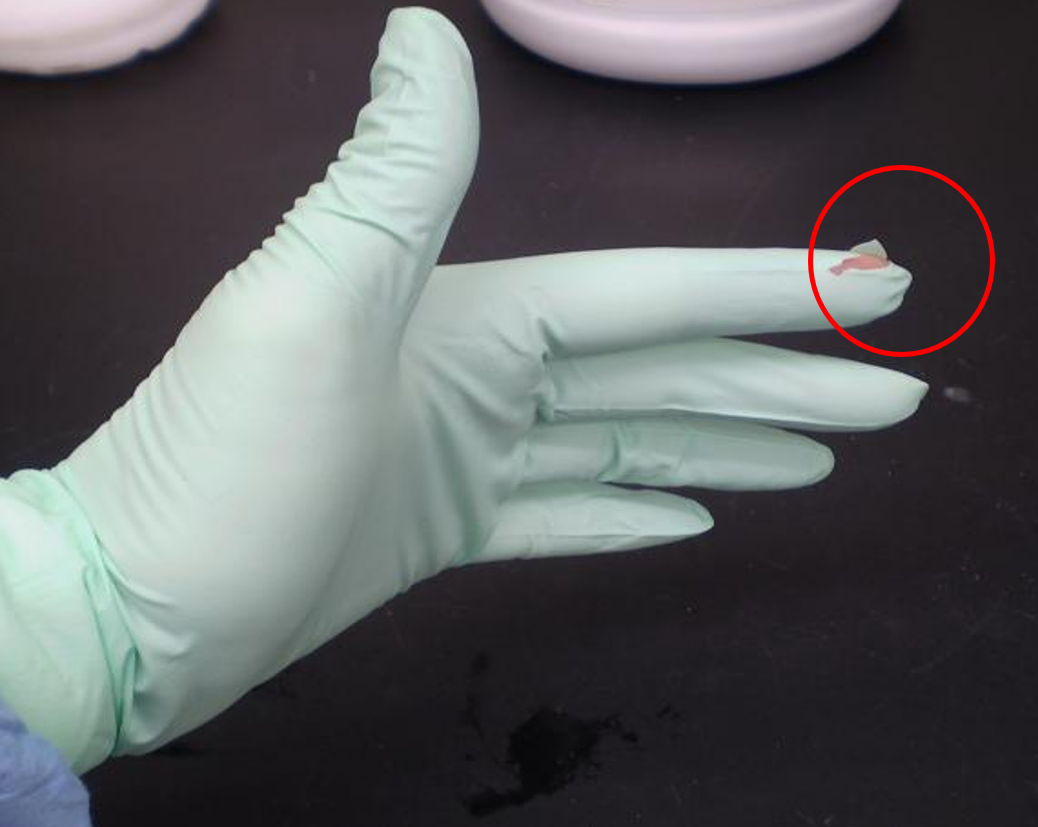
Figure 2: Torn gloves need immediate replacement
- Staff must wear double gloves when working with potentially hazardous materials in the biosafety cabinet.
- Staff must pull the gloves over the cuff of the lab gown for maximum protection.
- Staff must change the gloves:
- At the end of the task
- If gloves are soiled/punctured
- Soiled gloves must be discarded in the bag provided for waste disposal.
- Gloves guard against infection through cuts and abrasions on the hands. Cuts and abrasions must be covered with a sticking plaster and/or suitable barrier dressing at all times while in the laboratory
- Cryo gloves should be used while handling deep freezers and cotton gloves should be use while handling the autoclave
Don’ts when using gloves
- Contaminated gloves must not be used to handle or to operate equipment (e.g., microscope or telephone), that would otherwise never become contaminated.
- Staff must never wear gloves outside the laboratory.
- After wearing gloves, staff must avoid/limit touching any surface
Resources
Kindly provide your valuable feedback on the page to the link provided HERE
-
CDST_LT: Emergency preparedness
FullscreenEmergency Preparedness Plan in TB Lab Settings
ContentThe emergency preparedness plan in a tuberculosis (TB) laboratory is a written document that should provide:
- Operational procedures for incidents and accidents while storing or dealing with tubercule bacteria isolates
- Precautions against natural disasters, for example, fire, flood, earthquakes and explosions
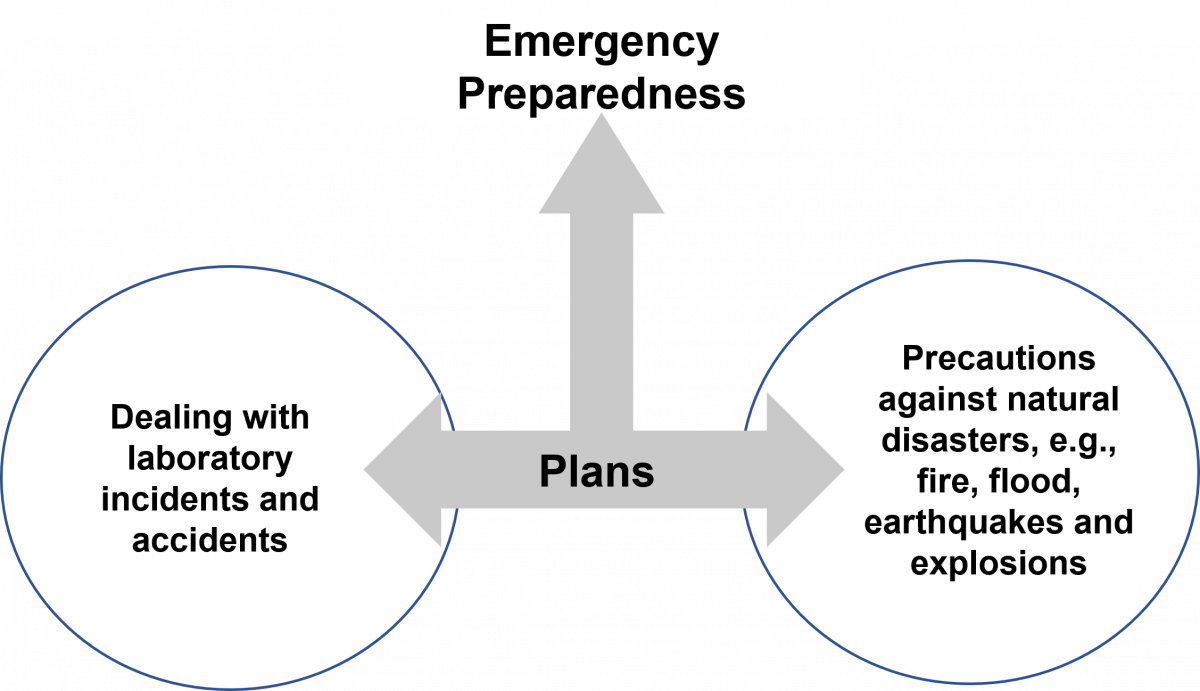
Figure: Composition of an Emergency Preparedness Plan
These protocols should follow standard protocols that are put together by organizations such as the World Health Organisation (WHO) and should be tailored to the needs of the laboratory.
The emergency preparedness plan should be prepared by the senior microbiologist/ laboratory technician who heads the laboratory, after due proceedings from the institutional infection control committee.
The plan can be revised from time to time based on the experiences during the course and should contain, who does what, the standard operating procedures for handling the emergency, checklists for operations and logistics, and emergency contact numbers.
The plan should provide operational procedures for the following scenarios:
- Responses to natural disasters such as fires, floods, earthquakes or explosions
- Risk assessments associated with any new or revised procedures
- Managing exposures and decontamination
- Emergency evacuation of people from the premises
- Emergency medical treatment of exposed and injured persons
- Medical surveillance and clinical management of persons exposed to an incident
- Epidemiological investigation and continuing operations after an incident
Considerations for the Emergency Plan
- Location of high-risk areas, such as laboratories and storage areas
- Identification of at-risk personnel and populations
- Identification of emergency procedures according to the level of risk
- Identification of responsible personnel and their duties, such as the biosafety officer, safety personnel, local health authority, clinicians, microbiologists, veterinarians, epidemiologists, fire services and police services
- Treatment and follow-up facilities that can receive exposed or infected persons
- Transport for exposed or infected persons
- How emergency equipment will be provided, such as protective clothing, disinfectants, chemical and biological spill kits, decontamination equipment and supplies
Resources
Kindly provide your valuable feedback on the page to the link provided HERE
TB Laboratory Accidents Leading to Infectious Spillage
ContentThere are different types of accidents that can occur in the TB lab. These accidents and actions to be taken are elaborated below:
Tube Breaks or Infectious Spills inside the Biosafety Cabinet (BSC)
- Place absorbent tissue over the spill and apply the disinfectant for 30 mins to 1 hour.
- Carefully collect contaminated sharps material and place it in a puncture-resistant container for disposal.
- Clean the walls of BSC with a layer of absorbent paper towel liberally soaked in disinfectant solution.
- Electrical equipment should be checked carefully before it is used.
- Collect other contaminated material in a biohazard bag for appropriate disposal.
Infectious Spills outside the Biosafety Cabinet
- Everyone should immediately vacate the affected laboratory area.
- The laboratory manager should be informed of the incident immediately.
- Staff must be prevented from re-entering the laboratory for at least 1 hour, to allow aerosols to be removed through the laboratory’s ventilation system and allow time for heavier particles to settle.
- Signs should be posted indicating that entry is forbidden during the clean-up procedure (Figure below).
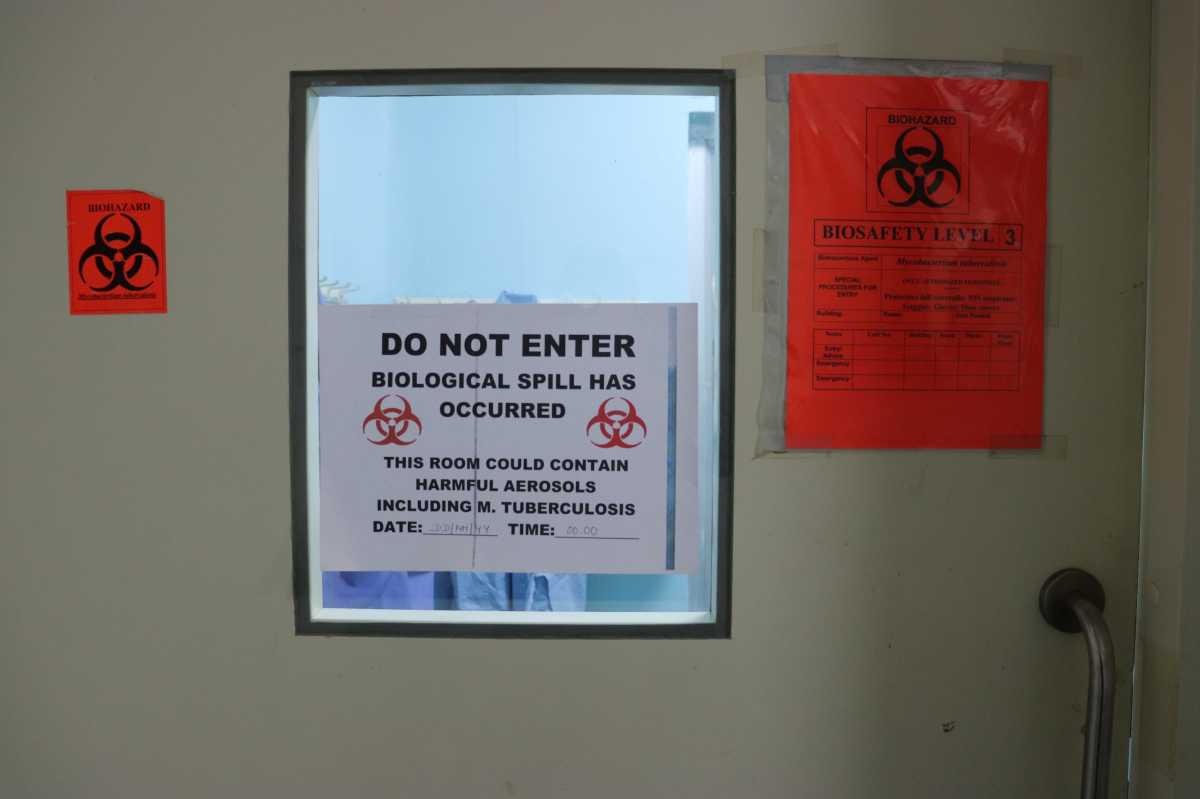
Figure: Door signs when a spill has occurred
- Appropriate protective clothing and respiratory protection MUST be worn during cleaning.
- Standard operating procedures for spill clean-up MUST be followed.
- The incident should be documented.
Spill Clean-up Procedure to be Used
- Put on gloves, a protective laboratory gown and a respirator.
- Re-enter the affected area.
- Cover spill with cloth or paper towels to contain it.
- Pour appropriate disinfectant over paper towels and the immediate surrounding area.
- Apply disinfectant concentrically, beginning at the outer margin of the spill and working towards the centre.
- Allow sufficient time for the disinfectant to act, before clearing away any material for disposal.
- Clean up the decontaminated area and place any contaminated material in a biohazard bag for disposal.
Tube Break or Spill Inside the Centrifuge: Clean-up Procedure
- The tube should be contained within the safety cup.
- Place the unopened safety cup in the BSC.
- Let sit undisturbed for 30 minutes.
- Disinfect all inside surfaces of the centrifuge.
- Carefully open the safety cup in which break occurred, place lid, top-down, next to the cup.
- Remove uncompromised tubes and disinfect the outer surface of tubes by wiping with disinfectant-soaked cotton/ gauze.
- Pour disinfectant into cup and lid, taking care not to splash.
- Let stand for 30 minutes, pour off disinfectant and place the broken tube into the discard container to be autoclaved.
- Disinfect the entire surface of the BSC.
- Wash the cup and lid, and insert in hot soapy water.
- Remove the O-ring to clean underneath, air-dry, and re-silicone the O-ring.
Resources
- World Health Organization Tuberculosis Manual 2012, p42.
- World Health Organization Lab Safety Manual, 3rd edition.
Kindly provide your valuable feedback on the page to the link provided HERE
Spill Clean-up Kit in TB Lab Settings
ContentThe spill response kits in a tuberculosis (TB) lab should be made available to deal with any contaminated or hazardous fluid spillage. Spill response kits should be made available:
- 1 kit placed outside the TB containment laboratory
- 1 kit placed inside the laboratory
The spill cleanup kit should include the items listed below:
- Hypochlorite solution (or 5% Phenol) stored in an opaque bottle
- Respirators (1 box)
- Gloves (1 box)
- Laboratory gowns (4-6 disposable gowns)
- Dustpan and brush (for disposal if necessary)
- Paper towels
- Soap
- Sharps container
- Biohazard bags
Note: Hypochlorite solution has a limited shelf life. For a large spill, it may be better to prepare the disinfectant solution at the time of clean up
Figure: BSL lab spill kit with spill incident logbook 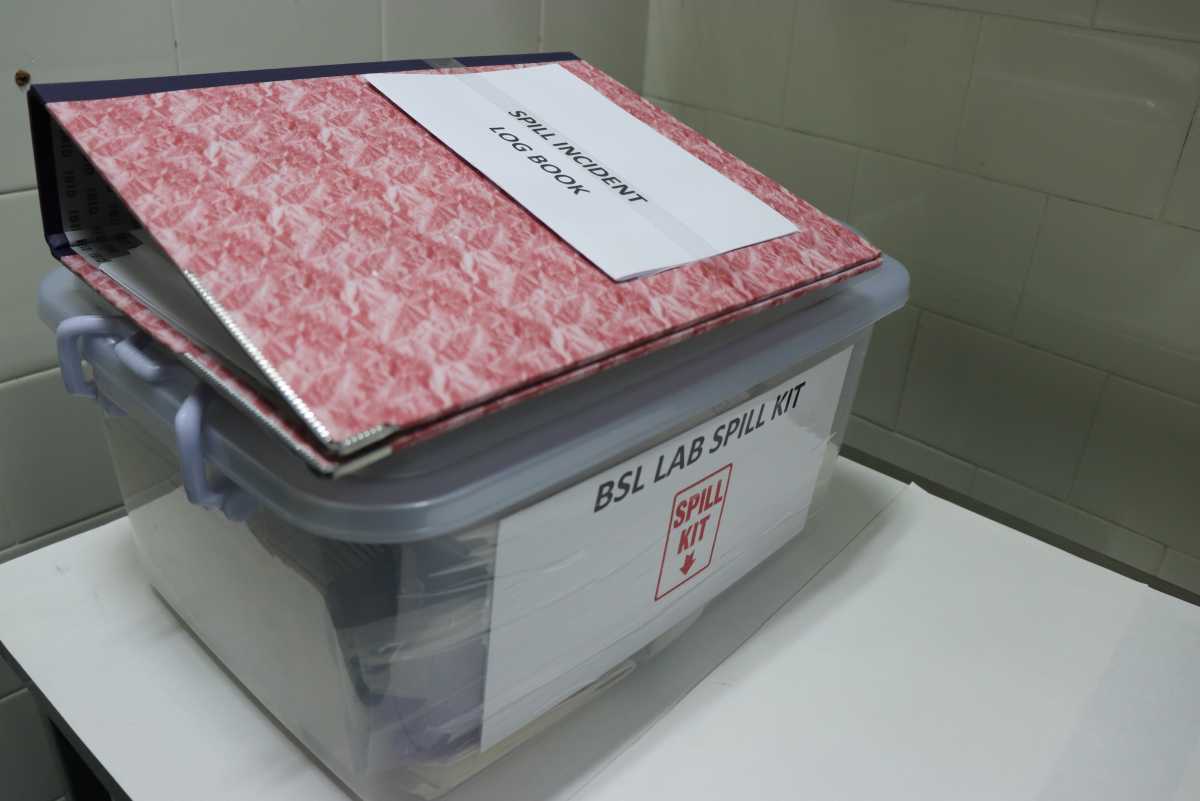
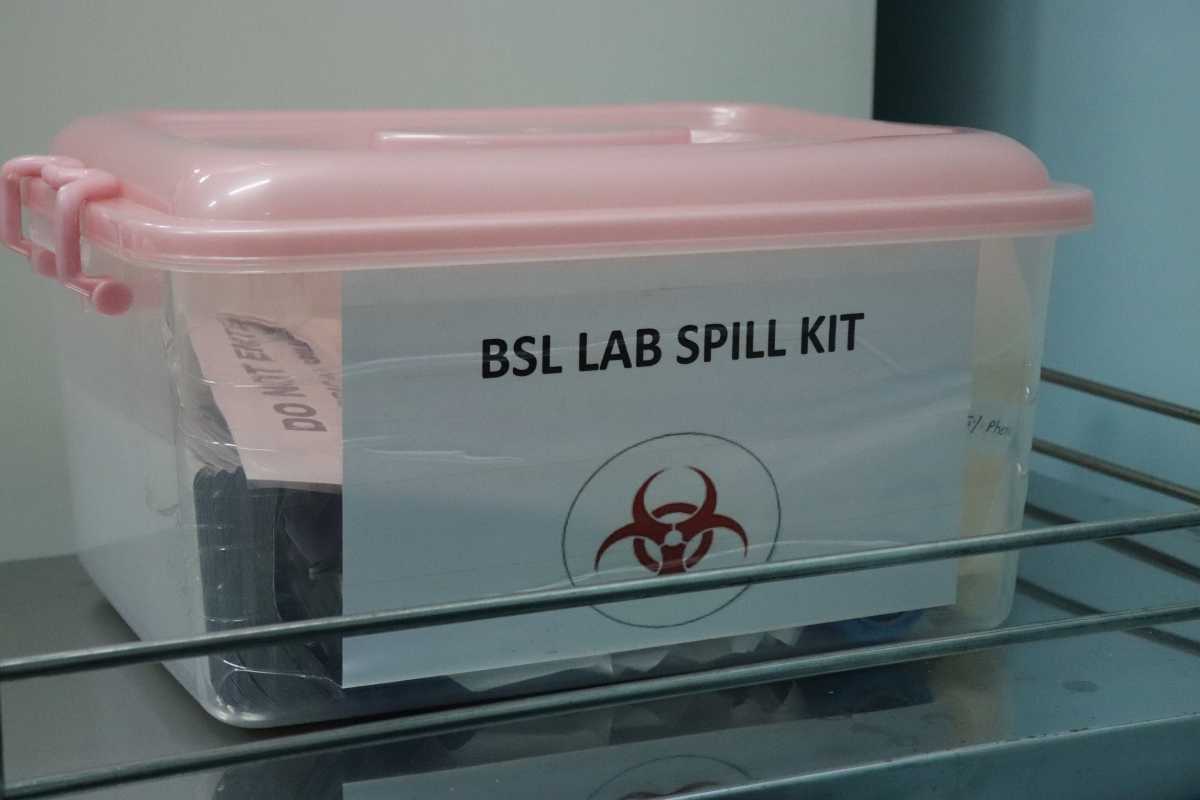
Resources
Kindly provide your valuable feedback on the page to the link provided HERE
Chemical Safety in TB Lab Settings
ContentWorkers in microbiological laboratories are not only exposed to pathogenic microorganisms, but also to chemical hazards. Therefore, knowledge of the toxic effects of these chemicals, exposure routes and hazards, that may be associated with handling and storage, is important.
A few important general safety measures against chemical exposure in laboratories are:
- Wear eyeglasses when using a chemical that can cause fumes or vapours.
- Wear gloves at all times.
- Wear lab coat all the time.
- Do not eat in laboratories.
- Tightly secure lids of all chemical bottles when not in use.
- Read chemical cautions on the labels carefully for all chemicals before use.
- Label the chemicals with appropriate icons to mark the potential risks (Figure).
Safety data sheets or other chemical hazard information are available from chemical manufacturers and/or suppliers. These should be part of the safety or operations manual and easily accessible.
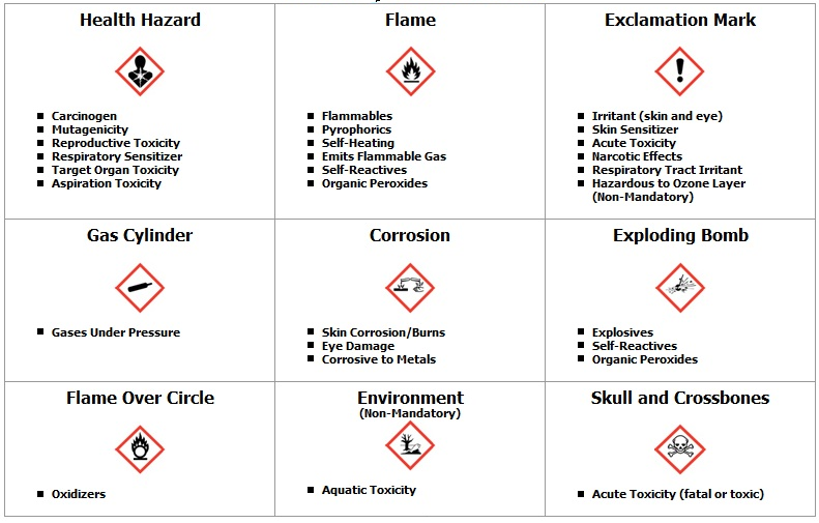
Figure: Different symbols on chemical or reagent bottles and their meaning
Resources
Kindly provide your valuable feedback on the page to the link provided HERE
Fire Safety in TB Lab Settings
ContentFor a fire to start, three components of the triangle namely: Fuel, Oxygen and Ignition sources need to come together (Figure).
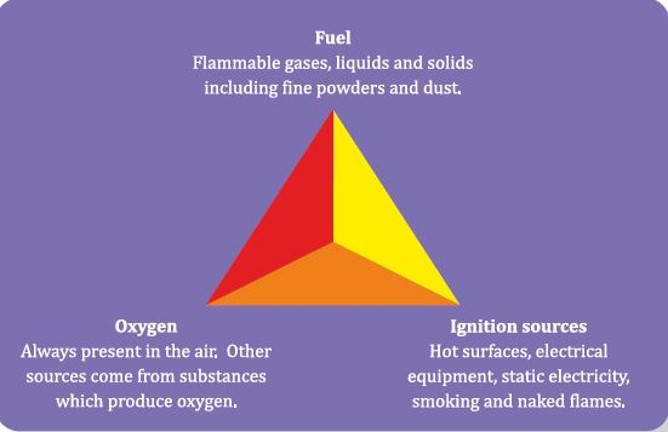
Figure: Components that cause a fire on coming together
- Fire will not start if any one of these components is missing.
- The laboratory personnel should ensure these three components will not come together, to reduce the chance of fire in the laboratory.
- Engineering controls and a variety of fire prevention and suppression strategies should be part of laboratory safety protocols.
Common Causes of Fires in TB Laboratories
- Electrical circuit overloading
- Poor electrical maintenance, e.g., poor and perished cable insulation
- Excessively long gas tubing or long electrical leads
- Equipment unnecessarily left switched on
- Equipment that was not designed for the laboratory environment
- Open flames
- Deteriorated gas tubing
- Improper handling and storage of flammable or explosive materials
- Improper segregation of incompatible chemicals
- Sparking equipment near flammable substances and vapours
- Improper or inadequate ventilation
Considerations for Fire Safety
- Close cooperation between safety officers and local fire prevention officers is essential.
- The effect of fire on the possible dissemination of infectious material must be considered as this may determine whether it is best to extinguish or contain the fire.
- Fire warnings, instructions and escape routes should be displayed prominently in rooms, corridors and hallways.
- Fire-fighting equipment should be placed near room doors and at strategic points in corridors and hallways.
- Fire extinguishers should be regularly inspected and maintained, and their shelf-life kept up to date.
General Measures to Handle Fire in the Laboratory
- All lab personnel must learn how to operate a fire extinguisher.
- Fire extinguisher must be inspected annually and replaced as needed.
- Laboratory should have appropriate class of fire extinguisher.
- In general Class BC or class ABC extinguisher is appropriate.
- The contact information for reaching out to the fire department, should be posted at various locations in the lab.

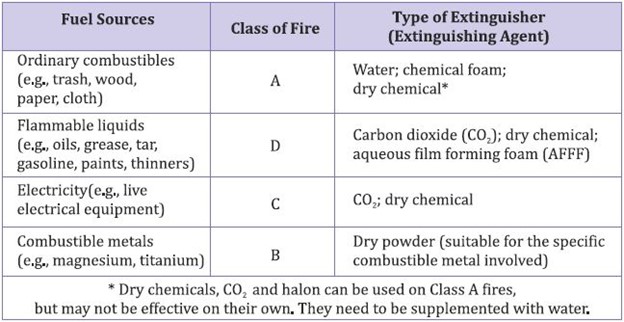
Table: Types and Uses of Fire Extinguishers
Prevention of Fire due to Electrical Hazards
- Electrical installations and equipment should be inspected and tested regularly, including earthing/ grounding systems.
- Circuit-breakers and earth-fault-interrupters should be installed in appropriate laboratory electrical circuits.
- Circuit-breakers do not protect people; they are intended to protect wiring from being overloaded with electrical current, and hence to prevent fires.
- Earth-fault-interrupters are intended to protect people from electric shock.
- All laboratory electrical equipment should be earthed/ grounded, preferably through three-prong plugs.
- All laboratory electrical equipment and wiring should conform to national electrical safety standards and codes.
Resources
Kindly provide your valuable feedback on the page to the link provided HERE
-
-
CDST_LT-M9: Interacting with patients
Fullscreen-
CDST_LT: Stigma, discrimination and gender sensitivity
FullscreenStigma and Discrimination towards TB Patient
ContentStigma is when someone sees you in a negative way.
Discrimination is when someone treats you in a negative way.
TB patients face various forms of stigma and discrimination in the community
Figure: Stigma towards TB Patients in the community
Effects of Stigma on TB Patients
ContentAt Individual Level
- Lack of self-esteem and confidence
- Increased sense of emotional isolation, feeling of guilt and anxiety
- Physical as well as financial debilitation
- People, more often women, are forced to leave their homes
- Concealing symptoms and hesitancy in seeking medical care making disease management more difficult
- Delayed diagnosis, interrupted treatment that can lead to further transmission and DRTB
- Vulnerability increases, can lead to suicidal thoughts due to isolation and shame
At Family and Community Levels
- Loss of household earnings
- Exposure of caregivers to the risk of infection that lowers productivity and cycle of poverty further gets perpetuated
- Isolation and stigmatization of infected persons often by people of their community
- Deep-rooted lack of knowledge and misconceptions among the affected and infected within their cultural and religious environment
- Loss of status and negative impact on those with the disease, their caregivers, family, friends and communities
- Perceived and internalized stigma of the community due to socio-cultural values that TB is punishment for sins or transgression
Gender Aspects of TB
ContentAlthough more men are affected by TB, women and transgender persons experience the disease differently. Gender differences and inequalities play a significant role in how people of all gender access and receive healthcare services.
Gender difference in Men Women Incidence of TB - Higher proportion of men(approximately- 2:1) are diagnosed with TB than women
- More likely to have microbiologically confirmed Pulmonary TB
- More likely to have Clinically diagnosed pulmonary TB and extra – pulmonary forms of TB
- Prevalence of HIV-TB co-infection is higher among women who live in overcrowded houses and consume alcohol
- High Risk for developing TB – Pregnant women and women in the postpartum period
Exposure, Risk & Vulnerability - Smoking and alcohol consumption among men
- High risk for developing TB - employment in mining, quarrying, metals and construction industries
Undernutrition, their role as caretakers and the use of solid fuel for cooking puts women at risk for TB Health Seeking & Health system factors - Fear of loss of income and the consequences of absence from work hinder care seeking.
- Women face difficulties due to perceived stigma, prioritization of household chores, lack of money or financial dependence
Treatment Outcomes - Pressure to get back to work and lifestyle habits such as smoking or consumption of alcohol influence discontinuation of treatment in men
- Migrant workers, mostly men, often face difficulties in adherence to treatment in the face of extreme poverty and issues of daily survival
- Women tend to have better adherence and treatment outcome as compared to men
- Stigma and discrimination are major impediments to treatment adherence, mainly among unmarried women, newly married women and the elderly
Transgender population often has low literacy, low education levels and are poor. A high proportion of transgender persons are known to smoke, consume alcohol and use drugs. All these factors make them vulnerable to TB.
Addressing Gender Inequalities
ContentBroad principles to address gender inequalities in TB care
- Confidentiality of patient needs to be maintained
- Non-discrimination and non-stigmatising behaviour to be promoted
- Respect for all to be ensured
- Informed consent and informed treatment
- Accountability to be fixed for actions and inactions
- Access for all health services
- Rights-based approach
- Empowered communities - Ensure representation of women, men and transgender persons in all forums
- Work in partnership - Strengthen linkages between program, private sector and communities
-
CDST_LT: Counselling for collecting sputum specimen
FullscreenObtaining Induced Sputum
ContentInduced sputum is considered in a situation where a person is unable to provide sputum sample in sufficient quantity for Tuberculosis (TB) diagnostic test. This situation is more evident in children.
- Sputum induction is usually done using 3% nebulized hypertonic saline.
- The patient is pretreated with nebulized bronchodilators like salbutamol prior to induction.
- Following saline nebulization, chest physiotherapy is done to loosen up the secretion and the samples are collected from the throat or nasopharynx using a collector attached to a suction at one end and a catheter/ tube to the other.
- The suction catheter provokes cough and the secretions brought up are collected via suction.
Sputum Induction has to be carried out only in a clinical setting under the close supervision of a trained medical practitioner.
Resources
Kindly provide your valuable feedback on the page to the link provided HERE
-
CDST_LT: Counselling the TB patients
FullscreenTB Awareness Generation in Community
ContentAwareness should be generated in the community for promoting various health programmes, health seeking behaviours, screening of TB cases etc. by involving and sensitizing community influencers including PRI members and treatment support groups.
Figure: Activities for awareness generation in community
Counselling for TB treatment initiation
ContentCounselling before initiating treatment for a patient. is an important component of the National TB Elimination Programme (NTEP). The patient is counselled along with his family by the health staff.
Counselling is done on the following points:
- Health education on TB and its symptoms
- Mechanism of TB transmission
- Infection control measures, like cough etiquette and sputum disposal
- Nature and duration of treatment
- Importance of adherence to treatment and the need for complete and regular treatment
- Possible side effects of drugs
- Consequences of irregular treatment or premature cessation of treatment
- Nutritious diet
- Nikshay Poshan Yojna
Communication tools
1. Communication is provided through interpersonal communication in one-to-one sessions and by use of Information, Education and Communication (IEC) materials like posters, pamphlets, flip charts, etc.
2. Arogya Sathi App: The app empowers TB patients to proactively increase their awareness of TB by addressing Frequently Asked Questions (FAQs) regarding TB and information on the symptoms of TB and side-effects of anti-TB drugs. It also helps them in accessing their treatment details, DBT details and adherence calendar.
3. Nikshay Sampark: National TB call centre "Nikshay Sampark" toll-free helpline number 1800-11-6666 can be contacted anytime by patients and their families to resolve concerns and issues faced by TB patients.
Resources
- Training Modules (1-4) for Programme Managers and Medical Officers, NTEP, 2020.
- Guidelines for PMDT in India, NTEP, 2021.
Assessment
Question
Answer 1
Answer 2
Answer 3
Answer 4
Correct answer
Correct explanation
Page id
Part of Pre-test
Part of Post-test
Nikshay Sampark can be used as a communication tool to resolve concerns and issues faced by TB patients.
True
False
1
Nikshay Sampark can be used as a communication tool to resolve concerns and issues faced by TB patients.
Yes
Yes
Counselling for regular follow-up during the treatment
ContentThe continuum of counselling and care is essential to constantly motivate TB patients to take their full drug regimen and complete it in due course.
Counselling is regularly given by counsellors, treatment supporters and all those involved with patient care and treatment.
Counselling should start at the initial point of contact as soon as the diagnosis is established and continued during all visits:
- By the patient to a health facility
- By healthcare workers’ visit to the patients’ home
- Through the national TB call centre (Nikshay Sampark)
Key Points for Counsellors:
- Counsellors must inform patients that regular monthly follow-up during their treatment is important to understand their TB treatment response and to determine if they have been cured.
- During these monthly follow-up visits, TB patients should be screened for any clinical symptoms and/or cough. If found positive on screening, then sputum microscopy and/or culture should be considered. This is important to detect recurrence of TB as early as possible.
- Counsellors should inform patients of the follow-up schedule, and follow up, via physical visits or telephone calls, with patients to verify that they have gone for their follow-up visits at these times:
a. Clinical evaluation at the end of every 4 weeks of treatment
b. Sputum examination at the end of each treatment phase i.e., intensive and continuation phase
c. Long-term post-treatment follow up: Sputum examination, at an interval of 6 months, 12 months, 18 months and 24 months, and if suspected, referred for testing again.
A counselling register is maintained for all patients for recording information about the patients’ situation and counselling services provided from the time of diagnosis till post-treatment follow-up period.
Information to be Provided to Patients During Regular Monthly Follow-up
- Nature and duration of treatment
- Need for regular treatment/adherence
- Information on the lab results, and the reliability of lab results
- Consequences of irregular treatment or pre-mature cessation of treatment
- Possible side effects of anti-TB drugs and management of side effects
- Nutritional counselling (Nikshay Poshan Yojna)
- Services under National TB Elimination Program (NTEP) and linkage to social protection schemes
- Infection control precautions that are necessary, and re-assurance to the family against panic or unnecessary stigmatization of the patient
Resources
Guidelines for PMDT in India, 2021
Assessment
Question Answer 1 Answer 2 Answer 3 Answer 4 Correct answer Correct explanation Page id Part of Pre-test Part of Post-test During the monthly follow-up visits during TB treatment, patients should be screened for any clinical symptoms and/or cough. True False 1 During the monthly follow-up visits during TB treatment, patients should be screened for any clinical symptoms and/or cough. Yes Yes Counselling of TB Patients
ContentConfidential dialogue between a health care provider and a patient that helps a patient to define his/her feelings, cope with stress, and to make informed decisions regarding treatment.
The patient should be counselled at all the three phases i.e.,
Pre-treatment counselling`
- About TB disease and treatment
- Air borne infection control
- Need for adherence
- Public Health Actions
- Identification of adverse events
- Tobacco /Alcohol cessations
- Identification of comorbidities
During Treatment Counselling
- Importance of Adherence
- Identification of adverse events
- Importance of timely follow ups
- Public Health Actions
- Tobacco /Alcohol cessations
- Management of comorbidities
Post treatment Counselling
- Testing at the end of treatment.
- Long term follow up
- Tobacco /Alcohol cessations
Objectives of TB Counselling:
- Prevention of TB transmission.
- Provision of emotional support to TB patients.
- Motivation of TB clients to complete treatment.
- Helping patients make their own informed decisions about their behaviour and supporting them in carrying out their decisions.
Figure: Characteristics of effective counselling
Do's & Don'ts for Patient Communication
ContentDo’s
- Active listening, emphatic gestures and expressions
- Ensure the confidentiality of the conversation done with the patient
- Ensure Minimum interruption during the conversation with patient
- Ensuring availability of IEC materials such as posters, videos, pamphlets etc. to dispel myths and misconceptions.
Don'ts
- Do not use any negative stereotypes
- Do not have any physical wall or glass between patient and yourself
- Do not breach the trust and confidentiality of the TB patient
- Do not make threats or use coercive language
- Do not exaggerate dangers or risk of TB
- Do not blame or shame TB patients
Nutritional Counselling
ContentNutritional Counselling begins with the nutritional assessment of TB patients by
-
Nutritional Status: Assessing the height, weight and BMI of the TB patient
-
Diet and Preference food for TB patients
-
Current appetite and food intake of TB patients
Based on the nutritional assessment, following information can be conveyed to TB Patients
-
Patients with TB should be encouraged to have frequent food intake in the form of three meals and three snacks.
-
Attempts should be made to increase the energy and protein content in the meals and snacks without increasing its volume.
-
The addition of oil, butter or ghee to the chapati or rice can increase the energy content of the diet.
-
Pulses in other forms, e.g. sprouts, roasted Chana, groundnuts, can be taken as snacks in either fried or in roasted form. Milk and eggs to be included in the diet.
-
The use of easily available nutritious foods based on vegetarian/non-vegetarian preferences of the patients must be emphasized.
-
Information about NFSA (National Food Security Act) and Poshan abhiyan should be given.
Figure: Healthy diet for TB Patients
Resources:
Kindly provide your valuable feedback on the page to the link provided HERE
-
-
-
CDST_LT-M10: CBNAAT
Fullscreen-
CDST_LT: CBNAAT as a rapid molecular diagnostic tool
FullscreenCartridge Based Nucleic Acid Amplification Test [CBNAAT]
ContentCartridge Based Nucleic Acid Amplification Test (CBNAAT) is a rapid molecular diagnostic test. It is used for diagnosis of Tuberculosis (TB) and Rif-resistant Tuberculosis (RR-TB) in NTEP. Results are obtained from unprocessed sputum samples in about 2hours which helps in early detection and treatment of TB patients.
India has vast number of CBNAAT laboratories which are utilized for TB/RR-TB detection and Universal Drug Susceptibility Testing (UDST) under the National TB Elimination Program (NTEP).
Figure: CBNAAT Cartridge and Machine in Use (Image courtesy: USAID supported Challenge TB Project)
The CB-NAAT system detects DNA sequences specific for Mycobacterium tuberculosis complex and rifampicin resistance by Polymerase Chain Reaction (PCR). It concentrates Mycobacterium tuberculosis bacilli from sputum samples, isolates genomic material from the captured bacteria by sonication and subsequently amplifies the genomic DNA by PCR. The process identifies clinically relevant rifampicin resistance-inducing mutations in the RNA polymerase beta (rpoB) gene in the Mycobacterium tuberculosis genome in a real-time format using fluorescent probes called molecular beacons.
Video fileVideo: Cartridge-Based Nucleic Acid Amplification Test [CBNAAT] - GeneXpert Technology
Resources
- Training Module (1-4) for Program Managers and Medical Officers, NTEP, MoHFW, 2020.
- India TB Report 2021, National TB Elimination Program (NTEP), MoHFW, 2021.
Assessment Questions
Question
Answer 1
Answer 2
Answer3
Answer 4
Correct Answer
Correct explanation
Part of pre-test
Part of post-test
Under NTEP, CBNAAT is offered upfront for which of these categories?
PLHIV
Paediatric presumptive TB
Presumptive DR-TB
All of the above
4
Under NTEP, CBNAAT is recommended upfront for People living with HIV, Paediatric Presumptive TB patients, Presumptive DR-TB patients and patients notified from the Private sector.
Yes
Yes
CBNAAT requires the processing of sputum samples before testing
True
False
2
Results are obtained from unprocessed sputum samples in about 2hours from a CBNAAT machine
Yes
Yes
Structure and Function of the CBNAAT Module
ContentThe CBNAAT module contains components that enable automated sample processing in the cartridge, and filling of the tube with the sample-reagent mixture for Polymerase Chain Reaction (PCR), followed by PCR amplification and detection.
The structure of the CBNAAT module is described below and shown in Figure 1:
- Syringe pump drive or plunger motor: Dispenses fluids into the different cartridge chambers
- I-CORE module: Performs PCR amplification and detection
- A cartridge loading and unloading mechanism ensures the proper movement of the cartridge in the instrument
- Reaction/PCR tube: Enables rapid thermal cycling and optical excitation and detection of the tube contents. The reaction tube is automatically inserted into the I-CORE module (hardware for PCR amplification and fluorescence detection) when the cartridge is loaded into the instrument.
- Valve drive: Rotates the cartridge valves to align the chambers with the syringe
- Ultrasonic horn: Lyses the sample
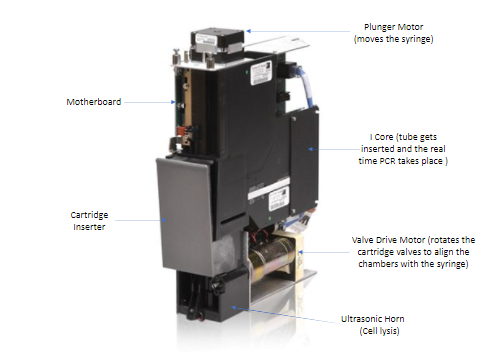
Figure 1: Structure of the CBNAAT module
The interior region of the cartridge insertion site also called cartridge bay and is shown in Figure 2.
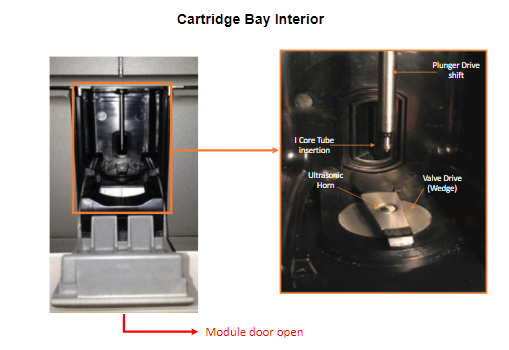
Figure 2: Interior of the Cartridge Bay
Mode of Operation of the CBNAAT Module
- The Intelligent Cooling/Heating Optical Reaction (I-CORE) module is the hardware component, within each instrument module, that performs PCR amplification and, fluorescence detection.
- As part of the cartridge load process, the PCR tube is inserted into the ICORE module.
- As the test starts, the sample and reagent mixture are pushed from the cartridge, into the PCR tube.
- During the amplification process, the ICORE heater heats up and the fan cools down the reaction tube contents.
Within the I-CORE, there is an optical system composed of two blocks: A six colour excitor and detector block excite the dye molecules, and detect the fluorescence emitted.
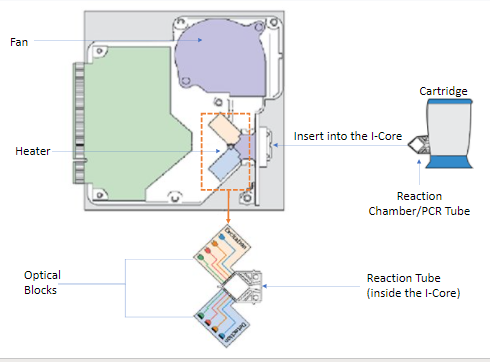
Figure 3: Mode of operation of the CBNAAT module
Video fileResources
Kindly provide your valuable feedback on the page to the link provided HERE
The CBNAAT Cartridge
Content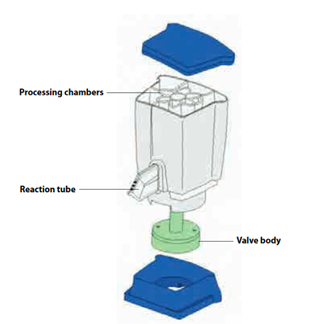
The disposable, single-use CBNAAT cartridge is a closed system unit to hold the samples and reagents. Inside of a CBNAAT Cartridge (CBNAAT operator manual). Each cartridge consists of the following components:
- Processing chambers: Hold samples, reagents, processed samples, and waste solutions. One chamber is designated as an air chamber to equilibrate pressures within the cartridge.
- Valve body: Rotates and allows fluid to move to different cartridge chambers and to the reaction tube. Within the valve body, the specimen is isolated, PCR inhibitors are removed, and the sample is mixed with PCR reagents and moved into the integrated reaction tube.
- Reaction tube: Enables rapid thermal cycling and optical excitation and detection of the tube contents. The reaction tube is automatically inserted into the I-CORE module (hardware for PCR amplification and fluorescence detection) when the cartridge is loaded into the instrument.
Video fileResources
Consumables required at CBNAAT Lab
ContentThe consumables required at a Cartridge-based Nucleic Acid Amplification Testing (CBNAAT) laboratory include the following:
CBNAAT/ GeneXpert Dx System consisting of CBNAAT machine preloaded with assay software, Computer and the Barcode reader
- CBNAAT assay kit (Figure) consisting of:
- CBNAAT cartridges: Kit contains 10 or 50 individually packed cartridges.
- CBNAAT reagent: 8 ml volume pack per cartridge. The sample reagent solution is clear but may range from colourless to golden yellow.
- Sterile pipette: Individually packed, disposable transfer pipettes, one per each test, with a single mark for the minimum volume of sample transfer to each cartridge.
- CD containing the Assay Definition File.

Figure: Contents of CBNAAT Assay Kit; Source: GLI Training Package for CBNAAT.
- Sputum containers
- Personal protective equipment:
- Laboratory coats
- Disposable gloves
- Disinfectants
- 1% Sodium hypochlorite solution
- 5% Phenol
- 70% Ethanol
-
Power stabiliser (UPS) for uninterrupted power supply to perform CBNAAT assay.
Resources
Assessment
Question Answer 1 Answer 2 Answer 3 Answer 4 Correct answer Correct explanation Page id Part of Pre-test Part of Post-test What are the components of the CBNAAT assay kit? CBNAAT cartridges CBNAAT reagent Sterile pipette All the 3 4 CBNAAT assay kit includes CBNAAT cartridges, CBNAAT reagent and sterile pipette. Yes Yes - CBNAAT assay kit (Figure) consisting of:
CBNAAT Testing Process Overview
ContentCartridge-based Nucleic Acid Amplification Test (CBNAAT) is used to detect Mycobacteria tuberculosis and rifampicin-resistance using GeneXpert IV Dx system and the Xpert MTB/ RIF cartridge.
The CBNAAT system integrates and automates sample processing, nucleic acid amplification, and detection of Mycobacteria tuberculosis and rifampicin resistance.
The system utilises the use of single-use disposable CBNAAT cartridges that hold the Polymerase Chain Reaction (PCR) reagents and hosts the PCR process.
The process involves the following steps:
- Sample processing: Specimens are processed by adding the sample reagent at 2:1 (v/v) ratio to the sputum sample, mixing and incubation for 15 minutes at room temperature. The sputum sample get liquified after the processing step.
- Loading sample into cartridge: Liquefied sample is added to the cartridge using a transfer pipette.
- Setting up the machine to run the test: After switching on the system, “Create Test” (Figure A) is clicked in the GeneXpert Dx system window, test details are added, the barcode label of the cartridge is scanned (Figure B) and “Start Test” (Figure C) is clicked to initiate testing.

Figure: Setting the machine to run the assay by creating test (A), adding test details, scanning barcode (B) to start test (C); Source: GLI Training Package for CBNAAT.
- Loading the cartridge: The instrument module door which displays the blinking green light is opened to load the cartridge. The door of module is closed firmly (an audible click sound should be heard). The green light stops blinking when the test starts.
- Obtaining the results: When the test is finished, the green light turns off. It takes around 1 hour 55 minutes to complete test run. On completion of test run, the result is generated automatically on the monitor.
- Ending the test run: When the system releases the door lock at the end of run, the module door is opened to remove the cartridge. The used cartridge is discarded.
Resources
Assessment
Question
Answer 1
Answer 2
Answer 3
Answer 4
Correct answer
Correct explanation
Page id
Part of Pre-test
Part of Post-test
Barcode is present on sterile pipette and CBNAAT cartridge.
True
False
2
Barcode is present on CBNAAT cartridge.
Yes
Yes
Other CBNAAT tests available
ContentIntroduction
Cartridge-based Nucleic Acid Amplification Test (CBNAAT) is an automated rapid molecular diagnostic test which detects targeted Deoxyribonucleic Acids (DNA) sequences of Mycobacterium tuberculosis (M.tb) genome by Real-time Polymerase Chain Reaction (RT-PCR) method.
CBNAAT uses the GeneXpert IV Dx system and the single-use disposable Xpert M.tb/ Rifampicin (RIF) cartridges that hold the Polymerase Chain Reaction (PCR) reagents and host the PCR process.
The various TB tests utilizing the CBNAAT platform:
1) GeneXpert MTB/ RIF
- The Xpert M.tb/ RIF assay is a Nucleic Acid Amplification Test (NAAT) that uses a disposable cartridge with the GeneXpert Instrument System to quickly identify possible Multidrug-resistant TB (MDR-TB) that is resistant to RIF.
- This test yields rapid results, i.e., within 2 hours and is therefore cost and time-saving.
2) GeneXpert MTB/ RIF Ultra
- The Xpert M.tb/ RIF Ultra assay is similar to the Xpert MTB/ RIF assay, just that it is even faster with a higher level of accuracy.
- The results are obtained in 80 minutes.
- It can detect paucibacillary TB disease.
3) GeneXpert MTB/ XDR
- This is a GeneXpert M.tb assay that detects mutations associated with Resistance Towards Isoniazid (INH), Fluoroquinolones (FLQ), Second Line Injectable Drug (SLID) (amikacin, kanamycin, capreomycin) and Ethionamide (ETH) in a single test.
4) GeneXpert Omni/Edge
- GeneXpert Omni/Edge is a battery-operated, wireless and web-enabled portable molecular diagnostics system, intended for use as the point-of-care diagnostic tool in remote and challenging settings.
- It is a single-slot platform i.e., runs one test per cycle, uses a 2-in-1 tablet/laptop and a compact printer and is expected to enable accurate, fast and cost effective test results.
Apart from TB, the CBNAAT platform can be used to diagnose several other pathogens using different cartridges. One of the common other pathogens detected using CBNAAT in India is COVID-19.
Note: Except GeneXpert MTB/ RIF , other CBNAAT tests are not currently being endorsed by NTEP.
Resources
- WHO Consolidated Guidelines on Tuberculosis. Module 3: Diagnosis - Rapid Diagnostics for Tuberculosis Detection 2021 Update.
- Guidelines for Programmatic Management of Drug-resistant TB (PMDT) in India; NTEP, CTD, MoHFW, India, 2021.
- Sachdeva K, Shrivastava T. CBNAAT: A Boon for Early Diagnosis of Tuberculosis-Head and Neck; Indian J Otolaryngol Head Neck Surg, 2018.
Assessment
Question Answer 1 Answer 2 Answer 3 Answer 4 Correct answer Correct explanation Page id Part of Pre-test Part of Post-test ‘Xpert M.tb/ RIF Ultra yields results faster than Xpert M.tb/ RIF’.
True
False 1 Xpert M.tb/ RIF Ultra yields results in approx. 80 minutes compared to Xpert M.tb/ RIF which gives results in approx. 110 minutes.
Yes Yes GeneXpert MTB/ RIF is the only CBNAAT tests that is endorsed by NTEP.
True False 1 Other tests using CBNAAT platform GeneXpert MTB/ RIF Ultra, GeneXpert MTB/ XDR and GeneXpert Omni/Edge are not endorsed by NTEP. Yes
Yes
Inbuilt Controls of CBNAAT Technology
ContentThe CBNAAT System automatically performs internal quality control for each sample.
During each test, the system uses the following inbuilt controls:
System Check Control (SCC)
- Checks integrity of the instrument, cartridges and PCR reagents.
Sample Processing Control (SPC)
- Ensures that a sample is correctly processed.
- Included in the cartridge and is processed with the sample. The DNA is detected by a PCR assay.
Probe Check Control (PCC)
- Performed during the first stage of the test.
- Verifies the presence and integrity of the labelled probes.
Video fileVideo 1: CBNAAT Technology -Inbuilt Controls
Video fileVideo 2: Summary of all In-built Control Checks
Resources
-
CDST_LT: Sample processing for CBNAAT
FullscreenSpecimen Processing for CBNAAT
ContentThe CBNAAT system integrates and automates sample processing with amplification and detection of the target sequences
For sample processing, sample reagent is provided in CBNAAT kit, 8ml volume pack per each cartridge
- The sample reagent solution is clear but may range from colourless to golden yellow
Processing of clinical specimens should be performed as per laboratory biosafety standards
- Treat all sputum specimens as potentially infectious
- Wear protective gloves and laboratory coats when handling specimens and reagents
Sample processing from direct sputum and decontaminated sputum sediments is described in the Video given below -
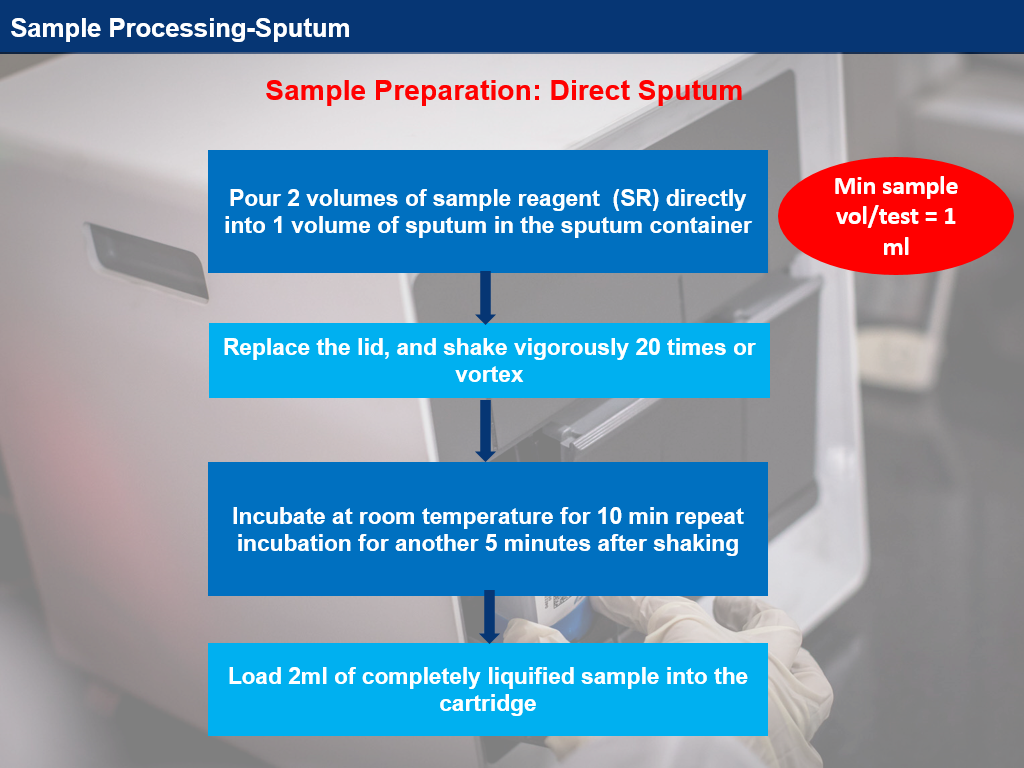
Video 1: Sample processing from direct sputum; Source: Challenge TB: Sample Processing Sputum
Video fileVideo : Specimen Processing for CBNAAT
Resources
CBNAAT Sample Processing for Other Body Fluids
ContentThe following procedures are recommended when processing various body fluids with the Cartridge-based Nucleic Acid Amplification Test (CBNAAT):
Bronchoalveolar Lavage (BAL):
Processing of BAL for CBNAAT assay is given here. However, it is important that each laboratory optimizes this protocol to minimize the error rate.
If the BAL volume is sufficient (approx. 5 ml), centrifuge and dissolve sediment into 1 ml sterile phosphate buffer/ saline, then add sample reagent in a 1:2 ratio.
If the BAL volume is less (less than 5 ml), take 1 ml and add 2 ml of sample reagent.
- If the BAL is mucoid or has more than 0.5% blood contamination, decontaminate using N-acetyl-l-cysteine–sodium hydroxide (NALC-NaOH) treatment.
- Decontamination of BAL should also be carried out if the error rate is more than 2%.
Pericardial/ Ascitic/ Synovial Fluid:
If the sample volume exceeds 5 ml, centrifuge and dissolve sediment into sterile phosphate buffer/saline to make volume 1 ml, then add sample reagent in a 1:2 ratio.
If the sample volume is less than 5 ml, take 1 ml and add 2 ml of sample reagent.
- Pleural fluid is a suboptimal sample, and pleural biopsy is preferred.
- A positive CBNAAT result in pleural/body fluid can be treated as TB, a negative result should be followed by other tests.
- Decontaminate/concentrate using standard NALC-NaOH treatment if bloody (more than 0.5% blood), thick and/or clots are present.
Pus/ Abscess/ Aspirates/ Semen:
- Liquid/ slightly viscous specimen: Use sample-to-sample reagent 1:2 ratio, mix well and follow routine CBNAAT protocol.
- If very thick, viscous or bloody specimens: Add 2 ml sample reagent to 0.2 - 0.3 ml pus, mix well to the vortex, and increase the incubation time, if required.
- Decontaminate, if required (>0.5 % blood).
*Each laboratory must optimize these protocols to minimize the error rate.
Resources
CBNAAT Cartridge Loading
Content- Use the sterile transfer pipette provided in the CBNAAT kit to draw liquefied sample into the transfer pipette
- The minimum amount to be loaded into the cartridge is 2 ml
- Do not process the sample if there is insufficient volume
- Open the cartridge lid
- Transfer the sample into the open port (Figure 1) of the CBNAAT cartridge and dispense slowly to minimize the risk of aerosol formation
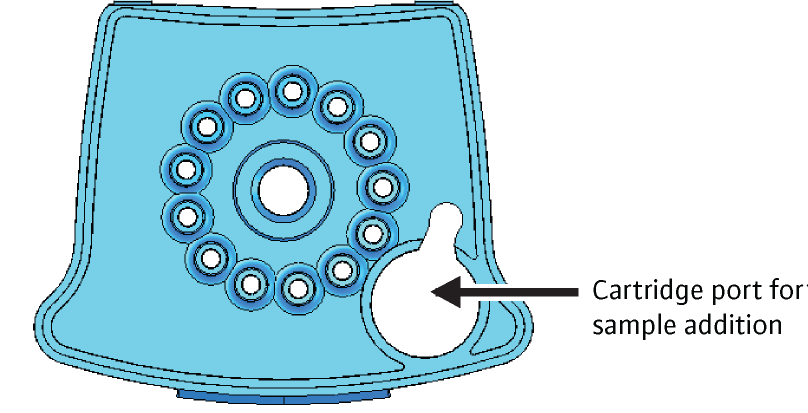
Figure 1: CBNAAT cartridge (top view) to show the open port
(SOP for GeneXpert MTB/RIF)- Discard the transfer pipette
- Snap the lid shut to close firmly
- Turn on the CBNAAT instrument
- Open the instrument module door, which displays the blinking green light
- Load the cartridge and close the door of the module firmly
- The test should be started within 30 minutes of adding liquefied sample to the cartridge
- The remaining liquefied sample may be kept for up to 12 hours at 2-8°C (for repeat testing)
Video fileVideo 1: CBNAAT loading
Video fileVideo 2: Sample Loading (Demonstration)
Resources
- Use the sterile transfer pipette provided in the CBNAAT kit to draw liquefied sample into the transfer pipette
-
CDST_LT: CBNAAT result interpretation and recording
FullscreenVisualization of CBNAAT Test Results
ContentThe test results of the Cartridge-based Nucleic Acid Amplification Test (CBNAAT) assay are displayed in the ‘View Results’ window, of the CBNAAT software.
For visualizing the results after the test is completed:
- In the CBNAAT Dx System window, click View Results on the menu bar.
- The View Results window appears.
- To select a test result, click View Test.
- ‘Select Test to Be Viewed’ - dialog box appears.
- Select the test of interest.
- Click OK.
Note: The selected test result appears in the ‘View Results’ window. A result will be displayed in PDF format.
To generate a PDF report
- To generate a report in PDF format, click on “Report” and then select the result you want.
- The PDF report will be generated.
Interpretation of Test Results
- The ‘View Results’ window displays information about the test, such as sample ID and run-time on the left-hand side panel.
- The interpretation of the result is in the center, and the real-time PCR amplification curves are displayed at the bottom.
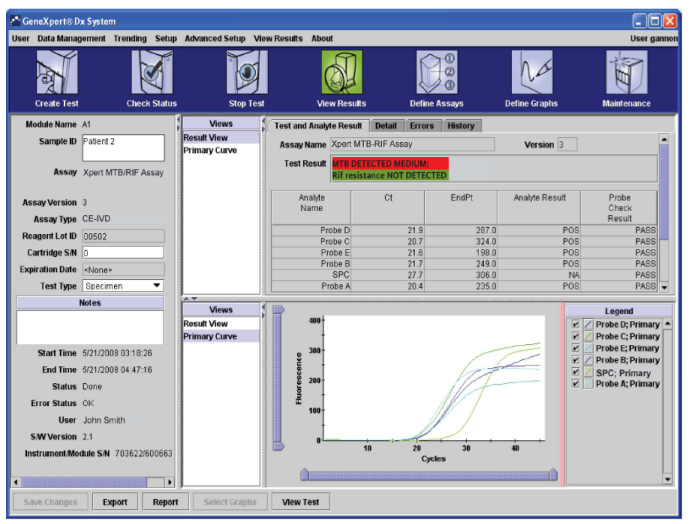
Figure: User 'View Results' Window showing the information about test, interpretation of results and real-time PCR curves
Resources
Kindly provide your valuable feedback on the page to the link provided HERE
CBNAAT Results Interpretation
ContentOn completion of a test run, the Cartridge-based Nucleic Acid Amplification Test (CBNAAT) gives the following results:
- MTB DETECTED; Rif Resistance DETECTED
- MTB DETECTED; Rif Resistance NOT DETECTED
- MTB DETECTED; Rif Resistance INDETERMINATE
- MTB NOT DETECTED
- Error
- Invalid
- No result
Conclusive results include: MTB NOT DETECTED, MTB DETECTED with Rif Resistance/ without Rif Resistance.
Non-conclusive results include: MTB Detected, Rif Resistance Indeterminate, Errors, Invalid and No Result - the test has to be repeated in these cases.
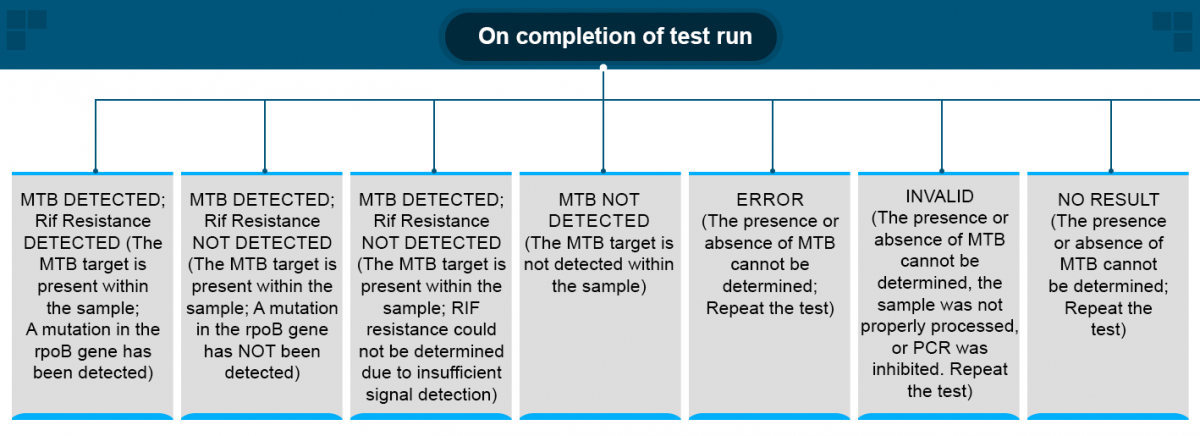
Figure: CBNAAT Result Algorithm
Video fileVideo : CBNAAT Results Interpretation
Resources
CBNAAT Assay Limitations
ContentThe Cartridge-based Nucleic Acid Amplification Test (CBNAAT) test has some limitations such as:
- Bacterial load below the Limit of Detection (LOD ~ 130 CFU/ml) may result in a false-negative result.
- Patients on an anti-TB regimen can still have positive results due to killed bacilli in the specimen and hence cannot be used for follow-up.
- A positive test result does not necessarily indicate the presence of viable organisms. It is, however, presumptive for the presence of Mycobacterium tuberculosis (MTB) and Rifampicin (Rif) resistance.
- MTB detection is dependent on the number of organisms present in the sample. Quality specimen collection and timely processing of the sample will minimize the errors.
- Test results might be affected by anti-TB medication. Therefore, therapeutic success or failure cannot be assessed using this test, because DNA might persist following antimicrobial therapy.
- Mutations or polymorphisms in primer or probe binding regions may affect the detection of new or unknown MDR or Rif-resistant strains, resulting in a false-negative result.
- Any modification in sample processing may alter the performance of the test.
- Results should be interpreted in conjunction with clinical data available to the clinician.
Video fileVideo:
CBNAAT Assay Limitations
Resources
Results Entry in Lab Register for NAAT
ContentThe results for Nucleic Acid Amplification Test (NAAT) assays are entered in Culture and Drug Susceptibility Testing (C&DST) register. The key variables entered are shown in the table below.
Table: Key Variables entered in C&DST Register; Source: Guidelines for PMDT in India, 2021. VARIABLES SET 1 VARIABLES SET 2 VARIABLES SET 3 VARIABLES SET 4 Test ID Health Facility (HF) name Residential district Current facility HF type Date of test updated in Nikshay Lab type Type of test Predominant symptom Date tested Patient ID Reason for testing Predominant symptom duration Date reported Episode ID Treatment status History of Anti-TB Treatment (ATT) Test status Name Diagnosis date No. of Health Care Provider (HCP) visited before the diagnosis of the current episode Type of specimen Gender TB treatment start date The visual appearance of sputum Date of specimen collection Age Current facility state State name Primary phone Current facility district District name Address Current facility TB Unit (TU) TB unit Residential state Current facility HF NAAT results are reported in the results section of “Request Form for examination of biological specimen for TB” including:
- Select Type of test: Cartridge-based Nucleic Acid Amplification Test (CBNAAT)/ TrueNAT
- Select Sample: A/B
- Select M. tuberculosis: Detected/ Not Detected/ Not Available (NA)
- Select Rif Resistance: Detected/ Not Detected/ Indeterminate/ NA
- Select Test: No result/ Invalid/ Error; Error code
- Date tested
- Date Reported
- Reported by (name and signature)
- Laboratory name
Video fileVideo : CBNAAT/Truenat Results Entry in Lab Register
Resources
Retest Procedure for CBNAAT
ContentThe assay needs to be repeated by using a new cartridge if one of the following test results occur:
INVALID: An INVALID result indicates that Sample Processing Control (SPC) failed. The sample was not properly processed, or Polymerase Chain Reaction (PCR) was inhibited.
ERROR: An ERROR indicates that Probe Check Control (PCC) failed, and the assay was aborted possibly due to the reaction chamber being filled improperly, a reagent probe integrity, syringe pressure issues, or failure of the CBNAAT module.
NO RESULT: A NO RESULT indicates that insufficient data were collected. For example, the operator stopped a test that was in progress.
RIF Indeterminate: RIF indeterminate result indicates that the sample has a less bacterial load.
Program guidelines recommend obtaining a second specimen to confirm rifampicin resistance in these scenarios.
How to Perform the Retest?
- Leftover sputum or fresh sputum or reconstituted sediment:
Treat it with a new Sample Reagent (SR) and load it into the new CBNAAT cartridge.
- Sufficient leftover SR-treated sample:
Use within 4 hours of initial addition of SR to the sample - Load into the new CBNAAT cartridge.
Do not use SR-treated sample if it is more than 4 hours old - Over-treatment may lead to false-positive test results.
Always use a new cartridge!
Video fileVideo : Retest Protocol for CBNAAT
Resources
-
CDST_LT: Troubleshooting in CBNAAT
FullscreenInterfering Substances causing errors in NAAT Assay
ContentIt is common in laboratories to see specimens with the following particles which may potentially alter nucleic acid amplification test (NAAT) results:
- Food particles
- Blood
- Tobacco
- Pan
- Debris or tissue pieces
These interfering substances cause failures in Truenat assays and may have inhibitory effects on CBNAAT assays. This interferes with the accuracy of results, leading to false positive or negative tests and delayed cycle threshold values.
Hence, it is important to follow certain precautions when collecting the specimen to avoid contaminating the specimen with these substances.
In such situations, the following protocol needs to be followed:
- Reject frank blood/bloody samples; however, the presence of blood up until 30% does not interfere in Truenat assays
- For samples containing food/tobacco/tissue particles that cause interference in processing:
- Use a fresh sample, if available
- Use a sample after food particles or tissue pieces settle/sediment; otherwise, reject the sample
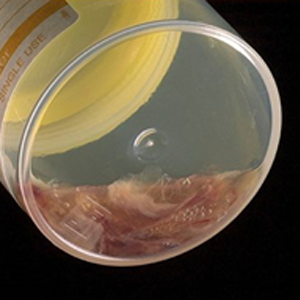
Figure: Blood in Sputum Sample Interferes with PCR
Resources
Troubleshooting Process for CBNAAT
ContentThe most common situations that need troubleshooting while using CBNAAT are:
- Hardware or instrument problems
- Failures without error codes
- Failures with error codes
Troubleshooting Approach
- In case of an issue, a message will be displayed (often with an error code).
- Check if the error affects one particular module.
- Refer to the CBNAAT user manual and follow the recommended corrective action.
If the problem persists, continue to use other modules in the meantime (if possible), and exclude the faulty modules from the tests. Contact the technical support team.
How to reach the technical support team?
Image
Resources
Kindly provide your valuable feedback on the page to the link provided HERE
CBNAAT Hardware Problem: Barcode Scanner Failure
ContentIf the barcode scanner is not working, enter the cartridge barcode manually (Figure):
- Step 1: Click on “Create Test”
- Step 2: A dialogue box - Scan Cartridge Barcode will appear. Click on “Manual Entry”
- Step 3: Manually type the 2-line numbers of the cartridges
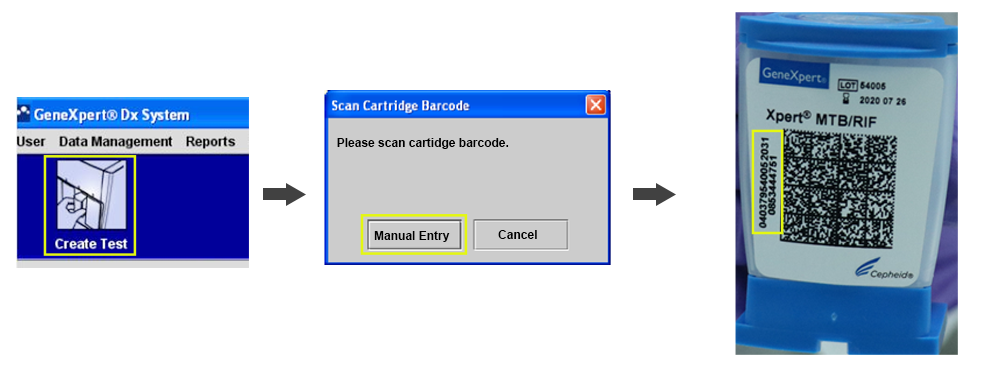
Figure: Process for Manual Entry of the Cartridge Barcode
In case of barcode reader failure, while using a new lot, this action cannot be performed. Contact the manufacturer or technical support to collect the Lot Specific Parameter.
Also, contact customer care for repair or replacement of the barcode reader.
Video fileResources
CBNAAT Hardware Problem: Stuck Cartridge
ContentThis hardware problem occurs when a cartridge is stuck inside a CBNAAT module.
Causes
- Module mechanical malfunction during the test
- Electrical failure
Solutions for releasing a stuck cartridge
Solution 1: Verify that the module door is not open. Gently try to open the module door.
Solution 2: Try to remove the cartridge from the software.
- In the CBNAAT System window, click ‘Maintenance’ on the menu bar and select ‘Open Module Door or Update EEPROM’ (see the figure below).
- Select the module. Click “Open Door” to open the module door.
Figure: CBNAAT system showing ‘Open Module Door’ and ‘Perform Self-Test’
Solution 3: If the door does not open, close the software, and re-launch the software.
When the software is re-launched, the module will reinitialize itself by putting the valve and the syringe in the correct position. This may help to open the door.
Solution 4: Turn the system off and restart the CBNAAT instrument and software.
Solution 5: In the CBNAAT system window, choose ‘Maintenance’ on the menu bar and select ‘Perform Self-Test' (see figure above).
Solution 6: If none of the solutions above work, manually remove the cartridge.
If the cartridge is not released, contact technical support, to manually remove the cartridge. If you are a senior lab supervisor, you may click here to see the steps to manually remove a stuck cartridge.
Video fileVideo : CBNAAT Hardware Problem: Stuck Cartridge
Resources
CBNAAT Hardware Problem: Modules Not Detected
ContentOne of the common problems encountered while using the CBNAAT machine is the non-detection of the module.
Usually, there is a loss of communication between modules and software, leading to non-detection.
Origins:
- Ethernet connection between Personal Computer (PC) and CBNAAT is bad
- Power supply issue (main power or Universal Power Supply (UPS) fluctuations)
- Bad connection points between gateway board and modules
- Too high room temperature
Solutions:
- Restart the instrument first and then the computer.
- Unplug and re-plug the ethernet cable between the PC and the instrument, then restart as above.
- Secure the power supply and use an adapted UPS/ surge protector.
- Check the temperature inside the module (should be below 39°C).

Figure: Troubleshooting protocol for the non-detection of CBNAAT Module
Video fileVideo : CBNAAT Hardware Problem: Modules Not Detected
Resources
Monitoring Different Types of Errors with CBNAAT
ContentWhile using the CBNAAT machine in a laboratory setting, many different causes can lead to an error (indicated on-screen as ‘ERROR’, as in figure 1).
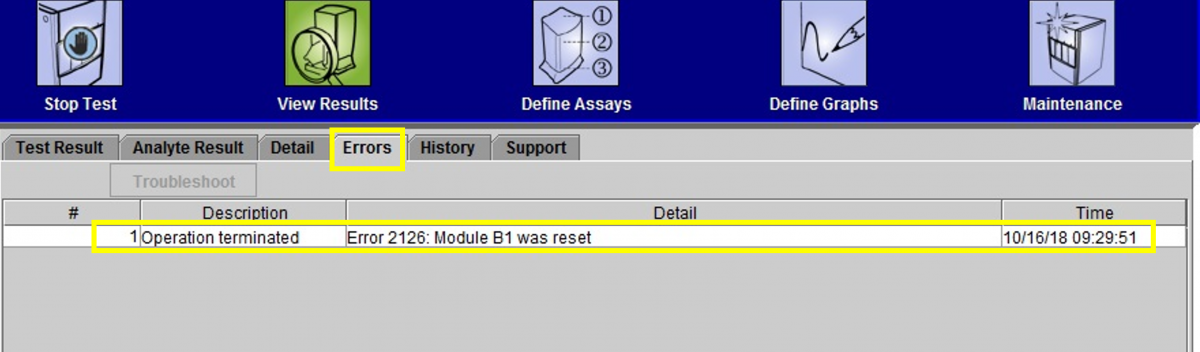
Figure 1: Window showing how to click on “Errors” to learn more about the issue
Error Message Categories
The errors are displayed by the instrument’s software to highlight various technical issues that disrupt the test process. They are grouped into five categories by the software:
- Cartridge loading errors: Errors that occur during a cartridge loading process
- Self-test errors: Errors that occur during the self-test process
- Run-time errors: Errors that occur during a test.
- Operation terminated errors: Errors that abort a test
- Post-run analysis errors: Errors that occur during the data reduction process
You can view the errors by clicking the ‘Check Status’ icon on the CBNAAT software, as seen in figure 2.
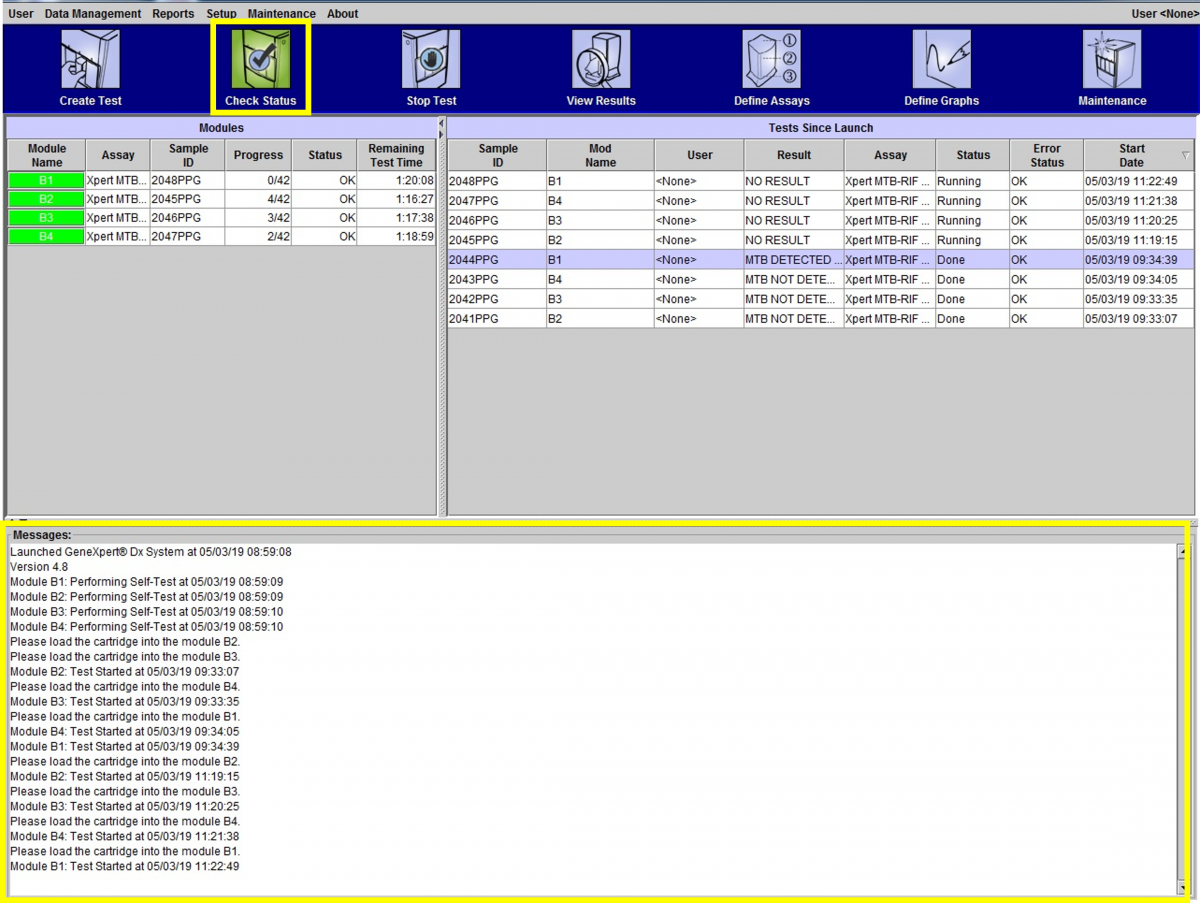
Figure 2: 'Check Status' Window of the CBNAAT Software
Monitoring of Errors and Invalid/ No Results
- Rates of errors and Invalid/ No Results need to be monitored by the module and user.
- Identifying the most frequent types of problems can help to troubleshoot since certain errors may be associated with a user’s technique in sample processing while others with mechanical problems with the instrument modules or room temperature.
- Recurring errors should be timely reported to the manufacturer.

Figure 3: Monitoring of Errors on CBNAAT
Video file
Video : Monitoring Different Types of Errors with CBNAAT
Resources
CBNAAT Troubleshooting: Error- 5006, 5007, 5008 and 5009 [PCC Failed]
ContentErrors 5006, 5007, 5008 and 5009 (Probe Check Control Failed) sometimes appear on the Cartridge-based Nucleic Acid Amplification Test (CBNAAT) machine in TB laboratories and need troubleshooting.
Problem:
Probe Check Control (PCC) failed, and the test was stopped before amplification.

Origins:
- Incorrect storage of cartridges (probe integrity issues detected)
- Dust on optical filters
- Sample too viscous
- Incorrect sample volume
- Improper fluid transfer (bubbles)
Solutions:
- Store the kits between 2 - 28°C.
- Use an optical brush to clean the optical filters (without a cleaning solution).
- Make sure the sample is totally liquified before transferring it to the cartridges.
- Add the correct volume of the specimen.
- Avoid making bubbles.
Video fileVideo : CBNAAT Troubleshooting: Error- 5006, 5007, 5008 and 5009 [PCC Failed]
Video fileVideo : Probe Check Control (PCC)
Resources
CBNAAT Troubleshooting: Error- 2008 and 2009
ContentDuring the use of the Cartridge-based Nucleic Acid Amplification Test (CBNAAT) machine, Error- 2008 and 2009 may appear on the screen and needs troubleshooting.
Problem:
2008: Pressure reading exceeds the maximum
2009: Syringe pressure is below the protocol limit
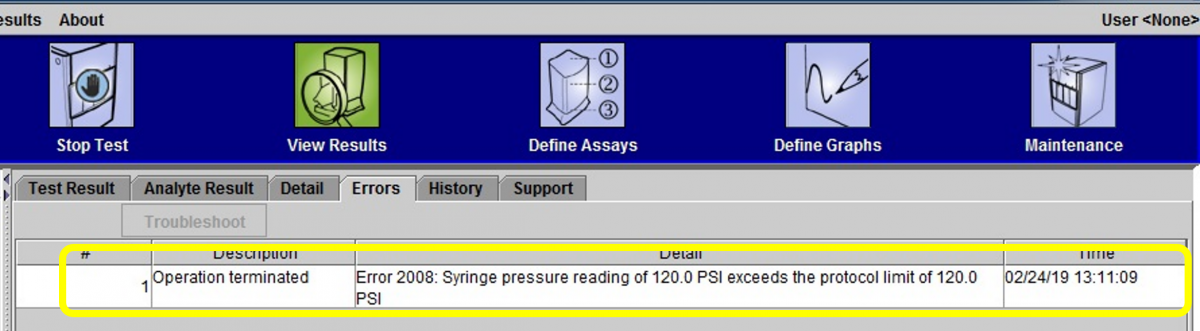
Figure: Error 2008
Origins:
- The cartridge filter is clogged (due to too viscous sample or particles)
- Pressure sensor failed
Solutions:
- Make sure the sample does not contain any solid particles.
- Make sure the sample is totally liquified before transferring it to the cartridges.
- If after 15 minutes of incubation with the sample reagent, the sample is still too viscous, wait up to 10 more minutes.
- Use a new cartridge and add only a sample reagent to test. If the problem persists, it is likely a module problem: Contact Technical Support.
Video fileVideo : CBNAAT Troubleshooting: Error- 2008 and 2009
Resources
CBNAAT Troubleshooting: Error- 2014, 3074, 3075 and 1001 (Heating Component Related Issues)
ContentError - 2014, 3074, 3075 and 1001, in the Cartridge-based Nucleic Acid Amplification Test (CBNAAT) machine are related to ‘Heating Component Related Issues’.
Problem:
Temperature/ Heater Failure
Origins:
- High temperature in module
- Heater component failure
- Broken fan
- Dust on filter near the fan
Troubleshooting:
In the CBNAAT Dx System window:
- Click “Maintenance” on the menu bar
- Select “Module Reporters” to check module temperature

Figure: Troubleshooting Heating Component Related Issues
If the problem persists, one needs to contact the manufacturer for technical support.
Video fileVideo : CBNAAT Troubleshooting: Error- 2014, 3074, 3075 and 1001 [Heating Component Related Issues]
Resources
CBNAAT Troubleshooting: Failures without Error Codes
ContentSome Cartridge-based Nucleic Acid Amplification Test (CBNAAT) machine errors will indicate test failure without Error Codes.
Error: Invalid
Problem:
Sample Processing Control (SPC) failed.
Origin:
Polymerase Chain Reaction (PCR) was inhibited due to food particles or blood in the sample.
Solution:
Laboratory Technician (LT) needs to collect another specimen, if necessary.
Prevention:
- Before mixing with the sample reagent for decontamination, check whether the sample contains food particles or blood.
- Allow food particles to settle down before adding the sample to the cartridge.
If the problem persists, one needs to contact the manufacturer for technical support.
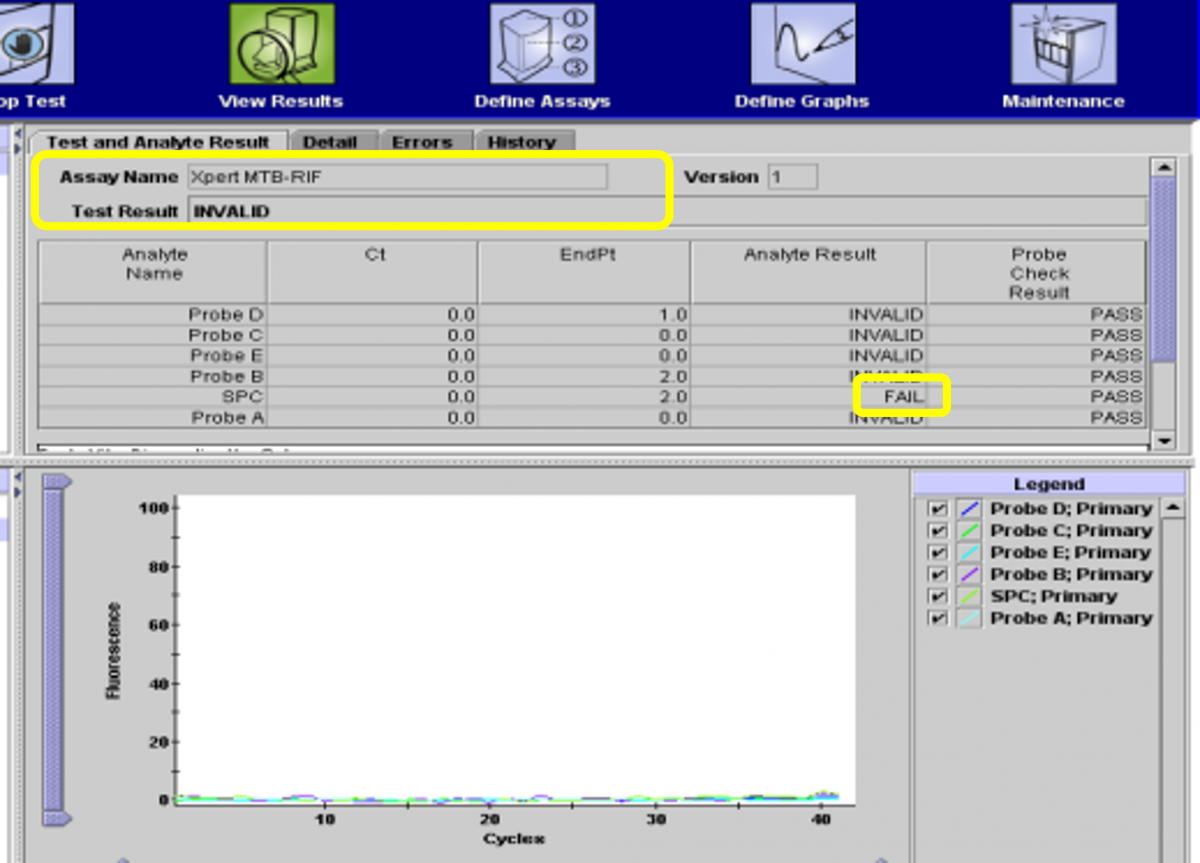
Figure: Error - Invalid
Error: No Result
Problem:
Test could not be completed and insufficient data collected.
Origins:
Software stops working before the test is completed due to:
- Windows or software freeze
- Power failure
- STOP TEST function was activated (accidentally or deliberately)
Solution:
Secure the power supply, restart the machine and repeat the test with a new cartridge.
Contact an authorized service provider if the problem persists.
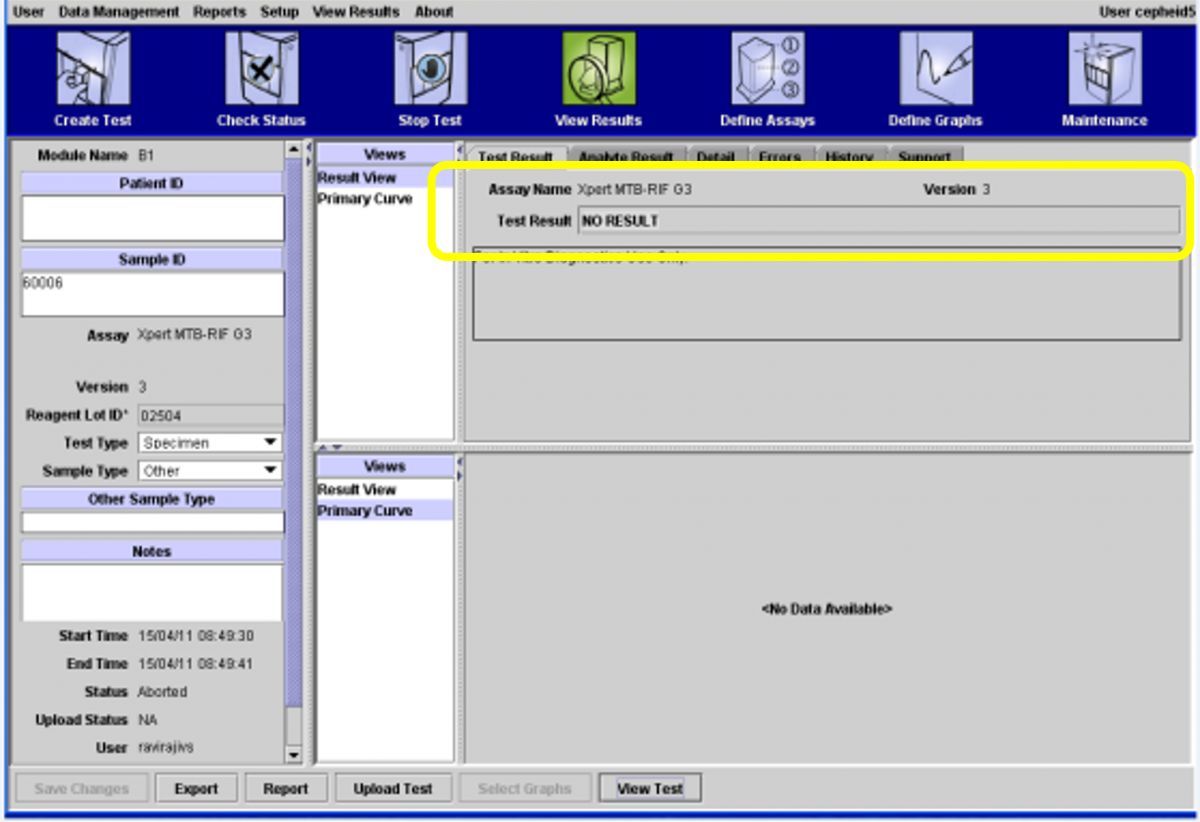
Figure: Error - No Result
Video fileVideo : CBNAAT Troubleshooting: Failures without Error Codes
Resources
-
CDST_LT: Maintenance of CBNAAT
FullscreenMaintenance of CBNAAT Instrument under NTEP
ContentMaintenance of the CBNAAT instrument is an essential activity to be performed in the laboratory setting and involves:
Preventive Maintenance Tasks
- Performed regularly by the user
- Ensure the good performance of the system
- Avoid problems of malfunction
Need-based Maintenance Tasks
- Performed in specific situations
- Performed or guided by manufacturer representatives
Frequency-based Tasks for the CBNAAT Instrument
DAILY WEEKLY MONTHLY ANNUAL OR AFTER 2000 TESTS PER MODULE - Remove and properly dispose off cartridges
- Clean and disinfect the work area
- Put on a dust cover when the instrument is not in use
- Disinfect the instrument’s surface
- Disinfect cartridge bay interior and plunger rod
- Filter cleaning
- Disinfect cartridge bay interior and plunger rod
- Clean instrument filter
- Archive and back-up test results
- Filter cleaning
Module Xpert Check (calibration) and maintenance of the module
Materials Required for CBNAAT Instrument Maintenance
- Freshly prepared 1% sodium hypochlorite solution
- 70% Ethanol
- Wipes, tissues, or cotton
- Disposable gloves
- Clean water and soap (for washing the filters)
- Replacement filters for the fan (available from the manufacturer).
Resources
CBNAAT Instrument Installation Criteria
ContentIt is important to adhere to the manufacturer's installation guide for optimal performance of the Cartridge-based Nucleic Acid Amplification Test (CBNAAT) machine. This guide should be kept in the laboratory. It is important to thoroughly read the instalment steps given in the brochure supplied with the machine.
Strict monitoring of these criteria should be carried out by the laboratory personnel:
- The instrument should not be kept directly under an air-conditioning vent or window. Direct sunlight should also be avoided.
- The instrument's room should have temperature control (15-30°C).
- The instrument needs to be installed on a vibration free/ stable workbench with no centrifuge adjacent to it.
- There is a need for a stable electricity supply (for added safety, the instrument must be connected to an Uninterruptible Power Supply (UPS) or surge protector).
For safety purposes, one needs to provide 10 - 15 cm of clearance on each side of the instrument.
Compliance with equipment installation criteria is necessary. The Instrument Qualification Documents include:
- Installation Qualification - IQ
- Operational Qualification - OQ
- Performance Qualification - PQ
Installation Qualification
IQ provides evidence for the delivery, installation and configuration of the instrument as per the manufacturer’s standards using an installation checklist.
Operational Qualification
OQ is a collection of test cases used to verify the proper functioning of a system before the instrument is released for use.
Performance Qualification
PQ is a collection of test cases used to verify that the system performs as expected under simulated real-world conditions.
Video fileVideo : CBNAAT Instrument Installation Criteria
Resources
Daily Maintenance of the CBNAAT Instrument
ContentDaily maintenance tasks of the CBNAAT instrument include:
At the end of the day:
- Turn off the computer
- Turn off the CBNAAT instrument
At the beginning of the day:
- Turn on the CBNAAT instrument
- Turn on the computer
Daily Maintenance Tasks
- After testing, remove the cartridges from the instrument.
- Dispose off cartridges in the appropriate biohazard waste container.
- Remove clutter from the work area.
- Disinfect the work area (1% hypochlorite solution or 70% ethanol).
- Put on the dust cover when the instrument is not in use.
- Switch off the machine at the end of the day.
- Do not turn off the UPS power supply.
It is essential to wear disposable gloves for the cleaning procedure. Wearing gloves prevents one from being exposed to biologically hazardous samples.
Video fileVideo : Daily Maintenance of CBNAAT Instrument
Resources
Monthly Maintenance of the CBNAAT Instrument
ContentMonthly maintenance tasks of the CBNAAT instrument include:
Cleaning of the Cartridge Bay and Plunger Rod
The CBNAAT manufacturer recommends monthly cleaning of the cartridge bay and plunger rod. However, if the sample load is high, this task can be carried out on a weekly basis.
Cleaning of Module PCR Slot (Figure 1)
- Wear laboratory gloves.
- Remove cartridges from the modules.
- Make sure that all the bristles are fully inserted (up to the shoulder of the plastic shank of the brush).
- Brush the inside of the slot with up and down movements.
- Rotate the brush for approx. 180º and back, then repeat the previous step 2 times.
- Clean each module for at least 30 seconds.

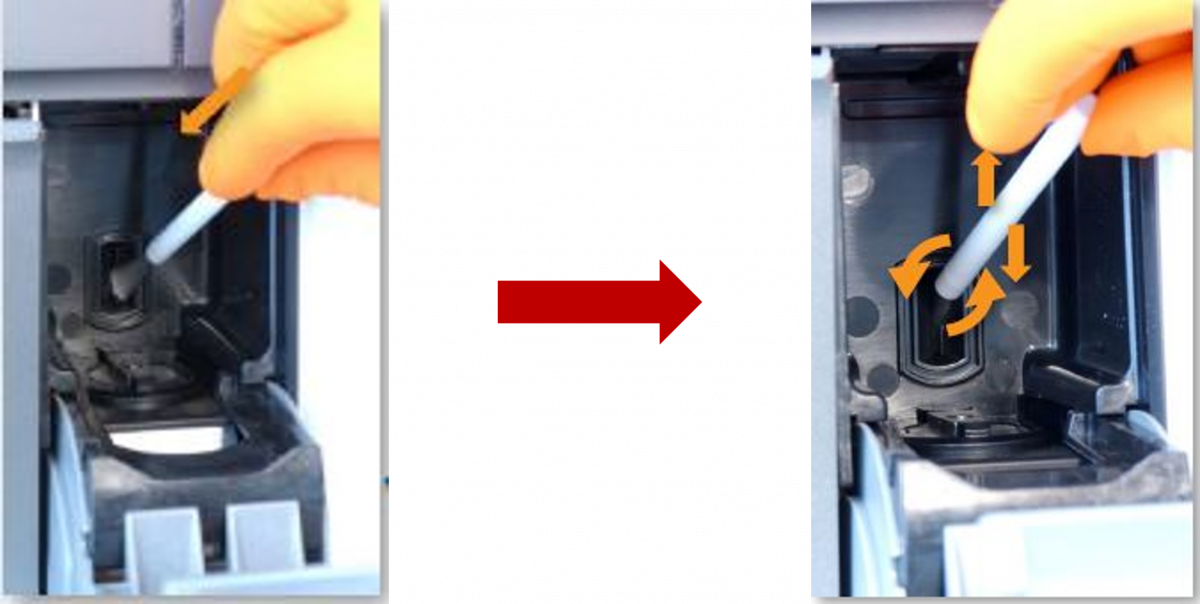
Figure 1: Cleaning of Module PCR Slot
Plunger Disinfection (Figure 2-7)
Plunger maintenance is initiated using the CBNAAT software. While cleaning, care should be taken not to touch the slit on the I-CORE module into which the cartridge reaction tube is inserted. Make sure that the cleaning cloth is damp but not dripping with disinfecting liquid.
1. To initiate the task, click on the “Maintenance” icon on the toolbar (Figure 2).

Figure 2: "Maintenance" icon on the toolbar
2. On the Maintenance menu, select “Plunger Maintenance” (Figure 3).

Figure 3: "Plunger Maintenance" in the Maintenance Menu

3. In the “Plunger Maintenance” window, select a module to clean or select “Clean All” (Figure 4).
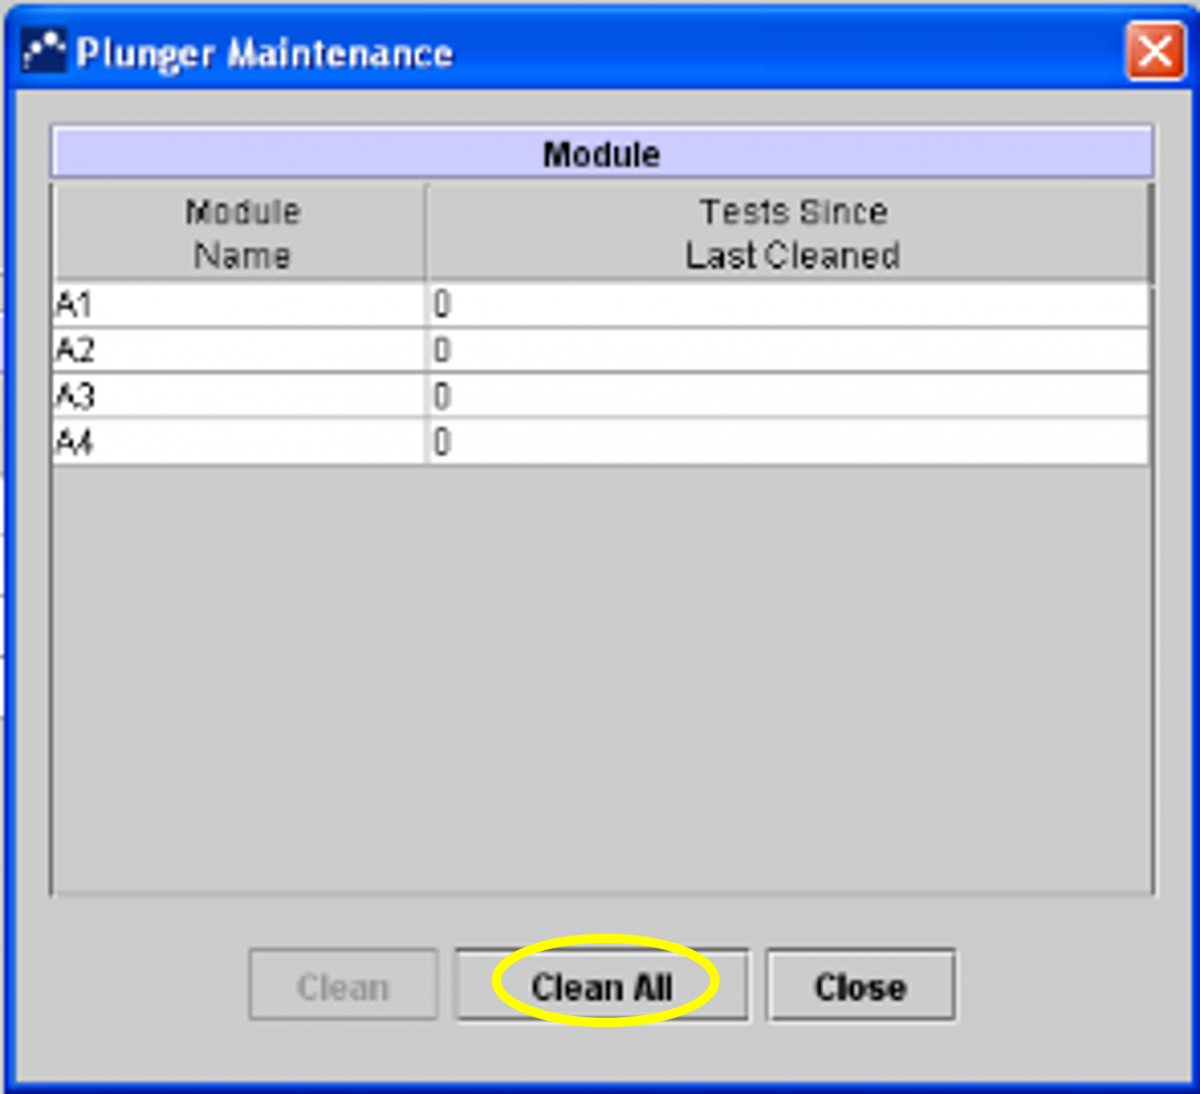
Figure 4: Selecting "Clean All" in the Plunger Maintenance Window
4. Follow the instructions in the Dialog box.
5. Click “OK” (Figure 5).
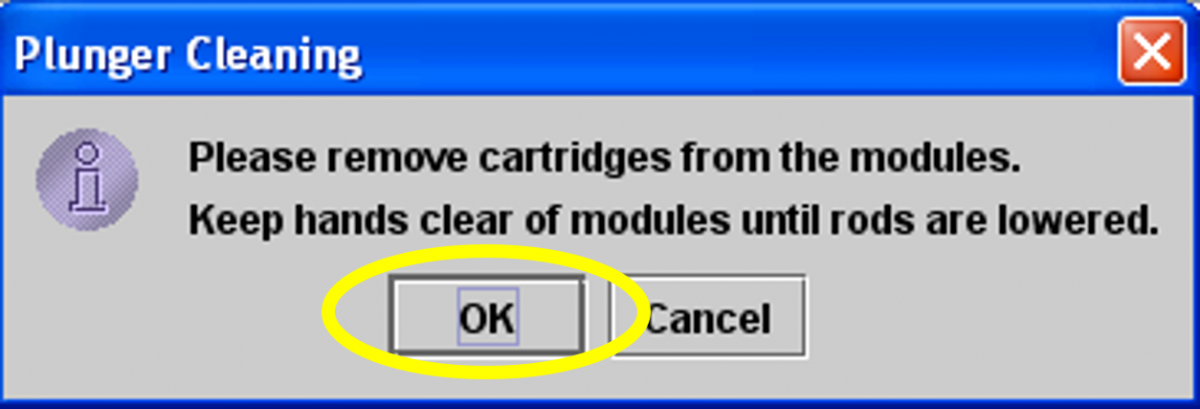
Figure 5: Click "OK" after following instructions in dialog box
6. The plunger rod in the chosen module will be automatically lowered (Figure 6).
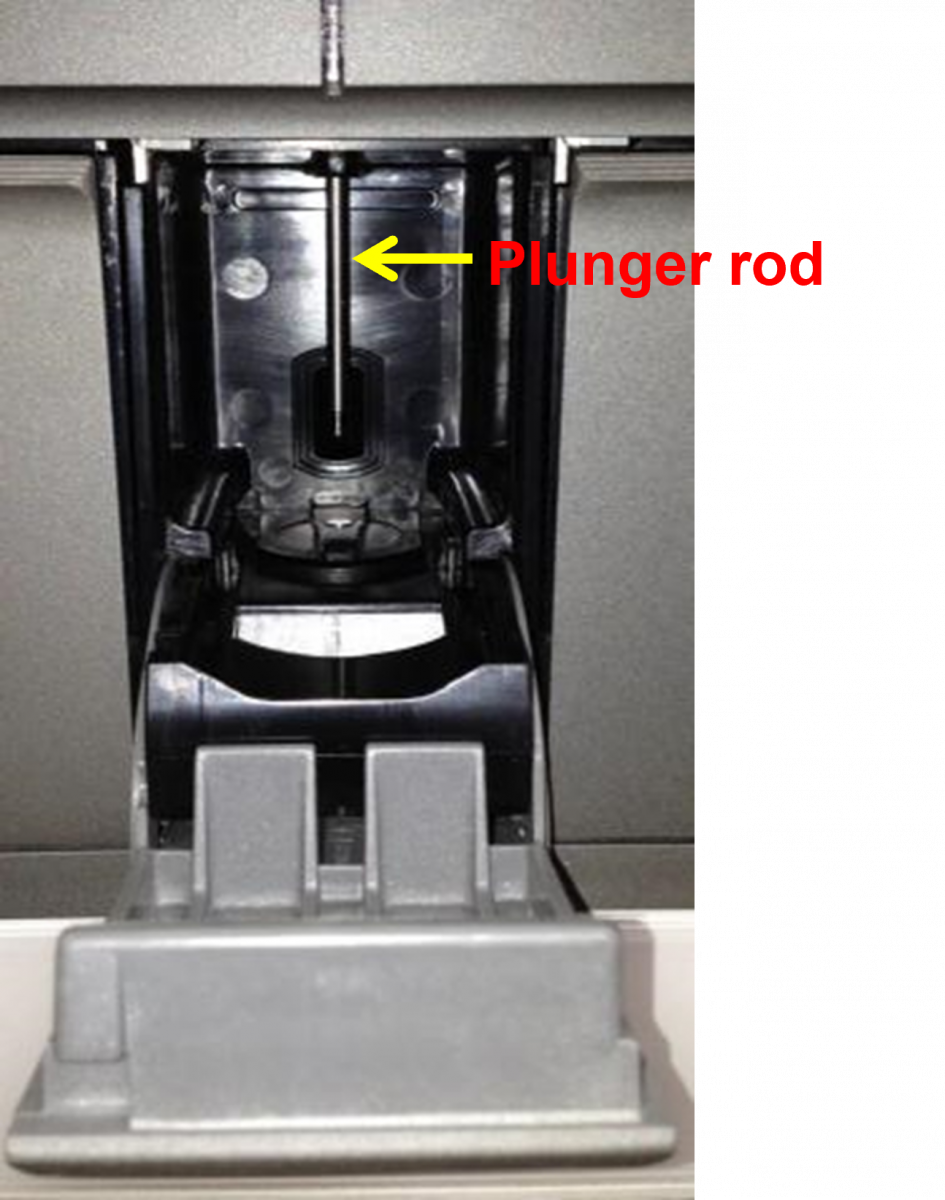
Figure 6: Plunger Rod of Module
7. After cleaning the plungers, click on “Move Up All” and the plungers will return to their original position (Figure 7).
8. Click “Close”.

Figure 7: Click "Move Up All" and then "Close" after cleaning the plungers
Replacing and Cleaning the Fan Filters (Figure 8)
Clean the fan filters weekly if you operate in an area of high pollution, dust or smoke, otherwise monthly/ quarterly is sufficient.
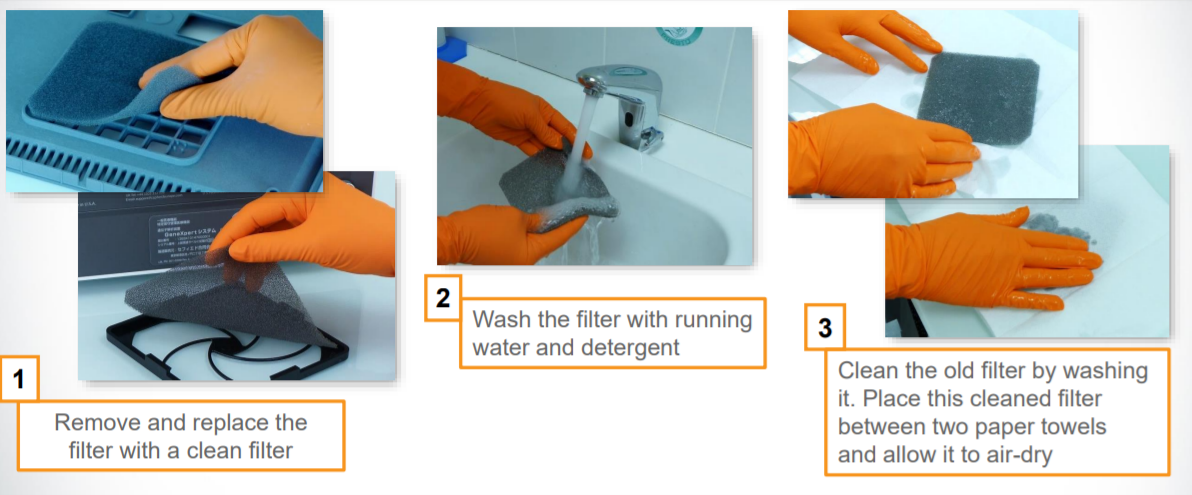
Figure 8: Steps for removing and replacing the filters
General Cleaning Procedure Outline


Make sure you wear disposable gloves for the cleaning procedure. Wearing gloves prevents you from being exposed to biologically hazardous samples.
Items required for cleaning:
- 1% Sodium hypochlorite solution (prepared within one day)
- 70% Ethanol
- Cotton swabs
- Disposable gloves
- Optical brush
Note: The current guidelines from the manufacturer suggest the use of freshly prepared 1% sodium hypochlorite (or 1:10 solution of household chlorine bleach).
- Dampen wipe/ swab with freshly prepared 1% sodium hypochlorite.
- Wipe the surface/ element.
- Discard the used wipe/ swab.
- Wait for 2 minutes.
- Dampen wipe/ swab with 70% Ethanol.
- Wipe the surface/ element.
- Repeat steps 5-7 three times.
Video fileVideo : Monthly Maintenance of the CBNAAT Instrument
Resources
CBNAAT Monthly Data Archive and Data Back-up Process
ContentThe Cartridge-based Nucleic Acid Amplification Test (CBNAAT) files should be archived and saved to a CD or other appropriate external media (preferably an external drive), at least once a month to ensure that no test data are lost.
Archiving tests creates copies of the test data in “gxx” files.
Importance of Archiving and Back-up
Archiving allows you to:
1. Back-up data to ensure it will not be lost if the computer breaks down.
2. Create a copy of the data to be sent to the manufacturer for assistance in troubleshooting problems.
How to Archive Results
1. Click “Data Management” (Figure 1).
2. Click on “Archive Test” (Figure 1).
3. Choose the tests that need to be archived (or “Select All”) (Figure 1).
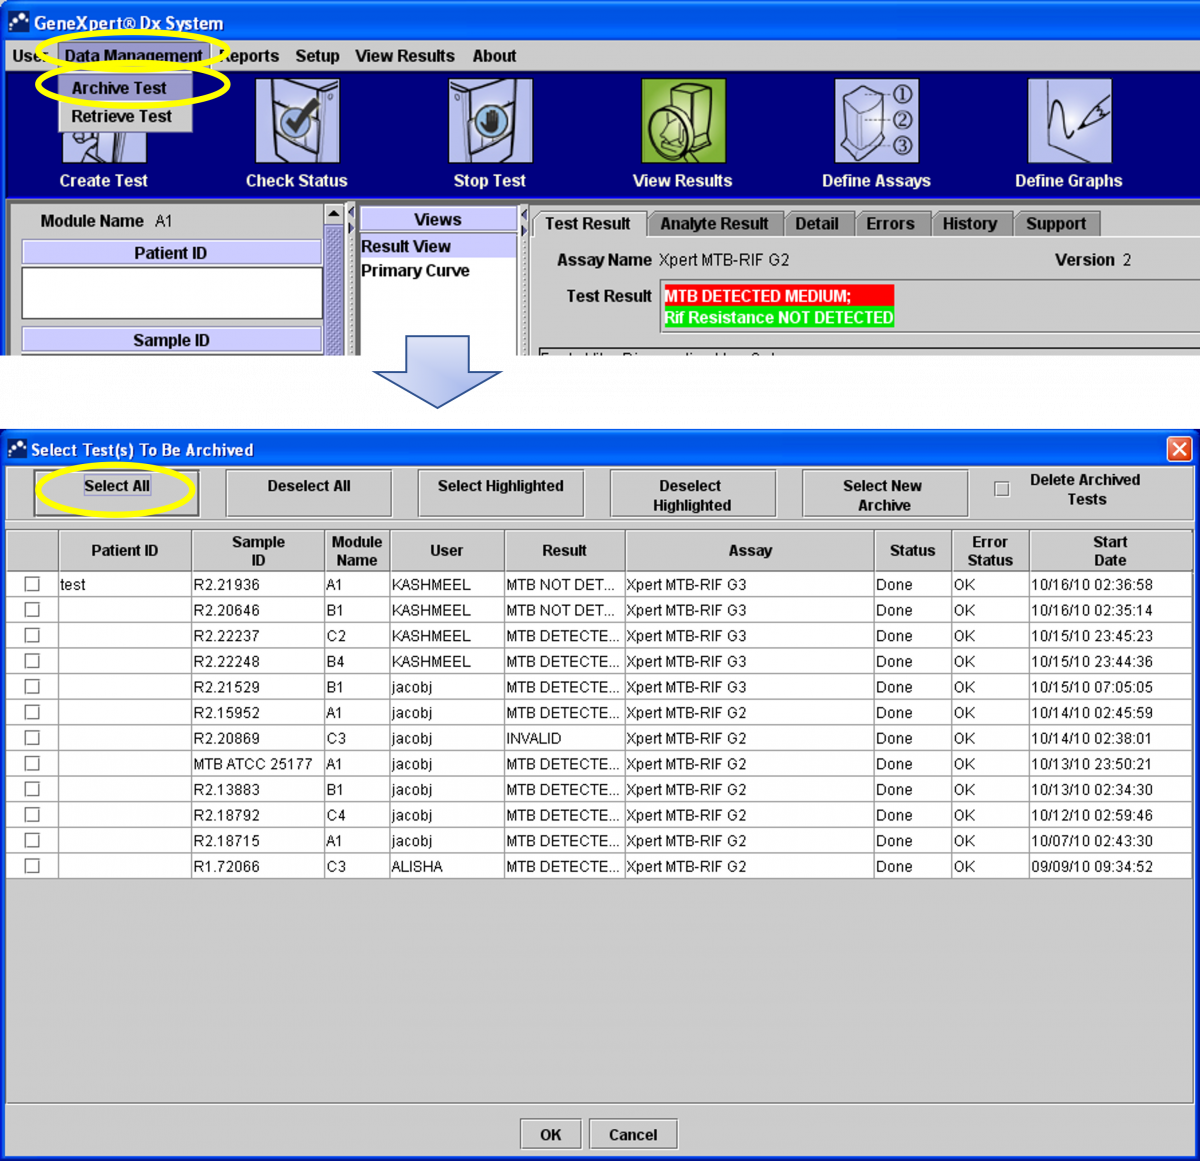
Figure 1: Steps to archive results
4. In the next dialogue box click “Proceed” (Figure 2).
5. The files will be saved in the folder “Export”. In the file name, you will see the date of archiving (Figure 2).
6. Click on “Save” (Figure 2).
7. Click “OK” (Figure 2).
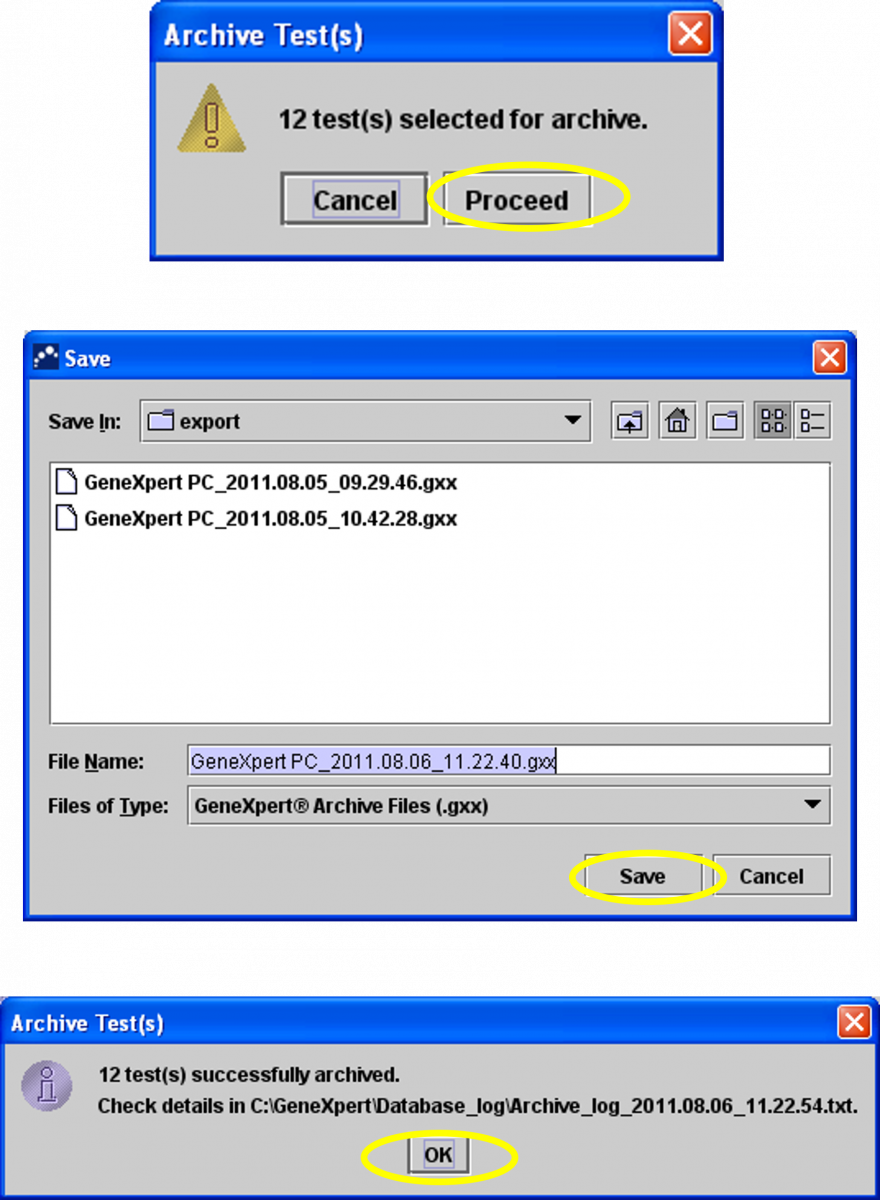
Figure 2: Steps to archive results (continued)
How to Retrieve Results
1. Click “Data Management” and then click “Retrieve Test” (Figure 3).
2. Select the file you want to retrieve.
3. Click on” Open” (Figure 3).
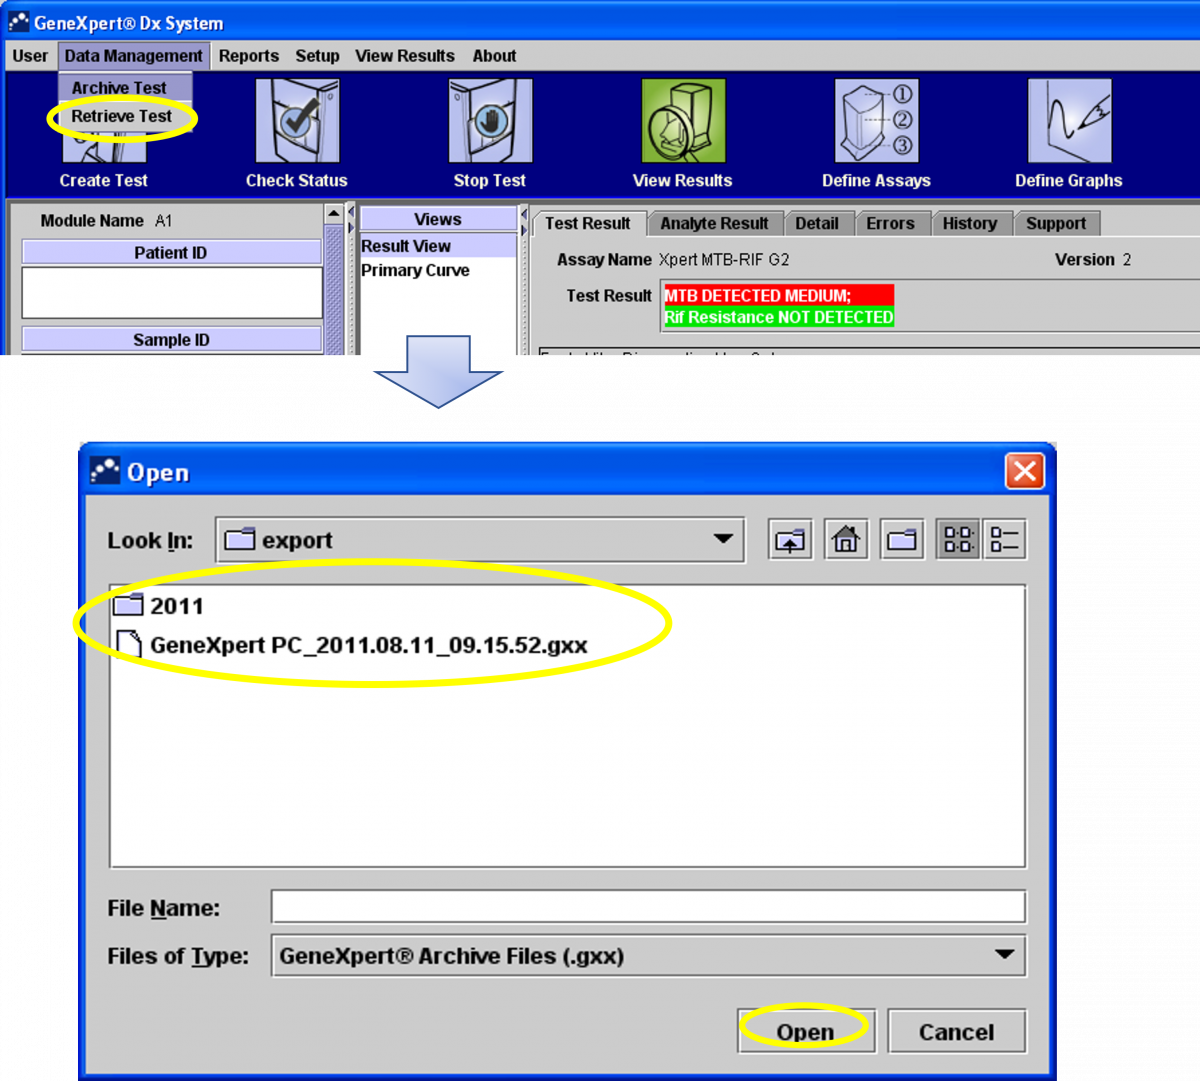
Figure 3: Steps to retrieve results
4. Select the test you may want to retrieve (or “Select All”) (Figure 4).
5. Click “OK” (Figure 4).
6. Click on “Proceed” (Figure 4).
7. Click “OK” (Figure 4).
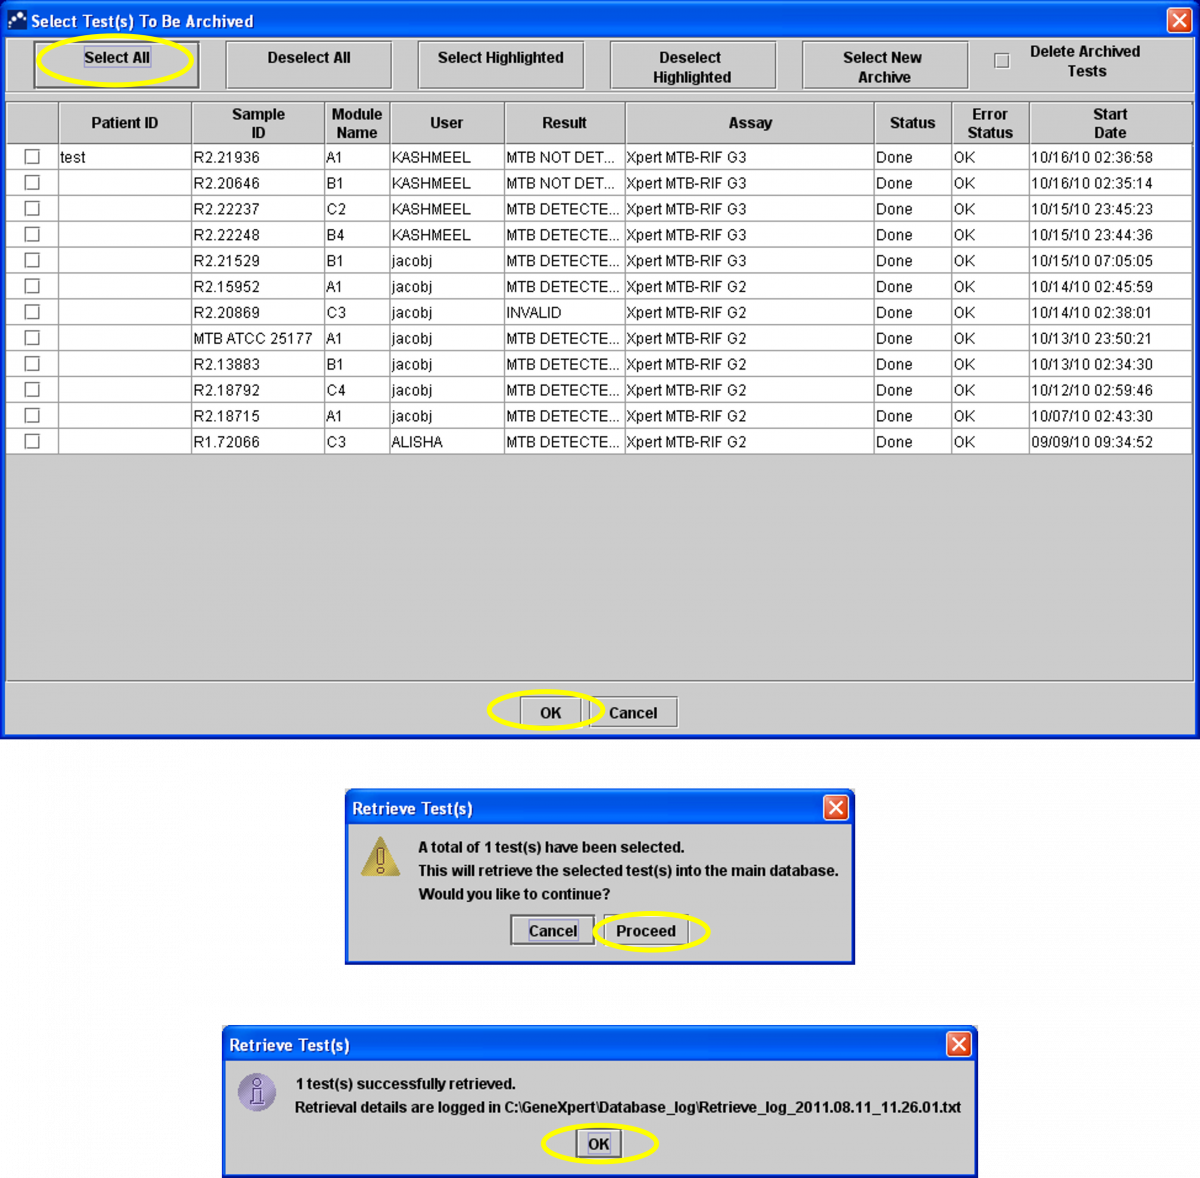
Figure 4: Steps to retrieve results (continued)
How to Back-up Data
Data backup should be carried out monthly.
1. Click “Yes” to the prompt (Figure 5).
2. Click on “Database Backup” (Figure 5).
3. Click on “Proceed” (Figure 5).
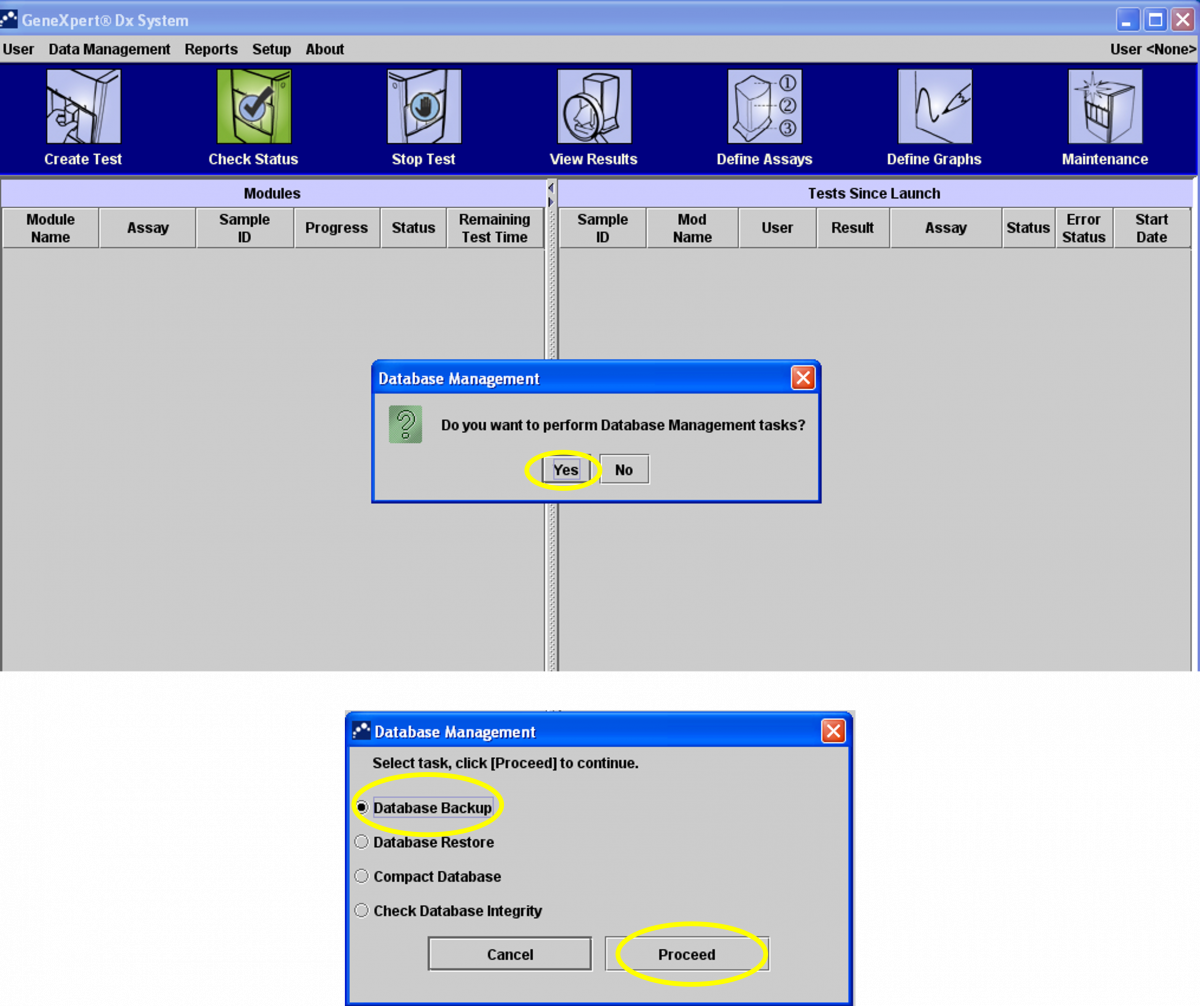
Figure 5: Steps to back-up data

4. The software will create a zip file with all the results (Figure 6).
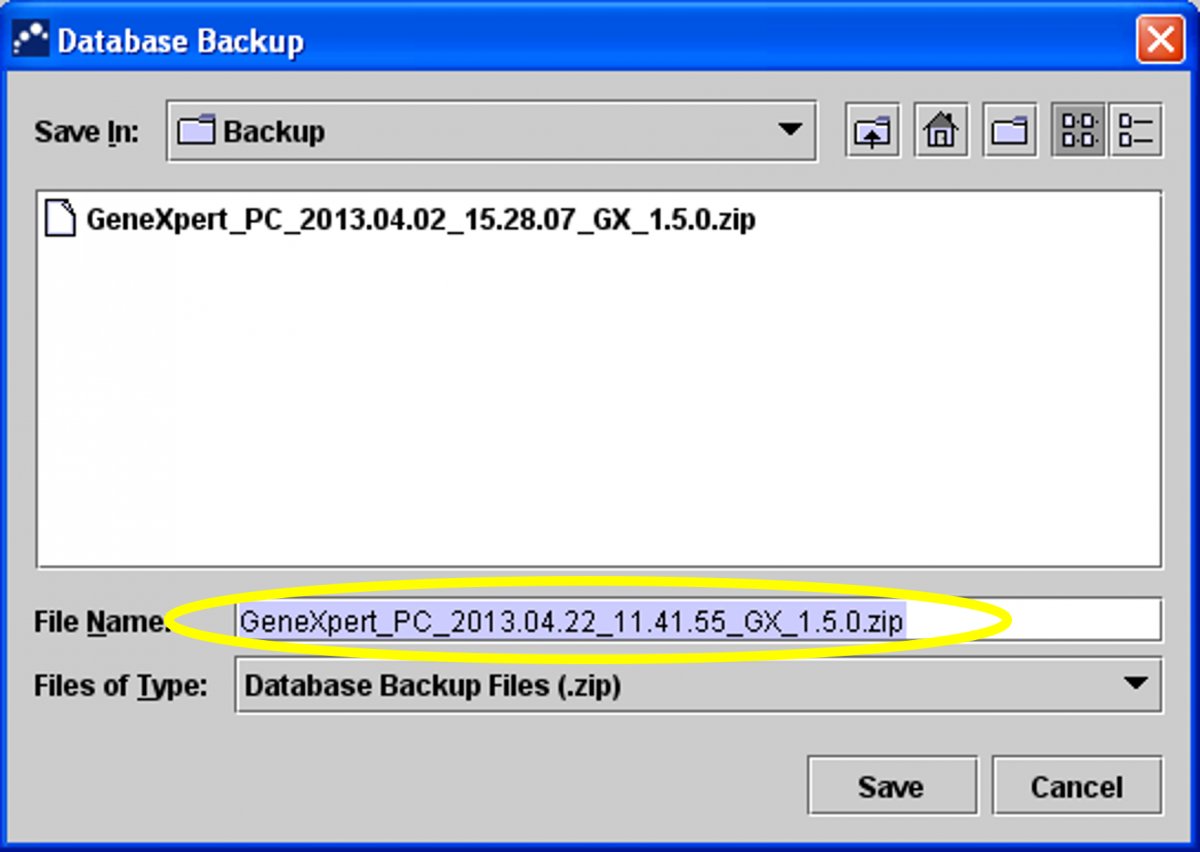
Figure 6: Software creates a zip file for all results

5. The file is saved on the desktop in the CBNAAT folder -> Backup section.
6. Click on “Save” (Figure 7).
7. Click “OK” (Figure 7).
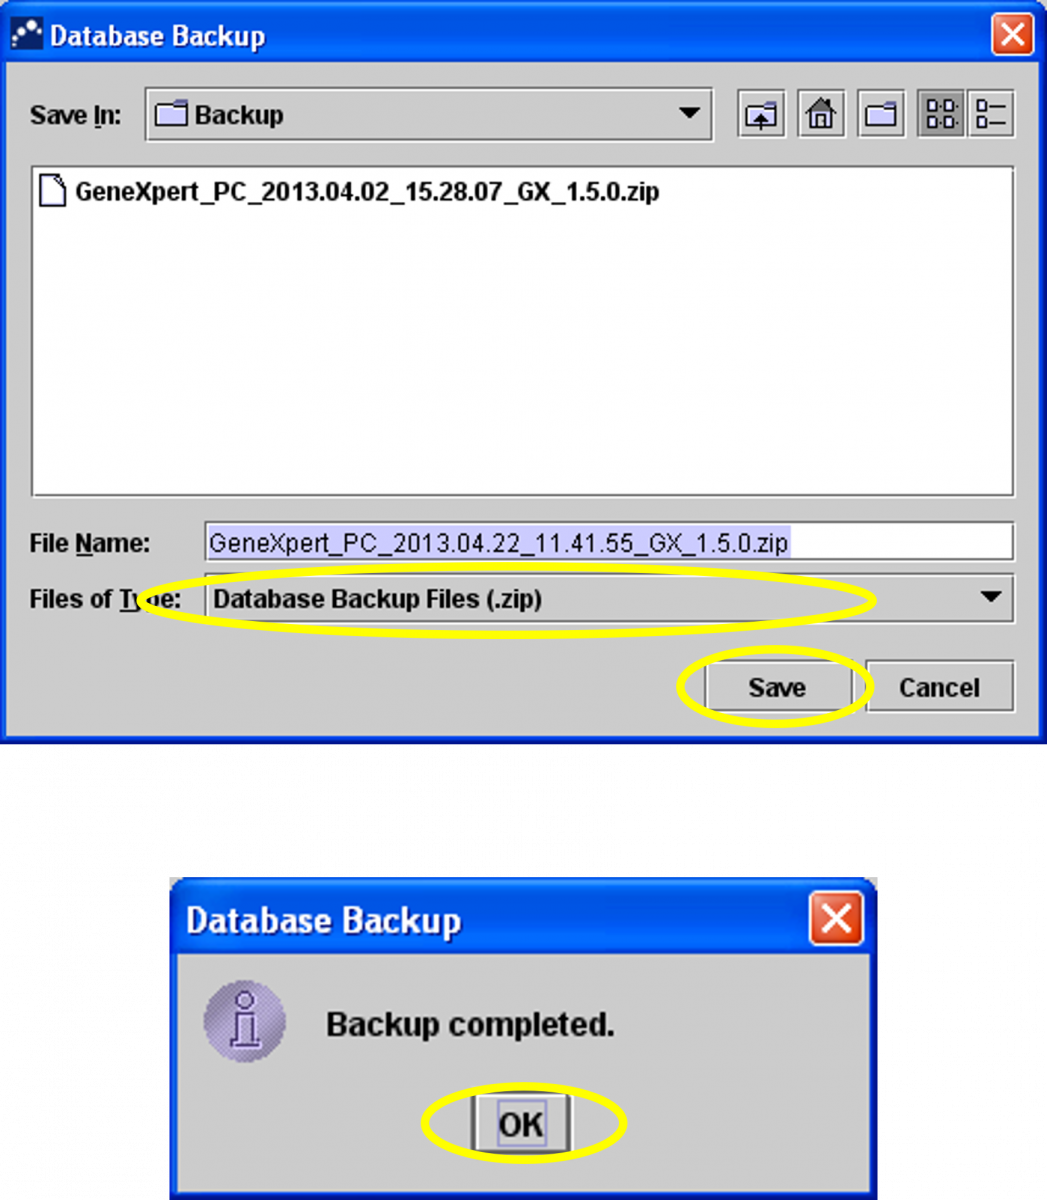
Figure 7: Steps to back-up data (continued)
Video file
Video : CBNAAT Monthly Data Archive and Data Back-up Process
Resources
CBNAAT Annual Maintenance Protocol
ContentThe annual maintenance protocol for the Cartridge-based Nucleic Acid Amplification Test (CBNAAT) instrument involves calibration of the machine.
Calibration:
- Calibration of the CBNAAT instrument is performed by the manufacturer before the system is shipped.
- Calibration is not required during the initial system setup.
- The manufacturer recommends that the system should be checked for proper calibration on an annual basis (or after every 2,000 runs on each instrument module).
- Based on the usage and care of the system, calibration checks may be recommended more frequently.
- The service engineer will perform the machine check during the annual maintenance visit.
Parameters Verified During Calibration
One calibration cartridge is used to calibrate a single module in conjunction with the calibration software.
- Recalibrate the optical system
- Verify the thermal system
- Module sub-system functionality: A series of system-level tests to ensure full system functionality within the instrument servicing specifications as provided by the manufacturer, and covers:
- Heater and fan performance
- Syringe drive and pressure performance
- Valve drive performance
- Ultrasonic horn performance
- Electronic components performance
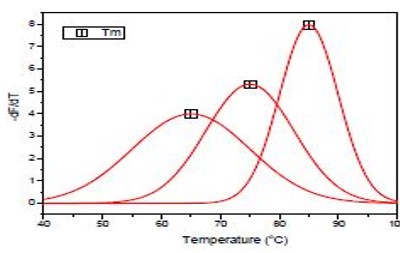
Figure: Temperature Calibration of the CBNAAT Instrument
Resources
-
CDST_LT: Monitoring CBNAAT quality and lab performance
FullscreenExternal Quality Assurance for CBNAAT
ContentExternal Quality Assurance (EQA) ensures that high-quality testing can be carried out efficiently and without interruption. It involves Proficiency Testing (PT) and On-site Evaluation (OSE).
PT is an important component of EQA for Cartridge-based Nucleic Acid Test (CBNAAT) under the National TB Elimination Program (NTEP) and guarantees accurate and reproducible results.
Importance of EQA/ PT for CBNAAT
- Gives assurance to users that the instrument is functioning properly
- Checks to verify that users can correctly interpret and report results
- Verifies that there are no major errors in the process control system and that samples are identified, tested and reported correctly
- Helps to recognize major problems with an instrument or user and take remedial action
Process of EQA for CBNAAT
- EQA of CBNAAT is done using dried tube panels consisting of Mycobacterium tuberculosis (MTB) strains that are RIF resistant/ sensitive/ Non-tuberculous Mycobacteria (NTM)/ negative.
- Coordination of the EQA activity, manufacture and validation of the panels is undertaken by the National TB Institute, Bangalore.
- The process of manufacturing and validating the Dried Tube Specimen (DTS) for EQA panels involves:
- Culturing the mycobacterial strain in the liquid culture system followed by inactivation of the cultures using sample reagents
- Further incubating for 84 days for confirmation of inactivation followed by preparation of DTS panel cultures and their validation.
- Once validated, the DTS panels are dispatched to the CBNAAT sites
Each CBNAAT site receives a set of 5 tubes/ machine.
Ideally, EQA/ PT for CBNAAT is done thrice in a year/ per module/ per site.
Based on the performance of the CBNAAT laboratory, corrective actions are taken by the supervising authority such as Intermediate Reference Laboratory (IRL)/ National Reference Laboratory (NRL). During the on-site visits by the IRL and the NRL, quality indicators for CBNAAT are evaluated and corrective actions are suggested.
Resources
Kindly provide your valuable feedback on the page to the link provided HERE
Monitoring of CBNAAT Quality Indicators
ContentMonitoring of quality indicators is an essential component of quality assurance for the Cartridge-based Nucleic Acid Amplification Test (CBNAAT).
- Routine monitoring of quality (performance) indicators:
- Critical element of quality assurance for any diagnostic test
- International Organisation of Standardisation (ISO) requirement
- Each testing site should collect and analyze quality indicators monthly.
- Document and investigate any unexplained change in quality indicators, such as:
- Increase in error rates
- Change in Mycobacterium tuberculosis (MTB) positivity rate or Rifampicin (Rif) resistance rate
- Significant change in volume of tests conducted
- Error rates > pre-determined threshold (>5%)
- Test turnaround time
- All unexpected trends should be reviewed by the laboratory manager and linked to corrective actions.
- Standard set of quality indicators should be used for all CBNAAT testing sites.
- System should be in place for centralized reporting of monthly quality indicators.
- Each instrument should be monitored monthly, using the following minimum set of indicators to evaluate proper use:
- Number of tests performed per month
- Number and proportion of MTB detected; Rif-resistance not detected
- Number and proportion of MTB detected; Rif-resistance detected
- Number and proportion of MTB detected, Rif-indeterminate
- Number and proportion of MTB not detected
- Number and proportion of errors
- Number and proportion of invalid results
- Number and proportion of no results
- Median time to result after receipt of the specimen
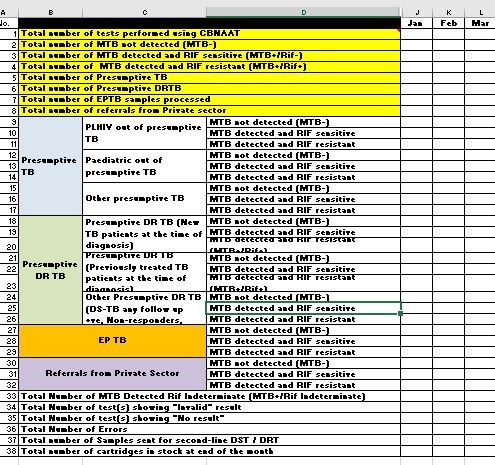
Figure: Monthly Quality Indicators for CBNAAT
Where possible, disaggregated data according to the tested population group (HIV positive, Multi-drug resistance (MDR) risk, extrapulmonary or paediatric TB) is collected.
Quality Indicator Monitoring: Troubleshooting Aid
Identifying the number and type of various errors can help with troubleshooting since certain errors may be associated with processing, instrumental or environmental conditions
The following analyses may be performed:
- The number of errors occurring by user
- The number of errors occurring by instrument module
- The number of tests lost due to power outages or surges
- The number, duration and causes of routine interruptions in the CBNAAT testing service
Video fileVideo : Monitoring of CBNAAT Quality Indicators
Resources
- Routine monitoring of quality (performance) indicators:
-
CDST_LT: Biomedical waste management in CBNAAT
FullscreenBiosafety measures required for CBNAAT
ContentIt is essential to follow biosafety protocols while handling specimens and cartridges. This will prevent anyone handling the specimens and cartridges from getting infected.
General Biosafety Requirements for CBNAAT
Cartridge-based Nucleic Acid Amplification Test (CBNAAT) is a low-risk procedure and requires the same level of precautions, like those used for direct Acid-fast Bacillus (AFB) sputum smear microscopy:
- Carry out the procedure in a well-ventilated area.
- Wear gloves and a laboratory coat at all times when handling patient samples.
- Minimize the generation of aerosols during sample processing and handle specimens carefully and responsibly.
Based on risk assessment, additional biosafety precautions may be required in CBNAAT laboratories, such as the use of N95 respirators or biosafety cabinets.
Personal Protective Equipment (PPE) is important, but it does not replace good microbiological and good laboratory practices. They include:
Gloves: Essential (disposable and powder-free)
Laboratory coats: Essential
Respirators: Usually not required, but:
- May be needed, based on risk assessment.
- Must always be included in a spill kit.
- Recommended respirators are N95 or chosen based on program guidelines.
Precautions to take while preparing samples for CBNAAT testing
- The sample reagent should be added to the specimen in such a manner that the procedure minimizes aerosol generation.
- Although the sample reagent inactivates M. tuberculosis bacilli, it reduces, but does not eliminate, the biosafety risk to the laboratory technician.
- There is an increased risk of generating aerosols when splitting and handling concentrated and extrapulmonary TB specimens. These procedures must be performed in a certified biosafety cabinet.
Precautions during cartridge loading and transport
- When transferring cartridges to the machine for loading, an appropriate size enclosed container should be used.
- Care should be taken, as samples may leak if the cartridges are toppled during transport.
Resources
Kindly provide your valuable feedback on the page to the link provided HERE
Disposal of Infectious Samples and Used Cartridges in CBNAAT Lab
ContentDisposal of biohazardous waste is essential to prevent contamination and possible infection of those handling the infected specimens.
At the end of each day, Cartridge-based Nucleic Acid Amplification Test (CBNAAT) laboratories generate contaminated material such as:
- Used sputum containers
- Used cartridges
- Transfer pipettes.
All used materials should be considered contaminated.
All infectious samples should be sealed in a biohazard bag and disposed off according to Biohazard Waste Disposal Guidelines under the National Pollution Control Guidelines, 2019.
- Contaminated materials should be picked up with a gloved hand and placed in a closed lid container of 5% phenol solution or a biohazard bag.
- At the end of the day, the phenol should be drained, and the materials/ bags should be autoclaved at 121°C at 15 psi pressure for 20 minutes.
- Once done, the materials should be cooled and sent to the common waste treatment facility for mutilation/ shredding or disposal.
It is a good practice to display the Standard Operating Procedures (SOPs) for the disposal of each item in the CBNAAT laboratory.
Resources
Preparation of TB Lab Disinfectants
ContentDisinfectants used in lab settings include:
1% Sodium Hypochlorite
- Broad spectrum antimicrobial action
- Used to disinfect surfaces
- Used to disinfect infectious material and disposal of used Truenat consumables (reagent bottles, cartridges, tips, chips)
- Hazardous and corrosive, to be used with care
- Is highly alkaline so can corrode metal
- Waste soaked in Sodium Hypochlorite should not be discarded by autoclaving.
70% Alcohol
- Bactericidal action
- Used for surface decontamination only
- Highly inflammable; keep away from fire
- Used to disinfect biosafety cabinets, laboratory benches and surface of instruments.
5% Phenol
- Used for decontaminating Cartridge-based Nucleic Acid Amplification Testing (CBNAAT) equipment and single-use items like CBNAAT cartridges prior to disposal
- Highly irritating to the skin, eyes and mucous membranes.
Preparation of these disinfectants is described below.
Preparation of 1% Sodium Hypochlorite
- Use commercially available 4% sodium hypochlorite solution.
- Dilute with distilled water to prepare required amount of 1% sodium hypochlorite
- E.g.: To prepare 100 ml of 1% sodium hypochlorite: 75 ml distilled water plus 25 ml 4% sodium hypochlorite solution.
- Sodium hypochlorite solutions (domestic bleach) contain 50 g/l available chlorine, and should therefore be diluted to 1:50 or 1:10 in water to obtain the final concentrations of 1 g/l or 5 g/l when used as a general-purpose disinfectant for TB laboratories.
- To be prepared fresh.
Preparation of 70% Alcohol
- Use commercially available absolute alcohol.
- Dilute with distilled water to prepare the required amount of 70% alcohol
- E.g.: To prepare 100 ml of 70% alcohol: 70 ml absolute alcohol plus 30 ml distilled water.
Preparation of 5% Phenol
- Melt 5 g of phenol by heating it.
- Dissolve in 100 ml distilled water.
Video fileVideo : Preparation of TB Lab Disinfectants
Resources
-
-
CDST_LT-M11: Truenat
Fullscreen-
CDST_LT: Truenat as a rapid molecular diagnostic test
FullscreenTruenat
ContentTruenat is an indigenous rapid molecular test platform that is currently under use in NTEP for diagnosis of TB and Rif Resistance. It is a platform utilising real-time Polymerase Chain Reaction (PCR) technology built into micro-PCR chips.
Testing on Truenat involves three components:
- Workstation (consisting of 2 devices)
- Trueprep AUTO Universal Cartridge-based Sample Prep Device for the automated extraction and purification of DNA
- Truelab Real-time micro PCR Analyzer for performing real-time PCR. It is available as 1 (Uno), 2 (Duo) or 4 (Quattro) chip ports.
- Cartridge and Chip
- Reagent kits (Sample Pre-treatment and Prep kits)
Figure: Truenat Source: MolBio Products.
Test results for MTB detection and Rif Resistance has a turn around time of 1-2 hours. Depending on the micro-PCR chips used various tests can be performed using Truenat. Truenat MTB micro-PCR chips detect Mycobacterium tuberculosis bacteria for TB diagnosis. Truenat MTB RIF micro-PCR chip is used as a reflex test to detect resistance to Rifampicin (RIF), the first-line drug for TB treatment
Truenat has many advantages. Truenat is designed to be mobile and is battery operated (~8 hours on full charge). It can be deployed in peripheral laboratories and microscopy centres with minimal or no added facilities and hence it is more point-of-care. Biosafety requirements are similar to smear microscopy. However, it is multi staged and partially automated, requiring the presence of a Lab Technician through out the test.
Resources
- Truenat MTB Kit Insert.
- Trueprep AUTO Universal Cartridge-based Sample Prep Device.
- Practical Guide to Implementation of Truenat Tests for the Detection of TB and Rifampicin-resistance, 2021.
Assessment
Question
Answer 1
Answer 2
Answer 3
Answer 4
Correct answer
Correct explanation
Page id
Part of Pre-test
Part of Post-test
Truenat is used in NTEP for: MTB detection Rif Resistance Detection INH resistance Detection MTB and Rif Resistance Detection 4 Truenat is used for MTB and Rif Resistance detection in NTEP Yes Yes The Truelab Analyzer is available in how many chip ports?
2 (Duo)
1 (Uno), 2 (Duo) and 4 (Quattro)
1 (Uno)
4 (Quattro)
2
The Truelab Analyzer is available as 1 (Uno), 2 (Duo) and 4 (Quattro) chip ports.
Yes Yes - Workstation (consisting of 2 devices)
Truenat Cartridge and Inside Demonstration
ContentTruenat cartridges are components of Trueprep AUTO v2 Universal Cartridge Based Sample Prep Kit. As shown in the figure below, each cartridge is:
- Used with Trueprep Device for DNA extraction and purification
- Disposable
- Single-use
- Preloaded with Internal Positive Control.
Truenat cartridges are used with Trueprep devices for DNA extraction and purification. The components of the cartridge are illustrated in the following figure and include:
- Sample Chamber - Processed samples (pretreated with lysis buffer) are added to the sample chamber of the cartridge for processing on the Trueprep device.
- Matrix Chamber - DNA released by chemical and thermal lysis cells binds to the proprietary matrix here.
- Elute Chamber - Trapped DNA is washed with buffers to remove Polymerase Chain Reaction (PCR) inhibitors and is eluted from the matrix using the elution buffer. The purified DNA is collected from here.
- Waste generated is contained within the dump region inside the cartridge.

Figure: Inside of a TrueNAT Cartridge; Source: Practical Guide to Implementation of TrueNAT Tests for the Detection of TB and Rifampicin Resistance
Resources
Consumables Required at a Truenat Lab
ContentConsumables required for Truenat test provided by the manufacturer include:
Trueprep AUTO MTB Sample Pre-treatment Pack for sample processing
- Liquefaction buffer
- Lysis buffer
- Disposable transfer pipette (graduated) - 1ml
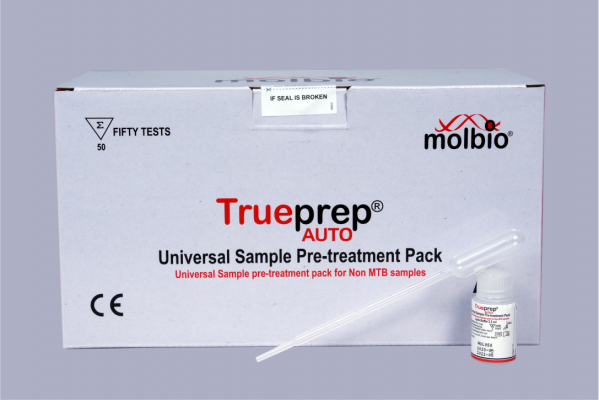
Trueprep AUTO v2 Universal Cartridge Based Sample Prep Kit for DNA extraction
- The Reagent Pack contains the following reagents
- Wash Buffer A
- Wash Buffer B
- Elution Buffer
- Priming Waste
- The Cartridge Pack contains the following
- Cartridge
- Elute collection tube
- Elute collection tube label
- Disposable transfer pipette
- Disposable Transfer Pipettes (graduated) - 3 ml
- Reagent Reset Card
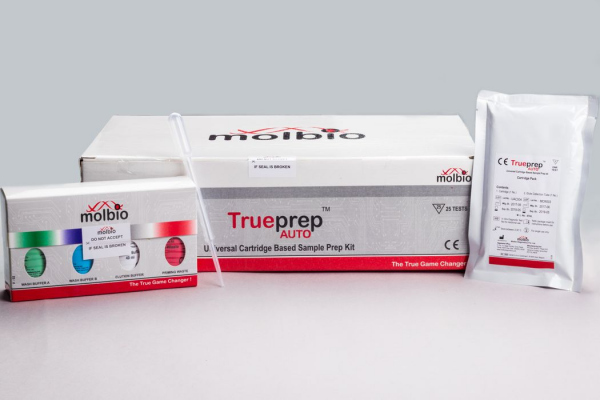
Truenat MTB Chip-based Real-Time PCR test for Mycobacterium tuberculosis
- Truenat MTB micro-PCR chip
- Microtube with freeze-dried PCR reagents
- DNase & RNase free pipette tip
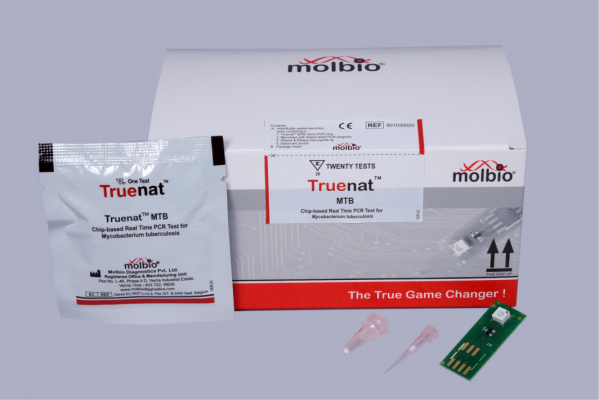
Truenat MTB-RIF Dx Chip-based Real-Time PCR Test for Rifampicin Resistant Mycobacterium tuberculosis
- Truenat MTB-RIF Dx micro-PCR chip
- Microtube with freeze-dried PCR reagents
- DNase & RNase free pipette tip
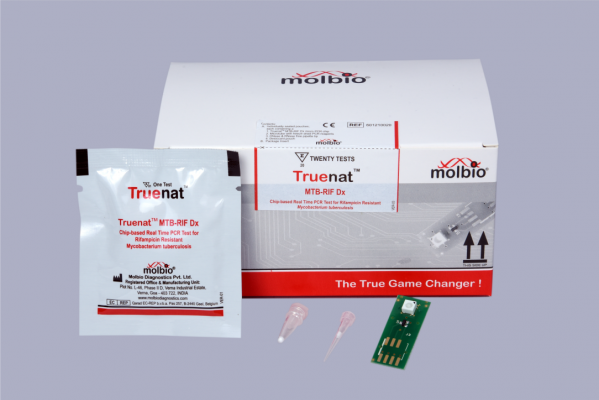
Other Consumables
- Gloves
- Masks
- Sodium hypochlorite
Resources
- MolBio Diagnostics Product Details
- Practical Guide to Implementation of Truenat™ Tests for the Detection of TB and Rifampicin Resistance
Kindly provide your valuable feedback on the page to the link provided HERE
Overview of the Truenat Testing Process
ContentThe Truenat Assay Technology works on Real-time Polymerase Chain Reaction (PCR).
The key steps include:
- Collection of specimens from a presumptive TB/known TB Patient (for UDST).
- Liquefaction and lysis of specimen using the Trueprep AUTO MTB sample pre-treatment pack (20 minutes)
- Extraction and purification of DNA using Trueprep AUTO v2 Universal Cartridge-based sample prep kit and Trueprep AUTO v2 Universal Cartridge-based sample prep device (20 minutes)
- Amplification of extracted DNA by the Truelab Real-time micro-PCR analyzer using freeze dry PCR reagent in microtubes on a Truenat MTB chip (35 minutes)
- DNA from positive test results is tested using Truenat MTB RIF Dx chip as a reflex test (55 minutes)
The process flow from sample to result for Truenat Assay Technology is described in the figure below.
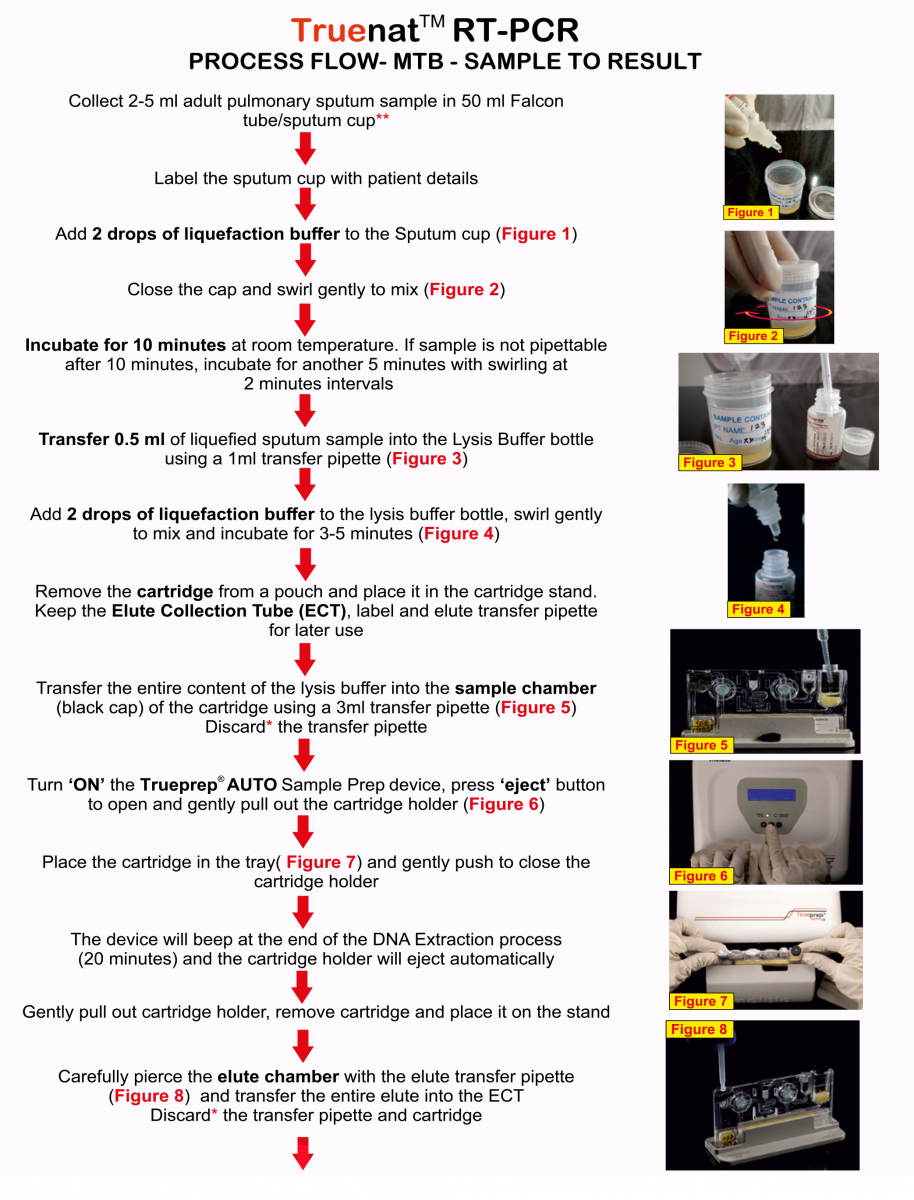
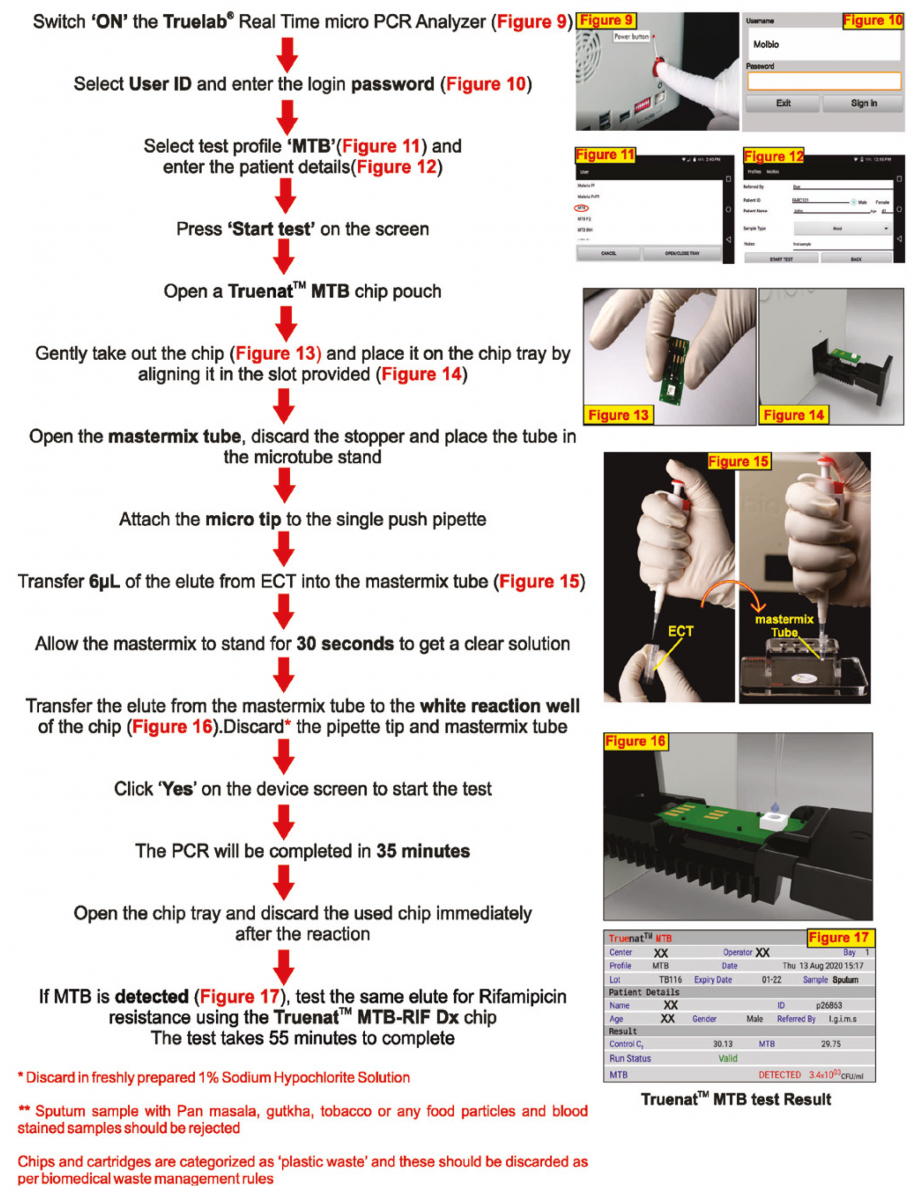
Figure: Process flow from sample to result for Truenat Assay Technology; Source: Practical Guide to Implementation of Truenat™ Tests for the Detection of TB and Rifampicin Resistance.
Resources
- Truenat MTB Kit Insert.
- Trueprep® AUTO Universal Cartridge-based Sample Prep Device.
- Practical Guide to Implementation of Truenat™ Tests for the Detection of TB and Rifampicin Resistance.
Kindly provide your valuable feedback on the page to the link provided HERE
Truenat MTB and RIF Assay as a TB Diagnostic Test
ContentThe tests are performed using Trueprep AUTO Sample Pre-treatment and Prep kits and Truenat micro-PCR chips.
To detect M. tuberculosis, the Truenat MTB chip amplifies a portion of the ribonucleoside-diphosphate reductase gene, nrdB with a Limit of Detection (LOD) of about 100 Colony Forming Units (CFU)/ml sputum sample.
DNA extraction and detection of M. tuberculosis takes approximately one hour.
When M. tuberculosis is detected, as a follow-on test, a small volume of the already extracted DNA is used to test for resistance to Rif using Truenat MTB Rif Dx chip.
Mutations associated with Rif-resistance within the RRDR region of rpoB gene are detected using a probe melt assay and read using the Truelab micro-PCR Analyzer.
The detection of Rif-resistance takes an additional one hour.
Truenat Testing Capacity
- The Truelab Analyzer is available as 1 (Uno), 2 (Duo) or 4 (Quattro) chip ports (figure below).
- The different ports can be used independently to test multiple samples.
- In an eight-hour daily work shift, the estimated throughput of Truelab Analyzer Uno, Duo or Quattro can be 7-9, 15-18, 30-36 specimens, respectively.
Results Reporting
A Truelab micro PCR printer (figure below) is used to print test results. It can also be connected via SIM card/ Wi-Fi/ Bluetooth to transmit results.
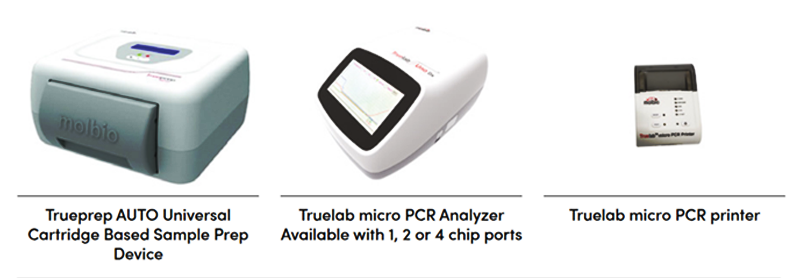
Figure: Different Equipments used in the Truenat Workstation
Resources
- Truenat MTB Pack Insert.
- Truenat MTB Rif Dx Pack Insert.
- Truelab Manual.
- Practical Guide to Implementation of Truenat™ Tests for the Detection of TB and Rifampicin-resistance.
Kindly provide your valuable feedback on the page to the link provided HERE
Inbuilt Controls used in TrueNAT
ContentTruenat tests use Internal Quality Control to assess test validity using Internal Positive Control (IPC).
- The cartridge contains pre-loaded IPC.
- IPC is part of the full process control.
- IPC undergoes all processing steps along with specimen from extraction to amplification.
- IPC assesses the validity of the test run from sample processing to result and is illustrated in following figures (Figure 1(A) and Figure 1(B)).

Figure 1(A): Amplification of IPC in Valid Test; Source: MolBio Diagnostics Pvt. Ltd.
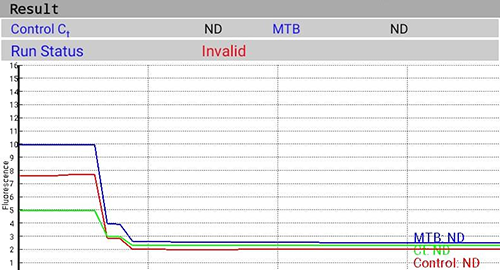
Figure 1(B): Invalid Test with Failure of IPC Amplification; Source: MolBio Diagnostics Pvt. Ltd.
Resources
- Truenat MTB Kit Insert.
- Trueprep AUTO Universal Cartridge Based Sample Prep Device.
- Practical Guide to Implementation of TrueNAT Tests for the Detection of TB and Rifampicin Resistance.
- MolBio Diagnostics Pvt. Ltd.
Kindly provide your valuable feedback on the page to the link provided HERE
-
CDST_LT: Specimen processing for truenat
FullscreenProcessing of Sputum Sample before Truenat Testing
ContentThe sputum sample needs to be processed to liquefy and lyse the specimen before Truenat testing. This is because of the following reasons:
- Sputum samples contain Polymerase Chain Reaction (PCR) inhibitors but PCR amplification requires pure DNA from sputum samples.
- The sputum sample should be homogenized and pipettable before DNA extraction can begin.
- Pre-treatment also decontaminates specimen for storage/ transportation/ extraction.
The Trueprep AUTO MTB Sample pre-treatment pack is used for processing the specimen. It digests sputum, releases bacteria, and removes PCR inhibitors.
Steps for specimen pre-treatment include:
- Open a Trueprep AUTO MTB sample pre-treatment kit which contains a graduated 1 ml transfer pipette, lysis buffer bottle and liquefaction buffer bottle.
- The sample and all reagents including the liquefaction buffer, lysis buffer should be at room temperature before starting the steps of pre-treatment.
- Switch on the Trueprep AUTO v2 sample prep device.
- Label lysis buffer bottle with corresponding sample number and date of extraction.
- Add 2 drops of liquefaction buffer to the sputum sample, swirl mix, incubate for 10 minutes at room temperature. If the sample is not pipettable after 10 minutes, incubate for another 5 minutes and swirl at 2 minutes intervals.
- Transfer 0.5 ml of the liquefied sputum sample from the sample container to the corresponding lysis buffer bottle using the 1 ml graduated transfer pipette provided.
- Dispose of the used transfer pipette into the container filled with freshly prepared 1% sodium hypochlorite.
- Add 2 drops of liquefaction buffer into the lysis buffer bottle; swirl gently to mix and incubate the lysis buffer bottle at room temperature for 3-5 minutes.
- Ensure that the sample has completely liquefied.
- Sputum may be stored in lysis buffer for up to 1 week at 30°C with no degradation of DNA.
Video fileResources
- Trueprep AUTO MTB Sample Pre-treatment Pack.
- Practical Guide to Implementation of Truenat™ Tests for the Detection of TB and Rifampicin Resistance.
Kindly provide your valuable feedback on the page to the link provided HERE
TrueNAT Sample Processing: Other Body Fluids
ContentThe extra-pulmonary samples (Non-sputum) can also be processed and used for MTB and Rif diagnosis using Truenat. The processing of various extra-pulmonary samples is described below.
Reagents required:
Trueprep AUTO MTB Sample Pre-treatment Pack for sample processing
- Reagents stable for two years (2-40°C) or one month (temperatures up to 45°C)
- Avoid exposure to light or elevated temperatures
- Do not freeze
Steps in processing of non-sputum samples
Non-sputum samples like tissue biopsy should not be processed at the Designated Microscopy Centre (DMC), but should be transferred to a higher centre.
General Instructions
- Disinfect work surfaces with freshly prepared 1% bleach, followed by 70% alcohol.
- Process fresh specimens immediately or store frozen at -20oC. Avoid more than three freeze thaws.
- Bring frozen samples and refrigerated reagents to room temperature (20-30°C).
- Open the Trueprep AUTO MTB sample pre-treatment pack that contains:
- Liquefaction buffer bottle
- Lysis buffer bottle
- Graduated 1 ml transfer pipette.
- Processing is to be done as instructed for each sample type.
- Non-sputum sample is stable for 3 days at up to 40°C and 1 week at 30°C in the lysis buffer.
A. Processing for Bronchoalveolar Lavage (BAL), Pleural fluid, Peritoneal fluid
Equipment: Centrifuge and centrifuge tubes (10-15 ml volume)
- Add 5-10 ml specimen in a centrifuge tube.
- Centrifuge at 4000x for 5 minutes to concentrate the sample.
- Discard the supernatant until 500 μl remains.
- Add two drops of the liquefaction buffer to the concentrated sample (500 μl).
- Transfer the contents to a labelled lysis buffer tube.
- Incubate for five minutes and proceed for DNA extraction.
B. Processing for Pus, Abscess, Lymph node aspirate, Cerebrospinal Fluid (CSF)
Equipment: Centrifuge tubes (1.5 ml volume)
- Add 0.5 ml specimen in a 1.5 ml tube.
- Add two drops of liquefaction buffer.
- Transfer the contents to a labelled lysis buffer tube.
- Incubate for 5 minutes and proceed for DNA extraction.
C. Processing for Tissue/ Biopsy Samples
Equipment: Mortar and pestle (for tissue homogenization)
- Homogenize sample by using 100 μl lysis buffer in mortar and pestle.
- Add two drops of liquefaction buffer.
- Transfer the contents to a labelled lysis buffer tube.
- Incubate for five minutes.
- Use only clear fluid for DNA extraction.
The processed samples will be used for DNA extraction and PCR amplification for diagnosis of MTB and Rif resistance.
Resources
Kindly provide your valuable feedback on the page to the link provided HERE
DNA Extraction in TrueNAT MTB and TrueNAT MTB/RIF DX Assay
ContentEquipment and Consumables
- Trueprep AUTO v2 Universal Cartridge Based Sample Prep Device
- Trueprep AUTO v2 Universal Cartridge Based Sample Prep Kit
Steps in DNA extraction (Molbio Trueprep Auto Universal Cartridge Based Sample Prep Device)
1. Wear gloves, mask.
2. Insert the plug-in connector to attach the reagent pack to the Trueprep device (Figure 1).

Figure 1: Trueprep Cartridge Based Sample Prep Kit attached to the Trueprep Auto Device using the Plug-in Connector; Source: Practical Guide to Implementation of Truenat Tests for the Detection of TB and Rifampicin Resistance
3. Disinfect the work surfaces with the freshly prepared 1% bleach, followed by 70% alcohol.
4. Open the cartridge pouch, take out the cartridge.
5. Label the cartridge (Patient ID, Date), place it on the cartridge stand.
6. Open the black cap of the cartridge sample chamber.
7. Using a pipette transfer 3 ml contents of the lysis buffer bottle (processing step) in the sample chamber.
8. Discard the pipette and lysis buffer bottle (1% sodium hypochlorite).
9. Re-cap the sample chamber.
10. Press the “Power” button to switch on the Trueprep device.
11. Press “Eject” to eject the cartridge holder (Figure 2), pull out gently.

Figure 2: Top view of the Trueprep AUTO Universal Cartridge-based Sample Prep Device; Source: Practical Guide to Implementation of Truenat Tests for the Detection of TB and Rifampicin Resistance
12. Insert the cartridge in the cartridge holder (sample chamber to the right when seen from the front).
13. Push to close the cartridge holder (the click sound confirms the correct cartridge loading).
14. Press the “Start” button (Figure 2).
15. DNA extraction begins, reagents from bottles are automatically added to the cartridge (pre-programmed) (Figure 2).
16. On completion (18-20 min), the cartridge holder automatically ejects.
17. Remove the cartridge, place it on the cartridge stand.
18. Label the ECT tube (Elute Collection Tube) with Patient ID & Date.
19. Pierce the covering of elute compartment in the cartridge with a filter barrier pipette tip, aspirate elute (DNA) into the ECT tube.
20. Discard the used pipette tips, used cartridge (1% sodium hypochlorite).
21. DNA can be used immediately for amplification/ stored in fridge (4°C for up to 24 hours) or -20°C (for up to 1 year).
Video fileResources
- Practical Guide to Implementation of TrueNAT Tests for the Detection of TB and Rifampicin Resistance.
- Operation of Molbio Trueprep AUTO Universal Sample Prep Device.
- Molbio Trueprep Auto Universal Cartridge-based Sample Prep Device.
Kindly provide your valuable feedback on the page to the link provided HERE
PCR Amplification of the Target genes in Truenat
ContentTruenat Mycobacterium tuberculosis (MTB) and Truenat MTB Rifampicin (Rif) Dx Assays amplify target genes through Polymerase Chain Reaction (PCR).
The presence of mutant gene is detected using probe melt assay.
The target genes include:
- Truenat MTB - ribonucleoside-diphosphate reductase gene nrdZ (the precursor for DNA synthesis)
- Truenat MTB Rif Dx assay – Rifampicin Resistance Determining Region (RRDR) region of the RNA polymerase Beta (rpoB) gene for resistance to Rif (between codon positions 509 and 533)

Figure: Image showing RRDR of the rpoB gene of M. tuberculosis; the target gene of Truenat MTB Rif Dx assay includes codons 509-533
Resources
- Truenat MTB Pack Insert.
- Truenat MTB Rif Pack Insert.
- Practical Guide to Implementation of TrueNAT Tests for the Detection of TB and Rifampicin Resistance.
Kindly provide your valuable feedback on the page to the link provided HERE
-
CDST_LT: Testing using Truenat
FullscreenUnloading the Truenat Cartridge
ContentVideo fileUsing Truenat autoanalyzer for MTB testing
ContentVideo fileLoading the elute onto the Truenat MTB Chip
ContentVideo fileAmplification and Detection of MTB and MTB-Rif
ContentProcedure
Equipment and reagents
- Truelab Uno/ Duo/ Quattro Real Time Quantitative micro–PCR analyzer
- Truenat MTB micro-PCR kit
- Truenat MTB Rif micro-PCR kit
- Truepet fixed volume (6 μl) precision micropipette
Amplification and detection of Mycobacterium tuberculosis (MTB)
- Wear gloves, laboratory coats, mask.
- Clean working surfaces with 1% Sodium hypochlorite, followed by 70% alcohol.
- Clean instruments with a paper towel dipped in 70% alcohol.
- Switch on the Truelab device by pressing the red button for two seconds.
- Select test bay.
- Select test profile: “MTB”, enter Details (Referred By, Patient ID, Gender, Patient Name, Age).
- Select the sample type.
- Press “Start Reaction". For Truelab Uno Dx, Press the eject button to open the chip tray. For Truelab Duo/Quattro, the chip tray opens automatically on tapping the “Start Reaction” .
- Take out “Truenat MTB chip” from the chip sleeve (check desiccant colour. If blue -chip can be used; discard chip if desiccant is pink/ white which indicates moisture is absorbed).
- Place the chip on the tray by aligning the registration holes with tray pins without touching the white reaction well. (the white reaction well should face upward).
- Open the microtube containing the freeze-dried PCR reagent (white colour) and place it on the microtube stand.
- Pipette 6 μl DNA from the Extraction Chamber (After DNA extraction and purification step) into the microtube.
- Wait 30-60 seconds for the DNA elute and PCR reagent to mix (clear solution obtained).
- Use the same tip to pipette 6 μl treated DNA from the microtube and load on the white reaction well of the chip.
- Discard the microtube and microtip (1% sodium hypochlorite).
- Start the test run.
- The test completes in 35 minutes, press ‘’RESULT’’ to view the result screen.
- Possible results:
- MTB Detected/ Not Detected/ Errors/ Invalid
- If MTB detected, test the same DNA eluate for Rif resistance using MTB-Rif chip. Select the MTB-Rif assay.
- If the result is Invalid/ Error, repeat amplification using the same extracted DNA and a new “Truenat MTB chip”. If Invalid again, repeat the test with a fresh sample.
- Tap “Open/ Close Tray” button to eject the chip tray.
- Lift the chip and discard (1% sodium hypochlorite).
Amplification and Detection of MTB Rif
- DNA from the MTB positive elutes is tested for Rif-resistance using the MTB-Rif chip.
- Select the test profile “MTB Rif”.
- Select the sample type.
- Press “Start Reaction". For Truelab Uno Dx, Press the eject button to open the chip tray. For Truelab Duo/Quattro, the chip tray opens automatically on tapping the “Start Reaction”.
- Take out “Truenat MTB Rif Dx chip” from the chip sleeve (check desiccant colour. If blue -chip can be used; discard chip if desiccant is pink/ white which indicates moisture is absorbed).
- Follow steps 10-16 as described in Amplification and detection of MTB (above).
- The test completes in 55 minutes, press ‘’RESULT’’ to view the result screen.
- Possible results:
- MTB Rif resistance detected/ MTB Rif resistance not detected/ Error/ Indeterminate.
- If result is Indeterminate/ Error, repeat the amplification using the same extracted DNA and new “Truenat MTB Rif Dx chip”. If Indeterminate/ Error again, repeat the test with a fresh sample.
- Tap “Open/ Close Tray” button to eject the chip tray.
- Lift the chip and discard (1% sodium hypochlorite).
The algorithm for Truenat MTB Assay (Figure) describes interpretation of test results obtained for Truenat MTB and Truenat MTB Rif Dx assays.
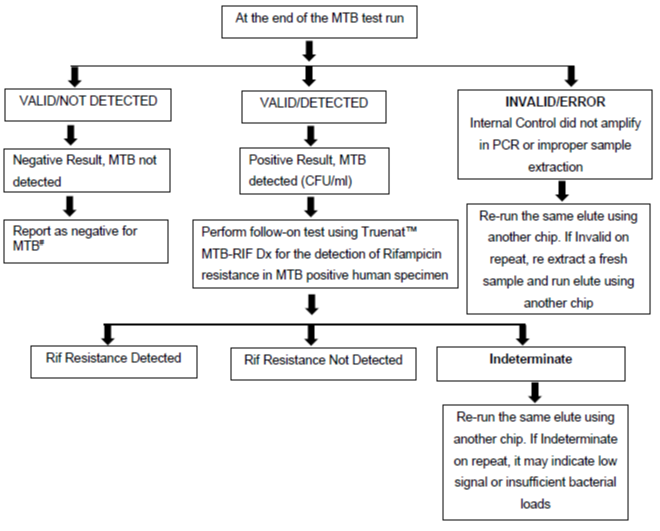
Figure: Truenat MTB Assay Results Interpretation: Algorithm; Source: Practical Guide to Implementation of Truenat Tests for the Detection of TB and Rifampicin Resistance
# Test is Valid as Internal Positive Control amplified
Video fileResources
- Practical Guide to Implementation of TrueNAT Tests for the Detection of TB and Rifampicin Resistance.
- Truenat MTB Pack Insert.
- Truenat MTB Rif Pack Insert.
Kindly provide your valuable feedback on the page to the link provided HERE
-
CDST_LT: Truenat result interpretation and recording
FullscreenTruenat MTB Assay Results Interpretation: Visualization
ContentTruenat MTB Assay results are visualized:
- During testing
- Completion of test
Test Status Screen (Figure 1)
Results visualization during testing include:
- “Green” Test Progress Bar helps to monitor the test progress and the current cycle number.
- “Yellow” Cycle Progress Bar indicates the progress of the current cycle.
- Test Details Bar indicates patient details, sample type, system health, battery level, current cycle temperature.
- “Red” Test Completion Indicator turns green when the test completes.
- PLOT button displays optical (fluorescence measure) and thermal graphs (temperature during PCR) on real time basis.

Figure 1: Test Status Screen; Source: TrueLab Manual
Test Result Screen (Figure 2(A)-(E))
On tapping the "Result" button, results visualization on the completion of test includes:
- Input details display; Patient details - Name, ID, Age, Sex, Referred by
- Chip details display; Type of Chip - Truenat MTB/ Truenat MTB Rif
- Test results of Truenat MTB:
- DETECTED
- NOT DETECTED
- Error
- Test results Truenat MTB-Rif Dx:
- Rif Resistance Detected
- Rif Resistance Not Detected
- Indeterminate
- Error
Figure 2(A): Truenat MTB Test Result Screen; DETECTED; Source: MolBio Diagnostics Pvt. Ltd.
Figure 2(B): Truenat MTB Test Result Screen; NOT DETECTED; Source: MolBio Diagnostics Pvt. Ltd.

Figure 2(C): Truenat MTB Rif Test Result Screen; Rif Resistance Detected; Source: MolBio Diagnostics Pvt. Ltd.
Figure 2(D): Truenat MTB Rif Test Result Screen; Rif Resistance Not Detected; Source: MolBio Diagnostics Pvt. Ltd.

Figure 2(E): Truenat MTB Rif Test Result Screen; Indeterminate; Source: MolBio Diagnostics Pvt. Ltd.
Video fileResources
Kindly provide your valuable feedback on the page to the link provided HERE
TrueNAT MTB Assay Results Interpretation: Detection of Mycobacterium tuberculosis and RIF Resistance
ContentOn completion of test run, the Test Result Screen displays the results for:
- Detection of Mycobacterium tuberculosis (Truenat MTB)
- “DETECTED” for Positive result, Cycle Threshold (Ct) value, Colony Forming Units per milliliter (CFU/ ml)
- “NOT DETECTED” for Negative result
- “Valid”/ “Invalid” for test validity based on amplification of Internal Positive Control (IPC)
- “Error” for test failure
- Detection of Rif Resistance (Truenat MTB-Rif Dx)
- “Rif Resistance Detected” if mutations to Rif are detected
- “Rif Resistance Not Detected” if mutations to Rif are not detected
- “Indeterminate” when test did not determine resistance to Rif
- “Error” for test failure
Resources
Kindly provide your valuable feedback on the page to the link provided HERE
- Detection of Mycobacterium tuberculosis (Truenat MTB)
Retrieving test results from the Truenat machine
ContentVideo fileRecording Truenat Results
ContentVideo fileResults Entry in Lab Register for NAAT
ContentThe results for Nucleic Acid Amplification Test (NAAT) assays are entered in Culture and Drug Susceptibility Testing (C&DST) register. The key variables entered are shown in the table below.
Table: Key Variables entered in C&DST Register; Source: Guidelines for PMDT in India, 2021. VARIABLES SET 1 VARIABLES SET 2 VARIABLES SET 3 VARIABLES SET 4 Test ID Health Facility (HF) name Residential district Current facility HF type Date of test updated in Nikshay Lab type Type of test Predominant symptom Date tested Patient ID Reason for testing Predominant symptom duration Date reported Episode ID Treatment status History of Anti-TB Treatment (ATT) Test status Name Diagnosis date No. of Health Care Provider (HCP) visited before the diagnosis of the current episode Type of specimen Gender TB treatment start date The visual appearance of sputum Date of specimen collection Age Current facility state State name Primary phone Current facility district District name Address Current facility TB Unit (TU) TB unit Residential state Current facility HF NAAT results are reported in the results section of “Request Form for examination of biological specimen for TB” including:
- Select Type of test: Cartridge-based Nucleic Acid Amplification Test (CBNAAT)/ TrueNAT
- Select Sample: A/B
- Select M. tuberculosis: Detected/ Not Detected/ Not Available (NA)
- Select Rif Resistance: Detected/ Not Detected/ Indeterminate/ NA
- Select Test: No result/ Invalid/ Error; Error code
- Date tested
- Date Reported
- Reported by (name and signature)
- Laboratory name
Video fileVideo : CBNAAT/Truenat Results Entry in Lab Register
Resources
Reset Procedure for Truenat Testing
ContentAfter completion of the set number of nucleic acid extractions (i.e., buffer count 05/ 25/ 50/ 100 completed) the Trueprep AUTO v2 device will prompt the alert on its 2- line LCD screen to “Change the reagent pack” and “Insert Reagent Reset Card & Start” on the screen alternatively. When this happens, the new reagent pack needs to be inserted into the device and the buffer count needs to be reset.
Image
Flowchart: Procedure for Reset in Truenat Testing
Image
Figure: 1) The Trueprep AUTO v2 Back Panel, with tubing and caps for plugging in reagent bottles 2) The Trueprep AUTO v2 device Back Panel with Reagent Pack 3) Reagent Reset Card; Source:Trueprep AUTO v2 Universal Cartridge Based Sample Prep Device User Manual.
Resources
- Trueprep AUTO v2 Universal Cartridge Based Sample Prep Device User Manual.
- Trueprep AUTO v2 Pack Insert Version 04.
Assessment
Question Answer 1 Answer 2 Answer 3 Answer 4 Correct answer Correct explanation Page id Part of Pre-test Part of Post-test The buffer count in the Trueprep Auto V2 device will be set to what after the reset procedure is completed? 0 1 10 100 1 The buffer count will be reset to ‘0’ once the reset procedure is completed. Yes Yes
-
CDST_LT: Troubleshooting in truenat
FullscreenInterfering Substances causing errors in NAAT Assay
ContentIt is common in laboratories to see specimens with the following particles which may potentially alter nucleic acid amplification test (NAAT) results:
- Food particles
- Blood
- Tobacco
- Pan
- Debris or tissue pieces
These interfering substances cause failures in Truenat assays and may have inhibitory effects on CBNAAT assays. This interferes with the accuracy of results, leading to false positive or negative tests and delayed cycle threshold values.
Hence, it is important to follow certain precautions when collecting the specimen to avoid contaminating the specimen with these substances.
In such situations, the following protocol needs to be followed:
- Reject frank blood/bloody samples; however, the presence of blood up until 30% does not interfere in Truenat assays
- For samples containing food/tobacco/tissue particles that cause interference in processing:
- Use a fresh sample, if available
- Use a sample after food particles or tissue pieces settle/sediment; otherwise, reject the sample
Figure: Blood in Sputum Sample Interferes with PCR
Resources
Monitoring Different Types of Errors with Truenat
ContentMonitoring of Truenat errors
There are various types of errors that occur with the Truenat machines, which include:
- Coded errors related to the Trueprep AUTO v2 sample prep device
- Coded errors related to the Truelab micro-PCR Analyzer
- Non-coded system errors/failures
Monitoring the Trueprep AUTO v2 errors
-
The Truenat system is a closed amplification system (i.e., the amplified product is sealed in the chip), and an enzyme system is incorporated in the reaction mix to prevent previously amplified material from getting re-amplified.
- It is recommended that testing sites perform negative control tests using Trueprep AUTO lysis buffer reagent and sterile Phosphate Buffered Saline (PBS) monthly or when contamination is suspected (e.g., an unusually high proportion of specimens with ‘M.tb detected’).
- Swab testing of work surfaces and both the Truelab and Trueprep machines should be conducted monthly.
- Used and expired cartridges should be discarded as per the protocols, so they are not re-used.
Monitoring the Truelab errors
-
To ensure that the Truelab micro Polymerase Chain Reaction (PCR) Analyzer is working accurately, the manufacturer recommends running positive and negative controls (which can be purchased as part of the Truenat™ Positive Control Kit- Panel I) periodically.
- The positive and negative controls can also be used for lot-to-lot verification and assessment of reagents if the temperature of storage areas falls outside the recommended ranges.
- An optional “Plot” view on the digital interface is also available while the process is being performed that allows for monitoring test progress in real-time.
- Truelab Analyzers can be configured to send data on device performance to the manufacturer’s (default configuration) or local servers to allow the manufacturer (without sharing any patient data) and/or the National TB Elimination Programme to monitor instrument performance on a real-time basis.
- This helps in the identification and possible prevention of instrument malfunctions or breakdowns, detection of user errors and retraining needs, and monitoring of instrument and test utilization across fleets of instruments.
Resources
- Guidelines on Programmatic Management of Drug-resistant TB (PMDT) in India;CTD, MoHFW, India,2021.
- Trueprep AUTO v2 Universal Cartridge Based Sample Prep Device; User Manual V4.
- TRUELAB UNO Dx Real Time Quantitative micro PCR Analyzer; manual VER 04.
Assessment
Question Answer 1 Answer 2 Answer 3 Answer 4 Correct answer Correct explanation Page id Part of Pre-test Part of Post-test Identify if the statement is True or False
Running positive and negative controls periodically is recommended to ensure that the Truelab micro PCR Analyzer is working accurately.
True False 1 Running positive and negative controls periodically is recommended by the manufacturer to ensure that the Truelab micro PCR Analyzer is working accurately Yes Yes Truelab Analyzers can be configured to send data on device performance to the manufacturer’s (default configuration) or local servers to allow the manufacturer (without sharing any patient data) and/or the National TB Elimination Programme to monitor instrument performance on a real-time basis.
True False 1 This helps in the identification and possible prevention of instrument malfunctions or breakdowns, detection of user errors and retraining needs, and monitoring of instrument and test utilization across fleets of instruments. Yes
Yes
Trueprep Error Classes and actions
ContentTrueprep Error Classes
The Trueprep errors are classified as:
-
Cartridge Errors
-
Reagent Pack Errors
-
Device Errors and Warnings
Image
Figure 1: Classification of Trueprep errors
Trueprep Error Actions
I Cartridge Error Actions
Image
Figure 2: Actions for Trueprep cartridge errors
II Reagent Error Actions
Image
Figure 3: Actions for Trueprep reagent errors
III Device Error and Warning Actions
Image
Figure 4: Actions for Trueprep device errors and warnings
Resource
-
Guidelines on Programmatic Management of Drug-resistant TB (PMDT) in India, 2021, CTD, MoHFW, India.
-
Trueprep AUTO v2 Universal Cartridge Based Sample Prep Device; User Manual V4.
Assessment
Question
Answer 1
Answer 2
Answer 3
Answer 4
Correct answer
Correct explanation
Page id
Part of Pre-test
Part of Post-test
In ‘E11 – RTD L Error’, what does L stand for?
Liquid
Lower
Light
Lysis
4
In E11 - RTD L Error (The code L is for error in the Lysis Heater)
Yes
Yes
-
Truelab Error Classes and actions
ContentHere we discuss the error classes and actions in Truelab.
Truelab Errors - Classes and Actions
Error Class
Error Name
Reason for the error
Error Actions
Error 1
Thermal Cycling Error
Occurs when the test chip is faulty and the thermal cycling does not happen.
Re-run the same elute using another chip. If the error repeats, process the sample again and re-run the elute using another chip. If the problem still persists, contact the Molbio support team.
Error 2
Test Stopped Manually
Occurs when the user has manually stopped the ongoing test and the analyser does not have sufficient run time to compute data.
Error 3
Incorrect Optical Profile
Occurs when there is a deviation in the expected optical profile due to a reduction in reaction volume in the chip during the course of the reaction.
Error 4
Runtime Error
Occurs when run data capture/ analysis is incomplete.
Error 5
Probe Check Error
Occurs in the event of a low initial signal due to insufficient mastermix dispensed onto the chip.
Invalid
Whenever Truelab displays the result as 'INVALID', it means that the internal control did not amplify in Polymerase Chain Reaction (PCR) or sample extraction was not proper.
Resources
-
Trueprep AUTO v2 Universal Cartridge Based Sample Prep Device, User Manual Version 4.
-
Truelab UNO Dx Real-time Quantitative Micro PCR Analyzer Manual Version 4.
-
Guidelines on Programmatic Management of Drug-resistant TB (PMDT) in India, 2021, CTD, MoHFW, India.
Assessment
Question
Answer 1
Answer 2
Answer 3
Answer 4
Correct answer
Correct explanation
Page id
Part of Pre-test
Part of Post-test
When does thermal cycling error occur in Truelab's real-time micro PCR analyzer?
Occurs when the test chip is faulty and the thermal cycling does not happen.
Occurs when run data capture/ analysis is incomplete.
Occurs in the event of low initial signal.
Occurs when the user has manually stopped the ongoing test.
1
Thermal cycling error occurs when the test chip is faulty and the thermal cycling does not happen.
Yes
Yes
When does the Runtime Error occur in Truelab's real-time micro PCR analyzer? Occurs when the test chip is faulty and the thermal cycling does not happen.
Occurs when run data capture/ analysis is incomplete.
Occurs in the event of low initial signal.
Occurs when the user has manually stopped the ongoing test.
2 Runtime error occurs when run data capture/ analysis is incomplete. Yes
Yes
-
Troubleshooting Failures Without Error Codes
ContentThe Truenat is a rapid molecular diagnostic method based on the Nucleic Acid Amplification Testing (NAAT) principle. Truenat uses portable, battery-operated devices to rapidly detect Mycobacterium tuberculosis Complex Bacteria (MTBC) and Rifampicin resistance.
Truenat system involves two main devices:
- Trueprep® AUTO v2 Universal Cartridge based Sample Prep Device: Used for the automated extraction and purification of DeoxyriboNucleic Acid (DNA).
- Truelab® Real Time micro-PCR Analyzer: Used for performing Real-Time Polymerase Chain Reaction (RT-PCR), resulting in the semi-quantitative detection of MTBC.
The errors in Truenat are broadly categorised as:
- Errors with codes (Trueprep and Truelab errors)
- Errors without codes (System failures)
The errors without codes in Truenat and the ways to resolve them are listed in the table below:
Sl. No. System failures Reason Troubleshoot 1 ‘Unable to read chip information’ Analyzer was unable to read chip memory Check if the chip was loaded properly into the tray. Remove the chip and re-select the profile from Status Screen and repeat the steps. If the message reappears, load a new chip and re-load the elute again 2 ‘Could not initialize. Please try again’ The system was unable to establish an internal connection Attempt the test again by using a new chip and re-loading the elute again 3 “Chip is already used” OR “Chip loaded is expired” User loaded a used chip/expired chip in the tray Use a fresh chip and re-load the elute 4 Login attempt failure Login failed due to incorrect password entered Re-enter the correct password 5 Invalid patient name in sample details screen The patient’s name in the sample details section is blank Fill patient’s name in the sample details section Resource
-
Guidelines on Programmatic Management of Drug-resistant TB (PMDT) in India; CTD, MoHFW, India. 2021.
-
Trueprep AUTO v2 Universal Cartridge Based Sample Prep Device; User Manual V4.
-
TRUELAB UNO Dx Real Time Quantitative micro PCR Analyzer; manual VER 04.
Assessment
Question
Answer 1
Answer 2
Answer 3
Answer 4
Correct answer
Correct explanation
Page id
Part of Pre-test
Part of Post-test
What should you do when you get a system failure alert as:
“ Chip is already used” ?
Re-insert the same chip
Insert a fresh chip
Do not insert any chip
None of the above
2
When you get a system failure alert as: “ Chip is already used” , Use a fresh chip and re-load the elute.
Yes
Yes
What should you do when you get a system failure alert as:
"Unable to read chip information"
Re-insert the same chip
Insert a fresh chip
Do not insert any chip
Check if chip is loaded properly, remove the chip and reselect the profile from status screen and repeat the steps.
4 When you get a system failure alert as "Unable to read chip information" Check if the chip was loaded properly into the tray. Remove the chip and re-select the profile from Status Screen and repeat the steps. If the message reappears, load a new chip and re-load the elute again Yes
Yes
-
CDST_LT: Truenat instrument maintenance and record keeping
FullscreenMaintenance of the Truenat Instrument - General Principles
ContentLike any other laboratory instrument, the TrueNAT machine needs a periodic maintenance.
Maintenance of Truelab and Trueprep instruments includes:
- Cleaning the instrument
- Disinfecting the surfaces
- Cleaning the spillages
- Discarding the used consumables
- Calibrations
- Replacement of parts
- Flush protocol
- Data backup
- Troubleshooting errors, alerts, warning messages
Frequency of maintenance:
The following schedule is required to maintain TrueNAT instrument(s):
- Daily, monthly maintenance by lab personnel
- As and when required (need based) by lab personnel/ manufacturer
- Annual maintenance by the manufacturer.
Posters on maintenance provided by manufacturer are shown in Figure 1(A)- (B)

Figure 1(A): Considerations (Do’s and Don’ts) for use of Trueprep Device; Source: MolBio Diagnostics Pvt. Ltd.
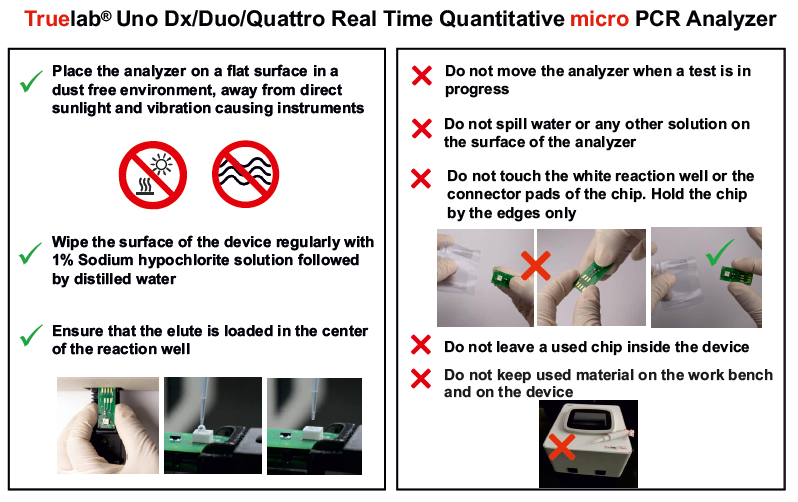
Figure 1(B): Considerations (Do’s and Don’ts) for use of Truelab Device; Source: MolBio Diagnostics Pvt. Ltd.
Resources
- Practical Guide to Implementation of Truenat™ Tests for the Detection of TB and Rifampicin Resistance.
- Trueprep Manual.
- MolBio Diagnostics Pvt. Ltd.
Kindly provide your valuable feedback on the page to the link provided HERE
Ensuring Compliance of Truenat Instrument Installation Criteria
ContentCompliance to equipment installation criteria is necessary to/for:
- Establish accurate and reliable results as claimed by the manufacturer
- To assure standard/specific requirements are met
- Provide proof that the process will consistently produce predetermined outcome
- Equipment safety
- Improve overall performance of the equipment
- Decrease work interruptions due to equipment failure
- Lower repair costs
- Cover equipment warranty and free maintenance
Instrument Qualification Documents include:
- Installation Qualification- IQ
- Operational Qualification- OQ
- Performance Qualification- PQ
Installation Qualification
IQ provides evidence for delivery, installation and configuration of the instrument as per manufacturer’s standards using an installation checklist.
Operational Qualification
OQ is a collection of test cases used to verify the proper functioning of a system before the instrument is released for use.
Performance Qualification
PQ is a collection of test cases used to verify that the system performs as expected under simulated real-world conditions.
Resources
Kindly provide your valuable feedback on the page to the link provided HERE
Daily, Weekly and Monthly Maintenance of Truenat Instrument
ContentDaily maintenance of Truelab and Trueprep instruments performed by the laboratory personnel includes:
- Maintaining a dust-free environment by wiping the exterior of instruments with a dry, lint-free cloth
- Cleaning the surface of the Trueprep device once with 70% ethanol
- Cleaning the spill or leak with a cloth or tissue-paper dipped in disinfectant (1% sodium hypochlorite solution, followed by 70% ethanol)
- Not spilling water or any other solution on the surface of instruments
- Discarding used cartridges, chips, reagent bottles and other consumables in 1% sodium hypochlorite solution, soaking for minimum 30 minutes, and disposing as per the biomedical waste management guidelines.
Monthly maintenance of the Truelab Analyzer performed by laboratory personnel includes:
- Cleaning the surface of the Truelab Analyzer with 70% ethanol
- Cleaning the Truelab bays
- Calibrating temperature.
Annual/ need-based maintenance of the Truenat instrument performed by the laboratory personnel/ manufacturer includes:
- Flush protocol for the Trueprep device when the device is left idle (not used) for 10 days and/ or errors relating to extraction process occur
- Replacement of spillage tray or linear motion guide tray for the Trueprep device in case of sample spillage on trays during extraction or when cross-contamination is suspected
- Replacement of slider glass for Truelab Analyzer after 200 tests and/ or when related errors occur
- Temperature calibration for Truelab Analyzer when error related to temperature occur and/ or when the temperature curve is abnormal (shows blips)
- Calibration of micropipettes (every 6 months/ biannual).
Resources
- Practical Guide to Implementation of Truenat™ Tests for the Detection of TB and Rifampicin Resistance.
- Trueprep Manual.
- MolBio Diagnostics Pvt. Ltd.
Kindly provide your valuable feedback on the page to the link provided HERE
NAAT Instrument Monthly Data Archive and Data Back-up
ContentSecurity of laboratory data and confidentiality of TB patient data are important. Hence, it is recommended to archive or take periodic data backup.
The Truelab Analyzer has an internal memory to store 20000 test results. The digital data can be transmitted through connectivity via email, SIM card, Wi-Fi or Bluetooth.
Recommended ways of documenting the results and archiving data are:
- Records should be maintained in the National TB Elimination Program (NTEP) recording and reporting formats.
- Entries should be made in Nikshay online platform of NTEP.
- Monthly/ periodically data should be exported in CSV format and saved on external devices-desktop/ laptop/ hard drive.
- Data records from Nucleic Acid Amplification Testing (NAAT) instruments should be kept in a secure area.
- Data access should be given to authorized personnel only.
Resources
- Practical Guide to Implementation of Truenat™ Tests for the Detection of TB and Rifampicin Resistance.
- MolBio Diagnostics Pvt. Ltd.
Kindly provide your valuable feedback on the page to the link provided HERE
Annual Maintenance of the Truenat Instrument
ContentNeed-based maintenance for Truenat instrument is done by lab personnel/ manufacturer while the manufacturer does annual maintenance.
The tasks included under annual maintenance are:
- Flush protocol for Trueprep device when the device is left idle (not used) for 10 days/ annually and/or errors relating to extraction process occur.
- Spillage tray or linear motion guide tray replacement for Trueprep device in case of sample spillage on trays during extraction or when cross-contamination is suspected/ done annually.
- Slider glass replacement for Truelab Analyzer after 200 tests/ annually and/or when related errors occur.
- Temperature calibration for Truelab Analyzer when error related to temperature occur and/or when temperature curve is abnormal (shows blips)/ annually.
- Annual calibration of micropipettes.
Resources
- Practical Guide to Implementation of Truenat™ Tests for the Detection of TB and Rifampicin Resistance.
- Trueprep Manual.
Kindly provide your valuable feedback on the page to the link provided HERE
-
CDST_LT: Monitoring Truenat quality and lab performance
FullscreenExternal Quality Assurance of TrueNAT
ContentExternal Quality Assurance (EQA) ensures quality of Truenat laboratory is maintained by comparing their results through retesting and panel testing by a higher level laboratory (Intermediate Reference Laboratory (IRL)/ National Reference Laboratory (NRL)).
EQA for Truenat laboratory is done by:
- Onsite supervision: Visits conducted at regular intervals by the IRL/ NRL/ Central TB Division (CTD)
- Proficiency Testing or Panel Testing (PT): Inter-laboratory comparisons conducted by IRL/ NRL to assess the performance of the laboratory supervised by them; re-checking of the standard panel provided by the IRL/ NRL.
- Random Blinded Re-checking (RBRC): Re-examination of randomly selected samples by the IRL/ NRL.
Plan for Truenat EQA
- Truenat EQA visits need to be conducted annually.
- Panel is provided by the National Tuberculosis Institute (NTI), Bangalore, to the participating sites.
- Participating site to conduct panel testing and report results to NTI as per timelines.
- Feedback/ corrective action provided by NTI to participating sites.
Resources
- Practical Guide to Implementation of Truenat™ Tests for the Detection of TB and Rifampicin Resistance.
- MolBio Diagnostics Pvt. Ltd.
Kindly provide your valuable feedback on the page to the link provided HERE
Monitoring Quality Indicators of Truenat
ContentMonitoring of key quality indicators or performance indicators of Truenat is important to assess the functioning of the instrument, calibration/ service requirements of the instrument, competency of the technician performing the assays and inventory management. Overall quality indicators should assess:
- Total tests done
- Type of samples tested
- Test failure
- Availability of consumables
- Turnaround time
- Specimen rejected
- External Quality Assurance (EQA) results
- Instrument downtime
Quality performance indicators should be reviewed weekly by personnel in charge of Truenat laboratory, and monthly by the Intermediate Reference Laboratory (IRL)/ National Reference Laboratory (NRL)/ Central TB Division (CTD).
Under the National Tb Elimination Programme (NTEP) the following quality indicators are to be reported monthly:
- Total number of tests performed using Truenat (including EP-TB and private sector)
- Total presumptive TB tested
- Total number of presumptive DR TB tested
- Total number of Rif indeterminate, invalid, error results
- Total number of re-tests done and results
- Total number of samples sent for First Line-Line Probe Assay (FL-LPA) and Second Line-Line Probe Assay (SL-LPA)
- Total number of chips (MTB, MTB Rif) in stock
Resources
- Practical Guide to Implementation of Truenat™ Tests for the Detection of TB and Rifampicin Resistance.
- MolBio Diagnostics Pvt. Ltd.
Kindly provide your valuable feedback on the page to the link provided HERE
-
CDST_LT: Biomedical waste management in Truenat
FullscreenBiosafety measures required for Truenat
ContentGeneral biosafety requirements for Truenat laboratory include:
- Using gloves, laboratory coat, mask when handling specimens
- Minimizing aerosol generation during sample processing and handling specimens carefully
- Working in a well-ventilated room
- Using laboratory work instructions, job aids, Standard Operating Procedures (SOPs) and checklists, from sample collection to reporting results, to avoid mishaps
- Maintaining a spill management kit
- Following manufacturer instructions to operate the instruments
Precautions during processing the specimen
- Handle all specimens as potentially infectious.
- Avoid cross-contamination.
- Nozzle of the liquefaction buffer bottle should not touch the sample container.
- Avoid aerosol formation during the transfer of the liquefied sample to the lysis buffer bottle.
- Use the transfer pipettes provided with the pre-treatment pack.
- Dispose the used transfer pipettes (1% sodium hypochlorite).
- Clean the spills with 1% sodium hypochlorite, followed by 70% alcohol.
Precautions during cartridge loading and transportation
- Keep the cartridges on the provided holder while loading the specimen.
- Load the cartridges onto the machine with care.
- Avoid turning the cartridge during transportation to prevent specimen spill.
- If a spill occurs, soak tray in 1% sodium hypochlorite solution for 30 minutes and dispose. Spray the cartridge holder with 70% alcohol and load a new tray in the cartridge holder after 5 minutes.
- Pipette carefully to avoid cross-contamination between reagents and/ or samples.
Resources
- Practical Guide to Implementation of Truenat™ Tests for the Detection of TB and Rifampicin Resistance.
- Tuberculosis Laboratory Biosafety Manual.
- MolBio Diagnostics Pvt. Ltd.
Kindly provide your valuable feedback on the page to the link provided HERE
Disposal of Infectious Samples and Used Cartridges in TrueNAT Laboratories
ContentDisposal of infectious samples and used cartridges in Truenat laboratories is an essential activity which needs to be performed to keep everyone safe and prevent TB infection in healthcare workers.
- Biomedical Waste (BMW) management guidelines need to be followed-up to dispose infectious samples and used Truenat consumables.
- Solutions and/ or solid waste containing biological samples should be disinfected before discarding.
- Lab personnel should soak material to be disposed in freshly prepared 1% sodium hypochlorite for 30 minutes and discard.
- Used Truenat chips, microtube, microtube cap, transfer pipette, pipette tips, reagent bottles need to be submerged in freshly prepared 1% sodium hypochlorite solution for at least 30 minutes before disposal as per biomedical waste disposal guidelines.
- Consumables submerged in sodium hypochlorite should NOT be autoclaved,
- Cartridge pouches, chip pouches, transfer pipette wrappers, desiccant pouches, sleeves needs to be discarded as general waste.
Resources
- Guidelines for PMDT in India, 2021.
- Practical Guide to Implementation of Truenat™ Tests for the Detection of TB and Rifampicin Resistance.
- Tuberculosis Laboratory Biosafety Manual.
- MolBio Diagnostics Pvt. Ltd.
- Central Pollution Control Board: Guidelnes for Hazardous and Other Wastes.
Kindly provide your valuable feedback on the page to the link provided HERE
-
-
CDST_LT-M12:- Liquid culture
Fullscreen-
CDST_LT: Introduction to MGIT 960 system
FullscreenMGIT 960 Instrument: Operation
ContentThe MGIT 960 is a sensitive instrument to be operated by trained and competent staff. To carry out the liquid culture using this instrument, following steps need to be performed.
Table: Operation of the MGIT 960 Instrument
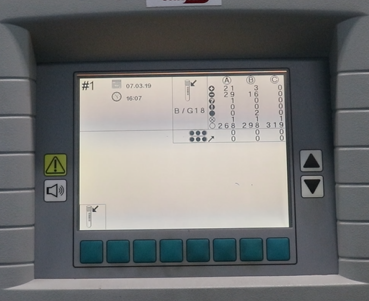
Step 1
To load the tubes, open the desired drawer.
Once the drawer is open, select the desired workflow on the LCD display, in this case, Tube Entry.
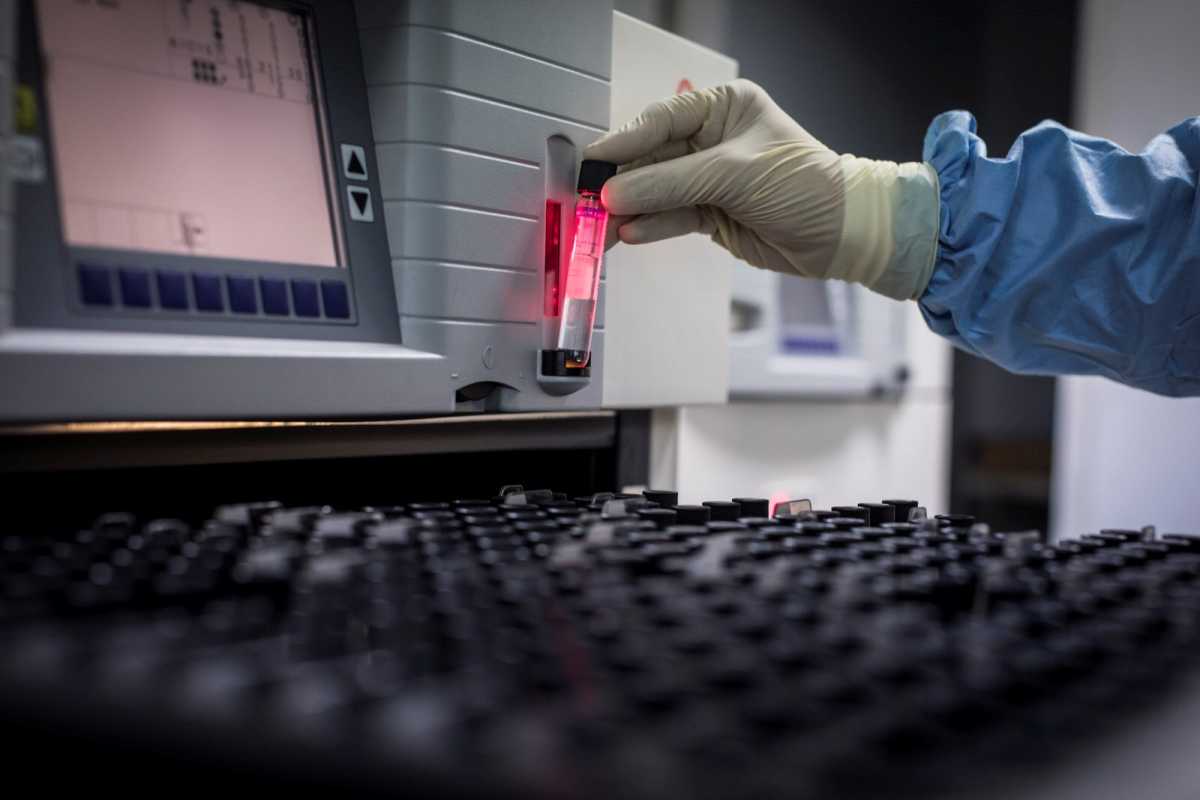
Step 2
Scan pre-affixed barcode on tube
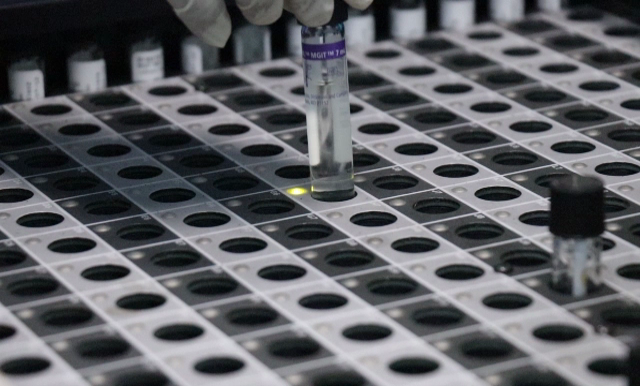
Step 3
Load where indicated by solid green LED light in drawer, and close the drawer.
Now the MGIT 960 system will do all the work.
Step 4
Wait until the MGIT 960 system either flags the tube as positive or negative. After opening the drawer, remove the positives and completed negatives as they occur (icons appear on each drawer) eg press positive that appears on the screen to pull out positive tube from the slot.
Resources
Kindly provide your valuable feedback on the page to the link provided HERE
-
CDST_LT: Sample processing reagents preparation
FullscreenPrecautions for Sample Processing and Reagent Preparation in TB Culture Labs
ContentPrecautions for sample processing and reagent preparation in TB culture labs are as follows:
- Precaution is necessary while performing aerosol-generating procedures such as centrifugation, vertexing, mixing, pipetting, pouring and inoculation of media. For example -delay the opening of caps until aerosols have settled, open centrifuge canisters only inside the Bio Safety Cabinets (BSCs), use pipettes that are easy to control.
- Safety precautions to minimize interruption of airflow inside the BSC by keeping arms parallel to the work surface inside the BSC and working in the center to minimize arm movements and ensure not to move hands out of the hood until work is completed. Minimize the equipment inside the BSC so that there is no interference in the airflow pattern.
- Disinfect the BSC and all work surfaces with a tuberculocidal disinfectant before and after every procedure.
- The autoclave should be monitored with a spore test, at least monthly, to ensure that sterility is achieved.
- Avoid practices that can result in spills.
- Train all personnel working in the TB culture lab.
- Working staff must wear Personal Protective Equipment (PPE) like protective gowns, gloves, hair covers and shoe covers etc.
Resources
Kindly provide your valuable feedback on the page to the link provided HERE
BACTEC MGIT 960 Growth Supplement
ContentThe MGIT 960 Growth Supplement (Figure below) is the enrichment added to the MGIT medium prior to inoculation of specimen.
It provides substances essential to the growth of mycobacteria, such as:
- Oleic acid, that is utilized by tubercle bacteria and plays an important role in the metabolism of mycobacteria.
- Albumin, that acts as a protective agent by binding free fatty acids which may be toxic to Mycobacterium species, thereby enhancing their recovery.
- Dextrose, that is an energy source.
- Catalase, that destroys toxic peroxides that may be present in the medium.
- Polyoxyethylene stearate, that enhances the growth of Mycobacterium tuberculosis and assists in providing a uniform inoculum.
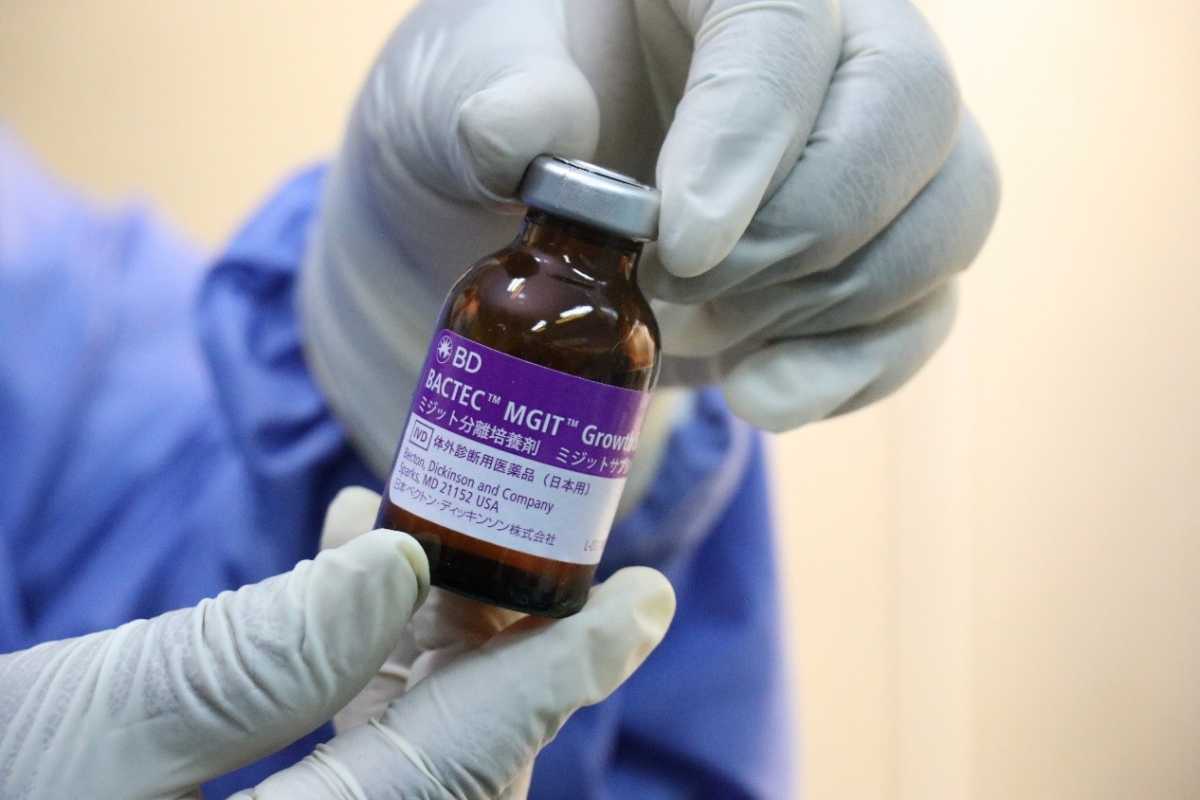
Figure: MGIT 960 Growth Supplement
Constituents of MGIT 960 Growth Supplement
15 ml MGIT 960 Growth Supplement contains:
- Bovine Albumin: 50.0 gm
- Dextrose: 20.0 gm
- Catalase: 0.03 gm
- Oleic Acid: 0.1 gm
- Polyoxyethylene state (POES): 1.1 gm
NOTE: It is a sterile product, do not use if turbid or contaminated.
Resources
Kindly provide your valuable feedback on the page to the link provided HERE
Quality Control of MGIT 960 Tubes
ContentMGIT 960 media quality control (QC) is to be done upon receipt of a new shipment or lot number. This includes checking the media visually and by growing control strains of Mycobacterium. Steps include:
- Visually check the tube for:
- Turbidity/contamination
- Expiry date
- Breakage
- Transport condition
- Control organisms prepared in Middlebrook 7H9 Broth should be used for QC testing as per the procedure shown in the figure below. It is important to test all three organisms, as each have different requirements for growth, and each will demonstrate a different time to detection. A good quality control program ensures that the media supports the growth of a variety of organisms, not just one organism.
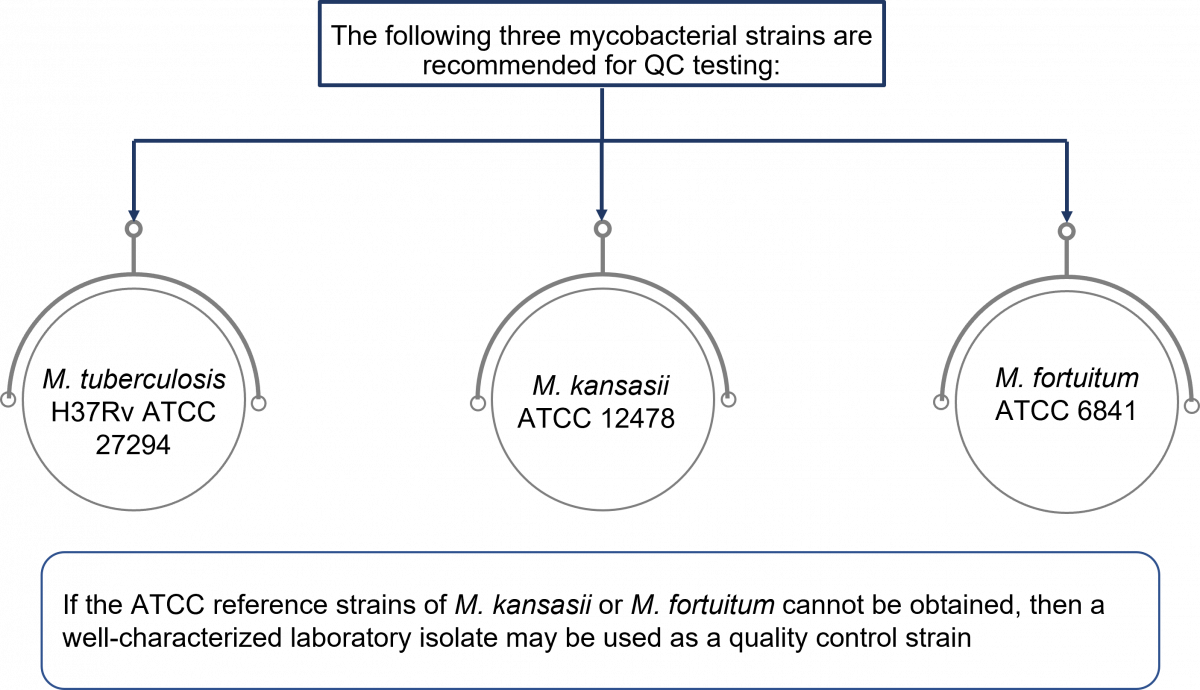
Figure: Control strains used for quality control of MGIT tubes
- Quality control testing should be performed in a biosafety cabinet
-
Subculture the quality control strains on Lowenstein-Jensen (LJ) slants and use pure and fresh growth to prepare a uniform suspension of 0.5 McFarland turbidity
- Dilution of culture suspension using sterile saline or distilled water, accordingly:
- M. tuberculosis - 1:500
- M. fortuitum - 1:5000
- M. kansasii - 1:50000
- Inoculate 0.5 ml of respective dilutions of culture suspension into two labeled MGIT tubes and further incubate the tubes into MGIT 960 system
- The expected results are:
- M. tuberculosis: Positive in 6 to 10 days
- M. kansasii: Positive in 7 to 11 days
- M. fortuitum: Positive in 1 to 3 days
Resources
Kindly provide your valuable feedback on the page to the link provided HERE
- Visually check the tube for:
-
CDST_LT: Specimen processing and inoculation
FullscreenSpecimen Processing for TB Cultures
ContentSputum specimens are viscous materials contaminated with normal flora. Therefore, processing involves pre-treatment of the sputum specimens via:
- Digestion: To free the TB bacilli from the mucus in which they may be embedded.
- Decontamination: To eradicate normal flora that grows more rapidly than TB bacilli, and would interfere with the ability to recover TB bacilli.
- Homogenization: Of the digested materials.
- Concentration: Of the TB bacilli by centrifugation before smear preparation and media inoculation.
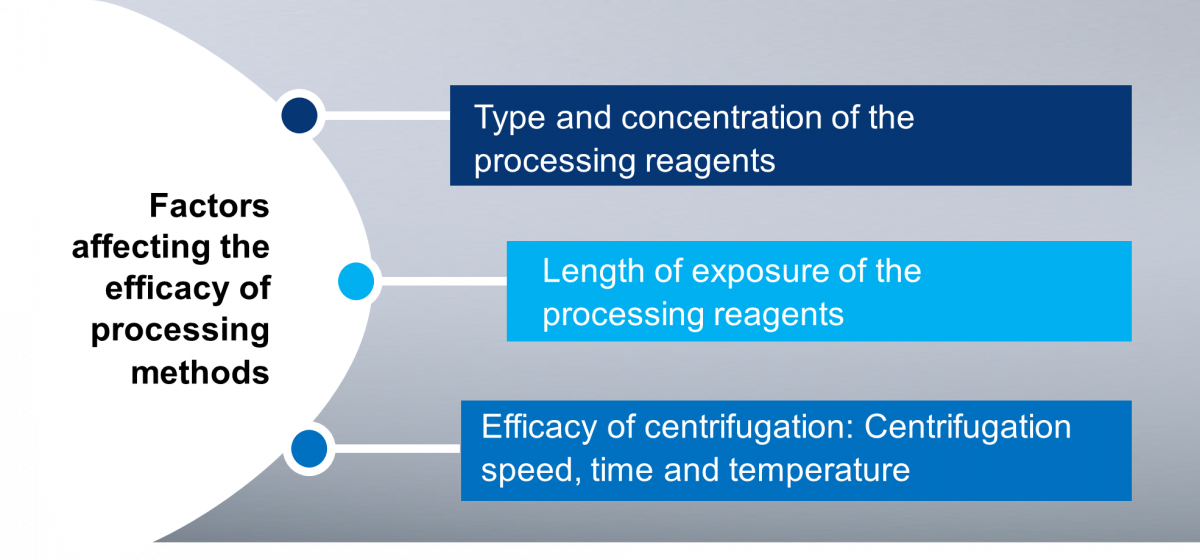
Figure: Factors Affecting the Efficacy of Processing Methods
Methods of Culture Specimen Processing
Various processing methods are used for TB specimens; amongst them, the most common methods are:
- N-acetyl-L-cysteine - sodium hydroxide (NALC-NaOH) method: It is the mildest decontamination method which can kill about 33% of mycobacteria in a clinical specimen. It can be used with both liquid and solid media.
- Petroff’s sodium hydroxide method: It is a harsher method – it can kill up to 70% of mycobacteria in specimens. Although useful with highly contaminated specimens, it is not recommended for use with liquid MGIT media.
Resources
- MGIT Procedure Manual, Mycobacteria Growth Indicator Tube (MGIT) Culture and Drug Susceptibility Demonstration Projects, FIND Training Manual.
- GLI Training Module on Specimen Processing, STOP TB Partnership.
Kindly provide your valuable feedback on the page to the link provided HERE
Procedure for Culture Specimen Processing: Pulmonary specimens
ContentThese are the steps to be followed when processing pulmonary specimens in TB culture laboratories:
Beginning the Specimen Processing Procedure:
- Process only one specimen at a time, and do not leave open containers or open centrifuge tubes in the Bio Safety Cabinet (BSC).
- Process the available specimen in a 50 ml sterile, plastic, screw-capped centrifuge tube (Figure).
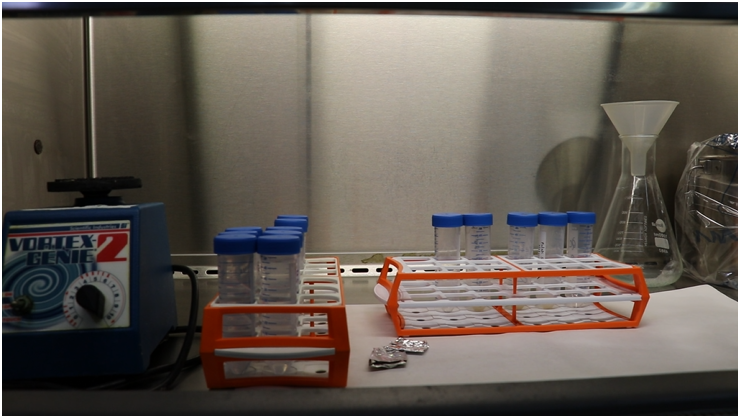
Figure: Capped 50 ml sterile, plastic, screw-capped centrifuge tubes
NALC - NaOH Procedure:
- Always open the cap of the specimen container slowly to minimize aerosol production.
- Aliquot reagent in a separate tube for each specimen to avoid contamination of reagent stocks. A freshly prepared single-use aliquot is preferred.
- Note the volume of the specimen. Add an equal volume of N-acetyl-L-cysteine-sodium hydroxide (NALC-NaOH) solution and tighten the cap.
- In order to avoid cross-contamination, do not allow the NALC-NAOH solution container to touch the specimen tubes.
- After the addition of the decontaminant and or digestant tighten the caps and vortex for not more than 20 seconds at a moderate speed.
- Invert each tube 5 times, making the figure 8 with your wrist, to ensure that the NALC-NaOH solution contacts the entire inner surface of the tube and cap.
- Avoid extreme agitation or shaking which can cause inactivation of the NALC.
- Let the tubes stand at room temperature for 20-25°C, for 15 minutes and mix by gently inverting the tube.
- NaOH exposure time must be strictly limited to 15 minutes to prevent the over-killing of the TB bacilli.
- If stronger decontamination is needed, the starting concentration of NaOH may be increased to 5-6%, but the time of exposure should not be extended.
- Neutralize the specimen with a phosphate buffer of pH 6.8 to the 45 ml mark. Do not exceed the 45 ml mark.
- To avoid cross-contamination do not allow the diluent (phosphate buffer) container to touch the mouth of the specimen tubes.
- Single-use aliquots of phosphate buffer or a dispenser are preferred to avoid cross-contamination during the procedure.
- After centrifugation, open the safety bucket in the BSC and carefully pour off the supernatant into a splash-proof discard container with a suitable disinfectant (5% phenol).
- If required, swab the tube with a disinfectant-soaked gauze (use individual pieces) and recap carefully.
- While wiping, do not allow the disinfectant to flow into the tube.
- Re-suspend the sediment in 1–2 ml of sterile phosphate buffer (pH 6.8) using a new transfer pipette.
Please click here to see a full video on sputum specimen processing for culture.
Resources
- MGIT Procedure Manual, Mycobacteria Growth Indicator Tube (MGIT) Culture and Drug Susceptibility Demonstration Projects, FIND Training Manual.
- GLI Training Module on Specimen Processing, STOP TB Partnership.
Kindly provide your valuable feedback on the page to the link provided HERE
Procedure for Culture Specimen Processing: Extrapulmonary specimens
ContentExtrapulmonary specimens are divided into 2 groups based on the site and mode of collection and the extent of contamination:
- Aseptically collected specimens, usually free from other microorganisms (sterile), which include fluids like spinal, pleural, pericardial, synovial, ascitic, blood, bone marrow, tissues (lymph node, tissue biopsies) and fine needle aspirates (FNAs)
- Specimens contaminated by normal flora or specimens not collected aseptically (not sterile), such as gastric lavage, bronchial washings, urine, pus, other muco-purulent specimens and stool (in case of disseminated TB in HIV infected patients and infants)
All extrapulmonary specimens have to be appropriately collected, transported, registered, decontaminated, cultured via solid culture methods or processed for MGIT960.
All extrapulmonary specimens have different processing procedures that need to be used for the respective specimen.
Resources
Kindly provide your valuable feedback on the page to the link provided HERE
Procedure for Culture Specimen Processing: Pus and other muco-purulent specimens
ContentThe procedure for processing pus and other muco-purulent specimens in TB cultures is as follows:
- If the specimen is thick or mucoid and less than 10 ml in volume, digest and decontaminate with N-acetyl-L-cysteine-sodium hydroxide (NALC-NaOH) method similar to the procedure used for sputum specimens.
- If the specimen is not thick, it may be treated with 2-4% NaOH.
- The concentration of NaOH depends upon the contaminating bacteria expected to be present in the specimen.
- If the volume is over 10-12 ml, process only 10 ml or the first concentrate by centrifugation at 3000x g for 15-20 minutes.
- In such a situation, if the specimen is thick, liquefy the specimen by adding a small quantity of NALC only (50-100 mg powder) and mix well.
- After the concentration step, resuspend the sediment in 5 ml sterile water, decontaminate with NaOH and concentrate again by centrifugation.
- Always resuspend the sediment (pellet) in buffer to reduce the pH.
Resources
Kindly provide your valuable feedback on the page to the link provided HERE
Procedure for Culture Specimen Processing: Gastric Aspirate
ContentThe procedure for processing gastric aspirates in TB cultures is as follows:
- Concentrate by centrifugation before decontaminating.
- Resuspend the sediment in about 5 ml of sterile water and decontaminate with N-acetyl-L-cysteine-sodium hydroxide (NALC-NaOH) method.
- After decontamination, concentrate again prior to inoculation of the sediment into the culture media.
- Due to the low pH, gastric aspirates should be processed as soon as possible (within 4 hours of collection).
- If the specimen cannot be processed quickly, it should be neutralized with NaOH before transportation or storage.
Resources
Kindly provide your valuable feedback on the page to the link provided HERE
Procedure for Culture Specimen Processing: Bronchial Lavage
ContentThe procedure for processing bronchial lavage specimens in TB cultures is the same as that for sputum samples. The following aspects need to be considered:
- If the specimen is larger than 10 ml in volume, it needs to be concentrated by centrifugation (3000x g, 15-20 minutes) and the sediment resuspended in 5 ml sterile water.
- Thick/ mucoid samples need to be liquefied by mixing the specimen with a pinch (50-100 mg) of N-acetyl-L-cysteine (NALC) powder.
The processed specimen is used to inoculate the MGIT tubes.
Resources
Kindly provide your valuable feedback on the page to the link provided HERE
Procedure for Culture Specimen Processing: Laryngeal Swab
ContentThe procedure for processing laryngeal swab specimens in TB cultures is as follows:
- Transfer the swab (without a stick) into a sterile centrifuge tube and add 2 ml sterile water.
- Add 2 ml N-acetyl L-cysteine - sodium hydroxide (NALC-NaOH) solution, replace the cap, mix well (vortex mix), keep for 15 minutes.
- Remove the swab with forceps, squeezing the liquid out of the swab, and discard the swab.
- Fill the tube with phosphate buffer, mix and centrifuge at 3000x - 3500x g (15-20 minutes).
- Discard the supernatant fluid and resuspend the sediment in 1-2 ml sterile buffer.
The processed specimen is used to inoculate the MGIT tubes.
Resources
Kindly provide your valuable feedback on the page to the link provided HERE
Procedure for Culture Specimen Processing: Tissue
ContentThe procedure for processing tissue specimens in TB cultures is as follows:
- Add saline or water (2 - 4 ml) and homogenize the tissue in a Biosafety Cabinet (BSC) using sterile equipment:
- Tissue grinder or homogenizer
- If these are not available, use a mortar and pestle
- Small tissue specimens may be placed in a petri dish with 2-4 ml sterile water and torn apart with the help of two sterile needles
- Decontaminate the homogenized specimen with N-acetyl L-cysteine - sodium hydroxide (NALC-NaOH) procedure as in processing sputum. Tissue biopsies collected aseptically do not require decontamination procedures.
- Resuspend the sediment in phosphate buffer.
The processed specimen is used to inoculate the MGIT tubes.
Resources
Kindly provide your valuable feedback on the page to the link provided HERE
- Add saline or water (2 - 4 ml) and homogenize the tissue in a Biosafety Cabinet (BSC) using sterile equipment:
Procedure for Culture Specimen Processing: Urine
ContentThe procedure for processing urine in TB cultures is as follows:
- Aliquot the entire volume in several centrifuge tubes.
- Concentrate the specimen by centrifugation in 50 ml centrifuge tubes for 20-25 minutes.
- Resuspend the pellet in each tube with 1-2 ml of sterile water and pool together with a total volume of 5-10 ml.
- Decontaminate sediment with 4% sodium hydroxide (NaOH) for 15-20 minutes and proceed as similar to processing sputum.
The processed specimen is used to inoculate the MGIT tubes.
NOTE: Isolation of mycobacteria from urine specimens using MGIT has not been validated by Becton, Dickinson & Company (MGIT 960 manufacturer) but other investigators have reported successful isolation of mycobacteria from urine specimens. When performed, the sample to be used is:
- Totally voided, early morning urine specimen
- Pooled or mid-stream urine is not recommended.
Resources
Kindly provide your valuable feedback on the page to the link provided HERE
Procedure for Culture Specimen Processing: CSF and other body fluids
ContentBody fluids collected aseptically (cerebrospinal fluid, synovial fluid, pleural fluid) can be inoculated into MGIT medium without decontamination (with the addition of PANTA). However, since it is difficult to maintain sterile conditions throughout the collection of specimens, it is recommended that all specimens be decontaminated.
Aseptically collected specimens need only light decontamination (NALC without NaOH). Steps for processing such specimens are:
- Large volume samples (>10 ml) are concentrated by centrifugation at 3000x - 3500x g (15-20 minutes).
- N-acetyl-L-cysteine (NALC) powder (50-100 mg) is added to thick/ mucoid specimens prior to centrifugation.
- Resuspend the sediment in 5 ml saline.
- Decontaminate as per the procedure for sputum samples.
The processed specimen is used to inoculate the MGIT tubes.
Resources
Kindly provide your valuable feedback on the page to the link provided HERE
Steps to be done after Culture Specimen Processing
ContentAfter specimen processing, the resuspended pellet may be used for various tests as per the laboratory policy or national guidelines recommended for TB diagnosis such as:
- Inoculation of sediments in Mycobacterium Growth Indicator Tube (MGIT) broth (Liquid media) and or solid media for primary culture isolation
- Subculture a loopful on a Brain Heart Infusion (BHI) Agar plate for contamination check
- Concentrated smear of processed specimen can be prepared if not prepared earlier, for a microscopy smear
- DNA extraction for Line Probe Assay
Transfer the remaining sediment into 2 mL labelled cryovials and store at 2-8⁰C for repeat or additional testing.
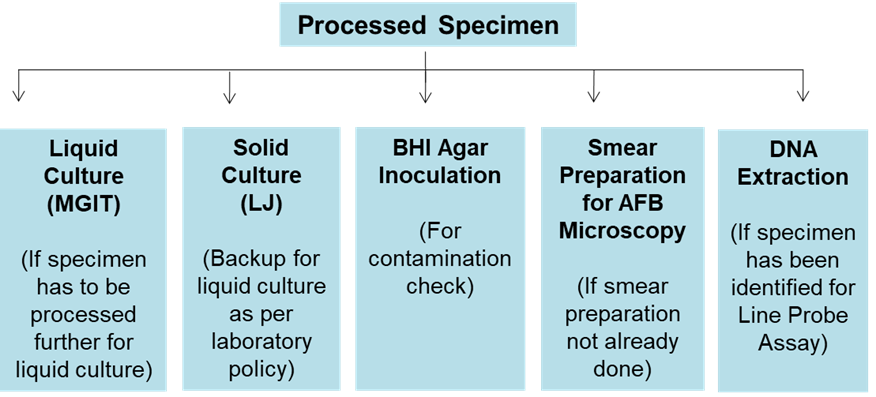
Figure: Steps After Sample Processing
Resources
Kindly provide your valuable feedback on the page to the link provided HERE
Preparation of PANTA for MGIT TB Cultures
ContentPreparation of PANTA is the first step when inoculating and incubating MGIT 960 tubes for TB cultures. The preparation steps are shown below (Figure 1).

Figure 1: Steps for Preparation of PANTA

Figure 2: Reconstitution of PANTA with growth supplement using a micropipette
NOTE:
- Reconstituted PANTA can be used for up to 5 days if stored at 2 to 8ºC, but do not freeze.
- Each PANTA vial is used for 15-18 MGIT tubes (BACTEC MGIT 960).
Please click the video below to see the full procedure for inoculating and incubating MGIT tubes for TB cultures:
Resources
Kindly provide your valuable feedback on the page to the link provided HERE
Preparation of MGIT Tubes for MGIT TB Cultures
ContentPreparation of MGIT tubes occurs after preparation of PANTA when inoculating and incubating MGIT 960 tubes for TB cultures. The preparation steps are shown below.
- Prepare the MGIT tubes in a clean Biosafety Cabinet (BSC) preferably prior to specimen processing.
- Put an absorbent sheet on the work surface of the BSC and soak it with disinfectant (bactericidal for mycobacteria).
- Before preparation of MGIT tubes:
- Know the number of samples for batch or per day
- Label each 7 ml MGIT tube with a specimen number
- Decontaminate all items to be used like micropipettes, racks, tip boxes and vortex
- Aseptically, add 0.8 ml of PANTA mixture to each MGIT tube.
- Inoculate tubes with specimen within 2 hours of adding PANTA.
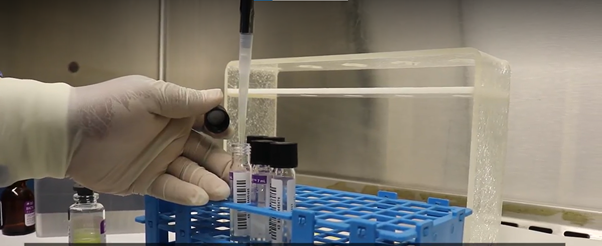
Figure: Addition of 0.8 ml of PANTA/ Growth supplement mixture to the MGIT tube using a micropipette
Please click the video below to see the full procedure for inoculating and incubating MGIT tubes for TB cultures:
Resources
Kindly provide your valuable feedback on the page to the link provided HERE
Inoculation of MGIT Tubes
ContentMycobacteria Growth Indicator Tube (MGIT) contains a modified Middlebrook 7H9 broth base. When supplemented with MGIT Growth Supplement and PANTA, it provides an optimum medium for the growth of a majority of mycobacterial species. All types of specimens, pulmonary as well as extra-pulmonary (except blood), can be inoculated into MGIT for primary isolation of mycobacteria.
The steps for inoculating MGIT tubes are elaborated below:
- Using a sterile transfer pipette, add 0.5 ml of the processed sample to a 7 ml MGIT tube (0.8 ml of PANTA-growth supplement mixture already added).
- Tightly recap the tube and invert gently several times to mix well.
- Recap and swab the exterior of each tube with disinfectant-soaked gauze (use individual swabs); ensure the disinfectant does not flow into the tube.
- Leave the inoculated tubes at room temperature for 30 minutes.
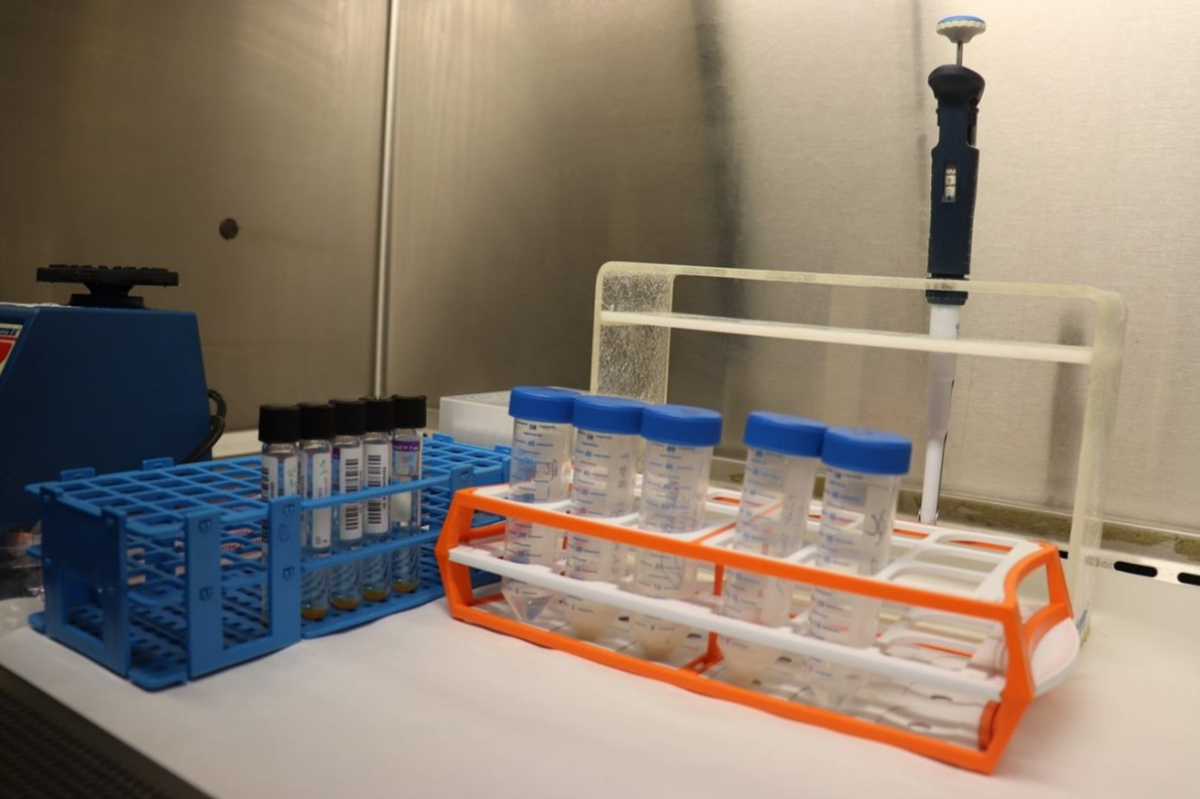
Figure: Micropipette that will be used to add processed sputum specimen to the prepared MGIT tube
Precautions
- Do not add more than 0.5 ml of processed specimen.
- Volumes greater than 0.5 ml may alter the pH of the medium and result in false-positive fluorescence.
- Use a separate pipette or pipette tip for each specimen.
- Always recap the tube tightly, as loose caps may affect the detection of fluorescence.
Please click the video below to see the full procedure for inoculating and incubating MGIT tubes for TB cultures:
Resources
Kindly provide your valuable feedback on the page to the link provided HERE
Incubation of MGIT Tubes
ContentAfter inoculating the tubes, they have to be incubated in the BACTEC MGIT 960 instrument to check if there is mycobacterial growth after the stipulated time.
The steps for incubating MGIT tubes for TB cultures are as follows:
1. Enter the inoculated MGIT tubes into BACTEC MGIT 960 instrument.
2. Scan the tube bar code and specimen bar code (if available) (Figure 1).
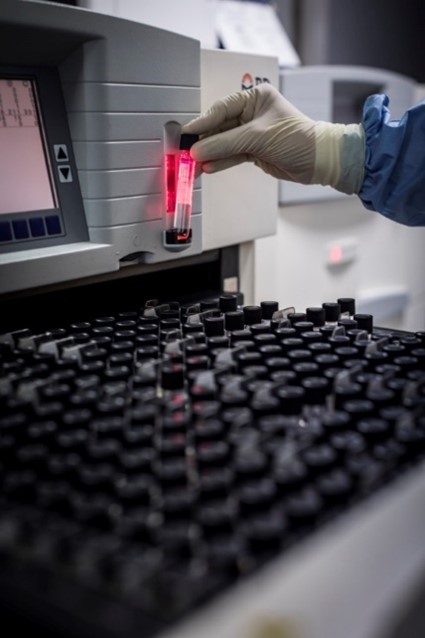
Figure 1: Scanning the tube bar code
3. Insert tubes into the instrument in the slots assigned (indicated by a green light) (Figure 2).

Figure 2: Slots with green light indicated for inserting the tubes
4. The tubes are incubated in the MGIT 960 instrument at 37±1°C.
a. The temperature readout of each drawer must be checked daily.
b. Since the optimum temperature for growth of M. tuberculosis is 37ºC, make sure the temperature is close to 37ºC.
5. Fluorescence in each tube is measured every 60 minutes by the photodetector assembly.
6. Tubes are detected Positive or Negative, based on the fluorescence.
7. MGIT tubes should be incubated until the instrument flags them positive. After a maximum of six weeks, the instrument flags the tubes negative if there is no growth.
8. Some species such as M. ulcerans and M. genavense may require extended incubation time; if such species are expected to be present, incubate further for 2-3 weeks.
Please click the video below to see the full procedure for inoculating and incubating MGIT tubes for TB culture:
Resources
Kindly provide your valuable feedback on the page to the link provided HERE
-
CDST_LT: Growth detection
FullscreenBACTEC MGIT 960 System Growth Detection
ContentBACTEC MGIT 960 System Growth Detection
Principle:
The MGIT (Mycobacteria Growth Indicator Tube) consists of a liquid broth medium in the form of Middlebrook 7H9 liquid media that is known to yield better recovery and faster growth of mycobacteria. The MGIT tube also contains an oxygen-quenched fluorochrome, tris 4, 7-diphenyl-1, 10-phenanthroline ruthenium chloride pentahydrate embedded in silicone at the bottom of the tube.
During bacterial growth within the tube, the free oxygen is utilized and is replaced with carbon dioxide. With the depletion of free oxygen, the fluorochrome is no longer inhibited, resulting in fluorescence within the MGIT tube when visualized under UV light. The intensity of fluorescence is directly proportional to the extent of oxygen depletion. MGIT tubes may be incubated at 37ºC and read manually under a UV light or entered into an MGIT 960 instrument, where they are incubated and monitored for increasing fluorescence every 60 minutes.
The growth of bacteria, as well as mycobacteria, increases the fluorescence. In the case of M. tuberculosis, at the time of positivity, there are approximately 105 – 106 colony-forming units (CFU) per ml of medium. The instrument declares a tube negative if it remains negative for six weeks (42 days). The detection of growth can also be visually observed by the presence of non-homogeneous light turbidity or a small granular/flaky appearance in the medium.
Notifications:
Positive Cultures:
The system will indicate the presence of presumptive positive vials in several ways:
-
The positive indicator lamp at the front of the drawer illuminates.
-
The tube count for each drawer, next to the filled circle with a plus sign icon, increments in the Summary window display.
-
When the drawer is opened, the "remove positive tubes" soft key appears on the screen.
-
The audible alert sounds until the condition is acknowledged.
Negative Cultures:
Negative cultures exist as ongoing negatives (in the protocol) or out-of-protocol negatives. Notification of these conditions includes:
-
Ongoing Negatives - In the summary region of the display, the ongoing tube count for each drawer appears next to the filled circle icon,
-
Out-of-protocol Negatives - In the summary region of the display, the tube count for each drawer appears next to the filled circle with a minus (- )sign icon.
-
The negative indicator light for the drawer(s) illuminates.
Resources
1. MGIT Procedure manual, FIND Diagnostics
Assessment
Question 1
Answer 1
Answer 2
Answer 3
Answer 4
Correct Answer
Correct Explanation
Page id
Part of Pre-Test
Part of Post-Test
The MGIT (Mycobacteria Growth Indicator Tube) consists of a liquid broth medium in the form of Middlebrook 7H10 liquid media.
True
False
False
The MGIT (Mycobacteria Growth Indicator Tube) consists of a liquid broth medium in the form of Middlebrook 7H9 liquid media that is known to yield better recovery and faster growth of mycobacteria.
Yes
Yes
Question 2
The instrument declares a tube negative if it remains negative for six weeks (46 days).
True
False
False
The instrument declares a tube negative if it remains negative for six weeks (42 days).
Yes
Yes
-
Work-up for Positive MGIT Cultures
ContentThe different steps of tube removal are as follows:
1. Visual Observation:
Characteristic flake-like growth (Presumptive Positive)
Uniform Turbidity (Presumptive Contamination)
2. Smear:
Corded AFB smear-positive (Culture positive)
Both Acid Fast or Non-Acid Fast Bacilli (Culture with contamination)
Only Non-Acid Fast Bacilli (Contamination)3. Inoculate LJ slant/BHI for contamination check by the rate of growth, morphology, smear and immunochromatographic assays
Growth in 24 – 48 hours (Contamination)
No Growth (Contamination free)
Cultures should be checked for purity and identification of M. tuberculosis using a rapid immunochromatographic species identification test, such as MPT 64 Ag Assay
Resource
Mycobacteriology Laboratory Manual
Assessment
Question 1
Answer 1
Answer 2
Answer 3
Answer 4
Correct Answer
Correct Explanation
Page id
Part of Pre-Test
Part of Post-Test
AFB smear should be prepared from a positive MGIT tube.
True
False
True
AFB smear should be prepared from a positive MGIT tube.
Yes
Yes
Question 2
Sub-culturing a positive MGIT tube on an LJ slant is recommended.
True
False
True
Sub-culturing a positive MGIT tube on an LJ slant is recommended.
Yes
Yes
Interpreting MGIT Results
ContentMGIT results are interpreted as described in Flowcharts 1-3:
Image Image
Image Image
Image
Resource
Mycobacteriology Laboratory Manual
Assessment
Answer 1
Answer 2
Ans
wer 3
Answer 4
Correct answer
Correct explanation
Page id
Part of Pre-test
Part of Post-test
How is early growth in the MGIT tube interpreted? Re-incubate for 42 days Sub-culture MGIT broth on LJ slant Rapid ID test from MGIT All 4 Flowchart 3 is followed to interpret early growth in MGIT, which includes re-incubation for 42 days, sub-culturing MGIT broth on LJ slant and rapid ID test from MGIT.
Yes Yes
-
CDST_LT: Liquid culture contamination
FullscreenLiquid Culture Contamination and sources of contamination
ContentLiquid Culture Contamination and Sources of Contamination
Liquid media are more prone to contamination than solid media. Therefore, it is essential to process specimens with extreme care, adhering very closely to procedures and recommendations.
Sources of Contamination:
- Improper or under-decontamination of the specimen
- Thick mucoid specimens that are hard to liquefy
- Prolonged storage and transportation time of the specimen after collection. In such situations, especially in hot weather, bacteria tend to overgrow and are hard to kill by routine decontamination procedures.
-
Use of non-sterile materials such as pipettes, tubes, etc.
The incidence of contamination with bacteria (other than mycobacteria) varies from laboratory to laboratory, depending upon several factors. According to the NTEP guidelines, up to a 5% contamination rate is acceptable in cultures of clinical specimens on solid media. However, for liquid media, slightly higher contamination may be accepted (up to 7-8%). A very low contamination rate (less than 3%) may indicate too harsh a decontamination process, which would also affect the growth of mycobacteria and may reduce the positivity rate and increase the time-to-detection of positive mycobacterial culture.
Resource
- Assessment
Question 1
Answer 1
Answer 2
Answer 3
Answer 4
Correct Answer
Correct Explanation
Page id
Part of Pre-Test
Part of Post-Test
The acceptable range of contamination in solid culture is up to 5%.
True
False
True
According to the NTEP guidelines, up to a 5% contamination rate is acceptable in cultures of clinical specimens on solid media.
Yes
Yes
Question 2
The acceptable range of contamination in liquid culture is up to 7-8%.
True
False
True
According to the NTEP guidelines, up to 7-8% contamination rate is acceptable in cultures of clinical specimens on liquid media.
Yes
Yes
- Improper or under-decontamination of the specimen
Monitoring Liquid Culture Contamination
ContentThe growth of contaminant bacteria results in positive fluorescence. Therefore, it is important to observe all fluorescent positive MGIT tubes visually for turbidity and to make an AFB smear. If an MGIT tube broth is heavily turbid, contamination is suspected even if the AFB smear is positive.
Usually, contaminating bacteria causes heavy turbidity, although M. tuberculosis growth appears as particles without significant turbidity, while some of the NTM may produce light turbidity.
Contamination may be confirmed by the following method:
1. Make a smear and stain with Ziehl-Neelsen stain. The presence of non-acid-fast contaminant bacteria on the smear confirms contamination.
2. Sub-culture a loopful on blood agar. If blood agar is not available, use chocolate agar or a brain heart infusion (BHI) agar plate. Several specimens (up to 4) may be carefully inoculated on a plate (small streak for each specimen, properly labelled). Divide the plate and identify the specimen number with a marker. Incubate these subcultures at 35ºC ±1ºC and observe after 24-48 hours. If contaminating growth appears, confirm again by gram and ZN stain.
3. If contamination is confirmed with a negative AFB smear from the broth, discard the specimen and report it as contaminated. The isolation procedure can be repeated if contamination is confirmed with a positive AFB smear from the broth.
Resource
Mycobacteriology Laboratory Manual
Assessment
Question 1
Answer 1
Answer 2
Answer 3
Answer 4
Correct Answer
Correct Explanation
Page id
Part of Pre-Test
Part of Post-Test
Liquid culture contamination can be monitored by inoculating on blood agar.
True
False
True
Sub-culture can be done on blood agar. If blood agar is not available, chocolate agar or brain heart infusion (BHI) plate may be used.
Yes
Yes
Question 2
If contamination is confirmed with a negative AFB smear from the broth, discard the specimen and report it as contaminated.
True
False
True
If contamination is confirmed with a negative AFB smear from the broth sample, it should be discarded and reported as contaminated.
Yes
Yes
-
CDST_LT: False culture results
FullscreenFalse Positive MGIT Cultures
ContentFalse positives are test results reported as positive for a Mycobacterium species not present in the patient specimen.
-
Not all false positives are due to laboratory cross-contamination.
-
All laboratories are capable of producing false positive results.
Practices that can lead to false positive cultures are:
-
Inadequate sterilization of instruments such as bronchoscopes
-
Mislabeling at the time of collection or time of accessioning
-
Use of contaminated water for specimen collection or laboratory procedures
-
Shared reagents and dispensers
-
Opening more than one specimen container at a time while processing
-
Mix-up of testing samples or lids
-
Failure to take precautions to minimize aerosol production
Resource
Assessment
Question 1
Answer 1
Answer 2
Answer 3
Answer 4
Correct Answer
Correct Explanation
Page id
Part of Pre-Test
Part of Post-Test
False positives are test results reported as positive for a Mycobacterium species not present in the patient specimen.
True
False
True
False positives are test results reported as positive for a Mycobacterium species not present in the patient specimen.
Yes
Yes
Question 2
The use of contaminated water for specimen collection or laboratory procedures is one of the reasons for false positives.
True
False
True
Among several reasons, the use of contaminated water for specimen collection or laboratory procedures is one of the reasons for false positives.
Yes
Yes
-
False Negative MGIT Cultures
ContentFalse negatives are test results reported as negative for a Mycobacterium species present in the patient specimen
Practices that can lead to false negative cultures are :
-
Extended exposure to NaOH during processing
-
High pH (insufficient neutralization during processing)
-
Growth may be inhibited by:
-
addition of too much PANTA
-
loss of CO2 from MGIT vial headspace
-
Resource
DocumentMGIT 960 Growth Detection Oct09.ppt (1.46 MB)Assessment
Question 1
Answer 1
Answer 2
Answer 3
Answer 4
Correct Answer
Correct Explanation
Page id
Part of Pre-Test
Part of Post-Test
False negatives are test results reported as negative for a Mycobacterium species present in the patient specimen.
True
False
True
False negatives are test results reported as negative for a Mycobacterium species present in the patient specimen.
Yes
Yes
Question 2
Extended exposure to NaOH during processing results in false negatives.
True
False
True
Extended exposure to NaOH during processing results in false negatives.
Yes
Yes
-
Impact of False MGIT Culture Results
ContentLaboratories need a mechanism to determine possible causes of false results (e.g., personnel logs, lot numbers used). Practices should be evaluated to determine where changes can be made. Most episodes of false results are recognized only after a review of laboratory records, including genotyping results. Laboratories need a review process to detect false cultures earlier.
Consequences of false positives which impact on clinical care of patients:
1. Patients may be managed incorrectly in the following ways.
-
Unnecessary treatment and toxicity
-
Unnecessary isolation, hospitalization, and healthcare costs
-
Emotional repercussions to the patient
-
Unnecessary contact investigations
2. Credibility of the laboratory, hospital, or clinician may be questioned.
3. It May increase laboratory workload and testing costs.
Resource
Assessment
Question 1
Answer 1
Answer 2
Answer 3
Answer 4
Correct Answer
Correct Explanation
Page id
Part of Pre-Test
Part of Post-Test
False positive results may lead to unnecessary treatment and toxicity.
True
False
True
False positive results may cause unnecessary treatment of the patient and cause toxicity.
Yes
Yes
Question 2
Due to false positive results credibility of the laboratory, hospital, or clinician may be questioned.
True
False
True
False positive results affect the credibility of the laboratory, hospital, or clinician.
Yes
Yes
-
-
CDST_LT: Liquid culture troubleshooting
FullscreenTroubleshooting LC Growth Recovery
ContentIf there is an overall decrease in the culture positivity rate, the following parameters need to be investigated:
A. Incubation:
The majority of mycobacterial species grow well at 37°C ± 1ºC. They may grow slowly or may not grow if the temperature drops below 35°C. If an incubator is used, confirm that the incubator's temperature is 37°C ± 1°C by placing a calibrated thermometer in various locations throughout the incubator or instrument drawers. Monitor the readings several times each day until heating stability is determined. Check the temperature of the MGIT 960 by retrieving the information from the instrument.
B. Decontamination Procedure:
-
Confirm that the purity and concentration of all the reagents used in the digestion/ decontamination procedure are satisfactory.
-
Use distilled/ deionized water only for the preparation of reagents.
-
It is better to start with freshly prepared reagents.
-
A high pH of the specimen inoculated into the MGlT medium may influence the performance of MGlT adversely.
-
Do not expose the specimen to the decontamination reagent for longer than the recommended time.
- Check if MGlT tubes are positive by visual growth but negative by fluorescence.
C. Centrifugation:
-
Relative Centrifugal Force (RCF) should be 3,000-5,000 x g. Make sure the centrifuge is giving the required RCF.
-
The generation of heat during centrifugation also lowers the recovery due to higher temperature. Avoid the generation of excessive heat by using a refrigerated centrifuge.
D. Use of PANTA:
Check that PANTA is reconstituted with the proper volume.
Resource
Mycobacteriology Laboratory Manual
Assessment
Question 1
Answer 1
Answer 2
Answer 3
Answer 4
Correct Answer
Correct Explanation
Page id
Part of Pre-Test
Part of Post-Test
The majority of mycobacterial species grow well at 37°C + 1ºC.
True
False
True
Most mycobacterial species grow well at 37°C + 1ºC; however, some may require temperatures other than 37°C.
Yes
Yes
Question 2
The reagents for decontamination can be used, which were prepared 1 month back.
True
False
False
It is better to use freshly prepared reagents.
Yes
Yes
-
Troubleshooting LC Detection Time
ContentDetection time can range from 24 hours to six weeks for MGIT and 8 weeks for LJ medium. If the average detection time is significantly longer, these instructions need to be followed:
Digestion/decontamination procedure:
-
Decrease the NaOH concentration and/or time of exposure to NaOH. Higher concentrations of NaOH or longer exposure time will prolong the detection time of mycobacteria.
-
A high pH of the final inoculum will prolong the detection time.
-
Check if the incubation temperature is within specifications. Lower temperatures would delay detection.
-
In a few instances, too high a concentration of PANTA may delay the detection of certain strains of NTM, especially if the starting number is low.
Procedures Check:
-
Water used to prepare reagents should be pure (distilled/deionized).
-
All the reagents used should be sterile.
-
All pipettes and tubes should be sterile.
-
All inoculations should be made in the biological safety hood.
-
Growth Supplement/PANTA mixture should be added to MGIT tubes just before inoculation.
-
The addition of MGlT OADC or MGIT Growth Supplement/PANTA must be done inside a biological cabinet. Leave the tube open for as little time as possible. Leaving the tube open, especially on an open bench top, would increase the contamination rate.
Resource
Mycobacteriology Laboratory Manual
Assessment
Question 1
Answer 1
Answer 2
Answer 3
Answer 4
Correct Answer
Correct Explanation
Page id
Part of Pre-Test
Part of Post-Test
Higher concentrations of NaOH or longer exposure time will prolong the detection time of mycobacteria.
True
False
True
Higher concentrations of NaOH or longer exposure time kill a lot of Mycobacteria.
Yes
Yes
Question 2
Growth Supplement/PANTA mixture can be added to MGIT tubes after inoculation.
True
False
False
Growth Supplement/PANTA mixture should be added to MGIT tubes just before inoculation.
Yes
Yes
-
Troubleshooting High Liquid Culture contamination
ContentA high contamination rate indicates improper decontamination procedure. At the same time, too low contamination indicates over-treatment of the specimen that could also lower the culture positivity rate or increase the detection time. If in the MGIT it is more than 7-8%, then the decontamination procedure is not satisfactory and corrective measures should be taken:
A. Specimen collection and transport:
1. Collect specimens in clean and sterile containers to avoid outside contamination.
2. Keep the specimen in cool conditions during transport, preferably in an insulated ice box.
3. Transport to the lab as quickly as possible.
4. Upon receipt, keep it in a cool place, preferably in a refrigerator.
5. Process the specimen as soon as possible.
B. Specimen quality and quantity:
1. The sample should not be too watery or too mucoid. If a mucoid specimen is not completely liquefied, add a small quantity of NALC powder.
2. The volume of the digested and decontaminated specimen should be 2.0–10.0 ml.
C. Specimen processing:
1. NALC-NaOH is the method of choice.
2. Recommended NaOH concentration of 4% is ideal (the final concentration in the specimen is 1%).
3. An increase in NaOH usually lowers the contamination rate.
4. Higher NaOH concentration (up to 1.5% in the specimen) is acceptable when contamination is a serious problem. Once the contamination problem is under control, try to lower the NaOH concentration gradually and bring it to the recommended concentration.
D. Addition of PANTA:
1. Check storage conditions and expiry date of lyophilized PANTA (refrigerated at 2- 8ºC). Improper preparation or storage of PANTA can affect the performance or optimal concentrations.
2. Once reconstituted can be stored at 2-8ºC within 5 days and may not be frozen.
E. Specimen inoculation:
-
The specimen should be inoculated inside a safety cabinet.
-
Tubes should be inoculated with the correct amount (0.5 ml) of the specimen.
-
The inoculated MGIT tubes should be mixed after adding the PANTA and specimen.
Quality control:
-
Process 5 ml sterile buffer (negative control) along with a regular batch of specimens processed in a day. Process the negative control in the same way as clinical specimens and inoculate them into MGIT tubes. This would indicate if there is a source of contamination during the processing.
-
Periodic sterility testing of the reagents, especially a freshly made batch, is required to keep a check on the contamination sources from the reagents. Use a blood agar plate or any other suitable bacteria medium for checking contamination and Middlebrook agar or LJ medium for mycobacterial contamination check.
-
Environmental contamination may be reduced by thoroughly disinfecting the lab, working inside a biosafety hood for all the additions and other processes, and fixing the source of contamination, if established.
Resource
Mycobacteriology Laboratory Manual
Assessment:
Question 1
Answer 1
Answer 2
Answer 3
Answer 4
Correct Answer
Correct Explanation
Page id
Part of Pre-Test
Part of Post-Test
The specimen can be inoculated outside the cabinet.
True
False
False
The specimen should be inoculated inside the cabinet. Otherwise, the chances of contamination will increase.
Yes
Yes
Question 2
Quality control measures should be followed at regular intervals for liquid culture.
True
True
True
Quality control measures should be followed at regular intervals for liquid culture.
Yes
Yes
-
Decontamination of Contaminated MGIT Culture
ContentUsually, more than one specimen is collected from a patient. Therefore, it is not necessary to salvage a contaminated specimen if other specimens from the same patient are positive and not contaminated. However, if it is critical to have the results of a particular specimen that was contaminated, the broth may be reprocessed.
The steps involved are as follows:
-
The entire contaminated MGIT broth should be transferred into a 50 ml centrifuge tube.
-
An equal quantity of sterile 4% sterile NaOH solution.
-
This should be mixed well and allowed to stand for 15-20 minutes while mixing the tube by inverting it periodically.
-
Phosphate buffer of pH 6.8 should be added after 15-20 mins up to the 40 ml mark on the centrifuge tube and mixed well by inverting the tube.
-
Centrifugation should be done at 3000g for 15-20 minutes.
-
The supernatant fluid is poured off.
-
The sediment is resuspended in 0.5ml phosphate buffer (6.8 pH) and mixed well.
-
0.5 ml of this is inoculated into a fresh MGIT tube supplemented with the MGIT growth supplement/PANTA.
-
The inoculated tubes are left at room temperature for 30 minutes and then placed in the instrument. This is followed up for observation of growth.
-
If no growth is observed, Autoclave all inoculated MGIT tubes before disposal.
Resource
Mycobacteriology Laboratory Manual
Assessment
Question 1
Answer 1
Answer 2
Answer 3
Answer 4
Correct Answer
Correct Explanation
Page id
Part of Pre-Test
Part of Post-Test
Contaminated culture can be decontaminated.
True
False
True
if it is critical to have results of a particular specimen that was contaminated, the broth may be reprocessed.
Yes
Yes
Question 2
The sediment is resuspended in 0.8 ml of phosphate buffer (6.8 pH).
True
False
False
The sediment is resuspended in 0.5ml of phosphate buffer (6.8 pH).
Yes
Yes
-
-
CDST_LT: MGIT Reading and reporting
FullscreenDocumentation of MGIT Cultures
ContentDocumentation of MGIT cultures is important to characterise if growth is positive for M. tuberculosis or unexpected result/contamination. The growth is tested for AFB by ZN microscopy and sterility by inoculation on the BHI agar/LJ slant.
The documentation of growth is as follows:
MGIT Machine Result
Growth Characteristics
ZN Result
BHI agar/LJ slant result
Documentation
Positive
Flakes like growth
Positive
No growth
M. tuberculosis complex detected
Positive
Flakes like growth
Plus turbidity
Positive
Growth
M. tuberculosis complex detected
with contamination
Positive
Flakes like growth
Positive
No Growth
M. tuberculosis complex not detected but positive for NTMs
Positive
Turbidity
Negative
Not Applicable
Contamination
Negative
No growth
Not Applicable
Not Applicable
Negative for M. tuberculosis complex
Assessment
Question 1
Answer 1
Answer 2
Answer 3
Answer 4
Correct Answer
Correct Explanation
Page id
Part of Pre-Test
Part of Post-Test
Flaky and turbid positive MGIT growth indicates which of the following?
M. tuberculosis complex with contamination
M. tuberculosis complex
M. tuberculosis complex not detected
NTM detected
1
Flaky and turbid positive MGIT growth indicates M. tuberculosis complex with contamination.
Yes
Yes
Question 2
Flakes like growth, MGIT positive but does not grow on BHI/LJ indicates which of the following?
M. tuberculosis complex with contamination
M. tuberculosis complex
M. tuberculosis complex not detected but positive for NTMs
E. coli detected
3
Flakes like growth, MGIT positive but does not grow on BHI/LJ indicates M. tuberculosis complex not detected but positive for NTMs.
Yes
Yes
MGIT Culture Reading Schedule
Content-
In automated systems, tubes are read continuously and flagged when positive. Performing acid-fast bacteria (AFB) smear with Zeihl-Neelsen (ZN) staining determines the next steps.
-
All MGIT-negative tubes at the end of the incubation period should be visually checked for evidence of growth before being discarded.
-
ZN staining should be performed on growth as soon as possible. After staining, culture should be handled according to the results.
Resource
Assessment
Question 1
Answer 1
Answer 2
Answer 3
Answer 4
Correct Answer
Correct Explanation
Page id
Part of Pre-Test
Part of Post-Test
In automated systems, tubes are read continuously.
True
False
True
In automated systems, tubes are read continuously.
Yes
Yes
Question 2
All MGIT-negative tubes at the end of the incubation period should be visually checked for evidence of growth before being discarded.
True
False
True
All MGIT-negative tubes at the end of the incubation period should be visually checked for evidence of growth before being discarded.
Yes
Yes
-
MGIT 960 Culture Detection Time Frame
ContentDetection time can range from 24 hours to six weeks for MGIT. The pictorial representation of MGIT 960 culture detection is shown below:
Image
Resource
DocumentMGIT 960 Growth Detection Oct09.ppt (1.46 MB)Assessment
Question 1
Answer 1
Answer 2
Answer 3
Answer 4
Correct Answer
Correct Explanation
Page id
Part of Pre-Test
Part of Post-Test
Detection time can range from 24 hours to six weeks for MGIT.
True
False
True
Detection time can range from 24 hours to six weeks for MGIT.
Yes
Yes
Question 2
The culture is declared negative after 24 days in MGIT
True
False
False
The culture is declared negative after 42 days in MGIT.
Yes
Yes
MGIT 960 Instrument Reports
ContentThe MGIT 960 offers a variety of reports which may be helpful in your daily workflow. Examples of these reports can be found in your binder.
The Unloaded Positives report will list all the positive tubes removed from the instrument since the last time the report was printed (up to a maximum of 500 positive, negative and ongoing tubes). This report could serve as a worksheet to document ZN stain results. It could help you account for every positive tube that was removed and ensure each was stained accordingly.
The Unloaded Negatives report will list all of the negative tubes removed from the instrument since the last time the report was printed. The same maximum tube capacity applies. This report may be helpful when reporting out-of-protocol negatives.
At times, ongoing tubes may need to be removed from the instrument to make room for newly processed tubes. (NOTE: If you need to remove ongoing tubes early, be sure to remove the oldest tubes first). The Unloaded Ongoing report can help you so that all tubes are tracked and reported appropriately. When the report printing is confirmed, the records for these unloaded tubes are removed (deleted) from the system. This is why you will be asked to confirm that the report successfully prints.
The instrument inventory report will give you a printout of all tubes in the instrument and their current status. This is a less frequently used report.
The Quality Control report lists the status of all of the detectors and the date and time of their last verification. This report also lists all manually blocked stations in the instrument. Some accounts print this report daily. This report may be useful for complying with local inspecting agencies.
Resource
DocumentMGIT 960 Growth Detection Oct09.ppt (1.46 MB)Assessment
Question 1
Answer 1
Answer 2
Answer 3
Answer 4
Correct Answer
Correct Explanation
Page id
Part of Pre-Test
Part of Post-Test
The instrument inventory report will give a printout of all tubes in the instrument and their current status.
True
False
True
The instrument inventory report will give you a printout of all tubes in the instrument and their current status.
Yes
Yes
Question 2
The Quality Control report lists the status of all detectors and the date and time of their last verification.
True
False
True
The Quality Control report list the status of all list detectors and the date and time of their last verification.
Yes
Yes
Reading MGIT 960 Tubes Manually
ContentThe beauty of the MGIT 960 tubes is that they can be read by the instrument and also manually. There are times AFB cultures are incubated at temperatures other than 37oC. If that is the case, the MGIT tube can be incubated at an alternate temperature. These tubes would then need to be read manually with a Wood’s Lamp or other UV sources of the proper wavelength and intensity.
In the event of an instrument failure where the instrument is down for an extended period, you may decide to incubate the tubes offline. These tubes can also be read manually.
Manual readings should not be conducted in a darkened room or rooms with bright sunlight. Normal room lighting is appropriate. When using any UV source, one must always wear protective UV goggles.
To read the tubes manually, place the rack of tubes directly on top of the UV lamp. There is no need to take the tubes out of the rack. Some accounts leave a blank row between tubes. This can make it easier to see the fluorescence when reading the tubes.
Tilt the tubes/rack slightly so that the tubes are read at a slight angle. Look for fluorescence both at the sensor at the bottom of the tube and the meniscus at the top of the media line (the fluorescence of the sensor reflects in the meniscus). Place a positive and negative control at the end of the row to give visual assistance in the reading. Place the suspect between these two tubes to determine if the patient tube is positive. The fluorescence in the patient tube should be greater than the background fluorescence in the negative control but does not need to be as great as the fluorescence in the positive control to be considered positive.
Resource
DocumentMGIT 960 Growth Detection Oct09.ppt (1.46 MB)Assessment
Question 1
Answer 1
Answer 2
Answer 3
Answer 4
Correct Answer
Correct Explanation
Page id
Part of Pre-Test
Part of Post-Test
The MGIT tubes can be read manually.
True
False
True
The beauty of the MGIT 960 tubes is that they can be read by the instrument as well as manually.
Yes
Yes
Question 2
UV sources with proper wavelength and intensity can be used to read MGIT tubes.
True
False
True
Wood’s Lamp or other UV sources of the proper wavelength and intensity can be used to read MGIT tubes manually.
Yes
Yes
-
CDST_LT: Identification methods for MGIT 960 LC growth
FullscreenLC Identification Methods for MTB/Isolated Mycobacteria
ContentThe following observations can make tentative identification:
-
Rate of growth: Generally, M. tuberculosis, M. bovis and, to some extent, M. Kansasii are slow growers and take a longer time to turn positive in an MGIT tube as compared to other non tuberculous mycobacteria (NTM).
-
Nature of turbidity: In liquid medium, M. tuberculosis appears as granular or flaky growth, while most NTM form uniform slight turbidity (except M. kansasii).
-
Smear examination: M. tuberculosis forms typical clumps and serpentine cords, while other mycobacteria appear as loose, smaller clumps and cording single cells. M. kansasii may be difficult to differentiate as it is morphologically closer to M. tuberculosis.
-
Lateral flow immunochromatography (Capilia TB Test): Used to differentiate M. tuberculosis from NTM.
-
Other methods: For complete speciation, other biochemical tests can be used.
Resource
Mycobacteriology Laboratory Manual
Assessment
Question 1
Answer 1
Answer 2
Answer 3
Answer 4
Correct Answer
Correct Explanation
Page id
Part of Pre-Test
Part of Post-Test
The majority of mycobacterial species grow well at 37°C ± 1ºC.
True
False
True
Most mycobacterial species grow well at 37°C ± 1ºC; however, some may require temperatures other than 37°C.
Yes
Yes
Question 2
The reagents for decontamination can be used, which were prepared one month back.
True
False
False
It is better to use freshly prepared reagents.
Yes
Yes
-
MTB growth characteristics and morphology
ContentIn liquid medium, M. tuberculosis appears as granular or flaky growth, while most NTM form uniform slight turbidity (except M. kansasii).
M. tuberculosis forms typical clumps and serpentine cords, while other mycobacteria appear as loose, smaller clumps and cording or single cells. M. kansasii may be difficult to differentiate as it is morphologically closer to M. tuberculosis.
Image Image
Image
Resource
Mycobacteriology Laboratory Manual
- Assessment
Question 1
Answer 1
Answer 2
Answer 3
Answer 4
Correct Answer
Correct Explanation
Page id
Part of Pre-Test
Part of Post-Test
In a liquid medium, M. tuberculosis appears as granular or flaky growth.
True
False
True
In a liquid medium, M. tuberculosis appears as granular or flaky growth.
Yes
Yes
Question 2
M. tuberculosis forms typical clumps and serpentine cords.
True
False
True
M. tuberculosis forms typical clumps and serpentine cords.
Yes
Yes
LC AFB Smears
ContentOnce an MGIT tube is positive by fluorescence or visual observation, prepare a smear and stain with carbol fuchsin stain.
Procedure:
-
Use a clean slide.
-
Mix the broth by vortexing, and then remove an aliquot using a sterile pipette. Place 1-2 drops on the slide and spread over a small area (approx. 1½ x 1 cm).
-
Let the smear air dry.
-
Heat-fix the smear by passing it over a flame a few times or using an electric warmer at 65ºC - 70ºC for 2 hours to overnight. Do not leave the smear openly exposed to the UV light of the safety cabinet.
-
Stain the smear with Ziehl-Neelsen.
-
Air dry, but do not blot dry.
-
Place a drop of oil on the stained and completely dried smear and screen under a low-power objective to locate stained bacteria. Then, switch to an oil immersion objective lens for detailed observation.
-
If the broth appears turbid or contaminated, irrespective of AFB smear results, subculture on a blood or chocolate agar, or TSI, to rule out the presence of contaminating bacteria.
-
If the smear is negative for AFB and the tube does not appear to be contaminated, i.e. broth is clear, re-enter the tube into the instrument for further monitoring. Repeat AFB smears after 1-3 days.
Resource
Mycobacteriology Laboratory Manual
Assessment
Question 1
Answer 1
Answer 2
Answer 3
Answer 4
Correct Answer
Correct Explanation
Page id
Part of Pre-Test
Part of Post-Test
Fluorochrome stain is not recommended for LC AFB smears.
True
False
True
Fluorochrome stain is not recommended for LC AFB smears.
Yes
Yes
Question 2
M. tuberculosis forms typical clumps and serpentine cords.
True
False
True
M. tuberculosis forms typical clumps and serpentine cords.
Yes
Yes
-
Rapid Antigen Detection/Immunochromatographic Assay for MTB
ContentPrinciple:
This method detects MPT64 antigen specifically produced by the M. tuberculosis complex. It detects MPT64 a mycobacterial protein secreted by the cells during growth.
Testing method:
Immunochromatography is a double-antibody sandwich technique in which:
-
An antibody labelled by colloidal particles, such as colloidal gold, reacts with target antigens to form an antigen-antibody complex.
-
This complex migrates across a chromatographic carrier such as a filter paper.
-
The complex is captured by a second antibody ready-fixed in the middle of the chromatographic carrier.
If the target antigens are present in the test specimen, a colour reaction caused by the gold colloidal particles is observed at the site on the chromatographic carrier where the second antibody is fixed, and the specimen is interpreted as positive.
This kit employs the colloidal gold-labelled MPT64 monoclonal (mouse) antibody in the main reaction system. The results are visually identified as a specific antigen-antibody reaction between the monoclonal antibody and MPT64 antigens secreted by the isolate.
However, if the growth of the M. tuberculosis complex is slight and the MPT64 concentration in the test specimen is below the detection limit, the complex may not be detected.
Resource
Mycobacteriology Laboratory Manual
Assessment
Question 1
Answer 1
Answer 2
Answer 3
Answer 4
Correct Answer
Correct Explanation
Page id
Part of Pre-Test
Part of Post-Test
Rapid antigen detection test is based on MPT64 Antigen.
True
False
True
This method detects the MPT64 antigen specifically produced by the M. tuberculosis complex.
Yes
Yes
Question 2
The kit can detect less mycobacterium growth too.
True
False
False
if the growth of the M. tuberculosis complex is slight and the MPT64 concentration in the test specimen is below the detection limit, the complex may not be detected.
Yes
Yes
-
Procedure for Immunochromatographic Test SD Bioline Assay/Capillia/TBcID
ContentThis method detects the MPT64 antigen specifically produced by the M. tuberculosis complex. It detects MPT64 (a mycobacterial protein fraction from BCG), a protein secreted by the M. tuberculosis cells during growth
The kit is a test plate that consists of a carrier strip composed of:
-
a specimen placing area
-
a reagent area containing a colloidal gold-labelled anti-MPT64 monoclonal antibody (mouse)
-
a developing area where the anti-MPT64 monoclonal antibody (mouse) and an anti-mouse immunoglobulin polyclonal antibody (rabbit) is fixed
Image
A drop of the culture is put on the “specimen placing area” on the test plate. The colloidal gold labelled MPT64 antibody “A” dissolves and forms an immune complex with MPT64 antigens in the specimen. This immune complex migrates through the developing area by capillary action and is captured by the anti-MPT64 antibody “B” fixed in the reading area [T =Test]. The resultant complex forms a purple-red line of colloidal gold in the reading area [T]. This visually indicates the existence of MPT64 antigens in the specimen. On the other hand, whether or not MPT64 antigens exist in the specimen, excess colloidal gold labelled anti-MPT64 antibodies further migrate through the developing area and are captured by the anti-mouse immunoglobulin antibody (fixed antibody). The resultant complex forms a purple-red line of colloidal gold in the reading area [C = Control]. This means that the colloidal gold-labelled anti-MPT64 antibodies have migrated normally.
Precautions:
1. Use freshly prepared suspension for each quality control test.
2. All work should be carried out in a proper biological safety cabinet.
3. All materials should be sterilized by autoclaving before disposal.
4. Follow all the recommended safety precautions.
Resource
Mycobacteriology Laboratory Manual
Assessment
Question 1
Answer 1
Answer 2
Answer 3
Answer 4
Correct Answer
Correct Explanation
Page id
Part of Pre-Test
Part of Post-Test
The kit is a test plate with only a reading area T.
True
False
False
The kit is a test plate consisting of a reading area, T, and a control area, C.
Yes
Yes
Question 2
The kit contains a developing area, reading area and specimen placing area.
True
True
True
The kit contains three areas - the developing areas, the reading area and the specimen placing area.
Yes
Yes
-
Inoculum Preparation for Immunochromatographic Test SD Bioline Assay/Capillia/TBcID
ContentSpecimen preparation and subsequent steps must be performed in a BSC using full PPE.
From positive MGIT tubes:
-
Ideally, test AFB smear-positive MGIT tubes within 5 days of instrument positivity.
-
Vortex the tightly capped MGIT tube for 30 seconds to ensure the suspension is well-mixed.
From positive LJ slants:
-
Test 2 to 4-week-old growth.
-
Add 200μL of TBC ID extraction buffer or Capilia extraction buffer to a sterile cryovial.
-
Using a sterile 10 μL loop, scrape a loopful of several colonies and mix with buffer, avoiding any solid medium and/or contaminants present.
-
Vortex the cryovial for 30 seconds to create a uniform suspension.
Further steps are the same for both :
-
Place 100μL of the specimen, either MGIT culture or bacterial suspension from LJ slant, into the specimen well of the test device. Change pipette tips between specimens.
-
Start timer for 15 minutes.
-
Examine the reading area of the test device after 15 minutes and record the test results. Do not interpret the test after 60 minutes.
Resource
Assessment
Question 1
Answer 1
Answer 2
Answer 3
Answer 4
Correct Answer
Correct Explanation
Page id
Part of Pre-Test
Part of Post-Test
The tightly capped MGIT tube for 30 seconds should be vortexed before performing the test.
True
False
True
The tightly capped MGIT tube must be vortexed for 30 seconds to ensure the suspension is well-mixed.
Yes
Yes
Question 2
The reading of the immunochromatographic test should not be taken after 60 min.
True
False
True
Do not interpret the test after 60 minutes.
Yes
Yes
-
Results interpretation for Immunochromatographic Test SD Bioline Assay/Capillia/TBcID
ContentThe SD Bioline is a solid-phase immunochromatographic assay that is inexpensive, easy to use and readily available. They are easily stored at room temperature and allow the results within 15 -20 minutes.
Interpretation of Result:
1) If a purple-red line appears in the Test area [T] and the control area [C], then the culture/strain is positive for the presence of the MPT64 antigens.
2) If a purple-red line appears in the Control area [C] but not in the Test area [T], then the culture/strain is negative for the presence of the MPT64 antigens.
3) If a purple-red line appears only in the Test area [T] and not in the Control area [C], then the test is invalid.
Resource
Mycobacteriology Laboratory Manual
Assessment
Question 1
Answer 1
Answer 2
Answer 3
Answer 4
Correct Answer
Correct Explanation
Page id
Part of Pre-Test
Part of Post-Test
If a purple-red line appears only in the Test area [T] and not in the Control area [C], then the test is invalid.
True
False
True
If a purple-red line appears only in the Test area [T] and not in the Control area [C], then the test is invalid.
Yes
Yes
Question 2
If a purple-red line appears in the Control area [C] and in the Test area [T], then the culture/strain is negative for the presence of the MPT64 antigens.
True
True
False
For a culture/strain to be negative for the presence of the MPT64 antigen, a purple-red line should appear in the Control area [C] but not in the Test area [T].
Yes
Yes
Internal Quality Control Kits for Immunochromatographic Test SD Bioline Assay/Capillia/TBcID
ContentA positive and a negative control must be tested with each new lot or a new shipment of kits received and with each new batch of extraction buffer prepared. Similarly, these controls must be run weekly or along with each batch of patient isolates when tests are set up less frequently.
1. Frequency:
-
Each new lot or shipment of kits and each new prepared lot of extraction buffer.
-
Weekly, or with each batch of patient tests, if testing is performed less frequently.
2. Controls:
-
Internal reagent control in the device
-
Positive control: Culture of M. tuberculosis reference strain (H37Rv or H37Ra) in MGIT broth
-
Negative control: Culture of a MOTT strain (e.g., a well-characterised strain of M. avium complex) in MGIT broth or broth from an uninoculated MGIT tube
3. Acceptable results: Correct results as expected for all controls
-
The internal control line is visible.
-
M. tuberculosis must result in a positive test.
-
MOTT strain or uninoculated broth must result in a negative test.
4. Corrective actions: If any control result is unacceptable, do not report patient tests.
-
Repeat the test with new controls; if acceptable, repeat patient tests
-
If repeat results are still unacceptable, notify the supervisor immediately and investigate potential causes for failure.
-
After the investigation is complete and QC is acceptable, repeat patient tests and report results.
Resource
- Assessment
Question 1
Answer 1
Answer 2
Answer 3
Answer 4
Correct Answer
Correct Explanation
Page id
Part of Pre-Test
Part of Post-Test
Each new shipment of kits and each newly prepared lot of extraction buffer should be tested.
True
False
True
Each new lot or shipment of kits and each newly prepared lot of extraction buffer should be tested.
Yes
Yes
Question 2
A culture of M. tuberculosis reference strain (H37Rv or H37Ra) in MGIT broth is present in the positive control used for immunochromatography assay.
True
False
True
The positive control used for immunochromatography assay includes a Culture of M. tuberculosis reference strain (H37Rv or H37Ra) in MGIT broth.
Yes
Yes
-
Biochemical Tests for MTB
ContentBiochemical Tests for MTB
An experienced laboratory technologist may make the presumptive diagnosis of tuberculosis on the basis of the morphological characteristics of tubercle bacilli, but it is best to do confirmatory tests.
Unfortunately, there is no completely reliable single test that will differentiate M. tuberculosis from other mycobacteria. Nevertheless, the following tests, when used in combination with the characteristics, will enable the precise identification of > 95% of M.tuberculosis strains:
1) Susceptibility to p-nitrobenzoic acid (PNB)
2) Niacin test
3) Catalase activity at 680C/pH 7.
Of these, the PNB test can be included along with the drug susceptibility test.
Resource
Assessment
Question 1
Answer 1
Answer 2
Answer 3
Answer 4
Correct Answer
Correct Explanation
Page id
Part of Pre-Test
Part of Post-Test
Biochemical tests differentiate M. tuberculosis from other mycobacteria.
True
False
True
PNB, Niacin and Catalase tests are used to differentiate M. tuberculosis from other mycobacteria.
Yes
Yes
Question 2
PNB test can be included along with the drug susceptibility test.
True
False
True
PNB test can be included along with the drug susceptibility test.
Yes
Yes
Susceptibility of MTB to p-Nitrobenzoic acid (PNB)
ContentPNB p-Nitrobenzoic acid susceptibility of MTB
Principle:
The inability to grow in the presence of PNB is one of the key elements in the phenotypic differentiation of tubercle bacilli from other mycobacterial species and is part of the identification process for M. tuberculosis.
M. tuberculosis and other tubercle bacilli will not grow on culture medium containing PNB, 500 µg/ml; other mycobacterial species, with the exception of M.gastri and some strains of M. kansasii and M. marinum, will grow in the presence of PNB.
The test must be carried out on pure cultures; otherwise, it will yield false results.
Procedure:
- Weigh out 0.5 gm PNB and dissolve in the minimum amount of dimethylformamide (~15ml).
- Add to 1 litre of L-J fluid, distribute and inspissate once for 50 minutes at 85 degrees.
- Store in a cold room.
- Inoculate with the neat bacterial suspension one slope of LJ medium and one slope of p-nitrobenzioc acid (PNB) at a concentration of 500 µg/ml and incubate at 370C for each set.
- Read on the 28th day.
- PNB should not be kept for reading on the 42nd day.
- It is critical to inoculate with a neat suspension prepared for DST, and reading should be only on the 28th day.
Results and Interpretation:
M. tuberculosis does not grow on the PNB medium. All other mycobacteria are resistant to PNB.
Resource
Assessment
Question 1
Answer 1
Answer 2
Answer 3
Answer 4
Correct Answer
Correct Explanation
Page id
Part of Pre-Test
Part of Post-Test
The reading of PNB should be taken on the 28th day.
True
False
True
The reading of PNB should be taken on the 28th day
Yes
Yes
Question 2
M.tuberculosis does not grow on the PNB medium.
True
False
True
M. tuberculosis does not grow on the PNB medium. All other mycobacteria are resistant to PNB.
Yes
Yes
- Weigh out 0.5 gm PNB and dissolve in the minimum amount of dimethylformamide (~15ml).
Niacin production test for MTB
ContentPrinciple:
Although all mycobacteria produce niacin, comparative studies have shown that M. tuberculosis accumulates the largest amount of nicotinic acid, and its detection is useful for its definitive diagnosis. Niacin-negative M .tuberculosis strains are very rare, while very few other mycobacterial species yield positive niacin tests.
Cultures grown on egg medium containing Asparagine yield the most consistent results in the niacin test, and LJ medium is therefore recommended. A culture must be at least three to four weeks old and must have sufficient growth of at least 100 colonies.
Controls:
Check the reagents by testing extract from an uninoculated tube of medium (negative control) and use an extract from a culture of M. tuberculosis H37Rv as a positive control.
Reagents:
1) O-tolidine - 1.5%: Mix 1.5 gm of O-tolidine in 100 ml of ethanol. Keep in an amber bottle and store in the dark in the refrigerator. Prepare fresh weekly.
2) Cyanogen bromide solution, approx. 10%.: Prepare a saturated aqueous solution of cyanogen bromide (approx. 10%). Store at 4oC in the refrigerator.
Procedure:
Image
Results and Interpretation
Pink colour = positive result
White precipitation = negative result
Add 2-3 ml of 4%NaOH to all test tubes and discard them.
Precautions:
• Cyanogen bromide is a severe lachrymator and toxic if inhaled. Work in a well-ventilated fume hood when preparing the solution and in a biological safety cabinet while testing cultures. Alternatively, commercially available niacin strips could also be used.
• In acid solutions, cyanogen bromide hydrolyses to hydrocyanic acid, which is extremely toxic. Discard all reaction tubes into a disinfectant solution made alkaline by the addition of sodium hydroxide.
Resource
Assessment
Question 1
Answer 1
Answer 2
Answer 3
Answer 4
Correct Answer
Correct Explanation
Page id
Part of Pre-Test
Part of Post-Test
Niacin negative M.tuberculosis strains are very rare.
True
False
True
M. tuberculosis accumulates the largest amount of nicotinic acid, and its detection is useful for its definitive diagnosis.
Yes
Yes
Question 2
Cyanogen bromide is a severe lachrymator and toxic.
True
False
True
Cyanogen bromide is a severe lachrymator and toxic if inhaled. Therefore, work in a well-ventilated fume hood when preparing the solution and in a biological safety cabinet while testing cultures.
Yes
Yes
Nitrate reduction test for MTB
ContentPrinciple:
The nitrate reduction test, which measures enzyme activity, is a key element in differentiating M. tuberculosis from other tubercle bacilli.
Nitrate reduction converts nitrate into nitrite, which is detected by a colourimetric test. M. tuberculosis exhibits strong nitrate reduction activity, whereas M. bovis gives a negative or weak reaction; M. Africanum strains are usually negative, but approximately 20% of strains give a positive test reaction.
The test must be carried out on pure cultures otherwise it will yield false results.
Reagents and Solutions:
Note: Discard any reagent if the colour changes or a precipitate forms.
1. Sodium nitrate substrate in buffer, pH 7
Sodium nitrate (NaNO3) 0.085 g
Potassium dihydrogen phosphate (KH2PO4) 0.117 g
Disodium hydrogen phosphate dodecahydrate (Na2HPO4.12H2O) 0.485 g
Distilled water 100 ml
Check pH using a pH meter. Then, sterilisee by autoclaving at 121°C for 15 minutes.
2 ml aliquots of the substrate solution are aseptically dispensed into sterile screw-cap tubes when needed.
2. Reagent 1: Hydrochloric acid solution
Concentrated hydrochloric acid (HCl, 36%) 10 ml
Distilled water 10 ml
Add concentrated HCI slowly to distilled water.
3. Reagent 2: Sulfanilamide solution, 0.2%
Sulfanilamide (C6H8N2O2S) 0.2 g
Distilled water 100 ml
Dissolve sulfanilamide in distilled water and store it in an amber bottle in the dark in a refrigerator.
4. Reagent 3: N-naphthylethylene diamine solution, 0.1%
N-naphthylethylene diamine dihydrochloride 0.1 g
Distilled water 100 ml
Dissolve N-naphthylethylene diamine in distilled water.
Store in an amber bottle in the dark in a refrigerator.
Procedure:
The entire procedure must be carried out in a biological safety cabinet.
-
Add 0.2 ml of distilled water to a 16 x 100 mm screw-cap tube.
-
Take 2 loopful of colonies from positive culture and emulsify in water.
-
Add 2.0 ml of NaNO3 substrate to the tube and mix well.
-
Place in the water bath at 37 °C for 2 hours.
-
Remove the tube from the water bath.
-
Add 1 drop of reagent 1, 2 drops of reagent 2, and 2 drops of reagent 3.
-
Examine immediately for the development of a pink to red colour.
Result and interpretation:
Pink colour = positive result
No colour = negative result
Add a small amount of zinc powder to all negative tests:
-
If nitrate is still present, it will be reduced by the zinc powder, and the colour will turn red (true negative).
-
means that Thethe original reaction was posit if no colour developsive, but nitrate was reduced beyond nitrite.
Resource
Standard Operating Procedures (Nitrate Reduction Test)
Assessment
Question 1
Answer 1
Answer 2
Answer 3
Answer 4
Correct Answer
Correct Explanation
Page id
Part of Pre-Test
Part of Post-Test
M. tuberculosis exhibits strong nitrate reduction activity.
True
False
True
A strong nitrate reduction activity is a key element in differentiating, a M. tuberculosis from other tubercle bacilli.
Yes
Yes
Question 2
Development of pink colour in Nitrate Reduction Test indicates a positive reaction.
True
False
True
The development of pink colour in Nitrate Reduction Test indicates the positive reactionTest.
Yes
Yes
-
Catalase peroxidase test for MTB
ContentCatalase Peroxidase test for MTB
Principle:
Catalase is an intracellular, soluble enzyme that splits hydrogen peroxide into water and oxygen. The oxygen bubbles into the reaction mixture to indicate catalase activity. Virtually all mycobacteria possess catalase enzymes, except for certain isoniazid–resistant mutants of M. tuberculosis and M.bovis.
Mycobacteria possess several kinds of catalase that vary in heat stability. Quantitative differences in catalase activity can be demonstrated by the 680C test at pH 7 (indicates loss of catalase activity due to heat). Drug susceptible strains of M. tuberculosis lose catalase activity when heated to 680C for 20 minutes. For these tests, cultures on LJ should be used.
Controls:
Check reagents by testing extract from an uninoculated tube of medium (negative control).
- 1. 0.067M phosphate buffer solution, pH 7.0
Solution 1:
Na2HPO4, anhydrous :9.47 g
Distilled water: 1 litre
Dissolve disodium phosphate in water to make a 0.067 M solution.
Solution 2:
KH2PO4: 9.07 g
Distilled water :1 litre
Dissolve in water to make 0.067 M KH2PO4 solution.
Mix 61.1 ml of Solution 1 with 38.9 ml of Solution 2. Adjust the pH to 7.
2. Hydrogen peroxide, 30% solution
Store in the refrigerator.
Tween- 80:10 ml
Distilled water: 90 ml
Mix Tween-80 with distilled water and autoclave at 121o C for 10 minutes.
Allow to cool. Store in the refrigerator.
4. Complete catalase reagent (Tween-peroxide mixture):
Immediately before use, mix equal parts of 10% Tween-80 and 30% hydrogen peroxide.
Use 0.5 ml reagent for each strain to be tested.
Procedure:
Image
Results and interpretation:
If bubbles appear (due to the production of oxygen gas), the bacteria are catalase positive.
If no bubbles appear, the bacteria are catalase negative.
Resource
Assessment
Question 1
Answer 1
Answer 2
Answer 3
Answer 4
Correct Answer
Correct Explanation
Page id
Part of Pre-Test
Part of Post-Test
All mycobacteria have catalase enzymes.
True
False
False
All mycobacteria possess catalase enzymes, except for certain isoniazid–resistant mutants of M. tuberculosis and M.bovis.
Yes
Yes
Question 2
During the formation of bubbles, do not shake the tubes.
True
False
True
The tubes should not be shaken because Tween 80 may also form bubbles giving false positive results.
Yes
Yes
- 1. 0.067M phosphate buffer solution, pH 7.0
-
CDST_LT: Storage of culture isolates
FullscreenStorage of Culture Isolates
ContentMaintenance and Storage of Mycobacterial Strains
Strains may be well-characterized clinical isolates or culture collection strains (e.g. American Type Culture Collection, ATCC). Mycobacterial strains must be stored in adequate conditions to preserve their viability and intact genetic background. Maintenance of mycobacterial cultures by rre-inoculatingmedia during prolonged time may cause accumulation of mutations that can lead to unpredictable results.
Steps to preserve and store MTB cultures
1. From culture on solid media
-
Prepare suspension equal to McFarland 1.0 standard from a culture not older than two weeks after growth appearance.
-
Label sterile screw-capped cryovials with laboratory number, study reference and date of preparation
-
If suspensions are from quality control strains, label them with name, ATCC number, batch number and date of preparation.
-
Distribute the suspension into sterile screw-capped cryovials.
-
Put the cryovials into a numbered storage box.
-
Put the storage box into the -80C freezer.
-
Record the location and strain identifiers in the -80°C Freezer Storage Logbook.
2. From liquid culture
-
Label sterile screw-capped cryovials with laboratory number, study reference and date of preparation
-
If cultures are from quality control strains, label them with name, ATCC number, batch number and date of preparation.
-
Distribute the suspension into sterile screw-capped cryovials.
-
Put the cryovials into a numbered storage box.
-
Put the storage box into the -80°C freezer.
-
Record the location and strain identifiers in the -80°C Freezer Storage Logbook.
Storage
Short-term storage
-
Cultures on solid media can be stored at room temperature in the dark for several months and 4°C for two years.
-
Liquid cultures can be maintained viable at 4°C for several months.
Long-term storage
-
Cultures can be stored at -20°C for several years and at -80°C for decades.
Resource
Mycobacteriology Laboratory Manual
Assessment
-
Question
Answer 1
Answer 2
Answer 3
Answer 4
Correct answer
Correct explanation
Page id
Part of Pre-test
Part of Post-te
Cultures can be stored for how long?
-20°C for several years -80°C for decades. Answer 1 Answer 2 Both Answer 3& 4 Cultures can be stored at -20°C for several years and at -80°C for decades.
-
Media and consumables required to store culture isolates
ContentMTB isolates from all positive cultures (using the LJ subculture from an MGIT tube positive for MTB or a subculture from the original LJ culture, if MGIT is unavailable) will be frozen in 7H9 broth and glycerol to preserve them for any repeat or additional microbiology tests that may need to be performed (either in-house or at a central laboratory). It is recommended that at least four aliquots from baseline visits, and two aliquots from subsequent visits, be frozen for each MTB isolate.
-
Media and consumables required to store culture isolates
1. Positive LJ slants (Solid Culture: Lowenstein Jensen (LJ) Media)
2.2 ml sterile cryotubes with a screw top, externally threaded
3. Water bath
4.7H9 media with glycerol
5. ADC or OADC enrichment broth
6. Sterile transfer pipettes with graduations marking volume (individually wrapped)
7. Sterile loop, disposable applicator stick, or cotton swab
8. Permanent marker
9. Cryobox and rack
10. Study-specific labels
Resource
https://stoptb.org/wg/gli/assets/documents/gli_mycobacteriology_lab_manual_web.pdf
Assessment
Question
Answer 1
Answer 2
Answer 3
Answer 4
Correct answer
Correct explanation
Page id
Part of Pre-test
Part of Post-te
Glycerol is essential for storing culture.
True False True Glycerol stabilises the frozen bacteria, preventing damage to the cell membranes and keeping the cells alive.
-
Preparation of Selective Middlebrook- 7H9 Liquid Medium
ContentLiquid media are used in the mycobacteriology laboratory for sub-culturing stock strains for storing strains at - 80°C and other in-vitro tests.
Steps in Preparation of Selective Middlebrook- 7H9 Liquid Medium
Salt solution: Disodium anhydrous hydrogen phosphate (Na2HPO4): 2. 5g
Potassium dihydrogen orthophosphate (KH2PO4): 1. 0 g
Ammonium sulphate ( NH4SO4) : 0. 5g
L-sodium glutamate : 0. 5g
Trisodium citrate (2H2O) : 0. 1g
Pyridoxine hydrochloride: 1. 0 ml of 0. 1% aq. soln.
Biotin : 1. 0 ml of 0. 05% aq. soln.
Ferric ammonium citrate (green) : 0. 5 ml of 8% aq. solution
Magnesium sulphate (MgSO4.7H2O): 1. 0 ml of 5% aq. solution
Calcium chloride (CaCl2.2H2O): 1. 0 ml of 0. 05% aq. solution
Zinc sulphate (ZnSO4.7H2O): 1. 0 ml of 0. 1% aq. solution
Cupric sulphate (CuSO4.5H2O): 1. 0 ml of 0. 1% aq. solution
Tween-80, 10% (For obtaining dispersed cultures): 5. 0 ml (Or) Glycerol: 5. 0 ml Distilled water to 900 ml.
Mix well, distribute in 95 ml amounts and sterilize at 15 lbs/15 mins.
The salt solution can also be prepared by using Difco dehydrated powder.
Weigh 4. 7 g of the dehydrated base into a 2-litre flask, and add 900 ml distilled water and 0. 5 ml of Tween-80 or Glycerol. Mix well, distribute in 95 ml amounts and autoclave at 15 lbs/15 minutes.
Before use, to each 95 ml salt solution, aseptically add 5 ml sterile ADC (bovine albumin-dextrose-catalase) solution and mix well.
Distribute in 5-10 ml amounts in sterile universal containers, check sterility by overnight incubation at 37 oC and store in the cold.
ADC supplement
Bovine albumin, Fraction V: 10g.
Glucose, A. R. (dextrose): 4g.
Catalase : 3 mg*
*Dissolve 30 mg catalase in 10 ml water by vigorous shaking and add 1 ml of this solution.
Distilled water: 100ml.
Mix well and sterilize by Seitz filtration or membrane filtration.
Resource
STANDARD OPERATING PROCEDURE FOR MYCOBACTERIOLOGY LABORATORY
-
Assessment
Question
Answer 1
Answer 2
Answer 3
Answer 4
Correct answer
Correct explanation
Page id
Part of Pre-test
Part of Post-te
Liquid media are used for which of the following?
Sub-culturing stock strains for storing strains at - 80°C To perform in-vitro tests Only option 1 Both options 1 & 2 Both options 1 & 2 Liquid media are used in the mycobacteriology laboratory for sub-culturing stock strains for storing strains at - 80°C and other in-vitro tests.
-
Quality Control of Selective Middlebrook- 7H9 Liquid Medium
ContentQuality control (QC) Testing of 7H9 Liquid Medium
Every new lot of MGIT medium and every new lot of the enrichment should be quality control tested by the user upon receipt and before it is used routinely.
A. QC strainsCultures: The following three mycobacterial cultures are recommended for quality control testing.
1.M. tuberculosis, H37Rv ATCC 27294
2.M. kansasii ATCC 12478
3.M. fortuitum ATCC 6841If the ATCC reference strains of M. kansasii or M. fortuitum cannot be obtained, then a laboratory isolate which is well-characterized may be used as a quality control strain. Well-characterized strains will be available from the mycobacterial strain bank of TDR/WHO in late 200673
B. Preparation of culture suspension
- Subculture the above mycobacteria on several LJ slants.
• Incubate at 37ºC + 1ºC.
• Observe growth visually.
• As soon as there is good, confluent and pure growth, use this growth for making suspension. Growth should appear within 10-15 days of subculturing and should be used within this period. Aged cultures would not give reliable results. - Remove growth from the slant by carefully scraping the colonies off the slant with a sterile loop or sterile spatula made from wooden applicator sticks. Take extreme precautions not to scrape off any culture medium (which gives false turbidity measurement).
- Transfer growth into a screw cap tube containing 4 ml of sterile 7H9 broth and glass beads (6-10 beads, 1-2 mm diameter), which helps to break up clumps (Tube A).
- Vortex the tube for at least 1-2 minutes. Ensure the suspension is well dispensed and turbid (greater than McFarland #1 turbidity).
Let the suspension stand undisturbed for 20 minutes. - Using a transfer pipette, carefully transfer the supernatant to another sterile screw cap glass tube (Tube B). Avoid picking up any sediment.
Let this stand undisturbed for 15 minutes. - Carefully transfer the supernatant into another screw cap glass tube (Tube C) without taking any sediment. Next, adjust the turbidity of suspension in Tube C to McFarland #0.5 turbidity standard by adding more 7H9 broth or sterile saline/deionized water and mixing well. If the suspension is too turbid, transfer some of the suspension to another sterile tube and adjust the turbidity to McFarland #0.5 standard. This is the working suspension for QC testing. This suspension may be frozen in small aliquots (1-2 ml) in appropriate tubes/vials at -70ºC + 10ºC. The frozen suspension may be used for up to 6 months. Once thawed, do not refreeze.
C.Preparation of dilutions
- Dilute the working suspension McFarland #0.5, freshly prepared or frozen) 1:5 by taking 1.0 ml of suspension and adding into 4.0 ml of sterile water or saline. Mixwell (Tube 1).
- Dilute two more times 1:10 by adding 0.5 ml of suspension Tube 1 into 4.5 ml of sterile water or saline (Tube 2). Mix well and then again add 0.5 ml from Tube 2 to 4.5 ml of sterile saline or distilled/deionized water (Tube 3). Mix well. Final dilution 1:500 (Tube 3). Stop here for M. tuberculosis and use Tube 3 for QC testing.
• For M. fortuitum, further dilute Tube 3 1:10. Take 0.5 ml of suspension from Tube 3 and add to 4.5 ml of sterile water or saline and mix well. Final dilution 1:5000 (Tube 4). Use Tube 4 for QC testing.
• For M. kansasii, dilute Tube 4 once again 1:10 by adding 0.5 ml from Tube 4 to 4.5 ml of sterile saline/water, mix well. Final dilution 1:50,000 (Tube Use Tube 5 for QC testing.
D. Inoculation/incubation
1. Supplement MGIT medium with Growth Supplement and PANTA as recommended.
2. Inoculate 0.5 ml from Tube 3 to each of the two MGIT tubes for M. tuberculosis. Similarly, inoculate 0.5 ml from Tube 4 for M. fortuitum and Tube 5 for M. kansasii into each of the two labelled MGIT tubes. Mix.
3. Enter the inoculated tubes in the MGIT 960 instrument. Take the tubes out when indicated positive by the instrument. Retrieve data for time to positive.E. Expected results
M. tuberculosis Tube fluorescence positive in 6 to 10 days
M. kansasii Tube fluorescence positive in 7 to 11 days
M. fortuitum Tube fluorescence positive in 1 to 3 daysIf the above criteria are not met, repeat the test. If the QC test still does not give satisfactory results, check the viability of the inoculum, the age of the culture if stored frozen and other procedures. If everything meets the established specifications, contact Technical Services at BD Diagnostic Systems.
F. Precautions.
- Use freshly prepared suspension adjusted to McFarland #0.5 standard. If frozen (-70ºC + 5ºC), thaw prior to use for each quality control testing. Do not store or refreeze once thawed.
- All work should be carried out in a proper biological safety cabinet.
- All materials should be sterilized by autoclaving prior to disposal.
- Follow all the recommended safety precautions.
Resource
Mycobacteriology Laboratory Manual
Assessment
Question
Answer 1
Answer 2
Answer 3
Answer 4
Correct answer
Correct explanation
Page id
Part of Pre-test
Part of Post-te
Which of the following mycobacterial cultures are recommended for quality control testing?
M. tuberculosis M. kansasii M. fortuitum All of the above Answer 4 The following three mycobacterial cultures are recommended for quality control testing.
1.M. tuberculosis, H37Rv ATCC 27294
2.M. kansasii ATCC 12478
3.M. fortuitum ATCC 6841- Subculture the above mycobacteria on several LJ slants.
Inoculation Procedure for Storage of Culture Isolates
ContentSteps to Preserve and Store MTB Cultures
From culture on solid media
- Store Mycobacteria in the 7H9 Liquid medium.
- Add 0. 5 ml of double sterile distilled water in a Bijou bottle containing glass
- Add bacterial growth from one slope of LJ medium with 3+ growth, and mix using
- Pipette out 100 μl of bacterial suspension into McCartney bottles containing
- After 10 days, examine for any gross contamination (turbidity). If turbidity is
- Inoculate a loopful of media on a nutrient agar plate.
- Incubate at 37°C for 24 hours and check for sterility.
- Record the observations are recorded in the Sterility Check Register.
- Using a 1ml tuberculin syringe, prepare uniform suspension by aspirating and discharging the suspension for about 10 times within the vial.
- Adjust the turbidity to McFarland No.1 standard.
- Pipette out aseptically 750 μl of bacterial suspension into a cryovial.
- Label it with the lab number & date and arrange it in a cryovial rack.
- Store Cryovials at –80 C freezer.
- Maintain a date-wise list of all cultures stored with particulars of the culture in
From liquid culture
- Label sterile screw-capped cryovials with laboratory number, study reference and date of preparation.
- If cultures are from quality control strains, label them with name, ATCC number, batch number and date of preparation.
- Distribute the suspension into sterile screw-capped cryovials.
- Put the cryovials into a numbered storage box.
- Put the storage box into the -80C freezer.
- Record the location and strain identifiers in the -80°C Freezer Storage Logbook.
Resource
Mycobacteriology Laboratory Manual
Assessment
Question
Answer 1
Answer 2
Answer 3
Answer 4
Correct answer
Correct explanation
Page id
Part of Pre-test
Part of Post-te
McFarland No.1 standard is used to adjust the turbidity. McFarland's
True False Answer 1 True Culture isolates are adjusted to McFarland No.1 standard to carry out the uniform suspension. - Store Mycobacteria in the 7H9 Liquid medium.
Sterility Check of Culture Isolates
ContentA sterility check of growth is ascertained to differentiate M. tuberculosis from other contaminants in MGIT-positive tubes.
BHI (Brain Heart Infusion) Agar plates are used for sterility checks using the following steps:
1. Divide the plate into 4 quadrants so that four specimens can be subcultured onto one plate.
2. Label the plate with specimen ID
3. Vortex the MGIT tube well, unscrew the tube cap and sample an aliquot of broth using a sterile, disposable pipette/inoculation loop. Remove about 200 μl of broth (~ 4 drops) and inoculate the BHI agar.4. Incubate the agar plate in the incubator at 37 °C for 72 hours.
Results:
1. Growth in 24 – 48 hours (Contamination)
2. No Growth (Contamination free) Resource
Mycobacteriology Laboratory Manual
Assessment
Question
Answer 1
Answer 2
Answer 3
Answer 4
Correct answer
Correct explanation
Page id
Part of Pre-test
Part of Post-te
What does growth in 24 – 48 hours in BHI Agar indicate?
Contamination
M. tuberculosis complex detected
M. tuberculosis complex not detected
NTM detected
1
Growth in 24 – 48 hours in BHI Agar indicates contamination.
Yes
Yes
Incubation and Storage of Culture Isolates
ContentThe MGIT system automatically and continuously incubates and monitors tubes once they are placed in a station; there is no need to remove the tubes from the instrument.
Cultures during incubation:
1. Cultures remain in their stations until signalled “positive”, or if no growth is detected after 42 days incubation, are signalled “negative”.
2. If an instrument-positive tube is determined to be smear-negative for either mycobacteria or contaminants, the tube may be re-entered into the instrument, but within 5 hours of removal.
3. If the tube is not returned within the 5-hour re-entry window, the associated data is removed from the instrument’s database, and the tube will be monitored as a newly entered tube.
The MGIT instrument will record the date each tube was entered.
• Do not turn tubes after placing them in the station.
• Do not remove tubes unless they are positive or out-of-protocol negatives (negative at 42 days).
• Do not reassign tubes to a new station.Resource
Mycobacteriology Laboratory Manual
Assessment
Question
Answer 1
Answer 2
Answer 3
Answer 4
Correct answer
Correct explanation
Page id
Part of Pre-test
Part of Post-te
What happens If the MGIT tube is not returned within the 5-hour window?
The tube can be returned without loss of data. The test has to be assigned to a new station. Data is removed from the instrument’s database, and the tube will be monitored as a newly entered tube. The tube has to be discarded. 3 If the tube is not returned within the 5-hour re-entry window, the associated data is removed from the instrument’s database, and the tube will be monitored as a newly entered tube.
Revival of the Frozen Cultures
ContentRevival of the frozen cultures
Take the cryo vial with culture from the – 80°C freezer and place it in an ice bucket. Wipe off the outer surface with a 70% ethanol cotton swab and allow thawing on ice.
Inoculate a loopful of culture aseptically onto LJ media slopes. Then, incubate the inoculated LJ slopes for 4 weeks at 37°C.
Store the cryo vial with culture back at -80°C
Note: Repeated freeze and thaw will affect the viability of the stored cultures
Resource
Revised National TB Control Programme
Assessment
Question
Answer 1
Answer 2
Answer 3
Answer 4
Correct answer
Correct explanation
Page id
Part of Pre-test
Part of Post-te
Revival of frozen cultures is done by which of the following methods?
Thawing Heating Boiling Spinning Answer 1 (Thawing) Revival of frozen cultures is done by thawing on ice.
-
-
CDST_LT-M13: LC-DST
Fullscreen-
CDST_LT: LT DST Introduction
-
CDST_LT: Requirements for submission, acceptance and processing of isolates for DST
FullscreenRequirements for submission, acceptance and processing for culture Isolates
Acceptance of MTB Isolates for DST
Preparing the Isolate for DST
Preparing the Isolate for Liquid Culture DST
Content1. Isolates can be grown on solid or liquid media before being tested in the MGIT DST.
-
Need healthy cells in the logarithmic phase of growth
-
Need fairly light inoculum so that drug concentrations are not overwhelmed
2. Growth should be AFB-positive and identified as a pure culture of the MTB complex before further testing.
Inoculum from the MGIT tube: It is important that the growth is within the following
-
The day an MGIT tube is positive by the instrument is considered Day 0.
-
The tube should be kept incubated for at least one more day (Day 1) before being
-
A positive tube may be used for drug susceptibility testing up to and including the fifth day (Day 5) after it becomes instrument positive. A tube that has been positive for more than 5 days should be subcultured in a fresh MGIT tube supplemented with MGIT 960 Growth Supplement and should be tested in an MGIT 960 instrument until it
-
If growth in a tube is on Day 1 or Day 2, mix well (vortex) to break up clumps.
-
If growth is on Day 3, 4, or 5, mix well to break up the clumps. Let the large
Resource
Mycobacteriology Laboratory Manual
Assessment
Question
Answer 1
Answer 2
Answer 3
Answer 4
Correct answer
Correct explanation
Page id
Part of Pre-test
Part of Post-te
The day an MGIT tube is positive by the instrument is considered as which day?
Day 0 Day 1 Day 2 Day 3 The day an MGIT tube is positive by the instrument is considered Day 0. -
-
CDST_LT: SIRE susceptibility testing
FullscreenSIRE Susceptibility Testing
ContentThe BACTEC MGIT 960 susceptibility testing for Streptomycin (S), Isoniazid (I), Rifampin (R) and Ethambutol (E), called SIRE, is a rapid and qualitative method that uses critical test concentrations of the four drugs.
Components of SIRE Kit
The kit has one vial for each of the drugs (S, I, R and E) and 8 vials of the MGIT 960 SIRE Supplement.
Drugs:
Drug
Approximate lyophilized drug per vial
Streptomycin (S)
332 µg
Isoniazid (I)
33.2 µg
Rifampin (R)
332µg
Ethambutol (E)
1660µg
SIRE Supplement: It differs from the MGIT Growth Supplement and contains the following:
Bovine Albumin
50g/l
Dextrose
20g/l
Catalase
0.03g/l
Oleic Acid
0.6g/l
Resource
Mycobacteriology Laboratory Manual
Assessment
Question
Answer 1
Answer 2
Answer 3
Answer 4
Correct answer
Correct explanation
Page id
Part of Pre-test
Part of Post-te
Which of the following is NOT a component of the SIRE kit? Streptomycin (S) Isoniazid (I) Rifabutin (R) Ethambutol (E) Answer 4 Components of the SIRE Kit are Streptomycin (S), Isoniazid (I), Rifampin (R), and Ethambutol (E). Critical Concentrations and Reconstitution of SIRE Drugs
ContentBACTEC MGIT 960 SIRE Kit for critical concentrations contains the following drugs in
Drugs
Streptomycin - approximate lyophilized drug per vial --------------- 332µg
INH - approximate drug per vial ---------------------------------------- 33.2 µg
Rifampin – approximate drug per vial ---------------------------------- 332 µg
Ethambutol – approximate drug per vial -------------------------------1660 µg
SIRE supplement
The SIRE supplement vial differs from the MGIT Growth Supplement and contains, per litre
Bovine albumin -------------------- 50.0 g
Dextrose----------------------------- 20.0 g
Catalase ----------------------------- 0.03 g
Oleic acid ---------------------------- 0.6 g
Storage
Upon receipt, refrigerate the lyophilized drugs at 2-8ºC. Reconstitute prior to use. Once
Reconstitution of SIRE Drug Lyophilized Drugs (stock preparation)
Reconstitute the drugs with the appropriate volume of diluent as described below. Volumes vary with different drugs. Failure to use the appropriate volume will invalidate these tests.
Preparation of drugs in MGIT 960 SIRE Kit
1 Reconstitute each Streptomycin lyophilized drug vial with 4 ml of sterile distilled/ deionized water to make a stock solution of 83μg/ml.
2 Reconstitute each Isoniazid lyophilized drug vial with 4 ml of sterile distilled/ deionized water to make a stock solution of 8.3μg/ml.
3 Reconstitute each Rifampicin lyophilized drug vial with 4 ml of sterile distilled/ deionized water to make a stock solution of 83μg/ml.
4 Reconstitute each Ethambutol lyophilized drug vial with 4 ml of sterile distilled/ deionized water to make a stock solution of 415μg/ml.
Resource
Mycobacteriology Laboratory Manual
Assessment
Question
Answer 1
Answer 2
Answer 3
Answer 4
Correct answer
Correct explanation
Page id
Part of Pre-test
Part of Post-te
The opened and reconstituted drug solutions can be stored under which conditions? Stored at -20ºC or Stored at -20ºC or Stored at -20ºC or Stored at -20ºC or 3 Once
-
CDST_LT: Pyrazinamide (PZA) susceptibility testing
FullscreenPyrazinamide PZA Susceptibility Testing
ContentThe BACTEC MGIT 960 PZA medium tube contains 7 ml of broth. It consists of 5.9 g of
The BACTEC MGIT PZA Drug Kit contains two vials of 20,000 µg of lyophilized PZA and
Bovine albumin---------------------------50.0 g
Dextrose -----------------------------------20.0 g
Polyoxyethyline state (POES) -----------1.1 g
Catalase -------------------------------------0.03 g
Olecic acid --------------------------------- 0.1 g
Storage instructions: PZA medium may be stored at 2-25ºC. Do not freeze, avoid exposure
Upon receipt, PZA drug vials should be stored at 2-8ºC. Once reconstituted, the antibiotic
Resource
Mycobacteriology Laboratory Manual
Assessment
Question
Answer 1
Answer 2
Answer 3
Answer 4
Correct answer
Correct explanation
Page id
Part of Pre-test
Part of Post-te
PZA supplement contains which of the following? Bovine albumin Dextrose Polyoxyethylene state (POES) All of the above Answer 4 PZA supplement contains Bovine albumin, Critical Concentration and Reconstitution of PZA
ContentCritical Concentration for PZA Drugs Recommended for the Treatment of DS- TB
Anti TB drugs
CC (ug/ml) for DST medium
Pyrazinamide
100μg/mL
Reconstitution of PZA Lyophilized Drugs (Drug stock preparation)
Reconstitute the PZA drug vial with 2.5 ml sterile distilled/ deionized water to make a stock solution of 8000 μg/ml. Failure to use the appropriate volume will invalidate these tests.
Drug lyophilised
Volume
added
Concentration of
reconstituted agent
μg/mL
Volume added
to each MGIT tube
Final concentration
in MGIT tubes
Pyrazinamide
2.5ml
8000 μg/ml
100
100μg/mL
Resource
Mycobacteriology Laboratory Manual
Assessment
Question
Answer 1
Answer 2
Answer 3
Answer 4
Correct answer
Correct explanation
Page id
Part of Pre-test
Part of Post-te
Which of the following is the Critical Concentration for PZA drugs recommended for the treatment of DS- TB?
100μg/mL 10μg/mL 1000μg/mL 800μg/mL Answer 1 Critical Concentration for PZA drugs recommended for the treatment of DS- TB is:100μg/mL.
-
CDST_LT: Second line drug testing
FullscreenSecond-line Phenotypic Drug Susceptibility Testing
ContentMultidrug-resistant (MDR) TB is caused by strains of MTB resistant to at least isoniazid and rifampicin; for effective MDR patient management, optimized treatment regimens are required. These complex regimens can include a fluoroquinolone, aminoglycoside, cyclic peptide or compounds from other drug classes, and any remaining first-line susceptible drugs.
Therefore, reliable drug susceptibility testing (DST) of these anti-TB drugs is crucial for the management of MDR-TB and for preventing the emergence of additional drug resistance in these patients.
Isolated cultures from TB patients are subjected to growth in the presence of a known concentration of a test drug. Growth control is also included without the addition of the drug. If the patient’s isolate grows in control but does not grow in the presence of the drug, it is considered susceptible. On the other hand, if it grows in both tubes, then it is considered to be resistant to that drug. Many methods are in use for susceptibility testing. The most commonly used method is the proportion method, where resistance is established at the 1% cut-off point for all the drugs. This means that if 1% or more of the total bacterial population is resistant to a drug, the strain is designated to be resistant to that drug.
Resource
Mycobacteriology Laboratory Manual
Assessment
Question
Answer 1
Answer 2
Answer 3
Answer 4
Correct answer
Correct explanation
Page id
Part of Pre-test
Part of Post-te
In the proportion method, resistance is established at which of the following cut-off points? At 1% cut-off point for all the drugs Is established by MIC Both MIC and 1% cut-off point for all drugs At a 1% cut-off point for some of the drugs Answer 1 The most commonly used method is the proportion method, where resistance is established at the 1% cut-off point for all the drugs. This means that if 1% or more of the total bacterial population is resistant to a drug, the strain is designated to be resistant to that drug. Critical Concentration and formulations of Second-line Anti-TB Drugs for DST
ContentPreparation of second-line drug stock:
Drug preparation: Prepare the drug concentration as per national and/or internationally defined drugs critical concentration, solvent and diluents of second-line drugs for DST by MGIT.
Drugs
Critical concentrations (μg/ml)
Solvent
Diluent
Kanamycin
2.5
DW
DW
Amikacin
1.0
DW
DW
Capreomycin
2.5
DW
DW
Ofloxacin
2.0
NaOH
DW
Levofloxacin
1.5
NaOH
DW
Moxifloxacin
0.5 /1.0
1N NaOH
DW
Linezolid
1.0
DMSO
DW
Clofazimine
1.0
DMSO
DMSO
PAS
4.0
Ethanol
DW
Ethionamide
5.0
DMSO
DW
All antimicrobial agents are assayed for standard units of activity. The assay units may differ widely from the actual weight of the powder and often may differ between drug production lots. Thus, the lab must standardize the antimicrobial solutions based on the potency of an individual lot of each drug powder.
The following formula is used to calculate the actual weight of the drugs to be weighed:
Volume (mL) x Concentration (mg/mL) x dilution factor
Weight (mg) = ------------------------------------------------------------------
Assay potency (mg/mg)
-
Weight (milligrams) is the weight of powder needed to prepare the desired volume of stock solution at the desired concentration.
-
Volume (in millilitres) is the desired volume of stock solution
-
Assay potency (micrograms per milligram) is the activity or potency specified by the manufacturer of the reference standard powder. This value usually appears on the label or the certificate of analysis.
-
Concentration (micrograms per millilitre) is the desired concentration (critical concentration) of stock solution.
-
The dilution factor is the number of times the drug added to the tube (100ml) is getting diluted by the total volume of the medium in the tube (8.3ml) = 83
Stock solutions of each drug are to be made 83 times higher for MGIT. Prepare a stock solution with a higher concentration than the highest concentration required in the medium. The dilution factor for MGIT is 1:83 (7mL of MGIT media + 0.8 mL of DST supplement + 0.5 mL of test inoculum /culture).
Example: Amikacin
Concentration to be tested: 1 µg/ml
Volume of the stock solution: 20 ml
Potency of the drug: (e.g.) 716 µg /mg
Dilution factor: 83
Diluent: Sterile distilled water (DW)
Amount of drug to be weighed to prepare 20 ml of stock solution:
20 x 1 x 83
----------------- = 2.32 mg
716
NOTE:
1. As it is difficult to weigh 2.32 mg (0.00232 grams), weigh 100 times this weight, i.e. 232 mg, and dissolve in 20 ml of sterile DW, aliquot in 500µl volume and store at – 20/ -70 oC.
2. At the time of setting up DST, prepare a working stock by diluting the stock 100 times, i.e. 100 µl of stock + 9.9 ml sterile DW, and add 100µl of this working solution to the designated MGIT tube.
3. As the assay potency is likely to vary with varying batches, care must be taken to include the correct potency factor while preparing the stock solution.
Resource
Mycobacteriology Laboratory Manual
Assessment
Question
Answer 1
Answer 2
Answer 3
Answer 4
Correct answer
Correct explanation
Page id
Part of Pre-test
Part of Post-te
Which of these solvents is NOT used for drug preparation? NaOH DMSO Ethanol PAS Answer 4 PAS is a drug and not a solvent. The solvents used for drug preparation are NaOH, DMSO, and Ethanol. -
Preparation and Storage of Second-line Anti-TB Drugs used for DST
ContentPreparation and Storage of Second-line Anti-TB Drugs used for DST
-
Freeze the stock solutions preferably at -20ºC or lower in appropriate tubes and use for up to 6 months or up to the date of original expiry, whichever comes sooner.
-
At the time of testing, make 100 folds dilution (1:100) to achieve the desired concentration and store at -20ºC or lower in appropriate tubes and use for up to 6 months or up to the date of original expiry, whichever comes sooner.
-
Once the working solution drug is thawed, use it immediately and do not re-freeze. Discard unused portions.
-
Always pipette accurately 100uL of the drug to the designated drug labelled MGIT tube.
Important notes for preparation of drug solutions
1. All the drugs, except Ethionamide, should be filter sterilized. Use a 0.2-micron syringe filter for sterilization of the drugs. Discard the first 20% filtered solutions, and collect the remaining solution for use.
2 In the case of self-sterilizing solutions as well as other aqueous stock solutions, all further dilutions should be made in water, using sterile distilled water and aseptic techniques.
3 If a solvent other than water is recommended, only use sufficient solvent to solubilize the antimicrobial powder and then dilute to the final stock concentration with sterile distilled water.
4 Record batch no., date of preparation and expiry date for all drugs. Store the stock solutions in small aliquots at –20° C / 70° C. Once thawed and used, discard the remainder. Refreezing may affect the potency of the drugs.
Resource
Mycobacteriology Laboratory Manual
Assessment
Question
Answer 1
Answer 2
Answer 3
Answer 4
Correct answer
Correct explanation
Page id
Part of Pre-test
Part of Post-te
Stock solutions are kept at which of these temperatures? Room temperature -20ºC 4ºC 20ºC -20ºC Stock solutions are preferably stored at -20ºC or lower. Yes Yes -
-
CDST_LT: Inoculum preparation and incubation for MGIT DST
FullscreenInoculum Preparation for First and Second-line Phenotypic DST
Content-
Label the required number of 7 mL MGIT tubes with lab ID. In addition, label tubes with one of each of the following: GC (Growth Control), drug 1, drug 2 etc.
-
Place the tubes in the suitable AST set carrier (5 tubes or 8 tubes), from left to right: GC, drug 1, drug 2 etc. (as per the number of drugs to be tested).
-
Aseptically add 800 μl of BACTEC MGIT OADC Supplement to each MGIT tube. Do not use MGIT 960 growth supplement or PZA supplement.
-
4 Aseptically pipette 100 μl of the reconstituted drug into the corresponding labelled MGIT tube; e.g., add 100 μl AMK (amikacin) solution to the MGIT tube labelled as “AMK”, etc.
-
It is important to add the correct drug to the corresponding tube.
-
Do not add drugs to the MGIT GC tube.
Resource
Mycobacteriology Laboratory Manual
Assessment
Question
Answer 1
Answer 2
Answer 3
Answer 4
Correct answer
Correct explanation
Page id
Part of Pre-test
Part of Post-te
MGIT GC Tube has which of the following? Dilute test culture suspension Undiluted test culture suspension Culture with drugs Culture without drugs Answer 1 MGIT GC Tube has Diluted the test culture suspension -
Inoculum Preparation from MGIT Positive Culture
ContentInoculation Preparation for Drug-containing Tube (1-2 days)
-
DST must not be set up on the same day an MGIT tube signals positive (0 Day).
-
If the culture is worked up one or two days after signalling positive, it can be used directly to inoculate the MGIT tubes for DST.
-
Mix well (vortex) the confirmed MTB pure culture isolate to break up the clumps. Leave the tube undisturbed for about 5-10 minutes to let big clumps settle on the bottom.
-
Use the undiluted supernatant for inoculation of the drug tube set.
-
Aseptically add 0.5 ml of the well-mixed culture suspension (inoculum) into each drug-containing tube using a pipette. Do not add to the growth control (GC).
Inoculation Preparation for Growth Control (GC) Tube (1-2 days)
For the growth control (GC) tube, first, dilute the test culture suspension 1:100 by adding 0.1 ml of the test culture suspension to 10.0 ml of sterile saline. Mix well by inverting the tube 5-6 times. Use this diluted suspension to add 0.5 ml into the growth control tube.
Inoculation Preparation for Drug-containing Tube (3-5 days)
-
If the culture is used to set up DST between three and five days after signalling positive.
-
Mix well (vortex) the confirmed MTB pure culture isolates to break up the clumps. Leave the tube undisturbed for about 5-10 minutes to let big clumps settle on the bottom.
-
Use the undiluted supernatant for preparation of 1:5 dilution, 1 ml of MGIT broth in 4 ml of sterile saline (1:5 dilution).
-
Use this well-mixed diluted culture for inoculation of the drug tube set.
-
Aseptically add 0.5 ml of the well-mixed culture suspension (inoculum) into each drug-containing tube using a pipette. Do not add to the growth control (GC).
Inoculation Preparation for Growth Control (GC) Tube (3-5 days)
-
For the growth control (GC) tube, first, dilute the test culture suspension 1:100 from 1:5 diluted MGIT tube. by adding 0.1 ml of the test culture suspension to 10.0 ml of sterile saline. Mix well by inverting the tube 5-6 times. Use this diluted suspension to add 0.5 ml into the growth control tube.
-
A tube that has been positive for more than 5 days should not be subjected to DST. Instead, it should be subcultured in a fresh MGIT tube supplemented with MGIT 960 Growth Supplement and should be tested in an MGIT 960 instrument until it is positive.
3 Use this tube from one to five days of instrument positivity as described above.
Resource
Mycobacteriology Laboratory Manual
Assessment
Question
Answer 1
Answer 2
Answer 3
Answer 4
Correct answer
Correct explanation
Page id
Part of Pre-test
Part of Post-te
DST must not be set up on the same day an MGIT tube signals positive (0 Day). True False True DST must not be set up on the same day an MGIT tube signals positive (0 Day). -
Inoculation of Growth Control Tube/Drug Containing Tubes
ContentIt is extremely important to perform quality control of drug susceptibility testing
It is not necessary to include a resistant strain, as most of the resistant strains against a drug which are available from ATCC and other culture collections are highly resistant and do not give any added benefit in quality control. The test procedure for QC organisms is the same as described above for clinical isolates. The inoculum should be from a freshly grown culture in the
Resource
Mycobacteriology Laboratory Manual
Assessment
Question
Answer 1
Answer 2
Answer 3
Answer 4
Correct answer
Correct explanation
Page id
Part of Pre-test
Part of Post-te
Which QC Strain is used in MGIT DST? M. tuberculosis H37Rv M.kansasii M.fortuitum M.avium Answer 1 M. tuberculosis H37Rv (ATCC [American Type Culture Collection] number
27294) as a QC strain which is susceptible to all anti-tuberculosis drugs.
PZA Inoculum Preparation
ContentThe PZA susceptibility test is recommended for a pure culture of the M. tuberculosis complex.
Preparation from a positive MGIT tube:
Use a freshly positive MGIT tube.
-
Day 0 – the day an MGIT tube is positive by the instrument. Re-incubate.
-
Day 1 or 2 – one or two days after instrument positive. Use undiluted for the susceptibility
-
Day 3, 4 or 5 – mix well and dilute 1:5 by adding 1.0 ml of positive broth in 4.0 ml of sterile
-
Day 6 and onward – subculture in a fresh MGIT tube and follow the above guidelines.
Caution: Avoid mycobacterial clumps by mixing the growth well (vortex) and letting it stand
Preparation from growth on a solid medium:
-
Scrape off as many colonies as possible from the surface of the solid medium using a sterile loop or wooden applicator stick.
-
Transfer into a sterilized tube containing 4-5 ml of sterile 7H9 broth with 8-10 glass beads. Tighten the screw cap and vortex the broth for 1-2 minutes.
-
Leave the culture suspension undisturbed for 20 minutes. Then, carefully remove the supernatant fluid and transfer it to a fresh sterile tube.
-
Vortex again and leave undisturbed for 15 minutes. Then, transfer the supernatant fluid into a third sterile tube.
-
Adjust the turbidity of the suspension to McFarland #0.5 standard by gradually adding sterile saline.
-
For susceptibility test inoculation, dilute this suspension 1:5 by adding 1.0 ml of the
Resource
Mycobacteriology Laboratory Manual
Assessment
Question
Answer 1
Answer 2
Answer 3
Answer 4
Correct answer
Correct explanation
Page id
Part of Pre-test
Part of Post-te
The PZA susceptibility test is recommended for which of the following? Pure Culture of M. tuberculosis complex Mixed Culture of M. tuberculosis complex 7 days old culture 5 days old culture Answer 1 The PZA susceptibility test is recommended for a pure culture of the M. tuberculosis complex. -
Inoculation of PZA Growth Control/Drug Containing Tube
ContentInoculation of PZA Growth Control/Drug-containing Tube
-
Label two MGIT PZA tubes, one as GC (growth control) and one as PZA (drug-containing). Using a pipette, aseptically add 0.8 ml of PZA supplement to each of
-
Aseptically add 0.1 ml (100 µL) of the reconstituted drug into the PZA tube. If
-
Inoculate 0.5 ml of the culture suspension to the PZA tube using a sterile pipette.
-
For growth control inoculation, first, dilute the inoculum 1:10 by adding 0.5 ml of
Note: For the PZA susceptibility test, the inoculum for the control is diluted 1:10 and not
-
Tighten the caps and gently invert both MGIT tubes several times to mix. Place them in two AST Set Carriers with the sequence of the first GC and the PZA.
-
Enter the PZA set into the instrument using AST set entry feature.
-
Check the purity of the inoculum by streaking a loopful of the culture suspension
Precautions: All the additions and handling of cultures should be done only inside a
Dilution (1:10) of the culture suspension for growth control and mixing is critical.
Resource
Mycobacteriology Laboratory Manual
Assessment
Question
Answer 1
Answer 2
Answer 3
Answer 4
Correct answer
Correct explanation
Page id
Part of Pre-test
Part of Post-te
Select the MGIT PZA DST correct sequence in the set carrier.
GC > PZA PZA Alone GC Alone PZA > GC Answer 1 The correct sequence in the set carrier is GC, followed by PZA.
Yes Yes -
Incubation of MGIT 960 DST Sets
ContentIncubation of MGIT DST tubes
-
Tighten the caps and mix the inoculated broth well by gently inverting the tube
-
Susceptibility test "Set Carriers" are provided in different numbers of drug
five tubes is used. Place labelled tubes in the correct sequence in the set carrier (GC, STR, INH, RIF, EMB).
-
Enter the susceptibility set carrier into the BACTEC MGIT 960 instrument using the susceptibility test set entry feature. Ensure that the order of the tubes in the AST Set Carrier conforms to Set Carrier definitions. For example, GC, STR, INH, RIF, and EMB for the SIRE
-
To check the inoculum's purity, streak the test culture suspension
Resource
Mycobacteriology Laboratory Manual
Question
Answer 1
Answer 2
Answer 3
Answer 4
Correct answer
Correct explanation
Page id
Part of Pre-test
Part of Post-te
Select the MGIT DST correct sequence in the set carrier.
GC > STR > INH > RIF > EMB STR > INH > RIF > EMB Drug tube only STR > INH > RIF > EMB > GC Answer 1 The correct sequence in the set carrier is GC > STR > INH > RIF > EMB.
Yes Yes -
-
CDST_LT: Reading and reporting of MGIT 960 DST results
FullscreenPrinciple of MGIT DST Reading
ContentPrinciple of MGIT DST Reading:
Two Mycobacterial Growth Indicator Tubes (MGITs) are inoculated with the test culture. Then, a known concentration of a test drug is added to one of the MGIT tubes (drug-containing tube), and growth is compared with the MGIT tube without the drug (growth control).
If the test drug is active against the isolated mycobacteria, it will inhibit the growth, and thus there will be suppression of fluorescence, while the growth control will grow uninhibited and will have increasing fluorescence.
The BACTEC MGIT 960 instrument continually monitors all tubes for increased fluorescence. Analysis of fluorescence in the drug-containing tubes compared to the fluorescence in the Growth Control tube is used to determine susceptibility results.
When the growth unit (GU) of the growth control reaches 400 within 4-13 days (SIRE) or 4-21 days (PZA), the GU values of the drug-containing vials are evaluated.
• S = Susceptible = the GU of the drug tube is less than 100
• R = Resistant = the GU of the drug tube is 100 or more
Resources
Assessment
Answer 1
Answer 2
Answer 3 Answer 4 Correct answer
Correct explanation
Page id
Part of Pre-test
Part of Post-test
Drug-containing vials are evaluated when the growth unit (GU) of the growth control reaches 400.
True
False
1
When the growth unit (GU) of the growth control reaches 400 within 4-13 days (SIRE) or 4-21 days (PZA), the GU values of the drug-containing vials are evaluated.
YES
YES
Procedure for Reading MGIT DST Results
ContentProcedure for Reading MGIT DST Results
Once the Antimicrobial Susceptibility Testing (AST) sets are loaded/entered, the BACTEC MGIT 960 instrument continually monitors all tubes for increased fluorescence. When the growth unit (GU) of the Growth Control (GC) tube reaches ≥400 within the timed protocol, the instrument marks the DST as complete and interprets the results. GU values of the drug-containing vials are evaluated, and final results are reported as Susceptible or Resistant as follows:
-
S = Susceptible = the GU of the drug tube is less than 100
-
R = Resistant = the GU of the drug tube is 100 or more
The steps involved in reading the MGIT DST results are listed below:
-
Completed AST sets (indicated by a red “+” on the drawer) are removed from the respective drawers, and an “Unloaded AST Set” report is printed.
-
All the unloaded AST sets are matched with the printed report and any discrepancies observed are resolved.
-
Before reporting, all ‘resistant’ tubes are observed visually for evidence of contamination. ZN stain is performed on any suspicious tube and subculture to a Blood Agar or Brain Heart Infusion agar Plate. Additionally, when drug resistance is observed and the patient’s isolate was not previously resistant to the drug, tube(s) are tested with ZN and Blood Agar or Brain Heart Infusion Agar Plate to ensure that growth is not due to contaminants or MOTT.
-
DST reports are recorded as “Susceptible” or “Resistant” on the internal lab worksheet/book and the laboratory register.
Resources
Assessment
Question
Answer 1
Answer 2
Answer 3
Answer 4
Correct answer
Correct explanation
Page id
Part of Pre-test
Part of Post-test
The MGIT instrument marks the DST as complete and interprets the results when the GU in the Growth control tube reaches ________.
≥100
≥400
≥200
≥1000
2
When the growth unit (GU) of the Growth Control (GC) tube reaches ≥400 within the timed protocol, the instrument marks the DST as complete and interprets the results.
YES
YES
-
Unloaded MGIT DST Report
ContentUnloaded MGIT DST Report
A completed DST in the Bactec MGIT-960 instrument is indicated by a red “+” on the drawer. The following steps are involved in removing the completed DSTs from the instrument and printing the “Unload AST Set” report:
Step 1: Open the desired drawer. Press the “Remove Completed AST Sets”
soft key. Step 2: The first completed AST set stations illuminate with FLASHING GREEN indicators.
Step 3: Remove the carrier, starting with the completed set closest to the front of the drawer, and scan its barcode label. The LEDs at this station extinguish.
Step 4: Repeat steps 2 – 3 to remove additional AST sets.
Step 5: Place completed AST sets in the AST tube rack.
Step 6: Close the drawer and press the “printer” soft key to access the report selection.
Step 7: Press the “Unloaded AST set report” soft key to print the report.
“Unloaded AST set report” soft key to print the report. Note: Ensure that a working printer is connected to the instrument and check that the paper is present before printing the report.
Resource
Mycobacteriology Laboratory Manual, First Edition, April 2014, Global Laboratory Initiative
Assessment
Question
Answer 1
Answer 2
Answer 3 Answer 4 Correct answer
Correct explanation
Page id
Part of Pre-test
Part of Post-test
A completed DST in the Bactec MGIT-960 instrument is indicated by a red “+” on the drawer.
True
False
1
A completed DST in the Bactec MGIT-960 instrument is indicated by a red “+” on the drawer.
YES
YES
Validation of Resistant/Unexpected MGIT DST Results
ContentValidation of Resistant/Unexpected MGIT DST Results
1. Validation of Resistant MGIT DST Results
Observe all ‘resistant’ tubes visually for evidence of contamination when first removed from the instrument. Then, perform a ZN stain on any suspicious tube and subculture to a Blood agar plate (BAP) or Brain Heart infusion (BHI) agar plate to rule out the contamination.
In addition, when drug resistance is observed, and the patient’s isolate has not been tested before, or if the isolate was not previously resistant to the drug, test the tube(s) with ZN and BAP/BHI to ensure that growth is not due to contaminants or Mycobacteria Other Than Tuberculosis (MOTT).
2. Validation of Unexpected MGIT DST Results
If DST results for any drug are inconsistent with previous results for the same patient, review the results and QC and repeat the test. If the repeat result is discrepant with the first result, repeat the test a third time and record the third test result as the tiebreaker.
Resources
Assessment
Question
Answer 1
Answer 2
Answer 3 Answer 4 Correct answer
Correct explanation
Page id
Part of Pre-test
Part of Post-test
Validation of the results is required if DST results for any drug are inconsistent with previous results for the same patient.
True
False
1
If DST results for any drug are inconsistent with previous results for the same patient, review the results and QC and repeat the test.
YES
YES
If DST results for any drug are inconsistent with previous results for the same patient, review the results and report. True False 2 If DST results for any drug are inconsistent with previous results for the same patient, review the results and QC and repeat the test. If the repeat result is discrepant with the first result, repeat the test a third time and record the third test result as the tiebreaker. YES YES LC DST Recording and Reporting
ContentLC DST Recording and Reporting
LC DST Recording
Once the LC DST results are validated, they should be recorded in the standard ‘NTEP Laboratory Register for Culture, CBNAAT and Drug Susceptibility Testing (Annexure IV)’. The result of the DST for a particular drug is recorded as either S (Sensitive) or R (Resistant) in the box provided for that drug.
A copy of Annexure IV is given below:
Image
LC DST Reporting
NTEP guidelines mandate the reporting of DST results to the requesting district/physician through Ni-kshay within the stipulated turn-around time. Resources:
Guidelines for programmatic Management of Drug-resistant Tuberculosis in India, 2021
Assessment
Question
Answer 1
Answer 2
Answer 3
Answer 4
Correct answer
Correct explanation
Page id
Part of Pre-test
Part of Post-test
The C&DST laboratory records the results of LC-DST in which of the following Annexures?
Annexure I
Annexure II
Annexure V
Annexure IV
4
Once the LC DST results are validated, they should be recorded in the standard ‘NTEP Laboratory Register for Culture, CBNAAT and Drug Susceptibility Testing (Annexure IV)’.
YES
YES
Tuberculosis Laboratory Register
ContentThe Tuberculosis (TB) Laboratory Register is a paper-based recording register kept in all National TB Elimination Programme (NTEP) laboratories for recording details of diagnostic services offered to TB patients referred from both private and public health facilities.
The register is maintained in the Designated Microscopy Centre (DMC). It is the only register used for recording the details of specimen smear examinations. The Laboratory Technician (LT) is responsible for maintaining and updating the laboratory register.
There are two portions in the TB lab register and the table below shows the details captured in each portion.
Table: Pages and Information Covered in the TB Laboratory Register; Source: NTEP Training Module 2 for Programme Managers & Medical Officers
PORTION
DETAILS CONTAINED
Left-hand Portion
Lab serial number assigned by the LT
Date of the sample collection
Patient details such as name, sex, age, address, and contact number
Information on if the patient is from a key population
Referring health facility details
Reasons for examination
Right-hand Portion
Details on the type of specimen
Visual appearance results along with dates
Comorbidity status (HIV and Diabetes)
Details of drug susceptibility testing
Nikshay ID / Notification
Treatment initiation details
The last two columns are for the LT’s signature and remarks by the LT or supervisor
Important Points to Note
- Duplicate registers should not be maintained.
- LTs should ensure that the correct laboratory serial number is recorded.
- Laboratory serial number is given to the patient and not to the sample. A new number should be assigned to every presumptive TB case whose sputum is to be examined.
- All smear-positive (including scanty) results should be recorded in red ink.
- No over writing or manipulation in already entered data should be done.
The figure below shows the left-hand portion of the TB lab register. Click here to access the full form in the NTEP Training Module 2 for Programme Managers & Medical Officers, p. 219.
Figure: First Page of the TB Laboratory Register; Source: NTEP Training Modules 1-4 for Programme Managers & Medical Officers, p. 219
Resources
Kindly provide your valuable feedback on the page to the link provided HERE
Drug Susceptibility Testing Logs
ContentMGIT DST testing logs are maintained by the laboratory for QC purposes to record information on the Lot number of MGIT tubes and drugs used along with their expiry dates. A sample DST log is shown here that laboratories can adapt and use as per their requirements:
Image
Resources:
Assessment
Question
Answer 1
Answer 2
Answer 3
Answer 4
Correct answer
Correct explanation
Page id
Part of Pre-test
Part of Post-te
DST logs should contain information on the following:
Lot number of MGIT tube and drugs used Test has to be assigned to a new station NTMs obtained Incubation time for each tube 1 DST logs should contain information on Lot number of MGIT tube and drugs used
Final Result Reporting
ContentFinal Result Reporting
Once the DST results are validated and finalized, these need to be communicated to the requesters. NTEP guidelines mandate the reporting of DST results to the requesting district/physician through Ni-kshay within the stipulated turn-around time. The following steps are involved in reporting the DST results in Ni-kshay:
Step 1: Log in to the Ni-kshay portal and search for the patient whose DST results are being reported by entering the Ni-kshay/episode ID.
Step 2: From the Diagnostic module drop-down, select the ‘add test’ option.
Image
Step 3: Select the appropriate option from the drop-down menu of ‘Reason for testing’ and select ‘DST’ from the ‘Test Type’ drop-down menu.
Step 4: Select the appropriate options in the ‘Facility Details’ section.
Image
Step 5: In the ‘Test details’ sections, after filling in the information about testing and reporting date, select the drug for which the DST is being reported from the drop-down menu of ‘DST to Drug’. Select the Susceptible/Resistant/None (whichever is applicable) option from the drop-down menu of ‘Resistance Status’. Choose the applicable option from the drop-down menu of ‘Final Interpretation’.
Image
Step 6: After adding remarks (if any), hit the ‘submit test’ option to complete the process.
Image
Resource
Guidelines for programmatic Management of Drug-Resistant Tuberculosis in India, 2021.
Assessment
Question
Answer 1
Answer 2
Answer 3
Answer 4
Correct answer
Correct explanation
Page id
Part of Pre-test
Part of Post-test
NTEP guidelines mandate the reporting of DST results to the requesting district/physician through which of these?
Request forms
Lab report form
Ni-kshay
Telephone
3
NTEP guidelines mandate the reporting of DST results to the requesting district/physician through Ni-Akshay within the stipulated turn-around time.
YES
YES
-
CDST_LT: MGIT DST quality control
FullscreenMGIT DST Quality Control
ContentMGIT DST Quality Control
Quality control of MGIT DST is critical to laboratory testing, as it ensures the accuracy and consistency of the test processes and the results reported.
Frequency:
-
For each new batch of reagents (MGIT drug kits, other drugs, media, etc.)
-
Weekly, in a DST run, when patient tests are run weekly.
-
With each batch of patient isolates, when DST is performed less frequently.
-
If the batch QC fails, all the results obtained within that batch and the new batch of a reagent should be thoroughly reviewed, and the testing should be repeated.
Strains used of MGIT DST Quality control:
-
M. tuberculosis H37Rv (ATCC [American Type Culture Collection] number 27294) is used as a QC strain which is susceptible to all anti-tuberculosis drugs. If the ATCC reference strain cannot be obtained, a well-characterized strain derived from a patient’s isolate that is completely susceptible to first-line anti-TB agents may be used instead. It is preferable to use a strain that has been fully sequenced and shown to have a wild-type pattern for all known genes associated with TB drug resistance.
-
It is not necessary to include a resistant strain, as most of the resistant strains against a drug which are available from ATCC and other culture collections are highly resistant and do not give any added benefit in quality control.
Procedure:
The test procedure for QC organisms is the same as for clinical isolates. The inoculum should be from a freshly grown culture in the MGIT medium or on the Löwenstein-Jensen medium (LJ) slant. After a standardized suspension has been made, it should be frozen at -70° C ±10° C. It may be stored for up to 1 year with no significant decrease in viable counts.
Resources
Assessment
Question
Answer 1
Answer 2
Answer 3 Answer 3 Correct answer
Correct explanation
Page id
Part of Pre-test
Part of Post-test
At what temperature and for how long can we store the QC organisms?
2 months at -70° C ±10° C
6 months at -70° C ±10° C
12months at -70° C ±10° C 24 months at -70° C ±10° C 3
After a standardized suspension has been made, QC strains should be frozen at -70° C ±10° C. It may be stored for up to 1 year with no significant decrease in viable counts.
YES
YES
-
Standard Controls
ContentThe definite diagnosis of tuberculosis demands that M. tuberculosis be recovered on culture media and identified using differential in vitro tests. Hence using laboratory standards is an important aspect of ensuring quality processes in all aspects of MGIT DST.
These include the following:
1. Standard laboratory biosafety measures as applicable to TB containment laboratories for handling culture isolated and performing DST
2. Trained staff to use standard operating procedures for equipment and laboratory methods
3. Standard stains for ZN microscopy, reagents and culture media as positive and negative controls
4. Using standard strains with every batch of the medium as a check on drug concentration in drug susceptibility tests
5. Using known standard positive and negative control in all biochemical tests for identification
6. Using standard Laboratory Performance Indicators for Mycobacterial Culture and DST
7. Using standard NTEP registers and formats for day-to-day work and monthly/quarterly abstracts to summarize laboratory activities
Resource
GLI Practical Guide to TB Laboratory Strengthening
Assessment
Question
Answer 1
Answer 2
Answer 3
Answer 4
Correct answer
Correct explanation
Page id
Part of Pre-test
Part of Post-test
Standard laboratory controls used in MGIT DST include which of the following?
Using standard strains with every batch of medium
Using known standard positive and negative control in all biochemical tests for identification
Using standard operating procedures for equipment and laboratory methods
All
4
Ensure that laboratory SOPs and procedures are followed. Using laboratory standards is an important aspect of ensuring quality processes in all aspects of MGIT DST.
YES
YES
Procedure of Quality Control
ContentQuality controls procedures are essential to generate quality DST results. Quality procedures are essential when using QC strains and reagents and preparing and using drugs for DST. These include:
QC strains
1. Use well-characterized pan-susceptible M. TB strain/ H37Rv/ M. tuberculosis ATCC 27294
2. Colonies from solid media less than 14 days old
3. MGIT 960 tube 1–5 days after flagged positively by instrument
4. Additional organisms may be tested to supplement BD QC recommendations
5. Test with a known mono-resistant strain of M. tuberculosisDrug and Inoculum Preparation
1. Ensure proper reconstitution of lyophilized drugs by following the given guidelines:- Rehydrate drugs with sterile distilled water
- Thaw aliquots of prepared drugs from freezer
- Check the expiry date before use
2. Avoid wrong drug concentrations.
3. Avoid improper drug preparation.
4. Proper dilution of inoculum for drug and growth control tube is critical.
5. Suspension must be well mixed and homogeneous without clumps.
6. Prepare QC inoculum (H37Rv) suspension in the same way as patient isolate suspension.7. Use positive and negative controls.
8. Follow standard operating procedures to perform SIRE/ Second-line and PZA DSTs.
Resource
GLI Practical Guide to TB Laboratory Strengthening
Assessment
Question
Answer 1
Answer 2
Answer 3
Answer 4
Correct answer
Correct explanation
Page id
Part of Pre-test
Part of Post-test
Which of the following procedures are included in the quality control of MGIT DST?
Prepare QC inoculum (H37Rv) suspension in the same way as patient isolate suspension.
Use well-characterized pan-susceptible M. TB strain/ H37Rv/ M. tuberculosis ATCC 27294 .
Ensure proper reconstitution of lyophilized drugs.
All 4
Quality procedures are essential when using QC strains and reagents and preparing and using drugs for DST.
YES
YES
Quality Control of the MGIT DST Inoculum
ContentQuality control of MGIT DST inoculum is essential for quality DST results. The different aspects of inoculum preparation include:
1. Using the right inoculum
2. Using pure cultures only
3. Using fresh cultures
4. Using slant < 14 daysQuality aspects for Positive MGIT tube include:
1. Time period should be plus 1 day to 5 days from the date of positivity
2. Homogeneous inoculum
3. Using sterile glass beads and vortex to break up organism clumps
4. Too high or too low an inoculum may give error results or un-interpretable results
5. Preparing dilutions according to the procedure
6. Using an accurate pipette to add inoculum to tubesResource
GLI Practical Guide to TB Laboratory Strengthening
Assessment
Question
Answer 1
Answer 2
Answer 3
Answer 4
Correct answer
Correct explanation
Page id
Part of Pre-test
Part of Post-test
Quality control of MGIT DST inoculum includes which of the following?
High inoculum
Time period to be plus 1 day to 5 days from the date of positivity
Non-homogenous suspension
21-day-old culture
2
The time period should be plus 1 day to 5 days from the date of positivity.
YES
YES
Quality Control in DST results interpretation
ContentQuality Control of DST is critical to ensure the test is functioning properly so that reliable results can be interpreted.
Steps in Quality Control in DST result interpretation include:
1. SIRE/ Second- line and PZA QC
- Carefully entering the tubes into MGIT 960
- Carefully scanning the DST set carrier into the BACTEC MGIT 960 instrument.
2. Interpretation of results
- The time period to interpret results is crucial. Interpret between 4–13 days for first and second-line drugs and 4-21 days for PZA.
- Results should read susceptible for all drugs.
- If proper results are not obtained, repeat the test.
3. First and Second- line drugs and PZA QC Records
- Record lot numbers of MGIT 960 tubes, drugs and drug supplements.
- Record QC results.
- Maintain records for a minimum of five years.
Resource
GLI Practical Guide to TB Laboratory Strengthening
Assessment
Question
Answer 1
Answer 2
Answer 3
Answer 4
Correct answer
Correct explanation
Page id
Part of Pre-test
Part of Post-test
Quality control in DST result interpretation includes which of the following?
Interpret the results between 4–13 days for first and second-line drugs and 4-21 days for PZA.
Ensure proper reconstitution of lyophilized drugs.
Use calibrated pipette.
Use control strains and reagents, 1
Interpret the results between 4–13 days for first and second-line drugs and 4-21 days for PZA.
YES
YES
-
CDST_LT: Quality assurance of TB Culture & DST laboratories
FullscreenQuality Assurance in TB C&DST Laboratories
ContentQuality Assurance (QA) is important to ensure quality DST results from a Culture and DST laboratory.
Foremost, it is essential to develop a Quality Assurance Plan that is practical and meets the laboratory requirements. It is important to ensure that specific procedures are available for specific components of the plan.
The QA plan should address the following:
1. General Laboratory Systems
2. Examination Phase of Testing (analytical)
3. Pre-Examination Phase of Testing (pre-analytical).
4. Post- Examination Phase of Testing (post-analytical)
With regards to QA, it is essential that the plan is designed to improve the following:
- Reliability
- Efficiency
- Use of laboratory services in order to achieve the required technical quality in laboratory diagnosis.
- Continuously improve the reliability and efficiency of laboratory services
- Includes quality control, external quality assessment, and quality improvement
Resource
GLI Practical Guide to TB Laboratory Strengthening
Assessment
Question
Answer 1
Answer 2
Answer 3
Answer 4
Correct answer
Correct explanation
Page id
Part of Pre-test
Part of Post-test
Quality Assurance in the C&DST laboratory includes which of the following?
General Laboratory Systems
Examination Phase of Testing
Pre-Examination Phase of Testing
All 4
Quality Assurance in the C&DST laboratory includes General Laboratory functioning and all aspects in the pre-post and examination phases.
YES
YES
C&DST Laboratory Arrangement and Administration
ContentQuality Control in Laboratory Arrangement and Administration
Laboratory Arrangement
- The laboratory should be arranged in a configuration which segregates clean areas from the dirtiest areas of the laboratory.
- Work areas, equipment and supplies must be arranged for logical and efficient workflow.
- Restricted access to containment areas; ensure that the doors are always closed during the work.
- Work areas should be clean, and work surfaces should be swabbed after each use with an appropriate disinfectant.
Laboratory Management And Administration
- Written procedures are maintained for easy reference.
- Quality control procedures must be implemented.
- Quality Control data must be reviewed at regular intervals.
- Records and registers must be maintained.
- Management of procurements: Equipment/ Consumables acceptance
- Tests and services must be scheduled.
- Proper management of biomedical waste must be done.
Resource
GLI Practical Guide to TB Laboratory Strengthening
Assessment
Question
Answer 1
Answer 2
Answer 3
Answer 4
Correct answer
Correct explanation
Page id
Part of Pre-test
Part of Post-test
Quality Control in Laboratory Arrangement and Administration includes which of the following processes?
The laboratory should be arranged in a configuration which segregates clean areas from the dirtiest areas of the laboratory.
Use a wide mouth beaker to prepare reagents.
Use non-homogenous suspension.
Use of 21-day-old culture.
1
The laboratory should be arranged in a configuration which segregates clean areas from the dirtiest areas of the laboratory.
YES
YES
Pre-examination QA Procedures in C&DST Laboratories
ContentThe pre-Examination Procedure for Quality Assurance of TB and DST Laboratories includes the following aspects during post-analytical aspects:
1. Giving proper instructions to collect and transport good quality specimens:
Appropriate specimens
Collection, transportation procedures
2. Specimen monitoring requirements:
Documentation of specimen quality
Specimen rejection policy
3. Test requests:
Essential documentation (patient name, specimen source, diagnostic and/ or follow-up, collection date)
Compared to the specimen for consistencyResource
GLI Practical Guide to TB Laboratory Strengthening
Assessment
Question
Answer 1
Answer 2
Answer 3
Answer 4
Correct answer
Correct explanation
Page id
Part of Pre-test
Part of Post-test
The pre-examination Quality Control in C&DST includes which of the following?
Giving proper instructions to collect and transport good quality specimens
Transporting samples after 3 days
Discarding inadequate samples
Use of 21-day-old culture
1
Giving proper instructions to collect and transport good quality specimens is a part of the pre-examination Quality Control in C&DST.
YES
YES
Examination QA Procedures in C&DST Laboratories
ContentThe examination procedure for Quality Assurance of TB and DST Laboratories includes:
1. Standard Operating Procedures (SOP)
Updated annually or more often as needed
Reviewed and initiated by staff annually
Obsolete procedures removed, labelled as “Obsolete”2. Calibration/ Validation- Equipment
Biosafety cabinets
Safety centrifuges and autoclaves
Thermometers, pipettes and timers3. Validation of new methods/procedures
All new methods are evaluated against the reference/gold standard for:
Sensitivity
Specificity
Positive predictive value
Negative predictive value
Turn-around time Resource
GLI Practical Guide to TB Laboratory Strengthening
Assessment
Question
Answer 1
Answer 2
Answer 3
Answer 4
Correct answer
Correct explanation
Page id
Part of Pre-test
Part of Post-test
The examination procedure for Quality Control in C&DST includes which of the following?
Giving proper instructions to collect and transport good quality specimens
Using standard Operating Procedures (SOP)
Discarding inadequate samples
Using expired reagents
2
Using standard Operating Procedures (SOP) is a part of the examination procedure for Quality Control in C&DST.
YES
YES
Post-examination QA Procedures in C&DST Laboratories
ContentPost-examination QA Procedures in C&DST Laboratories
Post-examination (also post-analytical phase) is one of the three-phase frameworks for the total testing process to describe issues related to the quality of laboratory testing. Most common laboratory errors occur following the testing of the sample, and some of these may be more difficult to detect. Common examples of these errors include making a transcription error when preparing the report; sending the report to the wrong location, which often results in complete loss of the report; failing to send the report.
All the C&DST laboratories should have procedures in place to ensure the validation of post-examination processes in the laboratory. These include:
-
Validation of the results: In this procedure, a review is done to verify that all the data and results in the Result Report have correctly been transcribed from the Request Form, the work forms, and the register. It must also be verified that results are legible and that quality controls were correctly performed on the day the results were produced (to determine if the examinations were performed correctly and that reagents and equipment were performing correctly). The person authorized to perform this procedure must be somebody in a management position (either the head of the data management section, the head of the section where the testing was performed or the laboratory manager him/herself).
-
Delivery of reports: All the C&DST laboratories should have a written protocol for sending the Result Reports to the requesters. There are two important requirements for choosing a method of sending the results: the method of sending Result Reports must have a minimal risk of losing Result Reports, and the Result Reports must always be transmitted promptly. Under NTEP, all C&DST laboratories should use the web-based portal- Ni-kshay- to send test reports. However, an alternative method should also be kept as a backup in case Ni-kshay does not work. In addition, all the C&DST laboratories should write a detailed SOP for the same.
-
Turn-around-Time (TAT): NTEP has already defined the TAT for all the diagnostics tests. The C&DST laboratory should be able to complete the test requested and report the results in Ni-kshay within the defined TAT. Period reviews should be done to ensure that the results are reported within the permissible TAT. The person authorized to perform this procedure must be somebody in a management position.
-
Result audit: Periodic internal audits should be done by the C&DST laboratory on the results reported. These audits should include the entire pathway of the laboratory activities, from validating results to reporting the results in Ni-kshay.
Resource
Laboratory quality management system: Handbook. World Health Organization
Assessment
Question
Answer 1
Answer 2
Answer 3
Answer 4
Correct answer
Correct explanation
Page id
Part of Pre-test
Part of Post-test
Post-examination phase is also known as which of the following?
Post-examination phase is also known as?
Analytical phase
Pre-analytical phase
Pre-examination phase
Post-analytical phase
4
Post-examination (also post-analytical phase) is one of the three-phase frameworks for the total testing process to describe issues related to the quality of laboratory testing.
YES
YES
-
Quality Improvement Activities in C&DST Laboratories
ContentQuality Improvement Activities in C&DST Laboratories
Continuous Quality Improvement is defined as “a philosophy and attitude for analyzing capabilities and processes and improving them repeatedly to achieve the objective of customer satisfaction”. Quality improvement (QI) is a critical and often neglected part of the quality assurance process. The QI cycle involves four steps: Plan, Do, Check, and Act.
Image
Key Components of the QI Process:
Identification of non-conformities through data collection, subsequent data analysis, and creative problem-solving are key components of the QI process. This involves continual monitoring and identifying and analyzing actual and potential defects.
Identification of non-conformities:
Non-conformities may be identified in many ways, including Proficiency Testing (PT), reviewing quality indicators, reporting issues identified by staff members, and audits.
-
Proficiency Testing: PT verifies that the C&DST laboratories are proficient in their testing process and can obtain accurate and reliable results. All the C&DST laboratories under NTEP receive an annual panel of 20 culture isolates from their respective National Reference laboratories (NRLs). PT helps to identify major non-conformities, allowing NRLs to target the most poorly performing C&DST laboratories for on-site supervision. PT panels may also be used to evaluate the training needs of technicians.
-
Reviewing quality indicators: All C&DST laboratories should collect and analyze testing data on at least a monthly basis, using a standardized format. Targets should be set for all indicators monitored, and any unexplained change in quality indicators, such as an increase in error rates and contamination rates, a change in MTB positivity rate or rifampicin resistance rate, or a significant change in the volume of tests conducted, should be documented and investigated. Quality performance indicators should be reviewed by the laboratory manager and must always be linked to corrective actions if any unexpected results or trends are observed.
-
Audit: An assessment, or audit, allows the laboratory to understand its performance when compared to a benchmark or standard. There are two types of audits- external and internal audits.
Audits should include the evaluation of steps in the whole laboratory path of workflow. They should be able to detect problems throughout the entire process. The value of a well-designed audit is that it will reveal weaknesses in the pre-examination, examination, and post-examination phases. During audits, information is gathered about: processes and operating procedures, staff competence and training, equipment, environment, handling of samples, quality control and verification of results, recording practices, and reporting practices.
Procedures for identifying non-conformities, determining responsibility, recalling the results associated with the non-conformities, and resuming routine testing following corrective actions must be clearly defined by all the C&DST laboratories. In addition, follow-up actions must also be implemented to prevent the same non-conformity from occurring in the future.
Resources
GLI Practical Guide to TB Laboratory Strengthening
Assessment
Question
Answer 1
Answer 2
Answer 3
Answer 4
Correct answer
Correct explanation
Page id
Part of Pre-test
Part of Post-test
Plan, Do, Check, and Act are the four essential steps of which cycle?
Quality control cycle
Quality assurance cycle
Quality improvement cycle
None of the above
3
The QI cycle involves four steps: Plan, Do, Check, and Act.
YES
YES
-
External Quality Assurance for C&DST laboratories
ContentExternal Quality Assurance for C&DST laboratories
External Quality Assurance (EQA) is a critical component of laboratory testing, as it ensures the accuracy and consistency of laboratory test processes throughout the examination of the specimen – from the point of collection to result reporting and database entry. The EQA of the C&DST laboratory under NTEP is through structured On-Site Evaluation (OSE), panel testing and retesting exercise.
On-Site Evaluation
A field visit is an ideal way to obtain a realistic assessment of the conditions and skills practised in the laboratory. On-site evaluation of C&DST Laboratory is therefore an essential component of a meaningful Quality Assurance (QA) programme. The visit includes a comprehensive assessment of laboratory safety, including infection control measures, conditions of equipment, adequacy of supplies, as well as the technical components of culture and DST. All the C&DST laboratories are visited at least once a year by their respective NRLs for this activity. A standard comprehensive checklist for on-site evaluation of the C&DST laboratory is available. Any significant problems identified are documented in the final report.
Panel testing:
The National reference laboratory (NRL) sends a panel of 20 strains to the C&DST laboratory every year. This panel consists of known pan-sensitive, mono-resistant, Multi-drug resistant (MDR) and poly-resistant strains and some isolates in duplicate to check for reproducibility. The C&DST laboratory sub-culture these 20 strains and then set up Drug Susceptibility Testing (DST). The results of DST are then communicated back to the NRL. The NRL checks for concordance between the results of the C&DST laboratory and their own results. The acceptable concordance level as per the NTEP guideline, is >90%.
Retesting:
10 randomly selected recent cultures with known sensitivity patterns from a C&DST laboratory are retested at the NRL. The results are then checked for concordance. This is generally a one-time activity conducted at the time of accreditation of the C&CST laboratory.
Resources
Assessment
Question
Answer 1
Answer 2
Answer 3
Answer 4
Correct answer
Correct explanation
Page id
Part of Pre-test
Part of Post-test
For Retesting, 20 randomly selected recent cultures with known sensitivity patterns from a C&DST laboratory are retested at the NRL.
True
False
2
10 randomly selected recent cultures with known sensitivity patterns from a C&DST laboratory are retested at the NRL.
YES
YES
Why is EQA a critical component of laboratory testing? Helps build the necessary skills for laboratory test processes Ensures the accuracy and consistency of laboratory test processes Collects and reports accurate results Improves the speed of laboratory test processes 2 External Quality Assurance (EQA) is a critical component of laboratory testing, as it ensures the accuracy and consistency of laboratory test processes throughout the examination of the specimen – from the point of collection to result reporting and database entry. YES YES
-
-
CDST_LT-M14: Line Probe Assay
Fullscreen-
CDST_LT: Molecular basics
FullscreenUnderstanding Key elements of Molecular Biology
ContentTo understand Line Probe Assay (LPA), we need to understand key elements of Molecular Biology.
Molecular Biology is the study of living systems at the molecular level, especially DNA, RNA and proteins.
Cell
The cell is the fundamental unit of life and is the building block of all organisms. It has three main components:
- Cell membrane
- Nucleus
- Cytoplasm
Types of Cells
Cells are of two types- Prokaryotic and Eukaryotic and are distinguished by the size and types of internal organelles they contain.
- Prokaryotes are single cell organisms e.g., bacteria like Mycobacterium tuberculosis.
- Eukaryotes are either single celled or multicellular with membrane-bound organelles. All animals, plants, fungi and protists are eukaryotic cells.
DNA
- The DNA molecule is a nucleic acid containing genetic information and is made of two nucleotide strands bonded together.
- In prokaryotes, the DNA is present in the cytoplasm and in eukaryotes, it is present in the nucleus.
- The functional unit of the DNA is known as a gene.
RNA
- RNA is formed by the transcription of a DNA molecule
- RNA is also a nucleic acid but has a different nucleotide composition
- RNA translates to further form proteins, which are large molecules formed by one or more chains of amino acids
Table: Comparison between DNA and RNA
DNA RNA Double Strand Single Strand Transcribed to RNA Translated to Proteins Bases: adenine (A), cytosine (C), guanine (G), and thymine (T) Bases: adenine (A), cytosine (C), guanine (G), and uracil (U) Sugar Motif - Deoxy Ribose Sugar Motif - Ribose Stable Prone to Hydrolysis Resources
Kindly provide your valuable feedback on the page to the link provided HERE
Structure of DNA in a Prokaryotic Cell
Content- Deoxyribonucleic acid (DNA) is a molecule that contains genetic information.
- DNA molecules have two nucleotide strands that wind around one another to form double helix structure.
- Each nucleotide strand has a backbone made of alternating sugar (deoxyribose) and phosphate groups.
- Attached to each sugar is one of four nitrogenous bases: adenine (A), cytosine (C), guanine (G), and thymine (T)
- These bases occur in pairs, where in Adenine is always bonded to Thymine with a 2-H bonds and Cytosine bonded to Guanine with 3-H bonds.
- Prokaryotic cells do not have a defined nucleus hence the DNA is tightly coiled in the cytoplasm.
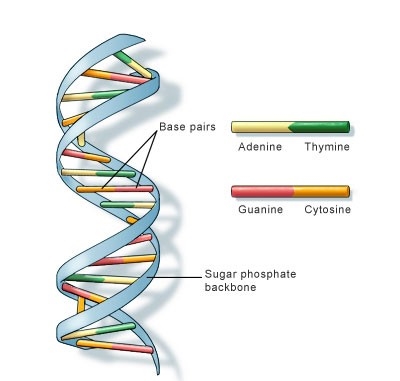
Figure: DNA double helix structure
Resources
Kindly provide your valuable feedback on the page to the link provided HERE
Central Dogma in the Function of DNA: Replication
ContentDeoxyribose Nucleic Acid (DNA) carry genetic information that is transmitted to new cells/off-springs.
The process by which cells maintain their genetic information and convert the genetic information encoded in DNA into gene products is called the Central Dogma.
The central dogma of DNA (Figure 1) are replication, transcription and translation.
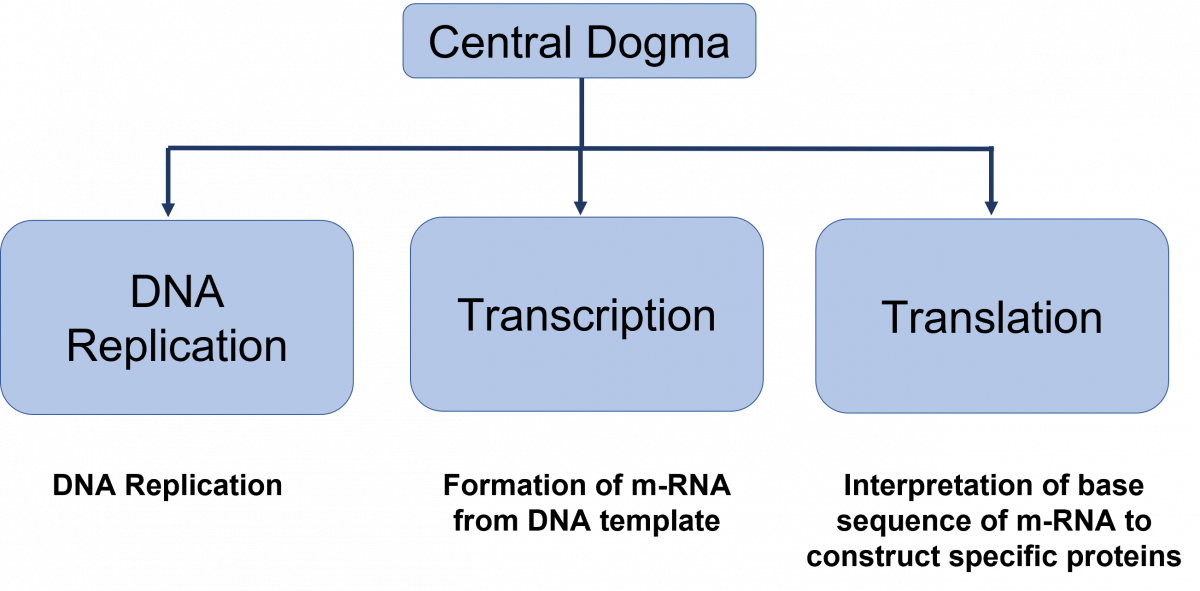
Figure: Central dogma of DNA functions
DNA Replication
DNA replication is the production of two identical replicas of DNA from one original DNA molecule.
Steps in DNA replication
- Helicase enzyme unzips coiled DNA to form a replication fork. The two separated strands act as templates for making new strands of DNA.
- Primase enzyme makes short primers to which DNA polymerase III enzyme binds and adds DNA nucleotides to create the leading strand during DNA replication.
- Primers are removed and replaced with DNA nucleotides by bacterial DNA polymerase I and DNA ligase seals the gaps between fragments.
- Okazaki fragments are short sequences of DNA synthesized discontinuously; linked by DNA ligase to create the lagging strand during DNA replication.
- Exonuclease enzyme removes primers and gaps are filled by DNA polymerase.
Resources
Kindly provide your valuable feedback on the page to the link provided HERE
Central Dogma in the Function of DNA: Transcription and Translation
ContentTranscription and translation together are responsible for Gene Expression.
Transcription
- The transcription process involves the formation of m-Ribo-Nucleic Acid (RNA) from DNA (Deoxyribose Nucleic Acid).
- One strand of DNA acts as a template, RNA polymerase associates with the DNA strand on the promoter region and transcription begins.

- RNA polymerase moves over the template DNA and adds complementary bases.

- RNA Polymerase stops transcription when the termination sequence is reached and releases the complete RNA chain, which moves to the cytoplasm.
Translation
- It is a process of synthesis of proteins from m-RNA.
- It starts when ribosomes attach to m-RNA.
- Bacterial ribosome has two subunits 50s and 30s, containing r-RNA and t-RNA.
- t-RNA is an adapter molecule - one side attaches to m-RNA, reading the triplet code and the other end attaches to a specific amino acid sequence.
- Once this assembly is formed, r-RNA catalyzes the process of attaching new amino acids, forming a chain.
The process of transcription and translation is shown in Figure 1

Figure 1: Process of transcription and translation under the central dogma of DNA function
Resources
Kindly provide your valuable feedback on the page to the link provided HERE
Molecular Basis of Genetic Code and Mutation
ContentThe genetic code is a triplet nucleotide sequence (codon) which encodes a specific amino acid during translation.
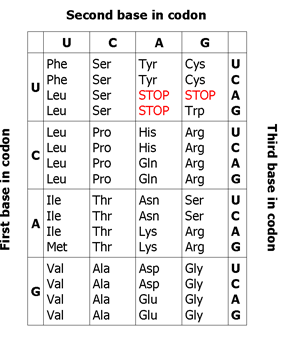
Figure 1: Genetic code
The three-letter codons consisting of four nucleotides found in mRNA (A, U, G, C) which produce a total of 64 different combinations. Of these 64 codons, 61 code for amino acids, the remaining three represent stop signals which trigger the end of protein synthesis (see Figure 1).
Properties of Genetic Code
- Universal: A particular codon will encode the same amino acid in all living beings
- Multiple codons: Different codons code for the same amino acid e.g. UUC and UUU code for Phe (Phenylalanine)
- Non-ambiguous: Each triplet specifies only a single amino acid
- Start codon (AUG): Codes for Met (Methionine) and marks the beginning of translation
- Stop codons (UAG, UAA, and UGA): Terminate protein synthesis as they do not code for any amino acid
Mutations
- Any alterations in the DNA sequence will result in an amino acid change e.g., GAA (Glutamic Acid) changes to GAC (Aspartic Acid)
- Changes in the amino acid sequence will alter the structure of the protein e.g., GAA (Glutamic Acid) changes to UAA (Stop codon)
- The structural change in the protein will alter its function e.g., for extracellular protein mutations in ACG (Cysteine) to TAT (Tyrosine) leads to loss of disulfide bond and protein function
- Silent mutations alter the DNA structure, but do not result in amino acid and functional changes e.g., GAA (Glutamic Acid) change to GAG (Glutamic Acid)
Resources
Kindly provide your valuable feedback on the page to the link provided HERE
Molecular Basis: Introduction to Polymerase Chain Reaction(PCR) Technology
ContentPolymerase Chain Reaction (PCR) is a laboratory technique to amplify Deoxyribose Nucleic Acid (DNA).
The PCR mix consists of:
- MgCl2 :1.5 - 6 mM
- Buffer (pH 8.3 - 8.8)
- DNA polymerase (Taq polymerase): 0.5 - 2.5 U
- Target DNA: <1µg
- Primers: Short DNA sequences to select the region to be amplified
During PCR, the temperature of the PCR mix is repeatedly raised and lowered to help the DNA polymerase enzyme replicate the target DNA sequence in the presence of the primer (Figure 1) and produce multiple copies in a few hours (Figure 2).
Steps in PCR:
- Denaturation of the DNA into single strands (94-95ºC)
- Annealing of primers to each strand for new strand synthesis (58-65ºC)
- Extension of the new DNA strands (72ºC)
The test is performed in a thermal cycler machine that maintains a different temperature required during the different PCR steps.
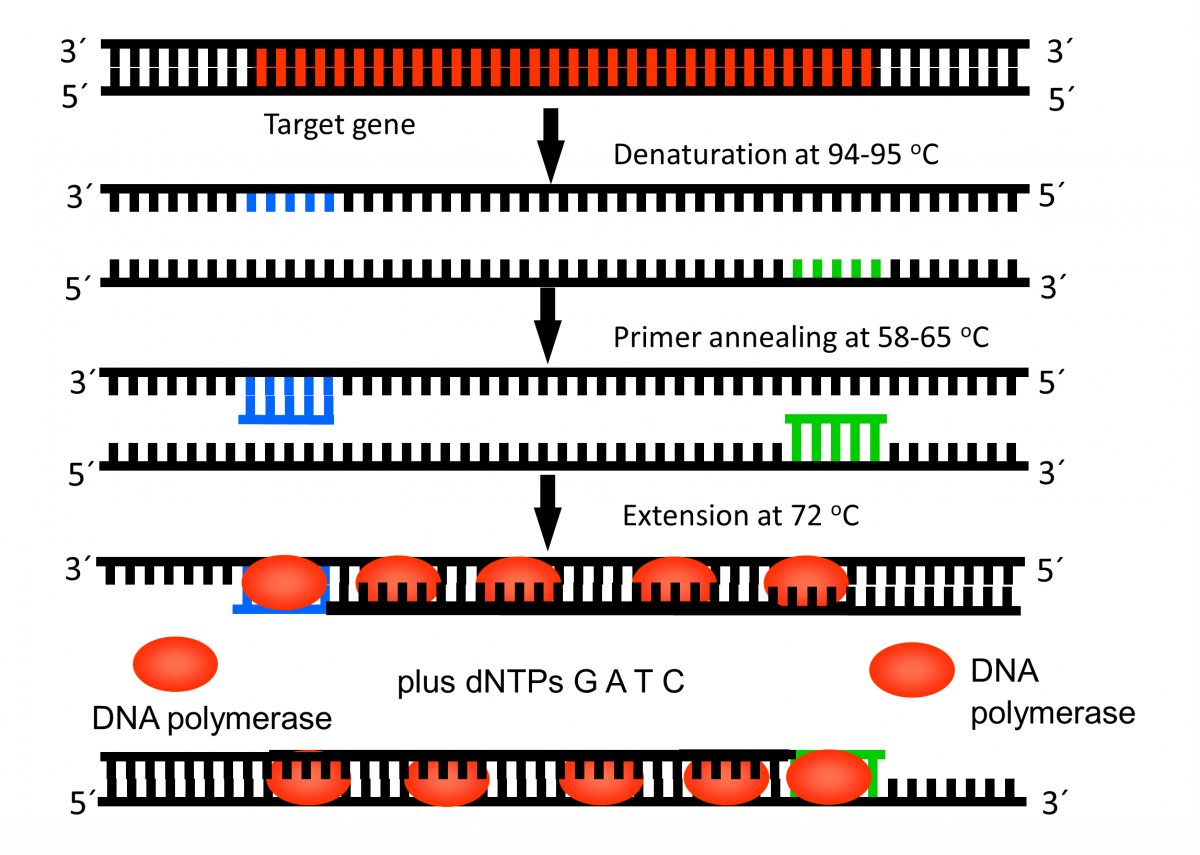
Figure 1: First Cycle in Thermal Cycler Machine

Figure 2: Exponential Amplification of Target Gene
Resources
Kindly provide your valuable feedback on the page to the link provided HERE
Molecular Mechanism of Multi-drug Resistance in Mycobacterium tuberculosis
ContentAnti-TB drugs and molecular mechanism of multi-drug resistance with regards to First Line- Line Probe Assay (FL-LPA) and Second Line- LPA (SL-LPA) is described here.
Rifampicin (RIF)
- It has a bactericidal effect on metabolically active M. tuberculosis and late sterilizing action on semi-dormant organisms undergoing short bursts of metabolic activity
- The mechanism of action of Rifampicin is the inhibition of RNA transcription in the mycobacterial cell by targeting DNA dependent RNA polymerase gene rpo B
- Resistance is due to mutations leading to a change in the structure of the beta subunit of Mycobacterium tuberculosis RNA polymerase
Isoniazid (INH)
- It has a potent early bactericidal action
- It is a pro-drug that requires activation by the mycobacterial enzyme, Catalase peroxidase gene katg
- INH resistant clinical isolates frequently lose their catalase peroxidase activity
INH may act on several targets within the mycobacterial cell, significant evidence supports the concept that it blocks the synthesis of cell wall mycolic acids. The major components of the envelope of M. tuberculosis.
Genes targeted in mycolic acid synthesis include:
- nadh-dependent enoyl acp synthase (encoded by inha)
- malonyl-coa acyl carrier protein (acp) transacylase (fabd)
- acetyl-coa carboxylase (accd6)
Other isoniazid target genes include peroxiredoxin alkyl hydroperoxide reductase subunit c (ahpc), ahpc-oxyrintergenic regulatory region; several efflux proteins encoded by iniabc and efpa
- Resistance is due to
- Mutations in katg, fabg1, oxyr- ahpc intergenic region, accd6 and efflux proteins
- Promoter region of inha, which leads to overexpression of isoniazid's target inha, requiring higher doses of the drug to achieve complete inhibition
Ethionamide (Eto)
- It has a bacteriostatic or bactericidal action, depending on the drug concentration in host
- It is a pro-drug, converted to active form by the bacterial monooxygenase EthA
- It targets mycolic acid synthesis
- Resistance is due to mutations in the inhA promoter
Pyrazinamide (Z)
- It has a bactericidal action; kills nonreplicating persistent Mycobacterium tuberculosis in macrophages
- It inhibits the synthesis of fatty acids; this disrupts the Mycobacterium tuberculosis cell membrane
- It is a pro-drug which must be activated by pyrazinamidase encoded by pncA, rpsA, and panD genes
- Resistance is due to mutation in pncA, rpsA, and panD; active drug effflux
Fluoroquinolones (Ofloxacin, Ofx; Levofloxacin, Lfx; Moxifloxacin, Mfx; Gatifloxacin, Gfx)
- Have a bactericidal action
- Inhibits gyrases encoded by gyrA and gyrB genes
- Prevent bacterial DNA synthesis
- High-level resistance requires multiple mutations in gyrA, or concurrent mutations in both gyrA and gyrB
Aminoglycosides (Kanamycin, Km; Amikacin, Am) /Polypeptides (Capreomycin, Cm)
- Have a bactericidal action
- Acts on ribosome rrs gene
- Prevents bacterial protein synthesis
- Resistance is due to mutation in rrs
- Low-level resistance to Kanamycin is associated with the promoter region of eis (enhanced intracellular survival protein) gene
Resources
Kindly provide your valuable feedback on the page to the link provided HERE
-
CDST_LT: Introduction to LPA
FullscreenLPA for DR-TB Diagnosis
ContentAs per the Integrated Drug Resistant Tuberculosis (DR-TB) Diagnostic Algorithm:
- Nucleic Acid Amplification Test (NAAT) are preferred for initial detection of Rifampicin (R) resistance.
- Line Probe Assay (LPA) test is preferred for detection of Isoniazid (H), Fluroquinolones (FQ) and second-line injectable (SLI) drugs resistance.
- When Rifampicin resistance is detected by NAAT (Figure):
- Offer first-line (FL) and second line (SL) LPA
- Direct LPA performed on smear positive specimen or indirect LPA is performed on culture isolate when smear is negative
- When Rifampicin resistance is not detected by NAAT (Figure):
- Offer FL-LPA to detect H resistance
- Direct LPA performed on smear positive specimen or indirect LPA is performed on culture isolate when smear is negative
- If H resistance is detected, SL-LPA is performed to check FQ resistance.
- When Rifampicin resistance is detected by NAAT (Figure):

Figure: Flow Chart to decide FL/SL-LPA after NAAT Results
Resources
Kindly provide your valuable feedback on the page to the link provided HERE
Line Probe Assay [LPA] in DR-TB Diagnosis
ContentAs per the Integrated Drug-resistant Tuberculosis (DR-TB) Diagnostic Algorithm:
- Nucleic Acid Amplification Tests (NAAT) are preferred for the initial detection of Rifampicin (R) resistance
- Line Probe Assays (LPA) are preferred for the detection of Isoniazid (H), Fluoroquinolones (FQ) and second-line injectable (SLI) drugs resistance.
When rifampicin resistance is detected by NAAT (see figure below):
- Offer first-line (FL) and second line (SL) LPA
- Direct LPA performed on smear positive specimen or indirect LPA is performed on culture isolate when the smear is negative
When Rifampicin resistance is not detected by NAAT (see figure below):
- Offer FL LPA to detect H resistance
- Direct LPA performed on smear positive specimen or indirect LPA is performed on culture isolate when the smear is negative
- If H resistance is detected; SL LPA is performed to check FQ resistance
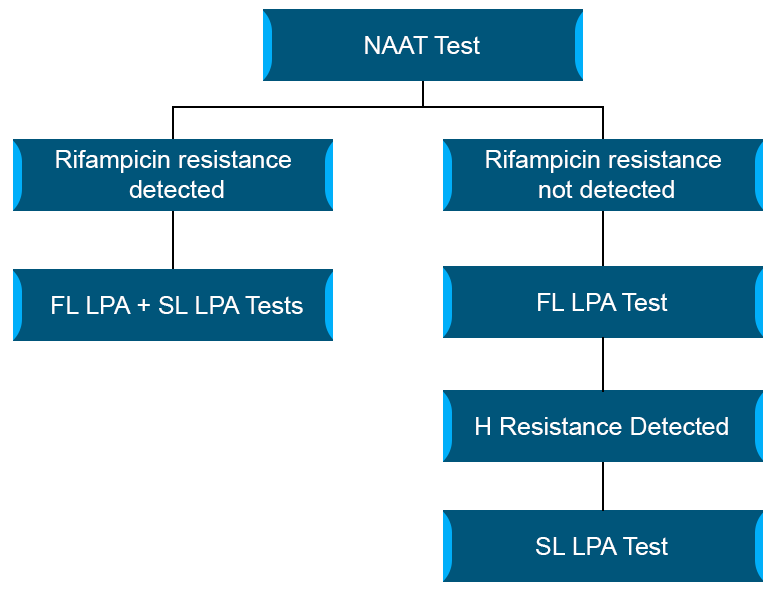
Figure: Flowchart to decide FL/SL-LPA after NAAT results
Resources
Kindly provide your valuable feedback on the page to the link provided HERE
First Line LPA [FLLPA]
ContentFirst Line (FL) LPA
- Performed using GenoType MTBDR plus ver 2.0 kit
- GenoType MTBDR plus (Figure) identifies:
- Mutations in the Rif-resistance Determining Region (RRDR) of rpoB gene (from codon 505 to 533) to detect Rifampicin resistance
- Mutations in the inhA promoter (from -16 to -8 nucleotides upstream) and the katG (codon 315) regions to identify Isoniazid resistance.

Figure: GenoType MTBDR plus FL-LPA strip to determine Wild Type genes and mutations responsible for resistance to Rifampicin and Isoniazid; Source: GLI LPA Guidance Document.
Resources
Kindly provide your valuable feedback on the page to the link provided HERE
Second Line LPA [SLLPA]
ContentSecond-line Line Probe Assay (SL-LPA) is a LPA to detect resistance to the second-line anti-TB drugs. This test is recommended for identifying TB patients with Multidrug-resistance (MDR) or rifampicin-resistance and those who can be placed on the shorter MDR-TB regimen.
The SL-LPA produces results in just 24-48 hours.
- It is performed using GenoType MTBDRsl Version 2.
- This is a DNA-based test that identifies genetic mutations in MDR-TB strains, making them resistant to fluoroquinolones and injectable second-line TB drugs.
- GenoType MTBDRsl Version 2 (Figure) identifies:
- Quinolone-resistance determining region (QRDR) of gyrA (from codon 85 to 96) and of gyrB (from codon 536 to 541) genes for detection of resistance to fluoroquinolones
- rrs (nucleic acid position 1401, 1402 and 1484), eis promoter region (from -37
to -2 nucleotides upstream, low level kanamycin resistance) for detection of resistance to SLI drugs.
- Single mutation in gyrA confers low level fluoroquinolone resistance.
- Concurrent mutations in gyrA or both gyrA and gyrB confer high level fluoroquinolone resistance.
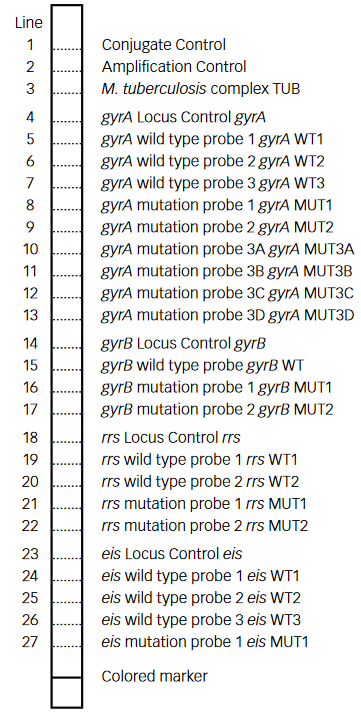
Figure: GenoType MTBDRsl Version 2 SL-LPA strip to determine Wild Type genes and mutations responsible for Resistance to Fluoroquinolones and Second-line Injectable Drugs; Source: GLI LPA Guidance Document.
Resources
Kindly provide your valuable feedback on the page to the link provided HERE
-
CDST_LT: LPA lab biosafety requirements
FullscreenBiosafety Requirements in Line Probe Assay [LPA] Laboratory
ContentDNA extraction for Line Probe Assay (LPA) from clinical specimens can be performed in either a BSL-2 or BSL-3 laboratory, while DNA extraction from mycobacterial cultures must be performed in a BSL-3 laboratory. Only after heat-killing of the organism and DNA isolation can the sample be considered non-infectious and moved to the LPA laboratory.
The subsequent steps, i.e., amplification and post-amplification, only require a BSL-1 laboratory.
Aspects of biosafety in LPA laboratory include:
- Facility Design
- Workflow description
- Rooms required to complete LPA procedures
- Access to authorized personnel only
- Electricity and backup power supply
- Laboratory Equipment
- Equipment operation
- Equipment maintenance
- Safe Lab Practices
- Cleaning and disinfecting work areas
- Use of Personal Protective Equipment (PPE)
- Disinfection and decontamination
- Biomedical waste management
Resources
Kindly provide your valuable feedback on the page to the link provided HERE
- Facility Design
Biosafety Requirements in LPA Facility Design
ContentThere are two types of risk while setting up a Polymerase Chain Reaction (PCR) facility for Line Probe Assay (LPA):
- Biohazard risk: The potential that a laboratory worker will become infected when working with live M. tuberculosis.
- Bio-risk: The potential that specimens or reagents will become contaminated with DNA, amplified products (amplicons) or exogenous contaminants that lead to false-positive PCR results.
Precautionary measures to reduce the biohazard and bio-risk in DNA molecular procedures are critical and drive the general facility design.
LPA Facility Design and Layout
There should be four separate rooms for:
- DNA extraction
- Reagent preparation for PCR - the pre-amplification step
- PCR amplification
- Hybridization and detection
In case of space constraints, one room can be used for both hybridization and amplification.
Movement in the LPA Facility (Figure 1 and 2)
- There should be a unidirectional flow of lab staff, as well as the tools used.
- Never reverse the flow.
For example:
- In the morning, commence work in the reagent preparation room as it is “the ultra-clean room”. From this room, one may proceed to either the specimen preparation room, the PCR amplification room, or the PCR amplification and detection room.
- If one starts work in the specimen preparation room they should not enter the reagent preparation room, but they may work in the PCR amplification room, or the PCR amplification and detection room.
- If one starts working in the amplification or detection room they should not enter the reagent preparation room.
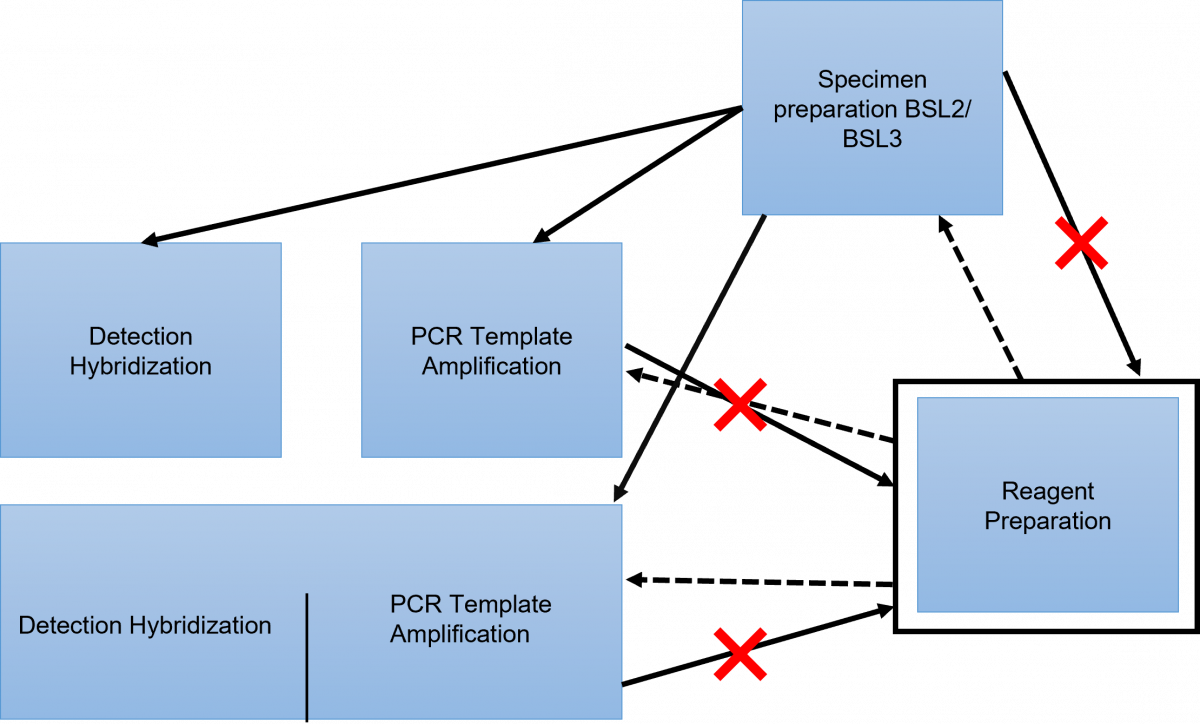
Figure 1: LPA Facility Layout showing Maintenance of Unidirectional Movement and Flow of Tools

Figure 2: Requirements to Maintain the Unidirectional Flow of Tools and Staff in the LPA Laboratory
Resources
Kindly provide your valuable feedback on the page to the link provided HERE
Electrical Supply and Back-up Power Requirements in LPA Facilities
ContentImportance of Electrical Supply and Backup Power in the Line Probe Assay (LPA) Facility
- Reagents used in LPA are to be stored at 4°C or -20°C. Hence, require uninterrupted electricity supply/ backup power.
- Amplification and hybridization procedures must be conducted under closely monitored temperature conditions.
- Uninterrupted Power Supply (UPS) connection is required during PCR amplification and use of the automated hybridization systems to avoid interruption of the procedure and subsequent loss of results.
Features of Electrical Fittings, Wiring, Power Points, Sockets, Fixtures and Electrical Boxes in the LPA Facility
- All the electrical fittings in the LPA laboratory areas should be suitable for clean room application and sealed (all conduits, outlets) with silicon sealant, leak-proof and capable of withstanding chemical exposures during fumigation.
- Necessary wiring and power points (at least six in each room) should be provided for all equipment.
- Modular type, power points of 5A/15A required at various locations on the wall as per placement of equipment.
- Power backup of about 125 KVA capacity is required for LPA laboratory.
- Provision should be made for backup power supply to the critical components and equipment through a UPS and diesel power generator set.
- There should be two outlets, one for direct line and one for UPS backups, planned for each lab equipment.
- The sockets meant for UPS should be screen printed as (UPS) for ease of operation and identification. Marked wires and cables used should be copper wire of standard make (ISI marked) and manufacturer.
- Light fixtures should be placed flush with roof, with gasket or otherwise sealed with silicon sealant.
- Accessibility for replacement of light fixtures should be provided from the roof side.
- Circuit breakers must be able to accommodate the electrical demand needed to operate the various laboratory equipment for LPA.
- All electrical boxes and wiring should be certified to avoid surges that might render the equipment inoperable.
Resources
Kindly provide your valuable feedback on the page to the link provided HERE
Equipment Required in Different Rooms in the LPA Lab Facility
ContentThe design of the LPA facility includes the availability of different rooms to perform different steps. Each room has a set of specific equipment.
There should be a minimum of 4 separate rooms to carry out procedures. The details of these rooms and equipment are elaborated below:
1. DNA Extraction Room: For DNA extraction from decontaminated samples. Table 1 shows the equipment in the DNA extraction room.
Table 1: Equipment in the DNA Extraction Room
BIOSAFETY CABINET MICROLITER CENTRIFUGE VORTEX MIXER 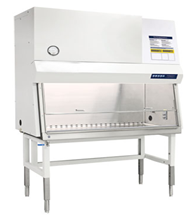

HOT AIR OVEN REFRIGERATOR 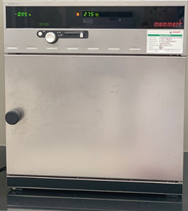
2. Master Mix/ Reagent Preparation Room: For the preparation of reagents required in the master mix for PCR. Table 2 shows the equipment required in this room.
Table 2: Equipment in the Master Mix/Reagent preparation room
PCR HOOD
PICO-FUGE
-20ºC FREEZER
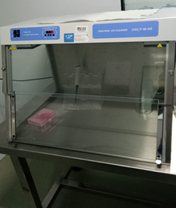
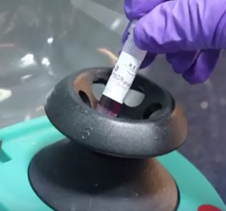
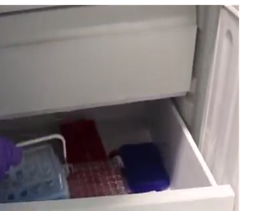
3. DNA Amplification Room: For PCR amplification of DNA. Table 3 shows the equipment in this room.
Table 3: Equipment in the DNA Amplification Room
PCR HOOD
THERMAL CYCLER
REFRIGERATOR


4. Hybridization – detection Room: For hybridization of amplicons with probes and detection of bands. Table 4 shows the equipment required in this room.
Table 4: Equipment in the Hybridization-detection Room
TWINCUBATOR
GT BLOT


REFRIGERATOR
WATER BATH
Resources
- Molecular Detection of Drug-resistant Tuberculosis by Line Probe Assay.
- GLI Training Package on LPA.
Kindly provide your valuable feedback on the page to the link provided HERE
LPA Biosafety Essentials: Procedural Biosafety Measures
ContentProcedural biosafety measures include:
- Biosafety measures taken during the Line Probe Assay (LPA) procedures
- Aerosol generation and preventive measures
Manipulations that produce aerosols in DNA Extraction Room are:
- Pipetting
- Centrifugation
- Vortexing
- Discarding micropipette tips after use
Measures to Prevent Aerosol Generation
- Always open and manipulate specimens and cultures in a certified Biosafety Cabinet (BSC).
- Work over absorbent material (sheet/ paper) soaked in a disinfectant.
- Use centrifuge safety cups/ aerosol tight rotor and open them in the BSC.
Resources
Kindly provide your valuable feedback on the page to the link provided HERE
LPA Biosafety Essentials: Waste Disposal
ContentBiomedical Waste Management is an essential biosafety component of TB containment laboratories. All infectious materials should be decontaminated, incinerated, buried or autoclaved.
The following materials are suitable for waste disposal by autoclaving:
- All positive TB cultures
- Mycobacterial cultures
- All infectious materials from TB-containment laboratories where mycobacterial culture is performed
In laboratories where the risk of infection with TB is low, plastic sputum containers, cartridges used for molecular analysis - Nucleic Acid Amplification Test (NAAT) and Line Probe Assay (LPA) - (CBNAAT cartridges, TrueNAT chips, used tips, droppers, reagents, other consumables) and wooden applicator sticks, should be removed from the laboratory in sealed disposal bags and incinerated.
Important considerations for waste disposal
- Any materials that are reused must be decontaminated with a suitable disinfectant or autoclaved before being removed from the laboratory.
- All infectious waste should be soaked in appropriate disinfectant (5% phenol/ 1% sodium hypochlorite) and discarded in the bio-safety disposal bins.
- The bio-medical waste should be segregated into containers.
- Colored plastic bags should be used as per the Programmatic Management of Drug Resistant TB, 2021 Guidelines, at the point of generation.
- The authorized person should maintain records related to the generation, collection, reception, storage, transportation, treatment, disposal or any other form of handling of bio-medical waste, for a period of five years.
- Waste should be disposed off according to the Bio Medical Waste Guidelines, 2019.
Resources
- Guidelines for PMDT in India, 2021.
- Central Pollution Control Board: Waste Management and Handling Rules.
Kindly provide your valuable feedback on the page to the link provided HERE
-
CDST_LT: Equipment used in LPA labs
FullscreenBiosafety in TB Laboratories
ContentWhat is Biosafety?
Biosafety is safe handling and containment of infectious microorganisms and hazardous biological materials.
Why Biosafety?
Infections which are obtained through laboratory or laboratory-related activities are known as Laboratory Acquired Infections (LAI). These infections are major occupational health hazards and are a cause of concern for the safety of the staff working in laboratories.
Routes of entry of LAI
There are multiple routes of entry and transfer of toxic material through the body and its transfer to various organs and systems.
The most predominant routes of LAI are:
- Nose - Inhalation of infectious aerosols
- Mouth - Ingestion or exposure through mouth pipetting or touching mouth or eyes with contaminated fingers or contaminated object
- Skin and mucous membrane:
- Spills and splashes onto skin and mucous membranes
- Parenteral inoculations with syringes or other contaminated sharps
- Animal bites and scratches from research laboratories or activities
Biosafety guidelines are prepared to promote:
- Safe microbiological practices
- Safety equipment and facility safeguards for reducing LAIs
- To protect public health and the environment
Biosafety in Tuberculosis TB laboratory (lab)
In a TB lab, the primary risk for infection transmission is the aerosol contaminated with TB bacilli when:
- TB patients walk into the laboratory for specimen collection or other testing and may be a source of droplet infection if they cough during laboratory visits
- Procedures such as centrifugation, vortexing, and vigorous shaking generate significant aerosols that are biohazardous
Key points to consider for M. TB as a biological hazard are given in the table below.
MYCOBACTERIUM TUBERCULOSIS (M. TB) AS BIOLOGICAL HAZARD
RISK FACTORS
Pathogenicity
M.TB exposure may lead to infection
5-10% of infected persons will develop TB disease
Primary route of transmission
Inhalation
Stability
Tubercle bacilli can remain viable for extended periods in the environment
Infectious dose
As little as 10 bacilli can infect humans
Effective Vaccine (for adults)
No vaccine is available for adults
Effective treatment for strain susceptibility to different medicines
Yes
Effective treatment for MUltiple Drug Resistant (MDR), Extensively Drug Resistant (XDR) strains
Yes, but more difficult to treat than susceptible strains
Standards for TB Lab Biosafety
- Standards are prepared based on the recommendations from the WHO expert group in 2012.
- Standards use a procedural approach for the assessment of risk.
- It establishes minimum requirements necessary to ensure biosafety during TB microscopy, culture, drug-susceptibility testing (DST) and molecular testing in different countries and epidemiological settings.
Resources
Kindly provide your valuable feedback on the page to the link provided HERE
Precautions for Using the Biosafety cabinet [BSC]
ContentThere are certain Do’s & Don'ts that should be followed while operating the Bio Safety Cabinet (BSC).
Do’s:
- Read the Standard Operating Procedure (SOP) before starting the work inside the BSC.
- Carry out functionality tests (smoke test, pressure gauge monitoring) before use, and maintain a record at installation and after the maintenance of BSC.
- Check that the sash is at normal operating height (READY state). Adjust the chair height so that your face is above the sash.
- Always use good microbiological practice when working inside the BSC.
- Disinfect work surface, interior walls and interior window surface before and after work.
- Maintain the log sheet after every run of BSC and perform the maintenance activity as required.
Don’ts:
- Never work in the cabinet with the ultraviolet light ON.
- BSC should not be used with the sash window above the design opening mark.
- Perform all the work on or over the work surfaces; avoid working over or placing items on the front grill or blocking the front or rear grills.
- To reduce turbulence, avoid rapid movement while working.
- Avoid unnecessary movement of hands and arms in and out of the cabinet.
- Open flames (Bunsen burners) should never be used inside the BSC; open flames actually create turbulence that disrupts the air flow and damages the filters.
- Never operate the cabinet when any alarms are activated.
Resources
Kindly provide your valuable feedback on the page to the link provided HERE
Biosafety Cabinet [BSC] Class I
ContentThe Biosafety Cabinet (BSC) or microbiological safety cabinet is an enclosed, ventilated laboratory workspace for safely working with materials.A Class I BSC is defined as a ventilated cabinet for personnel and environmental protection.Class I BSCs protect workers but do not protect work products (such as specimens or cultures) against contamination because unsterilized room air is drawn over the work surface.
- Class I biosafety cabinets are typically used to either enclose specific equipment like centrifuges or for procedures like aerating cultures that might potentially generate aerosols.
- Biosafety cabinets of this class are either ducted (connected to the building exhaust system) or unducted (recirculating filtered exhaust back into the laboratory).

Figure: BSC Class I Airflow Diagram - In the Class I BSC, the room air is drawn in through the opening that also allows the entry of the operator’s arm during work.
- The air inside the cabinet then takes in the aerosol particles that may have been generated and moves it away from the operator towards the HEPA filter.
- The air moving out of the cabinet is thus, sterilised via the HEPA filters before its discharge to the environment either:
- Into the laboratory and then to the outside of the building through the building’s exhaust system; or
- To the outside through the building’s exhaust system; or
- Directly to the outside.
- In this way, the cabinets protect the operator and the environment from the aerosols but not the sample.
Resources
Biosafety Cabinet [BSC] Class II Type A2
Biosafety Cabinet [BSC] Class III
Cleaning and Maintenance of the Biosafety cabinet [BSC]
ContentThe daily maintenance of the Bio Safety Cabinet (BSC) should be performed by lab staff and include:
- Surface decontamination of the work zone
- Cabinet power-up alarm verification
- Removal of unnecessary items from the BSC
- Flow check (inflow and downflow velocity)
- Smoke pattern test
- Entry in the logbook (shown in Table 2)
The weekly maintenance tasks to be performed by lab staff are:
- Surface decontamination of the drain pan
- Surface cleaning of fluorescent (FL) and ultraviolet (UV) lamps
- Front sash cleaning
Biosafety cabinets must undergo certification:
- At the time of installation
- Whenever they are moved
- Following any repairs or filter changes
The BSCs also require regular (annual) maintenance to ensure proper functioning.
Delaying maintenance or using underqualified personnel to conduct maintenance can put laboratory workers at risk.
Annual Maintenance - To be performed by an external agency
Parameters verified:
- Down flow and inflow velocities
- Particle count test
- Airflow smoke patterns
- Poly Alpha Olefin (PAO) test for High Efficiency Particulate Air (HEPA) filter integrity
The table 1 below summarizes the description of maintenance tasks to be performed and their frequency:
Table 1: Maintenance Tasks to be Conducted on the BSC
Description of task to be performed
Maintenance to be carried out every
Day
Week
Month
Quarter
Annually
1. Surface decontaminate the work zone
Yes
2. Cabinet power-up alarm verification
Yes
3. Decontaminate the work surface and interior surfaces with 5% phenol followed by 70% alcohol
Yes
4. Note the manometer’s reading, indicating any fall in pressure flowing through the HEPA filter
Yes
5. Thoroughly surface decontaminate the drain pan
Yes
6. Check the paper catch for retained materials
Yes
5. Clean the exterior surfaces of the cabinet
Yes
7. Check all service fixtures for proper operation
Yes
8. Inspect the cabinet for any physical abnormalities/ malfunction
Yes
9. Re-certification
Yes
10. Change UV-lamp
8000-9000 hrs. of use
Table 2: Maintenance Log Sheet
Date
Time of use
Cumulative duration of use
Cumulative duration of use of UV lamps
Visual alarm
Sound alarm
Smoke test
Airflow
m/s
(for class II BSC)
Observation
Operator’s
Sign
Change UV lamps after XXX hours of use (according to manufacturer's recommendations)
Resources
Kindly provide your valuable feedback on the page to the link provided HERE
Biosafety Requirements in the LPA Lab: Refrigerated Centrifuge Use
ContentThe refrigerated centrifuge is used in the mycobacteriology laboratory for concentrating bacterial cells, following the processing of sputum or other specimens. It is also used for spinning down reagents from walls of containers. The temperature maintained within the refrigerator centrifuge is 4°C to reduce the percentage of mycobacteria killed due to heat generated during centrifugation. The required G force is 3000 x g (not RPM).
Essential Features of the Refrigerated Centrifuge
- Swinging Bucket Rotor: The component that is rotated by the drive system and holds the containers being centrifuged. It is air and liquid-tight. It allows for longer distance of travel which allows better separation, and it is easier to withdraw or decant the supernatant without disturbing the pellet
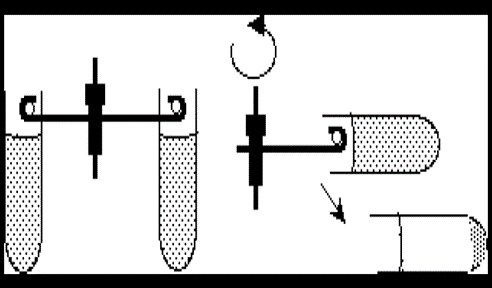
Figure 1: Advantage of the swing bucket in the centrifuge
- Sealed Safety Centrifuge Cups:
- Safety cups protect laboratory staff by providing containment of any aerosols that are produced during centrifugation, especially if tubes break (see Figure 2)
- Safety cups must be opened inside the biosafety cabinet (BSC)
- Safety cups have a silicone- coated rubber O-ring that provides an air-tight seal
- These seals must remain coated with silicone so that seals stays air-tight
Before use, it is important to inspect all the components.
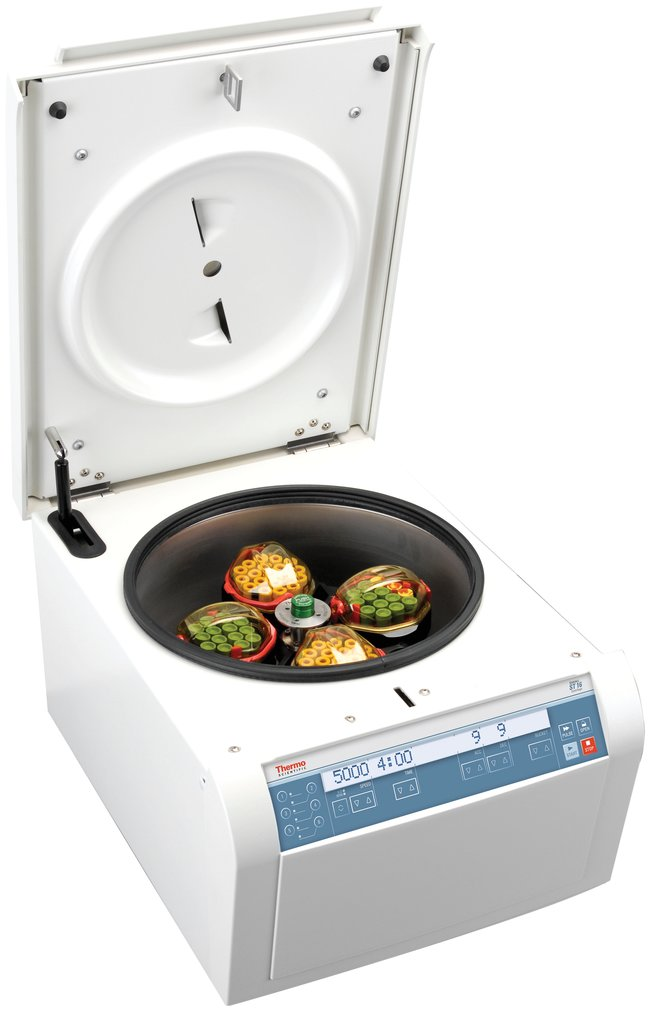
Figure 2: Refrigerated Centrifuge

Figure 3: Rotor and Centrifuge Cup (indicated by arrow) in a Refrigerated Centrifuge
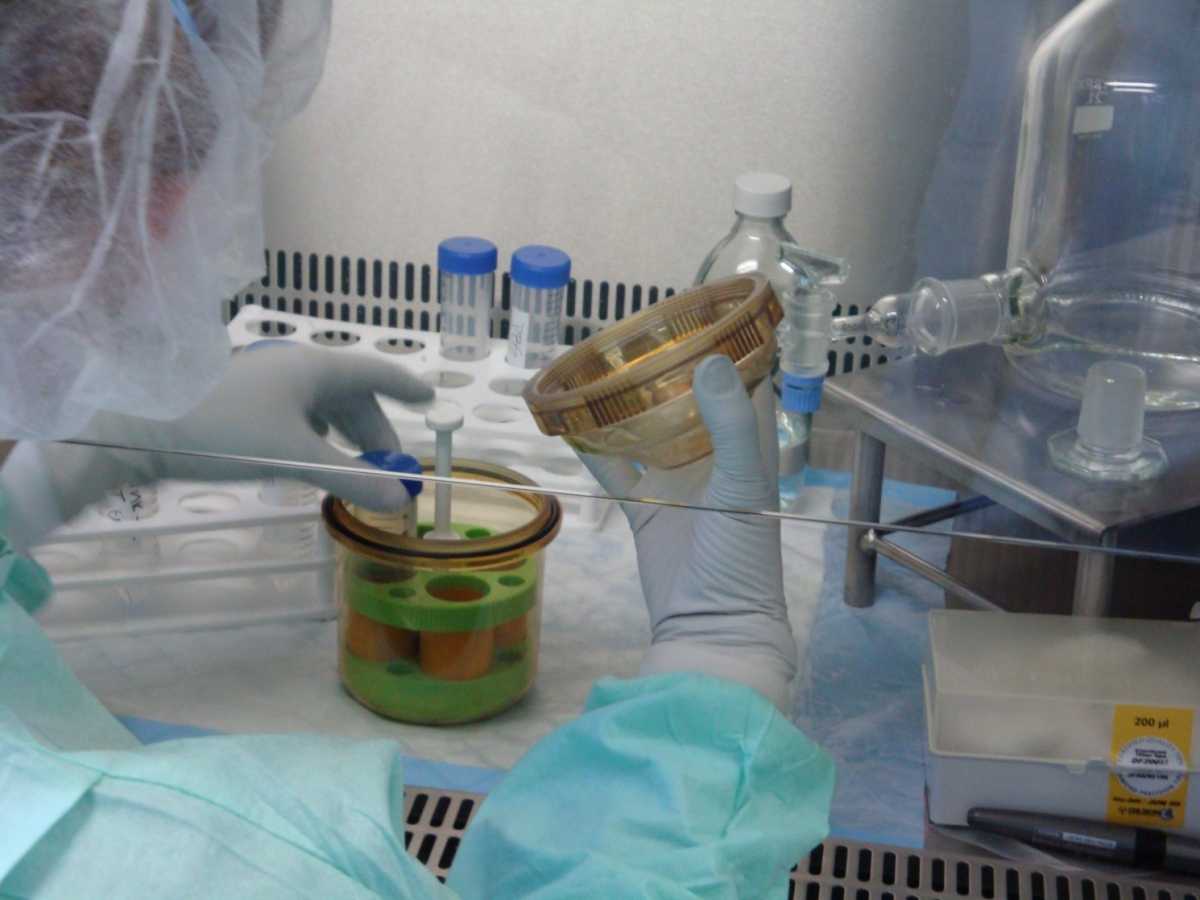
Figure 4: Safety bucket in use
Principle of Procedure
- A centrifuge is intended to separate particles in a liquid by sedimentation. Dense particles sediment first, followed by lighter particles.
- In a TB laboratory, centrifuges are used for the sedimentation and concentration of tubercle bacilli within liquefied sputa or body fluids (usually urine).
- To obtain a high sedimentation efficiency of 95%, i.e. 95% of bacilli recovered in the sediment and only 5% of bacilli still in suspension to be discarded with the supernatant, it is necessary to maintain 3,000 g for 15-20 minutes.
- The high speeds and time used to achieve effective sedimentation efficiency leads to heat build-up in the centrifuge and the specimen.
- To prevent cell death due to overheat, the use of a refrigerated centrifuge model, operated at 18-20°C, is recommended.
Refrigerated Microcentrifuge
- Provides high-speed centrifugation up to 13,000 rpm
- Use microcentrifuge tubes with a capacity of 1.5 to 2.0 ml
- Fixed angle rotor with a lid
- Rotor can be removed from the centrifuge chamber
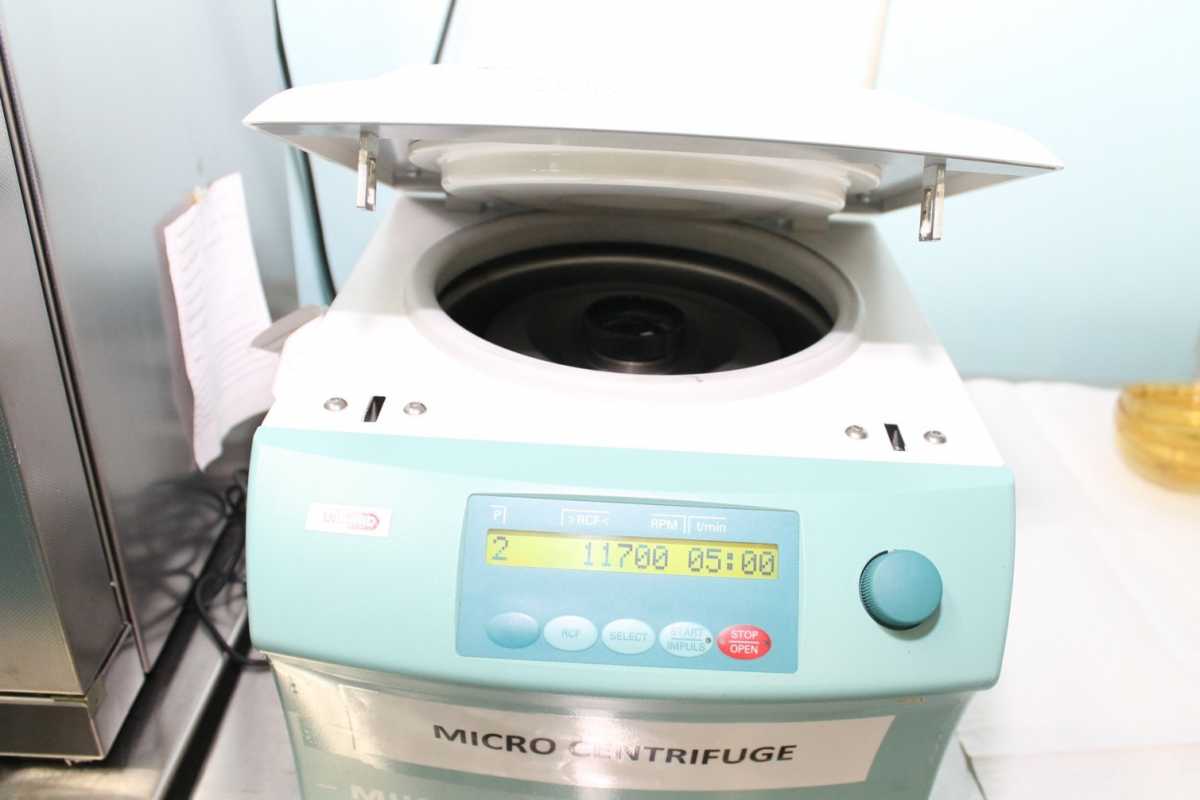
Resources
Kindly provide your valuable feedback on the page to the link provided HERE
How to Use Refrigerated Centrifuges
ContentPrinciple of procedure
- A centrifuge separates particles in a liquid by sedimentation. Dense particles sediment first, followed by lighter particles
- To obtain a high sedimentation efficiency of 95%, it is necessary to centrifuge the TB specimens at 3,000 g for 15-20 minutes
- The high speed and time used to achieve effective sedimentation efficiency lead to heat build-up in the centrifuge and the specimens. To prevent cell death due to overheating, the use of a refrigerated centrifuge is recommended
How to use refrigerated centrifuges?
Select type of tube, based on:
- G force used for swing-out bucket
- Time of centrifugation
- Temperature
- Compatibility with specimen
- Chemically inert
Visually inspect tubes
Do not use if tubes have:
- Cracks
- Scratches
- Chipped rims
Fill tubes only to the recommended volume
- Do not overfill tubes
- High g forces can drive liquid up to the cap and cause overflowing
Before using centrifuge
- Inspect the interior of the bowl for stains
- Inspect rotors and buckets for cracks and signs of corrosion
- Always check the silicon O ring for any wear & tear of the aerosol lid
- Check log book to ensure centrifuge is in good working condition
- Pre-cool centrifuge prior to use
Use of safety centrifuge
- Centrifuge load MUST always be balanced to avoid the risk of damage
- Add a balance tube with the same volume of water if processing an odd number of specimens
- Select the required time and g force or RCF
- Stop centrifuge immediately if any abnormal noise and/or shaking is noticed
- Never use the brake to stop a normal operating centrifuge for TB specimen processing
- ALWAYS open the sealed buckets inside the biosafety cabinet (BSC)
Microcentrifuge
- Always balance the rotor
- Use high-quality screw-capped tubes, which will not leak or break during centrifugation
- When using a microcentrifuge for DNA extraction, the microcentrifuge should be loaded and unloaded inside the BSC
- Remove and replace the rotor carefully
Resources
- World Health Organization laboratory biosafety manual 3rd edition, pgs 72-73
- Manufacturer's instructions
- Global Laboratory Initiative LC training module on Equipment slides 32-34.
Kindly provide your valuable feedback on the page to the link provided HERE
Revolutions per minute [RPM] vs Relative centrifugal force [RCF] in the Safety Centrifuge
ContentRevolutions Per Minute (RPM) and Relative Centrifugal Force (RCF) are important abbreviations used while using a centrifuge. However, these terminologies differ from each other.
RPM vs. RCF (g force)
- RPM indicates the speed at which the rotor is rotating.
- RCF is the term used to describe the amount of accelerative force applied to a sample in a centrifuge.
- RCF is measured in multiples of the standard acceleration due to gravity on the Earth’s surface (x g).
- This is why RCF and “x g” are used interchangeably in centrifugation protocols.
- The two variables that describe RCF are the radius and the angular velocity of the rotor, i.e., how wide the rotor is and how fast it is moving.
- RCF is more precise than RPM because the rotor size might differ, and RCF will be different, while the revolutions per minute stay the same.
Calculating RCF required from the known RPM value
Formula:
RCF = 1.1118 x 10 -5 x r x rpm2
r = radius in cm from the centrifuge spindle to the bottom end of the tube
RCF = desired centrifugal force
A nomogram, provided by the manufacturer, can be used to convert RPM to RCF value.
Resources
Kindly provide your valuable feedback on the page to the link provided HERE
Protocol for Cleaning and Maintenance of Refrigerated Centrifuge
ContentPeriodic maintenance of the refrigerated centrifuge is essential to ensure that the centrifuge is in optimum condition.
Daily Maintenance:
- For a refrigerated centrifuge that is turned off at the end of the day, open the top to allow the centrifuge chamber to dry (Figure 1).
- During the day, when the unit is under refrigeration, leave the top closed to avoid condensation and ice buildup.
- The centrifuge must not be used if the interior is hot, if unusual vibrations or noises occur, or if deterioration (corrosion of parts) is detected. A qualified service technician should be contacted.
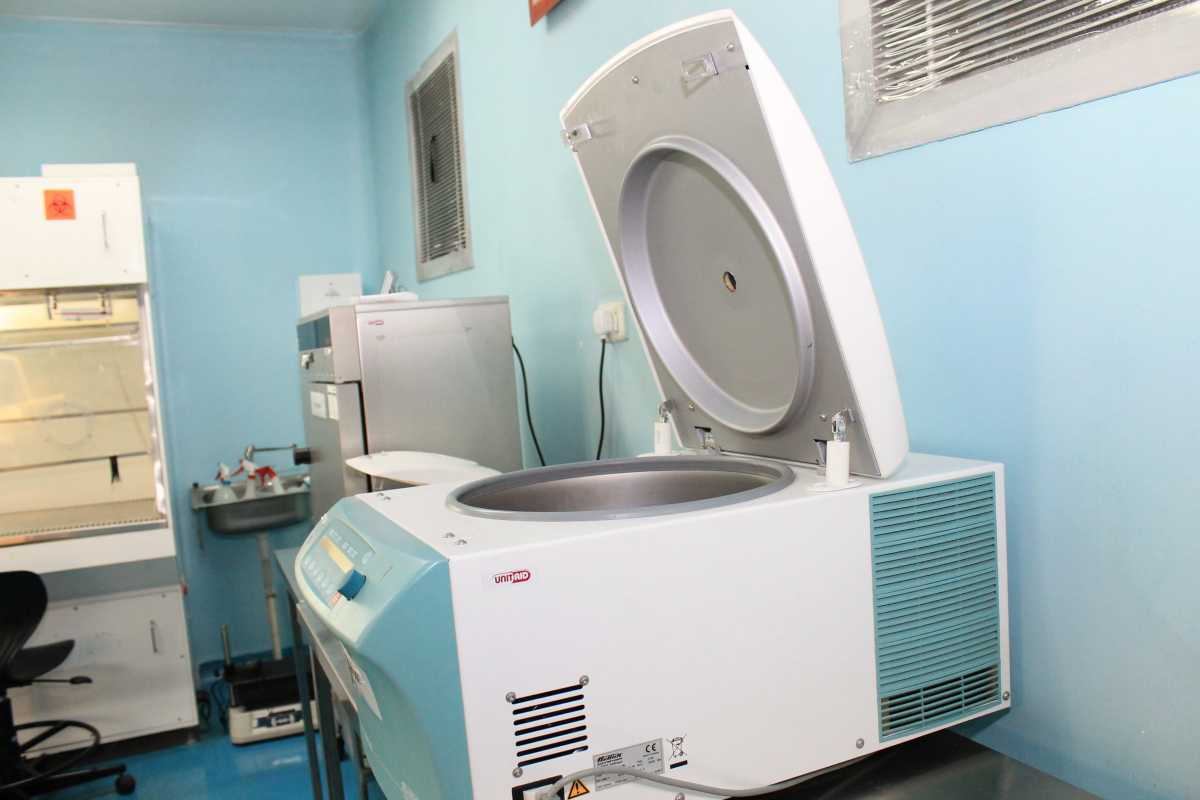
Figure 1: Refrigerated Centrifuge with Open Top to allow the centrifuge chamber to dry
Weekly Maintenance:
- Autoclave metal parts OR soak them in a disinfectant (not bleach or alcohol) for 15 minutes, rinse with sterile water and air dry.
- Soak lids in freshly prepared 1% bleach for 5 minutes and rinse with 70% alcohol or sterile water.
- Checking the rotors and rotor bores visually for residue and corrosion (Figure 2).
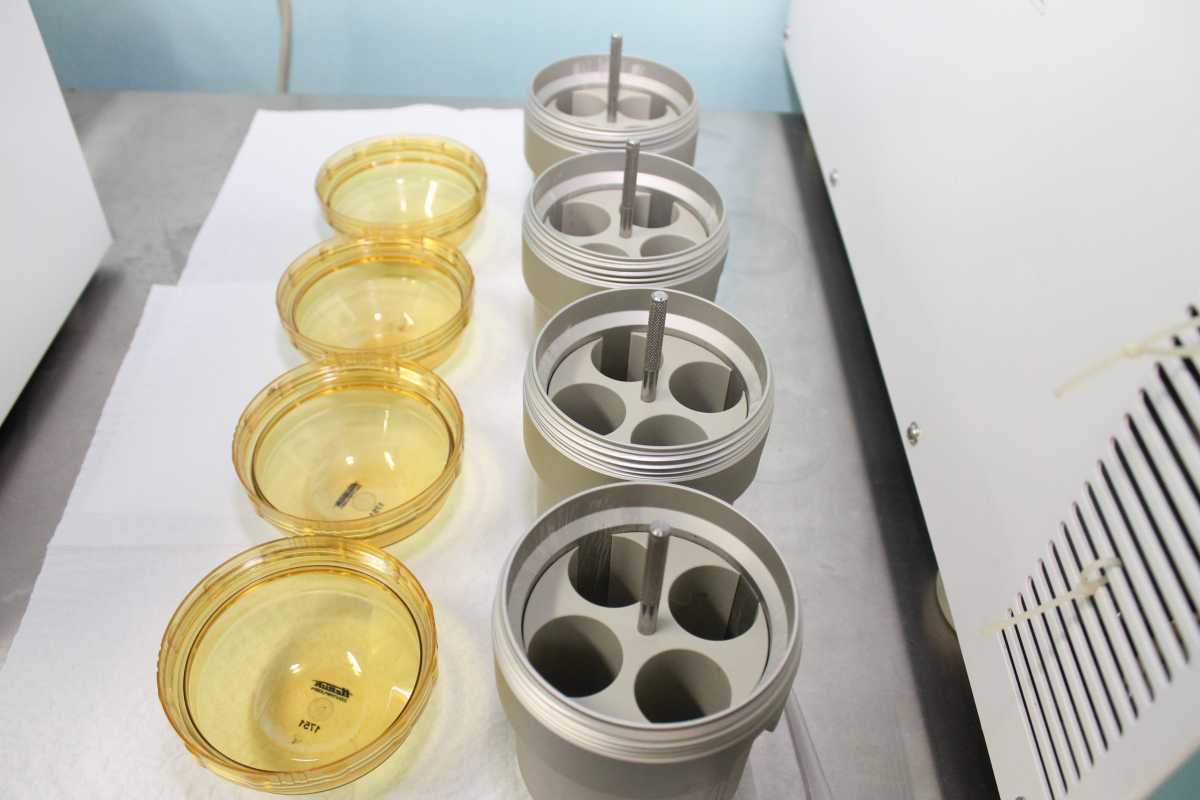
Figure 2: Lids and Rotor Bores
Monthly Maintenance:
- Clean the centrifuge housing, rotor chamber, rotors and rotor accessories with a neutral cleaning agent, e.g., mild soap.
- Lubricate rotor threads with lubricant.
- Lubricate O-rings with lubricant supplied by the manufacturer.
- Clean plastic and non-metal parts with a fresh solution of 1% sodium hypochlorite (bleach), followed rinsing with sterile water.
Note: Each laboratory should maintain centrifuge usage record in a log book (Figure 3).

Figure 3: Centrifuge Usage Log Book
Annual Maintenance:
Full service should be provided by a qualified service technician, which may include the servicing of the following:
- Centrifuge brushes
- Timer
- Electrical components
- Leaks
- Speed
Good practices for centrifuge usage:
- Always carefully read the operating manual before the initial operation of the centrifuge.
- Run the centrifuge with samples that are symmetrically loaded in the aerosol tightened buckets and open the buckets in the Bio Safety Cabinet (BSC) after centrifugation is done.
- Routinely check the silicon O-ring for any wear & tear of the aerosol lid.
- Always use centrifuge tubes that will withstand the required centrifugation speed.
- Perform maintenance activity as required.
Practices to be avoided when using the centrifuge are:
- Moving or knocking during operation
- Running the unit when there is heavy noise from the machine
- Running with unbalanced sample load
- Running if there is any wear & tear with the O-ring of the aerosol lid
- Adding water to a specimen to balance tubes
- Stopping the running cycle
Resources
- World Health Organization Laboratory Biosafety Manual, 3rd edition, p72-73.
- Global Laboratory Initiative Training Package on LC.
Kindly provide your valuable feedback on the page to the link provided HERE
Quality Control Process of the Autoclave
ContentThe quality control process for autoclaves is important to prevent the transmission of infection.
It is done to ensure that sterilization or decontamination by the autoclave is up to the mark.
To ensure that biohazardous waste is properly decontaminated during autoclaving, the following procedures should be followed by laboratory personnel for quality control during autoclaving:
A. Use of Chemical Indicator
- With each load of sterilization, an autoclave tape needs to be used (Figure 1)
- The autoclave tape is a visible temperature sensitive chemical indicator, with stripes that change colour after proper autoclaving is done (Figure 2)

Figure 1: Autoclave tape used on the load of material to be sterilized

Figure 2: Change in the colour of strips in the autoclave tape before and after proper autoclaving
Note: Temperature sensitive autoclave tape is not sufficient on its own to indicate that the sterilization temperature (121ºC), is uniformly achieved throughout the chamber.
B. Biological Indicator (BI)
Biological indicators are used for checking the quality of autoclaving on a monthly basis, even if the autoclave has a paper printed monitoring system for autoclave effectiveness. The results need to be documented and kept for at least one year.
Principle of Biological Indicators
- Heat-resistant Geobacillus Stearothermophilus spores are used for autoclave efficiency testing
- After autoclaving, the autoclaved spore vial is incubated in a culture along with a non-autoclaved control vial at 56-60ºC
- The control biological indicator should yield positive results for bacterial growth and the autoclaved biological indicator should not show any growth (see Figure 3)
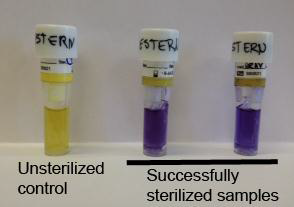
Figure 3: Showing effective use of the biological indicator

Figure 4: Steps to follow when using biological indicators
Reading and Recording
- Record details of the loading and of the autoclave’s operation in the autoclave logbook
- Incidents, accidents and/or mechanical problems must be recorded and reported to a supervisor immediately

Figure 5: Autoclave Logbook
Resources
- Tuberculosis Laboratory Biosafety Manual, 2012, WHO.
- Mycobacteriology Laboratory Manual, April 2014, WHO.
- Autoclave Quality Assurance Program, Biosafety Manual, Boston University.
Kindly provide your valuable feedback on the page to the link provided HERE
Maintenance of the Autoclave in TB Labs
ContentAutoclaves are pretty simple to use but there are a few steps for better maintenance of an autoclave.
A. Daily Maintenance
- Check that the lid/ door gasket is clean. After each cycle of an autoclave, the lid must be cleaned properly.
- Check if there is any crack in the gasket. If a crack is there, the instrument should not be used.
- Check for leaks while the autoclave is running. If bubbles are coming out, it indicates leaking from autoclave. Such an autoclave must be tagged as “Not Approved for Infectious Waste” and should not be used.
- The autoclave and work area must be cleaned after every use.
- Sensor must be checked after every use and there should not be any damage to the sensor.
- The work area must be disinfected according to the Standard Operating Procedure (SOP) for disinfection.
B. Weekly Preventive Maintenance
- The drain strainer must be removed and cleaned, if necessary.
- Whenever the drain strainer is cleaned, its entry into the logbook must be done.
- The operator must check the operation of the pressure release safety valve to verify proper function. During this check, the operator must keep himself away from the release valve exhaust to prevent a burn injury.
Resources
Kindly provide your valuable feedback on the page to the link provided HERE
Common Problems and Troubleshooting Related to Autoclaves in TB Lab
ContentCommon Problems and Troubleshooting Related to Autoclaves in TB Lab
Table: Common Problems and Troubleshooting Related to Autoclaves in TB Lab
SR NO
PROBLEM
CAUSES
SOLUTION
1
Drain is clogged or exhaust taking more time than normal
There may be clogging of drain valve dust
- Clean the chamber
- Drain the filter
2
Scaling and salt deposition
- Cleaning is not proper
- There is moisture inside the instrument
- Exposure to chemicals like acids & detergents
- Cleaning must be improved and proper
- Check the sterilizer for efficient drying
- Store autoclave in a dry area
- Do not expose instruments to chemicals like acids and detergents. If exposure occurs, rinse thoroughly after contact
- Use only distilled water in the boiler
3
Liquid container caps blowing off
The sterilizer is exhausting too rapidly
Use slow exhaust cycle during autoclaving
4
When the door of the autoclave is open, the solution is still boiling
The door of an autoclave is opened too quickly
- Do not open an autoclave door until the temperature gauge is below 85⁰C and the pressure gauge is at "0"
- Do not touch or move a load, when the solution is boiling
5
Indicator of an autoclave shows sterilization not complete
- Load in an autoclave chamber may be too large, too dense, or improperly loaded
- The time provided for an autoclaving is not sufficient for the load
- Autoclave may be malfunctioning
- Don’t overload an autoclave with the material
- Load must be placed properly in an autoclave chamber
- Increase the time given for autoclaving
- Strips may need to be changed
6
Steam leakage
- The gasket may be worn out
- The door of an autoclave may be closed improperly
- The gasket needs to be changed
- The door needs to be closed properly
7
Chamber door won’t open
- There may be a vacuum in the chamber
- The door lock clutch of an autoclave may be jammed
- The gasket of an autoclave may be sticking to the door frame
- Follow manufacturer instructions properly during each cycle of autoclave
- Contact service engineer, if the problem persists
Resources
- Tuberculosis Laboratory Biosafety Manual, 2012, WHO.
- Mycobacteriology Laboratory Manual, April, 2014 , WHO.
Kindly provide your valuable feedback on the page to the link provided HERE
LPA Laboratory Equipment: Micro Pipettes
ContentUse of Micropipette
- Micropipette (Figure) dispenses and aspirates liquid (reagent, sample).
- IT is used in the DNA Extraction Room, Master Mix Room, Amplification Room and Hybridization Room to dispense reagents for Line Probe Assay (LPA).
- A micropipette should be dedicated to each room and labelled accordingly.
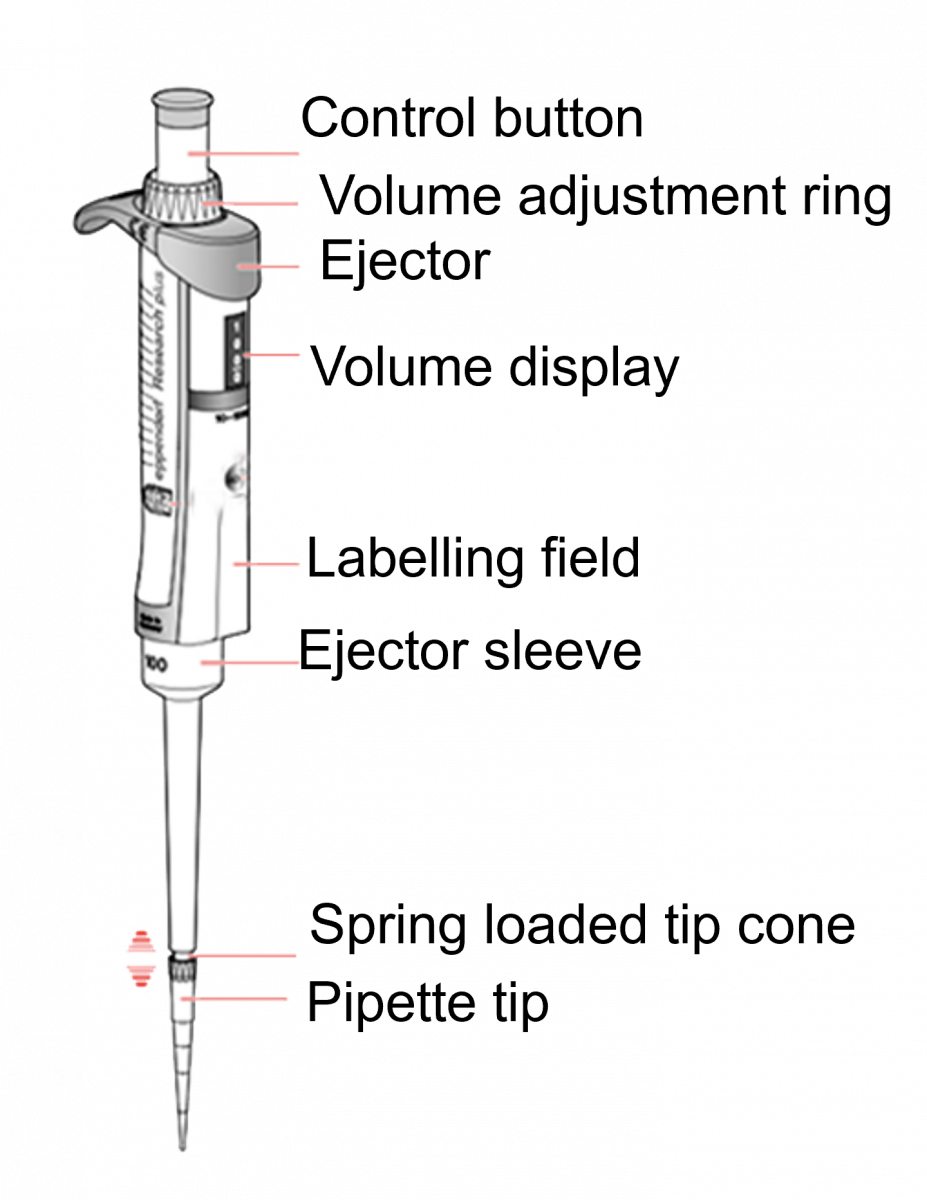
Figure: Micropipette
Cleaning:
- As per the manufacturer’s instructions
- Before and after every use wipe with 70% alcohol
Maintenance:
- Calibrated biannually
- To be done by a qualified service technician, which includes:
- Cleaning all parts
- Greasing of moving parts
- Checking function of all parts
- Calibration and validation using master calibration balance
Resources
Kindly provide your valuable feedback on the page to the link provided HERE
LPA Laboratory Equipment: Hot Air Oven
ContentUse of Hot Air Oven
- For heating non-explosive substances and objects
- For dry heat sterilization
- During DNA extraction step; kills Mycobacterium tuberculosis and partially lyses the cells at 95oC
Installation of the Hot Air Oven (Figure 1)
- The installation site must be flat and horizontal, and be able to reliably bear the weight of the appliance.
- Sufficient air circulation in the vicinity of the appliance must be guaranteed at all times.
- When installing, ensure that the distance between the wall and rear side of the appliance must be at least 15 cm.
- The clearance from the ceiling must not be less than 20 cm, and the side clearance from walls or nearby appliances must not be less than 5 cm.
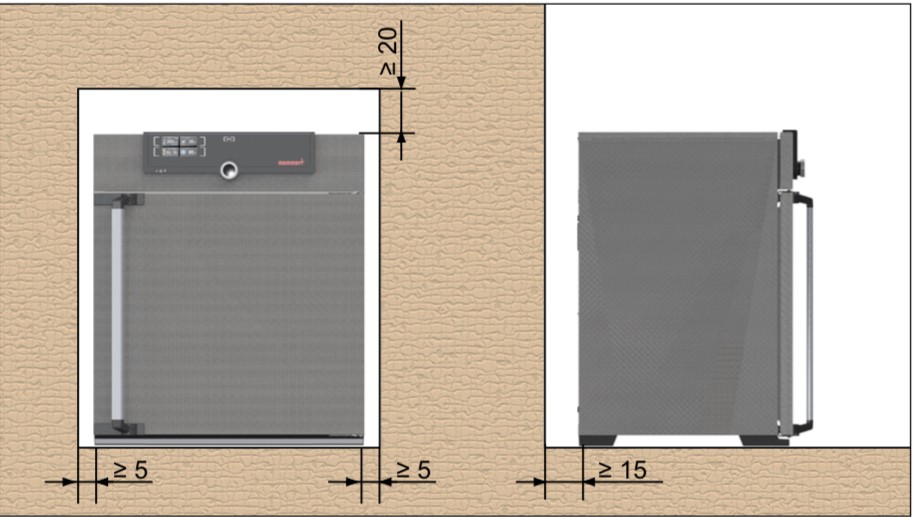
Figure 1: Clearance of the hot air oven to allow sufficient air circulation
Components of Hot Air Oven (Figure 2)
- Insulated chamber surrounded by an outer case containing electric heaters
- Fan
- Shelves
- Thermocouples
- Temperature sensor
- Door locking controls
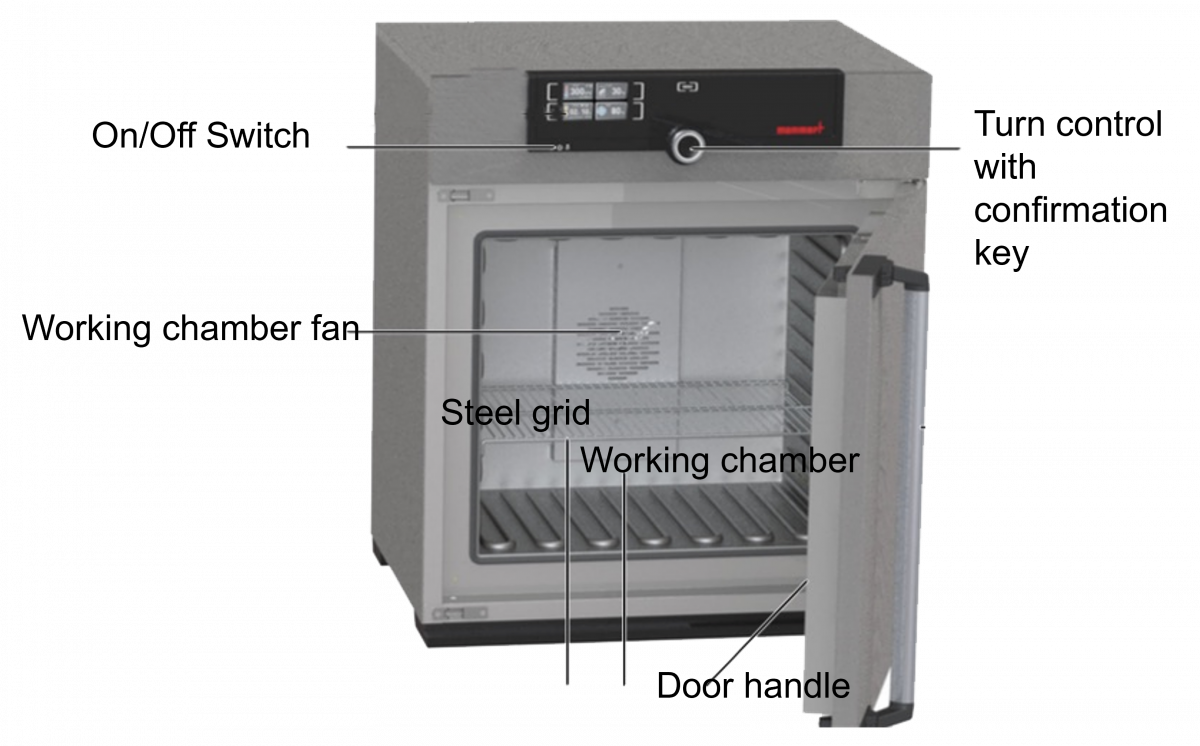
Figure 2: Hot Air Oven Components
General Instructions for Maintenance
- Always switch off the appliance before any maintenance activity.
- Always record every maintenance activity performed.
Maintenance:
- Monitor temperature
- Immediately clean up with disinfectant if there is any spill
- Leave the rack in the oven
- Lubricate the door hinges and door lock systems for proper operation
Annual Maintenance:
Performed by a qualified service technician:
- Check temperature system
- Temperature distribution
- Noise level detection
- Overall operation and alarm function
Resources
Kindly provide your valuable feedback on the page to the link provided HERE
LPA Laboratory Equipment: Micro Centrifuge
ContentUse of Micro Centrifuge
- Designed for the separation of materials through sedimentation using centripetal force
- Used in DNA Extraction Room to concentrate specimens during processing
Components and Use (Figure)
- Air tight rotor – Provides containment for aerosols that may be released during centrifugation, loaded symmetrically
- Positions in air tight rotor - To evenly distribute centrifuge tubes on all rotor positions
- Capacity of centrifuge tubes = 1.5 ml
- Can run a maximum of 24 samples at a time
Note: Always refer to the user manual for operations.
Figure: Top and Inside view of a Micro Centrifuge
General Instructions for Maintenance
- Always switch off the appliance before any maintenance activity.
- Always record every maintenance activity performed.
Maintenance
- Clean the appliances with clean tissue paper
- Lubricate/oil the turners, hinge of the rotor, lid locking systems
- Disinfect the spills with appropriate disinfectants
- Disinfect interior and exterior assembly with 70% Ethanol
Annual Maintenance
Performed by a qualified service technician who:
- Inspects each part
- Calibrates and validates
- Monitors temperature
- Sensors speed
Resources:
Kindly provide your valuable feedback on the page to the link provided HERE
LPA Laboratory Equipment: Vortex Mixer
ContentKey Features of Vortex Mixer
It is used in the TB laboratory to mix specimens with decontamination solutions and to homogenize solutions of TB bacilli for DNA extraction and during the preparation of the PCR Master Mix.
- During the DNA extraction step:
- Growth from liquid culture is vortexed to break up clumped Mycobacterium tuberculosis
- Homogenize bacilli
- Mix specimens with decontamination solutions
- Gentle vortex is used to mix reagents in PCR master mix tube.
Most vortex mixers have variable speeds and can run continuously or run only when a tube is inserted in the rubber cup.
The mixer must always be placed on a level and stable surface. Vortex mixing generates aerosol, must be placed towards the back of the biosafety cabinet.
Components and Mechanism of the Vortex Mixer
The vortex mixer has the following components:
- Electric motor
- On and off switch
- Knob for increasing or decreasing the speed
- Cupped rubber piece mounted on the center

Figure: Components of the Vortex Mixer
As the motor runs, the rubber piece oscillates rapidly in a circular motion.
When a sample tube is pressed into the rubber cup or touched to its edge, the motion is transmitted to the liquid inside and vortex is created.
Maintenance of Vortex Mixer
- Before and after use, wipe it with 70% ethanol.
- Clean and replace the rubber cup as needed.
Resources
Kindly provide your valuable feedback on the page to the link provided HERE
- During the DNA extraction step:
LPA Laboratory Equipment: PCR Hood
ContentPolymerase Chain Reaction (PCR) hood is a workstation enclosed by three sides.
Use of Polymerase Chain Reaction (PCR) Hood:
- Used in the Master Mix Reagent Preparation and DNA Amplification Room
- Ultraviolet (UV) light (Figure) in PCR hood denatures nucleic acids
- Used to decontaminate reagents and equipment prior to PCR reaction
- Provides protection against exogenous DNA, contaminants or inhibitors from entering the reaction tubes
Figure: Components of the PCR Hood
- PCR Hood has UV light and recirculator fan with prefilters
- It is made of stainless steel, therefore easier to clean
- Always refer to the user manual for operating the equipment

General Instructions on Maintenance
- Always switch off the appliance before any maintenance activity.
- Always record every maintenance activity performed.
Maintenance
- Clean outer and inner surfaces with freshly prepared 1% sodium hypochlorite.
- Replace UV bulbs and filters according to manufacturer recommendations.
Resources
Kindly provide your valuable feedback on the page to the link provided HERE
LPA Laboratory Equipment: Thermocycler
ContentThermocycler is also known as Polymerase Chain Reaction (PCR) Machine.
Use of Thermocycler
Thermal cycler is used for amplification of nucleic acid by PCR.
The thermocycler should be placed in the amplification/ post-amplification area.
The features of a thermocycler are listed below.
Features of a thermocycler:
- High accuracy
- Programmable heat block
- Temperature controlled
- Time controlled
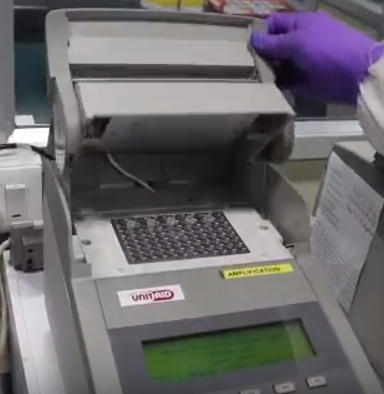
PCR is performed based on denaturation, amplification and annealing steps at different temperatures (Figure).
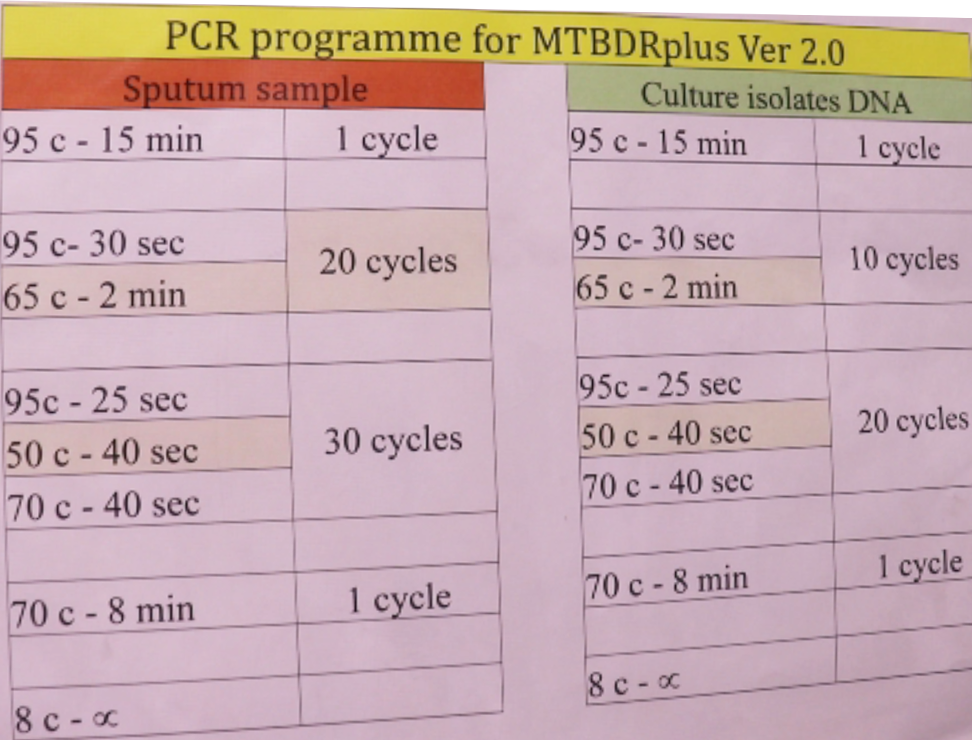
Figure: PCR Programme for MTBDR Plus Ver.2.0
General Instructions for Maintenance
- Always switch off the appliance before any maintenance activity.
- Always record every maintenance activity performed.
Annual Maintenance and Calibration
This is to be done by a qualified service engineer:
- Clean the exhaust fan assembly.
- Check all inbuilt switches.
- Temperature calibration and time validation with devices traceable to national and international standards.
- Validate the Peltier element efficiency by checking heating and cooling time, regimes and rates of block.
- Validate thermal block using PCR validation kit.
Resources
Kindly provide your valuable feedback on the page to the link provided HERE
LPA Laboratory Equipment: Water Bath
ContentIn the Line Probe Assay (LPA) lab, the water bath is used for warming reagents used in the Hybridization Room.
It is electrically heated and electronically controlled.
Components:
- Recessing push/ turn control for simple operation of the bath
- Visual temperature indication
- Push button to set desired temperature
- Electrically heated and electronically controlled
- Water trough
Installation of Water Bath (Figure):
- The unit must be placed on a horizontal, non-flammable sturdy surface.
- The vent openings must remain unobstructed.
- Minimum wall spacing on all sides is 80 millimetres.
- The minimum spacing from top of the bath to the next ceiling must be 750 millimetres.
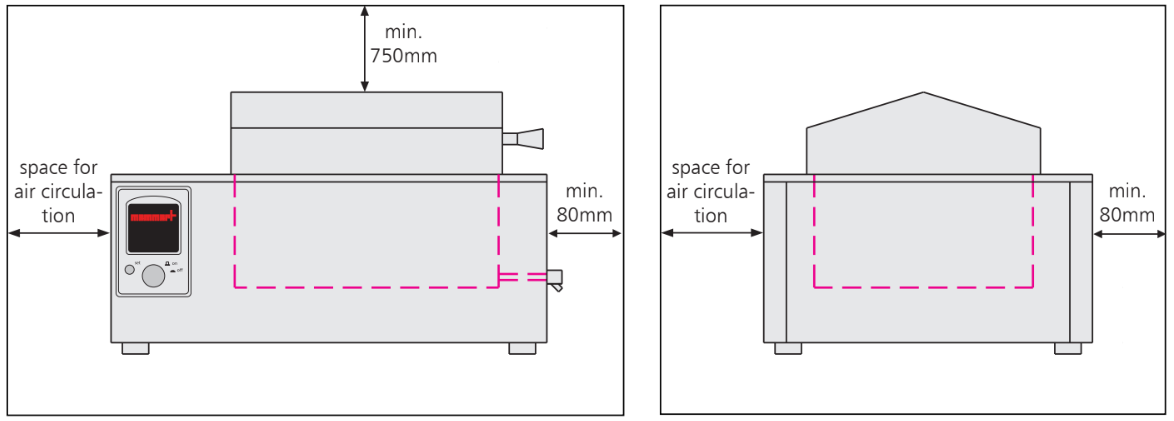
Figure: Spacing during Installation of Water Bath (Front and Side View)
Working with the Water Bath:
The heating positioned on three sides around the tank ensures a natural water circulation of the liquid inside, thus securing an optimal uniform temperature distribution.
- Vent openings must be unobstructed.
- The surface must be horizontal, nonflammable during installation.
General Instructions for Maintenance
- Always switch off the appliance before any maintenance activity.
- Always record the maintenance activity performed.
- Rusting objects must not come into contact with stainless steel bath tank.
- Rusting areas must be cleaned and polished immediately.
- Lubricate/ oil the hinge bolts from time to time.
- Replace distilled/ demineralized water and clean the water bath every week.
Annual Maintenance
- This is done by a qualified service technician
- Includes the calibration or validation of the temperature with a thermostat/ digital controller with devices traceable to National/ International Standards.
Resources
Kindly provide your valuable feedback on the page to the link provided HERE
LPA Laboratory Equipment: Twincubator
ContentUses of Twincubator in Line Probe Assay (LPA):
- Different steps of the hybridization (shown in figure below) and detection procedure with DNA strips in reverse blot hybridization assays.
- In the amplification/ post-amplification area.
Figure: Twincubator used in Hybridization
Features of Twincubator:
- Provides dry incubation
- Thermo-shaker
- Programmable
- Temperature and time-controlled features
- Pre-installed temperature profile for processing of the LPA tests
- Nine storage programs with up to 20 steps
- No. of samples run - 1 to 12, including one positive and two negative controls
- User friendly with minimum risk of contamination
Note: Always refer to the user manual for operation.
Maintenance:
- Always switch off the appliance before any activity.
- Always record every maintenance activity performed.
- Clean the housing of the instrument.
- The instrument must be protected from harsh chemicals.
- Clean the instrument immediately, if liquid enters the hybridization block.
- Perform preventive maintenance (temperature check) regularly.
Resources
Kindly provide your valuable feedback on the page to the link provided HERE
Laboratory Equipment: Thermometer
ContentThermometers are used to measure temperature. There are 4 types of thermometers used in line probe assay (LPA) laboratories:
- Electronic Thermo Hygrometer
- Alcohol Thermometer
- Digital Maxima – Minima Thermometer
- Dial Spring Thermometer
Electronic Max-Min Thermo-Hygrometer
It monitors the temperature and humidity, and has the following features:
- Recording of maximum/minimum humidity and temperature value automatically
- Alarm function
- Calendar function with months and years by pushing ADJ button (optional)
- Each thermometer is provided with a back stand and hanging hole
- Used in expert room and media preparation room

Glass Alcohol Thermometer
It is used for monitoring temperature of refrigerator, incubator, Walk-in Incubator (WII) and Walk-in Cold room (WIC). It has the following features:
- Temperature ranges from 0°C to +100°C
- Accuracy: ±1.0°C or better within the range 0°C to +70°C
- Resolution: ±0.5°C
- Sensor: Coloured alcohol in glass column
- Temperatures displayed in degrees Centigrade
- Casing is always non-corrodible plastics or metal case
- Easily readable centigrade scale

Digital Maxima-Minima Thermometer:
- Resolution: 0.1°C
- Accuracy: ± 0.1°C
- Precision: ± 0.2 % full scale
- Flexible probe (Preferably K type) Thermocouple, waterproof & Heat resistance cable/probe
- Measuring frequency: 3 measuring per second
- Display: Digital LCD display
Digital Maxima:
- Measuring range: -100°C to + 60°C
- It is used for calibration for -80 deep freezer, -20 deep freezer, refrigerator, WIC
Digital minima:
- Measuring range: 0°C to +300°C
- It is used for calibration for Incubator, Oven, WII, Autoclave, GT Blot, Twincubator, Thermocycler
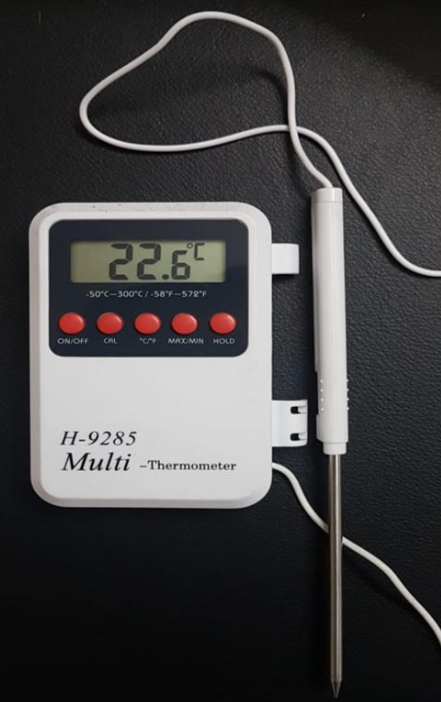
Dial Spring Thermometer:
It is used for calibration for -80 deep freezer, -20 deep freezer, refrigerator, WIC.
- Temperature Range: +50°C to +300°C
- Accuracy: +1% Full Scale. Reading stabilization within 1 min
- Casting Material: Optically clear strong glass cover with stainless surface mount (highly resistance to corrosion)
- Type: Bimetallic dial thermometer
- Easily readable centigrade scale
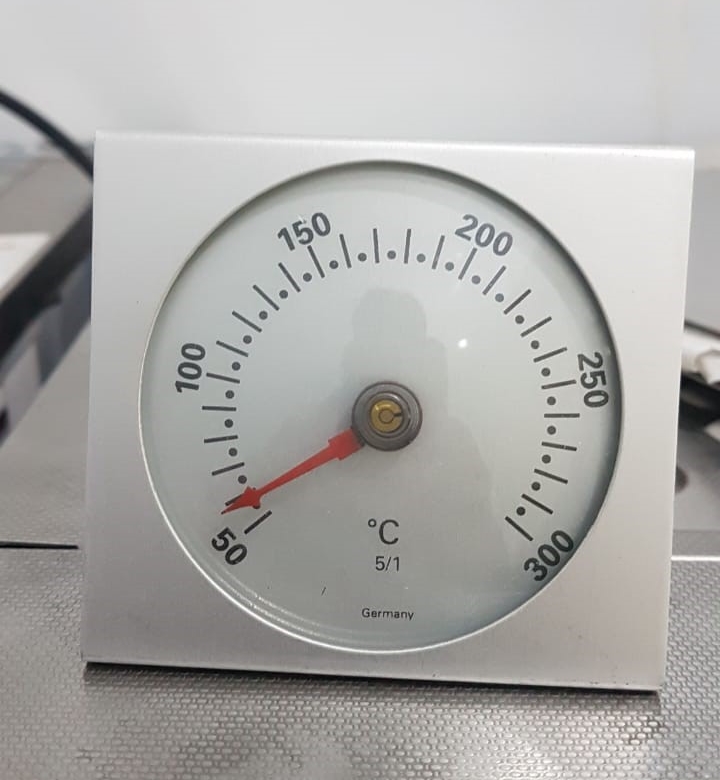
Maintenance:
- Verify that all thermometers in the laboratory are accurately reflecting the temperature
- Always use calibrated thermometers
- Thermometers that are in use should be calibrated every 6 months and documented
Resources
Kindly provide your valuable feedback on the page to the link provided HERE
-
CDST_LT: LPA procedures
FullscreenSpecimen Preparation for LC and LPA Labs
ContentLiquid Culture (LC) and Line Probe Assay (LPA) specimen processing involves pre-treatment of the sputum specimens.
Digestion and decontamination are usually done using N-acetyl-l-cysteine–sodium hydroxide (NALC- NaOH) method:
- The process is essential to free TB bacilli from the mucus cells/ tissue.
- This also helps in decontamination by killing normal flora that grows more rapidly than the TB bacilli.
NALC-NaOH Method for Sample Processing
Materials required:
• Disposable 50 ml plastic tubes (Falcon tubes)
• Sterile NaOH-NALC-sodium citrate solution/ commercial MycoPrep
• Phosphate buffer pH 6.8 (0.067M)
• Refrigerated centrifuge
• Vortex mixer
• Timer
• Transfer pipettesSteps:
- To the sputum sample in the 50 ml centrifuge tube, add equal volume NaOH-NALC-sodium citrate solution.
- Tighten the cap.
- Vortex lightly or hand mix (15-30 seconds); keep for 15-20 minutes with mixing/ vortexing gently every 5-10 minutes to completely liquify.
- Add phosphate buffer (pH 6.8) up to 50 ml mark of tube; mix well (invert mix/ vortex).
- Centrifuge at 3000 g (15-20 minutes), 4ºC.
- Wait 5 minutes for aerosols to settle, decant supernatant and discard.
- Resuspend sediment in 1-2 ml phosphate buffer (pH 6.8).
- After decontamination, resuspend the pellet in phosphate buffer (1-1.5 ml) and homogenize samples for proper mixing. This should be followed by the preparation of aliquots.
- Use aliquot/ sediment to inoculate Mycobacteria Growth Indicator Tube (MGIT) tubes and for DNA extraction for LPA.
Resources
Kindly provide your valuable feedback on the page to the link provided HERE
Extraction of DNA from Smear Positive Clinical Specimen, LJ and Liquid Media in LPA Lab Settings
ContentPurpose of DNA extraction
- Extract DNA from cellular components
For Line Probe Assay (LPA), DNA is extracted from:
- Clinical specimen
- Culture isolates on Loewenstein-Jensen (LJ) solid medium
- Bacteria growth in liquid media (Mycobacteria Growth Indicator Tube (MGIT), BD Diagnostics)
Extraction of DNA from a clinical specimen and culture isolates (LJ, liquid) is shown in the figure below:
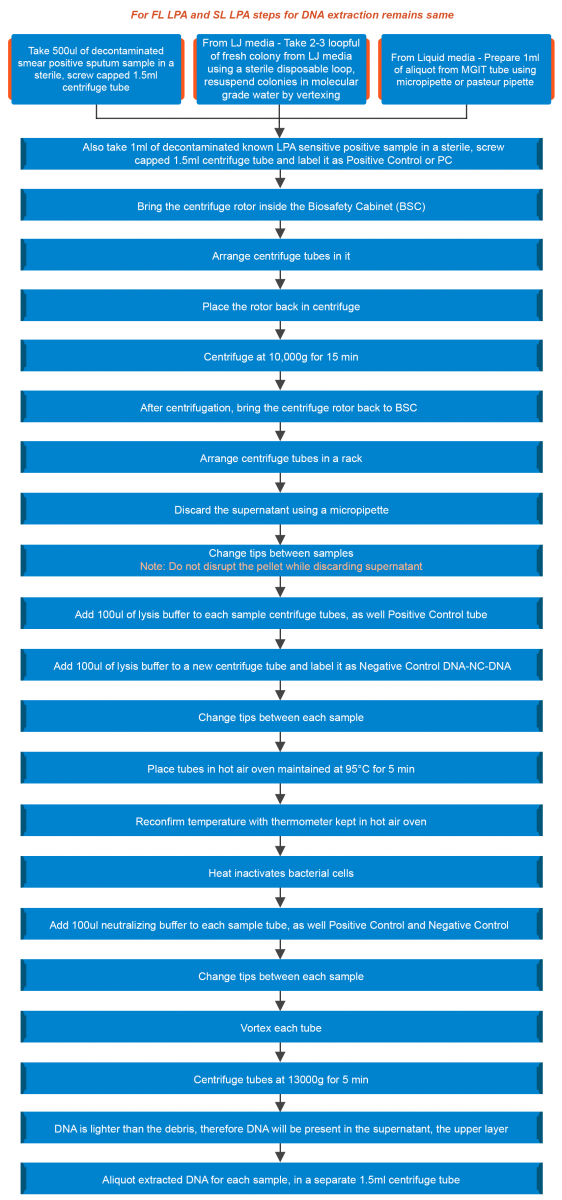
Figure: Extraction of DNA from a Clinical Specimen and Culture Isolates
Resources
- Guidelines for PMDT in India, 2021.
- Challenge TB: LPA - Introduction to Molecular Biology.
- GenoType MTBDR plus ver 2.0 kit, Instructions for Use.
Kindly provide your valuable feedback on the page to the link provided HERE
Contamination Control During DNA Extraction in LPA Lab Settings
ContentContamination of the Polymerase Chain Reaction (PCR) can occur from previously processed specimens. Hence, it is important to take precautions to avoid contamination.
To ensure contamination control during DNA extraction in a Line Probe Assay (LPA) setting, follow the do's and don’ts elaborated below.
DO's
- Label tools and instruments “For use in LPA laboratory only”.
- Do specimen preparation on a separate day (earlier) and store extracted DNA at 2-4°C.
- Proceed with reagent preparation and amplification/detection on the following day.
- Always use Biosafety Cabinet (BSC) for DNA extraction.
- Always use filtered tips.
- Change gloves if contaminated by specimens.
- Clean and disinfect the work area before and after use with disinfectant.
- Establish regular (e.g., weekly) and thorough laboratory cleaning protocols for floors, doors, walls.
DON’Ts
- Instruments used in the LPA laboratory should not be used elsewhere.
- Never take any tools/ instruments used for DNA extraction to Reagent Preparation Area.
- Do not try to put cotton plugs into unfiltered tips.
- Do not use flip-cap tubes, always use screwcap tubes.
Resources
- Molecular Detection of Drug-resistant Tuberculosis by Line Probe Assay.
- GLI Training Package on LPA.
Kindly provide your valuable feedback on the page to the link provided HERE
LPA PCR Reagent Preparation: Test Reagents Kit
ContentTest Reagents Kits Used for First Line (FL) and Second Line (SL) Line Probe Assay (LPA)
- For FL LPA- kit used is MTBDR plus version 2.0
- For SL LPA- kit used is MTBDRsl version 2.0
Components of kits are shown in the following table.
Table: Components of MTBDR plus version 2.0 (FL LPA) and MTBDRsl version 2.0 (SL LPA) kits
COMPONENTS OF FL LPA KIT
COMPONENTS OF SL LPA KIT
Membrane strips coated with specific probes
(MTBDRplus VER 2.0 STRIPS)
Membrane strips coated with specific probes (MTBDRsl VER 2.0 STRIPS)
Denaturation Solution (DEN)
Denaturation Solution (DEN)
Hybridization Buffer (HYB)
Hybridization Buffer (HYB)
Stringent Wash Solution (STR)
Stringent Wash Solution (STR)
Rinse Solution (RIN)
Rinse Solution (RIN)
Conjugate Concentrate (CON-C)
Conjugate Concentrate (CON-C)
Conjugate Buffer (CON-D)
Conjugate Buffer (CON-D)
Substrate Concentrate (SUB-C)
Substrate Concentrate (SUB-C)
Substrate Buffer (SUB-D)
Substrate Buffer (SUB-D)
Tray
Tray
Evaluation sheet
Evaluation sheet
Instructions for use
Instructions for use
Template
Template
Amplification Mix A (AM-A GT MTBDRplus VER 2) contains buffer, nucleotides, Taq polymerase
Amplification Mix A (AM-A GT MTBDRsl VER 2.0) contains buffer, specific primers, nucleotides, Taq polymerase
Amplification Mix B (AM-B GT MTBDRplus VER 2.0) contains salts, specific primers, dye
Amplification Mix B (AM-B GT MTBDRsl VER 2.0) contains buffer, salts, dye
All kits are stored at 2-8°C while Amplification Mix A and B (both kits) are stored at -20°C.
Resources
- GenoType MTBDR plus ver 2.0 kit, Instructions for Use.
- GenoType MTBDRsl VER 2.0 kit, Instructions for Use.
Kindly provide your valuable feedback on the page to the link provided HERE
PCR Reagent Preparation Procedure in the LPA Lab
ContentIn a Line Probe Assay (LPA) lab, subsequent to DNA extraction, reagents are prepared for PCR amplification using the checklist and worksheets.
Preparation Steps
- Prepare a written checklist of materials and tools needed.
- Prepare a worksheet with a list of specimens (identifiers) to be tested.
- Prepare worksheet to calculate the volume master mix ingredients (put on the wall near work area).
Setting up the Workplace
- Put on gloves and lab coat.
- Decontaminate biosafety cabinet and work area (1% Sodium hypochlorite solution, followed by 70% alcohol).
- Cover work area in a biosafety cabinet with clean paper towels.
Calculations for Master Mix Preparation
- Determine the number of specimens and controls.
- Use this number “+” 1 to calculate the volume of different components of the master mix.
- The volume of the master mix is 45 μl per specimen:
- 10 μl AM-A
- 35 μl AM-B
- Prepare the number of tubes required.
Polymerase Chain Reaction (PCR) Reagent Preparation Procedure in Master Mix Room
- Reagent preparation for both First Line - Line Probe Assay (FL-LPA) and Second Line - Line Probe Assay (SL-LPA) remains the same with only difference in the kits used. The master mix must be freshly prepared.

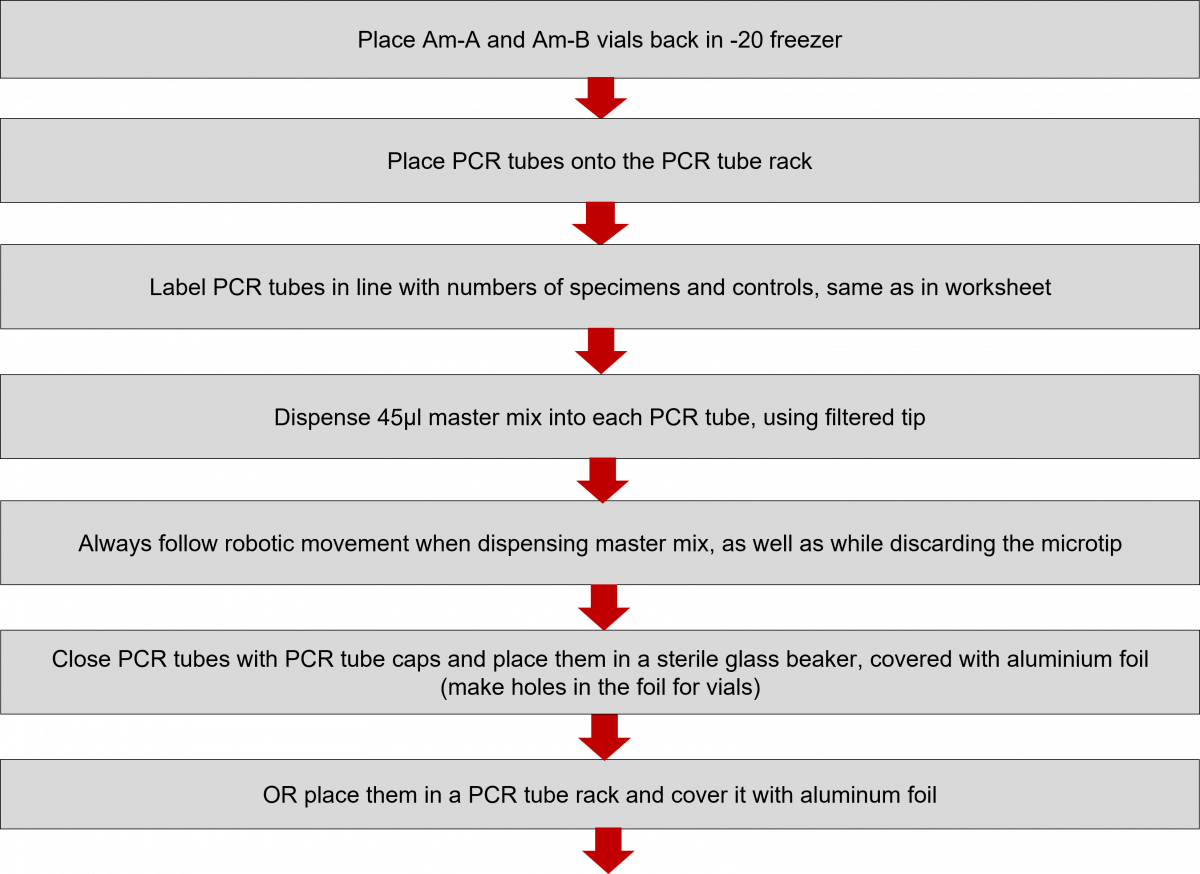

Click the video below to see how to prepare the Master Mix.
Resources
- GenoType MTBDR plus ver 2.0 Kit, Instructions for Use.
- GenoType MTBDRsl VER 2.0 Kit, Instructions for Use.
- GLI Training Package on LPA.
Kindly provide your valuable feedback on the page to the link provided HERE
Contamination Control During PCR Reagent Preparation in the LPA Lab
ContentDuring PCR Reagent preparation, if DNA fragments from the lab environment, such as a DNA template amplified in a previous qPCR experiment, enter the qPCR reaction or reagents (even in small quantities), they can be amplified during the reaction. This contamination and non-specific amplification can cause misleading results, such as false positives. Hence, contamination needs to be rigorously controlled.
Do’s and Don’ts for Contamination Control during PCR Reagent Preparation
Do’s
- Change shoes or use shoe covers, before entering the Reagent Preparation/ Master Mix Room.
- Always clean the work area properly before and after completing the work, using disinfectants.
- Keep master mix reagents in -20°C freezer.
- Label tools and instruments to be used only in Master Mix Room.
- Use 0.5 ml individual PCR tubes.
- Use a PCR hood.
- Decontaminate and calibrate pipettes regularly.
- Always prepare fresh disinfectant (1% sodium hypochlorite solution).
- Establish regular (e.g., weekly) and thorough laboratory cleaning protocols for floors, doors, walls.
Don’ts
- Tools and instruments used in Master Mix Room should not be used elsewhere.
- After working in other areas, do not come back and clean the reagent preparation area.
Resources
- GenoType MTBDR plus ver 2.0 Kit, Instructions for Use.
- GenoType MTBDRsl VER 2.0 Kit, Instructions for Use.
- GLI Training Package on LPA.
Kindly provide your valuable feedback on the page to the link provided HERE
Amplification of Extracted DNA in the LPA Lab
ContentIn the Line Probe Assay (LPA) labs, subsequent to the preparation of the Polymerase Chain Reaction (PCR) Master mix, DNA amplification is carried out.
The DNA amplification steps remain the same in both First Line - Line Probe Assay (FL-LPA) and Second Line - Line Probe Assay (SL-LPA). In DNA amplification, there is the addition of DNA to the master mix, and the amplification of DNA using PCR machine.
The procedure for amplification is shown below. Play the video below to know more.
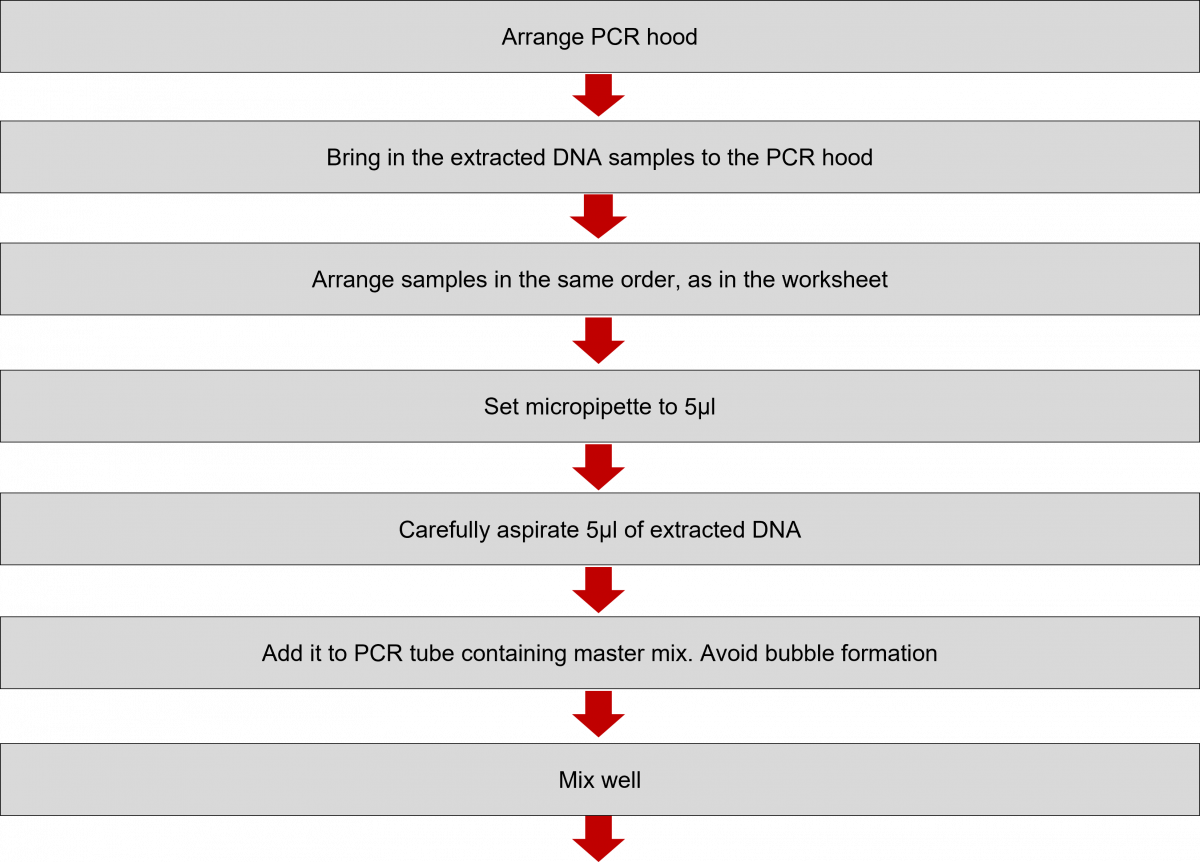
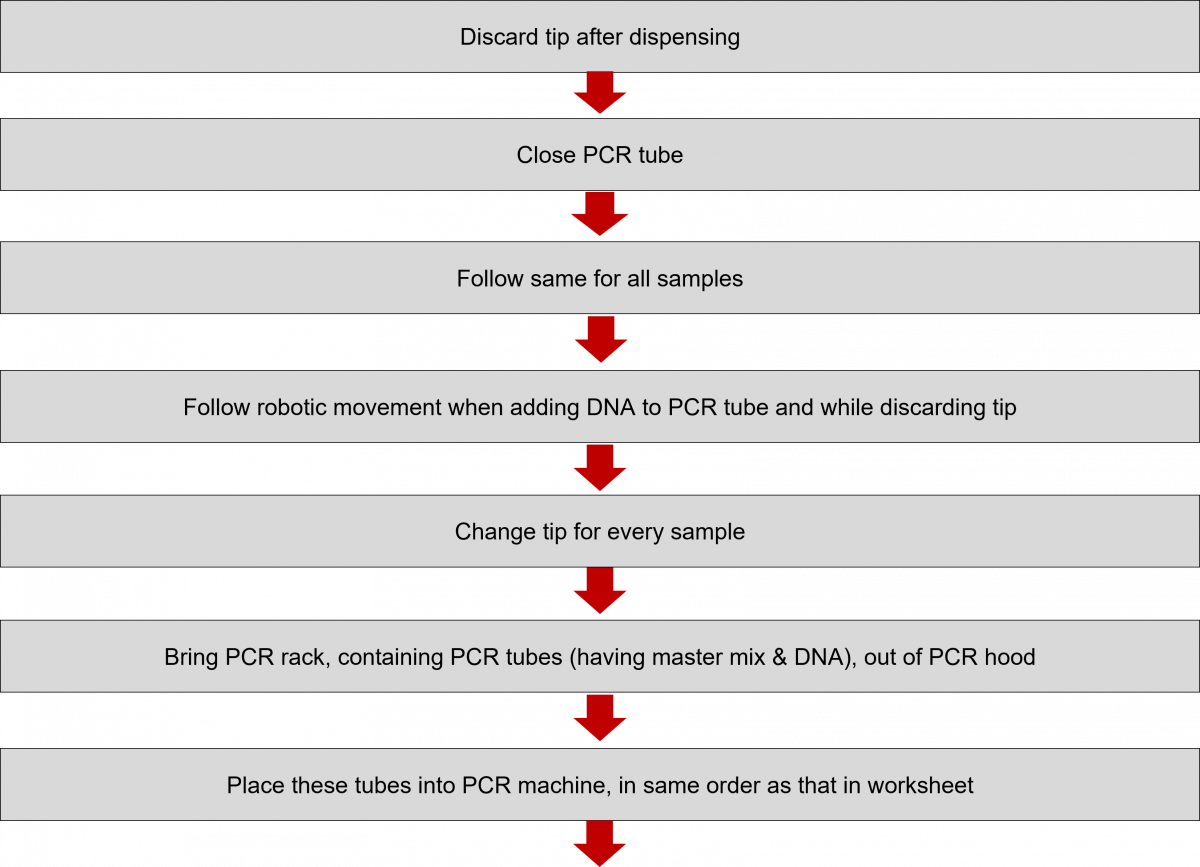
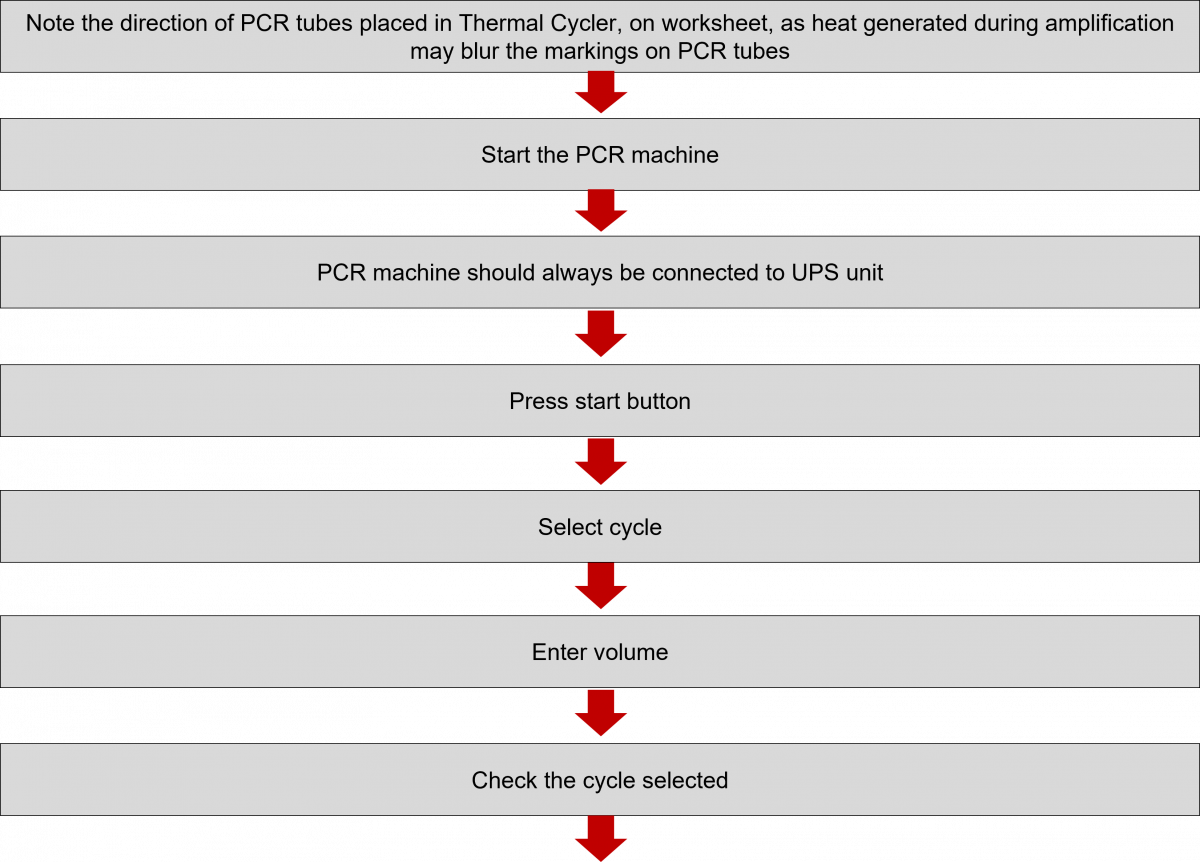

Click the video below to see the procedure for PCR amplification.
Resources
- GenoType MTBDR plus ver 2.0 Kit, Instructions for Use.
- GenoType MTBDRsl VER 2.0 Kit, Instructions for Use.
- GLI Training Package on LPA.
Kindly provide your valuable feedback on the page to the link provided HERE
Contamination Control in the Amplification Room in the LPA Lab
ContentContamination can happen in the amplification room due to exogenous DNA and spillover from last amplification or contaminants or inhibitors entering the reaction tubes.
Do’s and Don’ts for Contamination Control in the Amplification Room
Do’s
- Label tools and instruments “For use in Amplification Room Only”.
- Follow unidirectional work flow.
- Add DNA extract to PCR tubes in PCR hood.
- Change gloves if they get contaminated with amplicons.
- Always clean work area properly before and after completion of tasks.
- Establish a regular (e.g., weekly) and thorough laboratory cleaning protocol (floors, doors, walls).
Don’ts
- Tools and instruments used in the amplification room cannot be used elsewhere.
- Never take anything from the amplification room to the reagent preparation area.
Resources
- GenoType MTBDR plus ver 2.0 Kit, Instructions for Use.
- GenoType MTBDRsl VER 2.0 Kit, Instructions for Use.
- GLI Training Package on LPA.
Kindly provide your valuable feedback on the page to the link provided HERE
Overview of Hybridization in Line Probe Assay and Genotypic Drug Sensitivity Testing
ContentDeoxyribonucleic Acid (DNA) hybridization is based on complementary strands of single-stranded DNA (ssDNA) hybridizing or binding to each other to form double-stranded DNA (dsDNA).
- Line Probe Assay (LPA) is based on reverse hybridization between amplicons derived from a multiplex PCR and nitrocellulose-bound probes covering wild-type sequences and specific mutations in Mycobacterium tuberculosis.
- Biotin-labelled amplicons (amplified DNA of the genes of interest generated during amplification of the target DNA) are in a fluidic state.
- Wild-type and/ or mutated probes (reaction zones) are unlabeled and immobilized as bands onto nitrocellulose membrane strips.
- LPA results are based on banding patterns detected on a strip following hybridization with PCR products amplified from target DNA in clinical specimens.
The figure below shows the steps involved in hybridization.
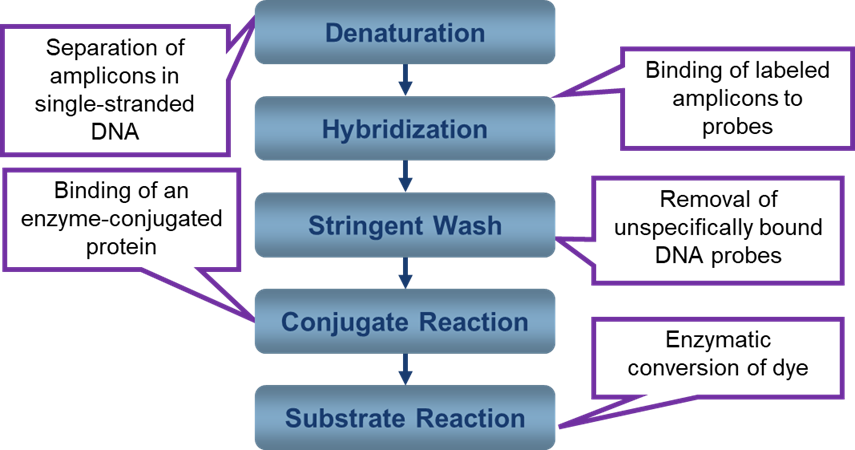
Figure: Steps involved in Hybridization
Resources
- GenoType MTBDR plus ver 2.0 Kit, Instructions for Use.
- GenoType MTBDRsl VER 2.0 Kit, Instructions for Use.
- GLI Training Package on LPA.
Kindly provide your valuable feedback on the page to the link provided HERE
Hybridization Setup in LPA and Genotypic DST
ContentThe steps listed below need to be followed when setting up for the hybridisation procedure.
Workstation Set-up
- Compile all the tools and reagents required for the step.
- Switch on all the equipment and check whether they are in working condition.
- Always connect the Twincubator and GT blot to the UPS.
- Thoroughly clean the workbench and tools with appropriate disinfectant.
- Clean the equipment as suggested by the manufacturer.
- Place an absorbent sheet.
- Bring out the hybridization reagents from the refrigerator.
Reagent Preparation
- Kit Component 1 is used for this step.
- Hybridization reagent preparation and steps involved in hybridization procedure remains the same in First Line (FL) and Second Line (SL) Line Probe Assay (LPA).
- Bring out the reagent kit from the refrigerator.
- Pre-warm the hybridisation and stringent solution in a water bath, as these 2 solutions form crystals due to the kit’s storage at 2 - 8ºC.
Reagents Required for Hybridization
- Hybridization Solution - HYB
- Stringent Solution - STR
- Conjugate Solution - CON
- Substrate Solution - SUB
- RIN Solution - RIN
- Distilled Water - DW
The steps for preparing these reagents are shown in the tables below.
Table 1: Preparation of Hybridization and Stringent Solutions
PREPARATION OF HYBRIDIZATION SOLUTION PREPARATION OF STRINGENT SOLUTION - Pre-warm hybridization solution in a water bath.
- Check the hybridization solution for precipitate.
- If the solution is consistent, without any precipitate, aliquot the calculated amount to a falcon tube and label it as “HYB".
- Remember: Hybridization solution should be warm when adding it to the Hybridization tray.
- Pre-warm stringent solution in a water bath.
- Check the stringent bottle for precipitate.
- If the solution is consistent, without any precipitate, aliquot the calculated amount to a falcon tube and label it as “STR”.
Table 2: Preparation of Conjugate and Substrate Solutions
PREPARATION OF CONJUGATE SOLUTION PREPARATION OF SUBSTRATE SOLUTION - Aliquot calculated conjugate diluent to a 50 ml falcon using a micropipette.
- Add calculated conjugate concentrate to it, using a micropipette.
- Mix well.
- Label it as “CONJUGATE”.
- Aliquot calculated substrate diluent to a 50 ml falcon using a micropipette.
- Add calculated substrate concentrate to it, using a micropipette.
- Mix well.
- Cover the falcon tube with aluminium foil as the substrate is photosensitive.
Table 3: Preparation of RIN Solution and Distilled Water
PREPARATION OF RIN SOLUTION FOR DISTILLED WATER - Aliquot calculated RIN solution to a 50 ml falcon tube.
- Label it as "RIN".
- Aliquot the calculated amount of distilled water required in a falcon tube.
- Label it as "DW".
Please click the video below to see more on hybridization.
Resources
- GenoType MTBDR plus ver 2.0 Kit, Instructions for Use.
- GenoType MTBDRsl VER 2.0 Kit, Instructions for Use.
- GLI Training package on LPA.
Kindly provide your valuable feedback on the page to the link provided HERE
Hybridization Using Twincubator in LPA Lab Settings
ContentGeneral instructions when conducting hybridization using a twincubator are:
- Thoroughly clean the workbench with disinfectant (1% sodium hypochlorite).
- Prepare reagents as per the calculation table.
- Using clean/ new tweezers place strips onto a clean sheet of paper and label them as in the worksheet.
- Use a clean/ new tray.
Steps of Hybridization Using Twincubator
Step-1
- Dispense 20 μl denaturation (DEN) solution in the corner of each trough.
Note: No need to change tips between samples.
Step-2
- Add 20 µl Amplicon to DEN and carefully mix by pipetting up and down.
- Incubate for 5 minutes.
Note: Change tips between samples.
Step-3
- Carefully add 1 ml of pre-warmed hybridization (HYB) buffer to each well, using filtered tips.
Note: Change tips between samples.
- Gently shake the tray to homogenously mix HYB with amplicon.
- Do not spill into neighbouring troughs.
Step-4
- Carefully place numbered strips in each well, strip face side up using clean/ new plastic tweezers.
- Strips must be completely immersed in HYB.
- If strips turn over, reposition them with a fresh pipette tip.
Step-5
- Place tray onto Twincubator and press START.
- Twincubator will then start shaking with a temperature of 45°C.
- This step will be of 30 minutes.
- After 30 minutes, the Twincubator will set off an alarm.
- When the alarm goes off, press the right arrow to stop.
Step-6
- Completely aspirate HYB using transfer pipettes.
Note:
Change pipettes for every sample.
Do not decant the contents of the tray into a sink or jar as this can contaminate the work area.
Wipe off the condensation that forms on the lid of the incubator before every incubation step.
Step-7
- Add 1 ml of STR solution to each well.
- Press start.
- This step will be of 15 minutes at 45°C.
- After 15 minutes, the Twincubator will set off an alarm.
- When the alarm goes off, press the right arrow to stop
Step-8
- Completely aspirate STR solution by transfer pipette.
Note:
Change pipettes for every sample.
Do not decant the contents of the tray into a sink or jar; this can contaminate the work area.
Step-9
- Add 1ml of RIN solution to each well.
- Press start.
- This step will be for 1 minute.
- After 1 minute, the machine will set off an alarm.
- Once the alarm goes off, press the right arrow to stop.
Step-10
- Completely aspirate the RIN solution by transfer pipette.
Note: No need to change pipette between wells.
- From this step, the content of the tray may be decanted into a container with 1% sodium hypochlorite solution.
Step-11
- Add 1 ml of conjugate solution to each well using a micropipette.
Note: No need to change tips for every sample.
- Press start.
- This step will be of 30 minutes.
- After 30 minutes, the machine will set off an alarm.
- Once the alarm goes off, press the right arrow to stop.
Step-12
- Completely aspirate conjugate solution using a transfer pipette, or the content of the tray may be decanted into a container with 1% freshly prepared sodium hypochlorite solution.
Step-13
- Work at room temperature from this step.
- Add 1 ml of RIN solution to each well.
- Press start.
- This step will be for 1 minute.
- After 1 minute, the machine will set off an alarm.
- Once the alarm goes off, press the right arrow to stop.
Step-14
- Completely aspirate the RIN solution using a transfer pipette, or the content of the tray may be decanted into a container with 1% freshly prepared sodium hypochlorite solution.
Step-15
- Repeat step-13.
Step-16
- Repeat step-14
Step-17
- Add 1 ml of distilled water to each well.
- Press start.
- This step will be for 1 minute.
- After 1 minute, the machine will set off an alarm.
- Once the alarm goes off, press the right arrow to stop.
Step-18
- Completely aspirate distilled water using a transfer pipette, or the content of the tray may be decanted into a container with 1% freshly prepared sodium hypochlorite solution.
Step-19
- Add 1 ml of substrate solution to each well.
Note: No need to change tip.
- Cover the machine with aluminium foil as the substrate solution is photosensitive.
- Press start.
- This step may be for 3-5 minutes (depending on the colour that develops).
- The machine will set off an alarm.
- Once the alarm goes off, press the right arrow to stop.
Step-20
- Completely aspirate the substrate solution using a transfer pipette, or the content of the tray may be decanted into a container with 1% freshly prepared sodium hypochlorite solution.
Step-21
- Add 1 ml of distilled water to each well.
- Press start.
- This step will be for 1 minute.
- After 1 minute, the machine will set off an alarm.
- Once the alarm goes off, press the right arrow to stop.
Step-22
- Completely aspirate distilled water using a transfer pipette, or the content of the tray may be decanted into a container with 1% freshly prepared sodium hypochlorite solution.
Step-23
- Repeat step-21.
Step-24
- Do not aspirate distilled water from wells.
Step-25
- Using clean tweezers, remove the strips from the tray and dry them between two layers of absorbent paper
Step-26
- Align strips and paste them on a reporting sheet using cello tape/ scotch tape.
Resources
- GenoType MTBDR plus ver 2.0 Kit, Instructions for Use.
- GenoType MTBDRsl VER 2.0 Kit, Instructions for Use.
- GLI Training Package on LPA.
Kindly provide your valuable feedback on the page to the link provided HERE
Hybridization Using GT BLOT in LPA Lab Settings
ContentGeneral Instructions
- Thoroughly clean the work bench with 1% sodium hypochlorite solution.
- Run the wash cycle A and B in GT Blot.
- After cleaning, prepare reagents as per the calculation table.
- Pour prepared reagents into reagent bottles provided with GT Blot.
- Place GT Blot reagent bottles back to machine.
- Cover the bottles with a tubed lid.
- Using clean/ new tweezers, place strips onto a clean sheet of paper and label them same as that in the work sheet.
- Use a clean/ new tray, check for any wear/ tear.
Steps for hybridization using twincubator are shown in the table below.
Table: Hybridization Steps using Twincubator
STEP-1
DISPENSE 20ΜL DENATURATION (DEN) SOLUTION IN A CORNER OF EACH WELL
NOTE: NO NEED TO CHANGE TIPS
Step-2
- Add 20µl amplicon to DEN and carefully mix by pipetting up and down
- Incubate for 5 min
- Change tips for every sample
- Carefully place the tray in GT Blot
- Close the GT Blot lid
- Press start
- Select no. of wells (always in even numbers)
- Press start
Note: Change tips between samples
Step-3
- The instrument will automatically dispense hybridization solution to each well selected
- Message – ‘Add amplicon’ will be displayed
Step-4
- Carefully place numbered strips in each well, up (face-side), using clean/ new plastic tweezers
- Close the lid of GT Blot
- Press start
- All the subsequent steps will be carried out automatically in a fully automated GT Blot machine
Resources
- GenoType MTBDR plus ver 2.0 kit, Instructions for Use.
- GenoType MTBDRsl VER 2.0 kit, Instructions for Use.
Kindly provide your valuable feedback on the page to the link provided HERE
Contamination Control in the Hybridization Area in LPA Lab Settings
ContentDo’s and Don’ts for Contamination Control
DO’s
- Label the tools and instruments “For use in Hybridization Area”.
- Change gloves if they get contaminated amplicon.
- Decontaminate trays before reuse.
- Keep cleaned strip trays and tweezers in a clean and sealed plastic bag.
- Always clean work bench and tools with 1% freshly prepared sodium hypochlorite solution followed by 70% alcohol.
- Establish weekly laboratory cleaning protocols for floors, doors, walls.
DON’Ts
- Tools and instruments used in hybridization area should not be used elsewhere.
- Never take anything from hybridization area to reagent or specimen preparation area.
- Do not reuse falcon tubes for conjugate and substrate preparation.
- Do not decant the content of the strip tray into the sink or any other container during the Hybridisation (HYB) and Stringent (STR) steps. This will contaminate the work area.
Resources
- GenoType MTBDR plus ver 2.0 kit, Instructions for Use.
- GenoType MTBDRsl VER 2.0 kit, Instructions for Use.
Kindly provide your valuable feedback on the page to the link provided HERE
-
CDST_LT: LPA Recording, interpretation and reporting
FullscreenInterpretation of FL-LPA: Examples of Test Results Interpretation
Contentxamples of banding patterns for First Line - Line Probe Assay (FL - LPA) are shown in figure below.
Description
- All wild type bands display signal, mark as “+” against Wild Type (WT) column of the respective gene
- If at least one of the wild type bands is absent, mark as “-“ against WT column
- Similarly, “+” or “-” for Mutation (MUT) probes
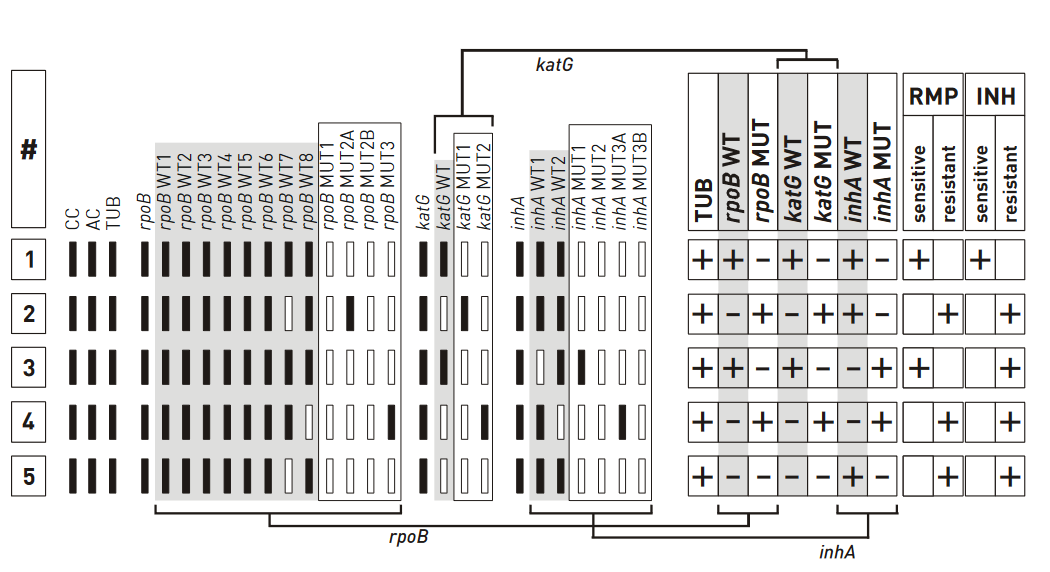
Figure: Banding patterns examples for Rifampicin and Isoniazid resistance; Source: GenoType MTBDR plus ver 2.0 kit, Instructions for Use.
Example #1
- The wild type banding pattern
- All wild type probes, but none of the mutation probes display a signal; hence, the evaluation chart shows “+”
- Three wild type columns and “–” in three mutation columns; hence “rifampicin (rmp) sensitive” and “Isoniazid (INH) sensitive” are marked “+”
Example #5
- One rpob and katg wild type probes missing; hence, the boxes for “rpob WT” and “katg WT” are marked with “–”
- No mutation probes developed; boxes are marked “–”
- inhA promoter region does not deviate from the wild type pattern, hence strain is evaluated as resistant to RMP and INH
Resources
Kindly provide your valuable feedback on the page to the link provided HERE
Evaluation of First-line Line Probe Assay Strip
ContentEach strip for First Line – Line Probe Assay (FL - LPA) has a total of 27 reaction zones (Figure below).
The Key Zones Include:
Conjugate Control (CC)
- Indicates the efficiency of conjugate binding and substrate reaction
Amplification Control (AC)
- Develops when control amplicon binds indication correct procedure was followed
- The absence of AC zone indicates an invalid test
M. tuberculosis Complex (TUB)
- Hybridizes with amplicons generated from Mycobacterium tuberculosis complex
- The absence of TUB zone indicates the absence of M. tuberculosis complex
Locus Controls (rpoB, katG, and inhA)
- Detect gene region specific for genes rpoB/ katg/ inhA
Wild-type Probes
- Comprise the resistance regions of respective genes (rpoB/ katg/ inhA)
- The absence of signal for at least one of the wild type probes indicates the resistance of the tested strain to the respective antibiotic
Mutation Probes
- Detect most common resistance-mediating mutations (rpoB/ katg/ inhA)
- Each pattern deviating from the wild-type pattern indicates resistance
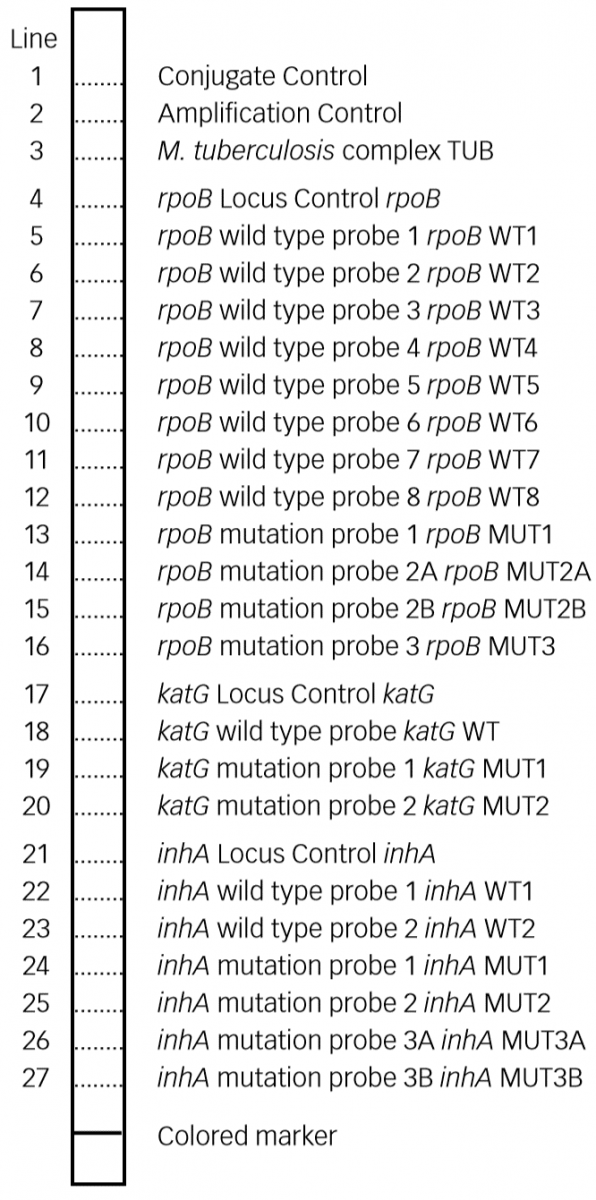
Figure: Key Zones of FL - LPA Evaluation Strip; Source: GenoType MTBDR plus ver 2.0 kit, Instructions for Use.
Evaluation of Assay Strip for FL - LPA Zones:
- The resistance status is determined and noted for each respective column.
- Distances between single probes on the strips may vary slightly.
- Not all bands of a strip have the same signal strength.
- The DNA strip should only be interpreted when:
- AC, CC and TUB bands are present
- Along with the presence of locus control bands for rpoB, katG and inhA
- Only those bands whose intensities are about as strong as, or stronger than that of the AC zone are to be considered.
- Bands whose intensities are about as strong as or stronger than that of the AC zone are considered.
Important: For an accurate evaluation, align provided template separately for each locus with the respective Locus Control band.
Resources
Kindly provide your valuable feedback on the page to the link provided HERE
Evaluation of Second-line Line Probe Assay Strip
ContentEach strip for Second Line - Line Probe Assay (SL - LPA) has a total of 27 reaction zones (Figure below).

Figure: Key Zones of SL - LPA Evaluation Strip; Source: GenoType MTBDRsl VER 2.0 kit, Instructions for Use.
Evaluation of Assay Strip for SL- LPA Zones:
- Evaluation of Conjugate Control (CC), Amplification Control (AC), M. tuberculosis complex (TUB) are the same as described for First Line - LPA.
- Locus Controls (gyrA, gyrB, rrs, eis)
- Detect gene region specific (gyrA/ gyrB/ rrs/ eis)
- Wild type probes
- Comprise the resistance regions of respective genes (gyra/ gyrb/ rrs/ eis)
- Absence of signal for at least one of the wild-type probes indicates resistance of the tested strain to the respective antibiotic
- Mutation probes
- Detect most common resistance-mediating mutations (gyra/ gyrb/ rrs/ eis)
- Each pattern deviating from the wild type pattern indicates resistance
Important: For an accurate evaluation, align provided template separately for each locus with the respective Locus Control band.
Resources
Kindly provide your valuable feedback on the page to the link provided HERE
Interpretation of FL-LPA: Predicting TB Drug-resistance
ContentZone developed/ not developed (failing) in Wild Type (WT) and Mutation (MUT) probes are used to predict drugs resistance in First Line - Line Probe Assay (FL-LPA).
For Rifampicin
Table 1 shows mutations in rpoB gene and corresponding WT, MUT and responsible codons and mutations.
- rpoB WT1-8: rpoB wild type probes
- rpoB MUT1-3: rpoB mutation probes
Table 1: Mutations in the rpoB gene and corresponding wild type and mutation band; Source: GenoType MTBDR plus ver 2.0 kit, Instructions for Use.
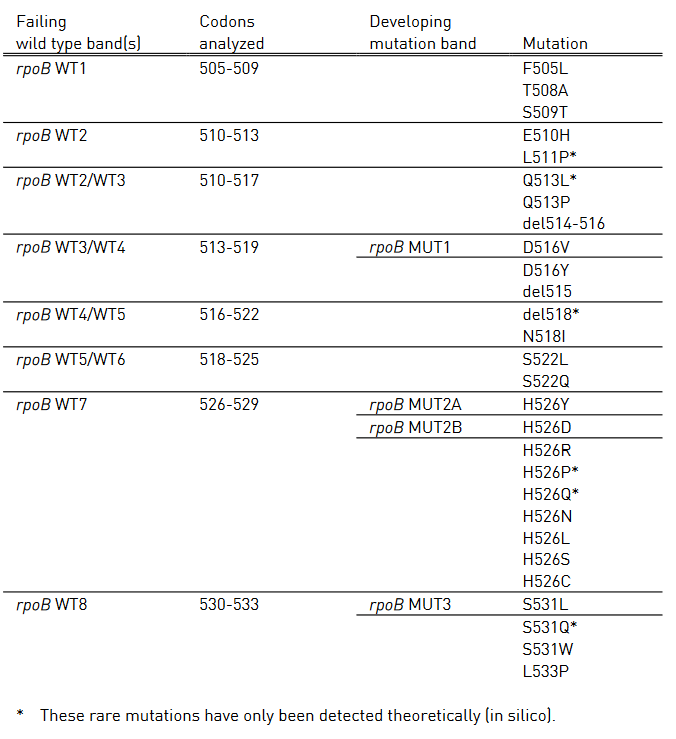
For Isoniazid
Table 2 and Table 3 show mutations in katG gene and inhA promoter region, respectively and the corresponding WT and MUT bands.
- katG WT: katG wild type probe
- katG MUT 1-2: katG mutation probe
- inhA WT 1-2: inhA wild type probe
- inhA MUT 1-2, MUT 3A, MUT 3B: inhA mutation probe
Table 2: Mutations in katG gene and corresponding WT, MUT bands and responsible codons and mutations; Source: GenoType MTBDR plus ver 2.0 kit, Instructions for Use.

Table 3: Mutations in inhA promoter region and corresponding WT, MUT bands and responsible codons and mutations; Source: GenoType MTBDR plus ver 2.0 kit, Instructions for Use.
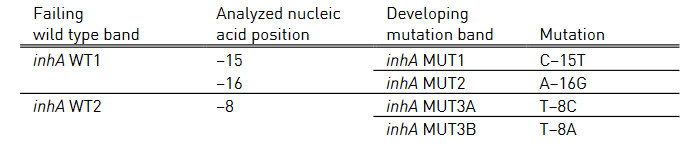
Resources
- GenoType MTBDR plus ver 2.0 kit, Instructions for Use.
- GLI Line Probe Assays for Drug-resistant Tuberculosis Detection.
Kindly provide your valuable feedback on the page to the link provided HERE
Interpretation of FL-LPA: Predicting Drug-resistance in Special Cases
ContentPredicting Drug Resistance in Special Cases
- When specimen tested contains a hetero resistant strain:
- Mutated as well as a wild-type sequence can be detected
- One of the mutation probes as well as corresponding wild type probe may stain positive on the respective strip
- Whether the respective resistance becomes phenotypically evident, depends on the ratio of mutated and nonmutated sequences
- The tested specimen contains more than one M. tuberculosis complex strain (due to mixed culture or contamination):
- One of these strains harbors a mutation, one of the mutation probes as well as the corresponding wild type probe may stain positive.
- Whether the respective resistance becomes phenotypically evident, depends on the ratio of the resistant and sensitive strain
- Due to mixed infection with M. tuberculosis complex strain and a nontuberculous mycobacterium:
- The TUB band may be missing
- If resistance pattern develops, presence of M. Tuberculosis complex must be suspected and repeat test
- All bands of a gene locus (including the Locus Control band) missing completely on a test strip:
- DNA concentration below the limit of detection or indicates the presence of interfering substances
- Repeat test
- If cultivated sample generates result with complete katG locus missing
- Indicates Isoniazid resistance
Resources
- GenoType MTBDR plus ver 2.0 kit, Instructions for Use.
- GLI Line Probe Assays for Drug-resistant Tuberculosis Detection.
Kindly provide your valuable feedback on the page to the link provided HERE
- When specimen tested contains a hetero resistant strain:
Interpretation of FL-LPA: Examples of Test Results Interpretation
Contentxamples of banding patterns for First Line - Line Probe Assay (FL - LPA) are shown in figure below.
Description
- All wild type bands display signal, mark as “+” against Wild Type (WT) column of the respective gene
- If at least one of the wild type bands is absent, mark as “-“ against WT column
- Similarly, “+” or “-” for Mutation (MUT) probes
Figure: Banding patterns examples for Rifampicin and Isoniazid resistance; Source: GenoType MTBDR plus ver 2.0 kit, Instructions for Use.
Example #1
- The wild type banding pattern
- All wild type probes, but none of the mutation probes display a signal; hence, the evaluation chart shows “+”
- Three wild type columns and “–” in three mutation columns; hence “rifampicin (rmp) sensitive” and “Isoniazid (INH) sensitive” are marked “+”
Example #5
- One rpob and katg wild type probes missing; hence, the boxes for “rpob WT” and “katg WT” are marked with “–”
- No mutation probes developed; boxes are marked “–”
- inhA promoter region does not deviate from the wild type pattern, hence strain is evaluated as resistant to RMP and INH
Resources
Kindly provide your valuable feedback on the page to the link provided HERE
Limitations of First-line Line Probe Assay [FL-LPA]
ContentFirst Line - Line Probe Assay (FL - LPA) can detect the mutations that are most frequently identified in resistant strains.
However, there are certain limitations of the test as follows:
- Some mutations that confer resistance are outside the regions covered by the test. Therefore, resistance cannot be completely excluded even in the presence of all wild type (WT) probes. Thus, in some cases, additional phenotypic Drug Sensitivity Testing (DST) may be necessary to provide a full assessment.
- Some mutations are identified specifically by mutation (MUT) probes, whereas others are only inferred by the absence of binding of the amplicons to WT probes. This lack of binding of a WT probe, without simultaneous binding of a MUT probe, is likely caused by the presence of a resistance mutation.
- Systematic errors are possible due to synonymous and non-synonymous mutations (e.g., phylogenetic mutations). Globally, this is rare (<1% of isolates), but these isolates can be frequent locally.
- LPA is less efficient than conventional culture-based methods in finding resistance in samples harbouring both drug-susceptible and resistant bacteria (i.e., hetero-resistance).
- More specifically, with LPA, it is possible to detect resistant bacteria with mutations detected by the MUT probes, if resistant bacteria represent at least 5% of the total population.
- However, resistant bacteria with mutations inferred by the absence of WT probes would probably be missed, if the resistant population is less than 95% of the total bacterial population.
Resources
Kindly provide your valuable feedback on the page to the link provided HERE
Reporting First-line Line Probe Assay [FL-LPA] Results
ContentResults of the First-line Line Probe Assay (FL-LPA) are entered in Nikshay and downloaded as the culture and drug susceptibility test (CDST) register.
Information on the patient, facility, reason for testing and test results are captured, and are shown in the table below.
DETAILS
TEST RESULTS
TestID
Visual_appearance_of_Sputum
DateOfTestUpdatedInNikshay
Sample
DateTested
TUB_Band
DateReported
RpoB_Locus_Control
TestStatus
RpoB_Wt1
Typeofspecimen
RpoB_Wt2
Dateofspecimencollection
RpoB_Wt3
StateName
RpoB_Wt4
DistrictName
RpoB_Wt5
TBUnit
RpoB_Wt6
PHINameLab
RpoB_Wt7
LabType
RpoB_Wt8
PatientId
RpoB_MUT1(D516V)
EpisodeID
RpoB_MUT2A(H526Y)
Name
RpoB_MUT2B(H526D)
Gender
RpoB_MUT3(S531L)
Age
KatG
PrimaryPhone
KatG WT1
Address
KatG MUT1
ResidentialState
KatG MUT2
ResidentialDistrict
InhA
TypeofCase
InhA WT1
ReasonforTesting
InhA WT2
TreatmentStatus
InhA MUT1
DiagnosisDate
InhA MUT2
TBTreatmentStartDate
InhA MUT3A
CurrentFacilityState
InhA MUT3B
CurrentFacilityDistrict
Final_Interpretation
CurrentFacilityTU
CurrentFacilityPHI
CurrentFacilityPHIType
ReasonforTesting1
PredominantSymptom
Predominantsymptom_duration
HistoryATT
No_of_HCP_visited_before_diagnosis_of_current_episode
Resources
- Guidelines for Programmatic Management of Drug-resistant TB, 2021
- Nikshay Reports CDST Test Register
Kindly provide your valuable feedback on the page to the link provided HERE
Reporting the Result of First-line Line Probe Assay [FL-LPA] in Special Cases
ContentReporting Drug-resistance in Special Cases
- When specimen tested contains hetero resistant strain:
- Strips contain both wild type and mutant probes for three genes known for resistance to Rifampicin and Isoniazid
- Bands to be interpreted as indicating resistance to a particular drug; should be reported as such
- Example of hetero resistant strain: rpoB WT 8 and rpoB MUT 3 bands are present
- Strips contain both wild type and mutant probes for three genes known for resistance to Rifampicin and Isoniazid
- The tested specimen contains more than one Mycobacterium tuberculosis complex strain (due to mixed culture/ non-tuberculous mycobacterium or contamination):
- If any strains harbor mutation, one mutation probe, as well as the corresponding wild type probe, may stain positive; ascertain the presence of TUB band
- Repeat test or phenotypic testing to confirm resistance
- Presence of non-tuberculous mycobacterium:
- TUB band missing; not be reported as M. tuberculosis
- TUB band absent but random banding patterns visible, eg: bands at rpoB WT 1, 4, 5 or 8; not be reported as M. tuberculosis
Resources
- GenoType MTBDR plus Ver 2.0 Kit, Instructions for Use.
- Line Probe Assays for Drug-resistant Tuberculosis Detection, GLI.
- Molecular Detection of Drug-resistant Tuberculosis by Line Probe Assay.
Kindly provide your valuable feedback on the page to the link provided HERE
- When specimen tested contains hetero resistant strain:
Interpretation of SL-LPA: Predicting Drug Resistance
ContentZone developed/ not developed (failed) in Wild Type (WT) and Mutation (MUT) probes are used to predict drugs resistance in Second Line - Line Probe Assay (SL - LPA).
For Fluoroquinolones (FLQ)
Tables 1 and 2 show mutations in gyrA, gyrB genes and corresponding WT, MUT and responsible codons and mutations:
- gyrA WT1-3: gyrA wild type probes; gyrA MUT1-2, 3A-3D: gyrA mutation probes
- gyrB WT: gyrB wild type probes; gyrB MUT1-2: gyrB mutation probes
Table 1: Mutations in gyrA gene and corresponding wild type and mutation band; Source: GenoType MTBDRsl Ver 2.0 Kit, Instructions for Use.
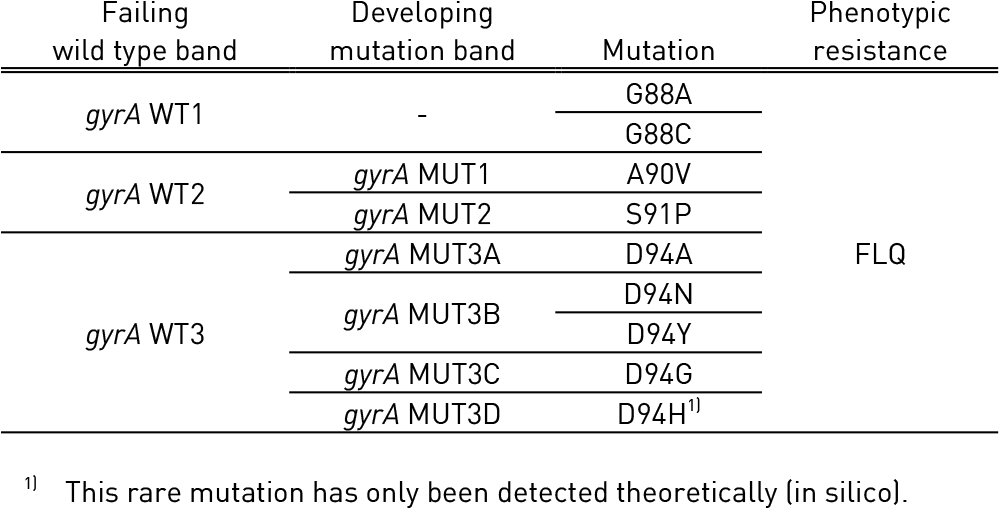
Table 2: Mutations in gyrB gene and corresponding wild type and mutation band; Source: GenoType MTBDRsl Ver 2.0 Kit, Instructions for Use.

For Second Line Injectable Drugs - Kanamycin (KAN), Amikacin (AMK), Capreomycin (CAP)
Tables 3 and Table 4 show mutations in rrs gene and eis gene respectively and corresponding WT and MUT bands:
- rrs WT 1-2: rrs wild type probe; rrs MUT 1-2: rrs mutation probe
- eis WT 1-3: eis wild type probe; eis MUT 1: eis mutation probe
Table 3: Mutations in rrs gene and corresponding WT, MUT bands and responsible codons and mutations; Source: GenoType MTBDRsl Ver 2.0 Kit, Instructions for Use.

Table 4: Mutations in eis gene and corresponding WT, MUT bands and responsible codons and mutations; Source: GenoType MTBDRsl Ver 2.0 Kit, Instructions for Use.

Resources
- GenoType MTBDRsl Ver 2.0 Kit, Instructions for Use.
- Line Probe Assays for Drug-resistant Tuberculosis Detection, GLI.
Kindly provide your valuable feedback on the page to the link provided HERE
Interpretation of SL-LPA: Predicting Drug resistance in Special Cases
ContentNotes
- Bands with intensities similar or better than Amplification Control (AC) zone are considered.
- Not all bands of strip show same signal strength
Special Scenarios
- Both mutation probe and corresponding wild type probe are developed, represents a valid result
- Possible reasons:
- The tested specimen contains hetero-resistant strain
- The tested specimen contains more than one M. tuberculosis strain (mixed infection)
- Possible reasons:
- Resistance with wild type pattern
- Possible reasons:
- The tested specimen contains hetero-resistance strain; caused by mutation not covered by mutation probes
- The tested specimen contains the wild type and resistant strain (mixed infection); mutation not covered by mutation probes
- Possible reasons:
- Complete gene locus (all bands including Locus Control band) missing, invalid result
- Possible reason:
- DNA concentration below the limit of detection
- Possible reason:
Resources
Kindly provide your valuable feedback on the page to the link provided HERE
Interpretation of SL-LPA: Interpretation Examples
Contenthe examples of banding patterns for Second Line - Line Probe Assay (SL - LPA) are shown in the figure below.
Description
- All wild type bands display signal, mark as “+” against Wild Type (WT) column of the respective gene.
- If at least one of the wild type bands is absent, mark as “-“ against WT column. Similarly, “+” or “-” for Mutation probes (MUT).
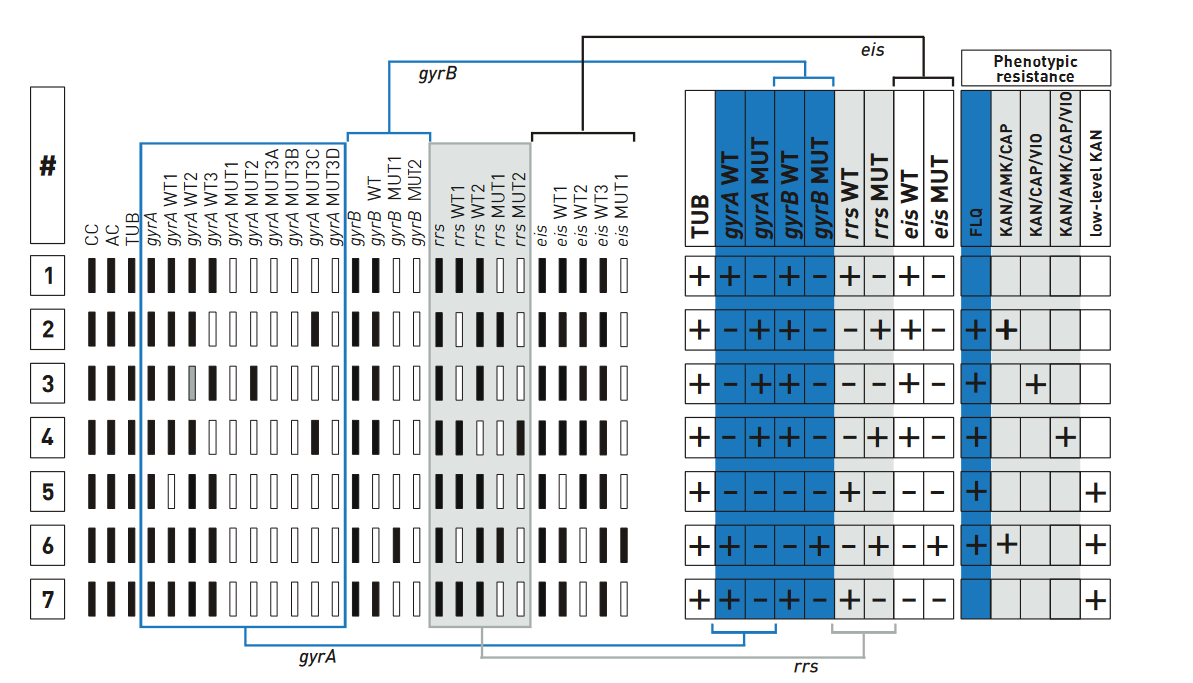
Figure: Examples for banding patterns for SL - LPA; Source: GenoType MTBDRsl Ver 2.0 Kit, Instructions for Use.
Example #1
- The wild type banding pattern.
- All wild type probes, but none of the mutation probes display a signal; hence, evaluation chart shows “+”.
- Four wild type columns and “–” in the four mutation columns; hence, no entry made in the fields of resistance columns.
Example #7
- gyrA locus and gyrB locus show wild type pattern; hence, evaluation chart shows “+” for fluoroquinolone (ofloxacin) resistance.
- rrs locus shows wild type pattern; hence, evaluation chart shows “+” for Kanamycin.
- eis wild type bands are present and “eis MUT” is absent; low-level Kanamycin resistance is assigned to the test.
Resources
Kindly provide your valuable feedback on the page to the link provided HERE
Limitations of Second-line Line Probe Assay [SL-LPA]
ContentThe limitations of Second Line Probe Assay (SL-LPA) are:
- It detects resistance due to mutation in gyrA, gyrB, rrs, and eis genes; resistances originating from mutations of other genes or gene regions as well as other drug resistance cannot be determined.
- Individual strains in mixed samples cannot be differentiated, which hampers the interpretation of the test.
- It cannot be used to monitor drug treatment, as DNA is detected from viable and non-viable bacteria.
- The results are qualitative, the intensity of bands does not give an estimate of bacterial load in the sample.
Resources
Kindly provide your valuable feedback on the page to the link provided HERE
Reporting Second Line-Line Probe Assay [SL-LPA] Results
ContentThe Results for Second Line Probe Assay (SL LPA) are entered in:
- Culture and Drug Susceptibility testing (CDST) register
- Nikshay-CDST module
- Request Form for examination of biological specimen for TB
- The fields entered are shown in Figure 1
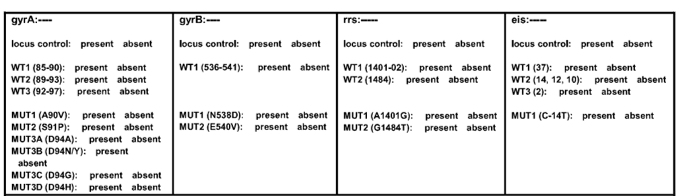
Figure 1: Result entry for Second Line LPA
Source: TOG Annexure- The final results are entered as:
- Select MTB Result: MTB Positive, MTB Negative
- Select Quinolone: Sensitive, Resistant, Indeterminate
- Select SLID (Second Line Injectable Drug): Sensitive, Resistant, Indeterminate
- Date result
- Date reported
- Reported by (name and signature)
Resources
- Challenge TB: LPA - Interpretation and reporting SL-LPA
- Guidelines for PMDT in India, 2021
- TOG Annexure
Kindly provide your valuable feedback on the page to the link provided HERE
-
CDST_LT: LPA Troubleshooting and quality assurance
FullscreenLPA Troubleshooting for No Signal
ContentThere could be overall weak or no signals on the strip including or except for the conjugate control zone.
Weak or no signal including conjugate control (CC) zone could be due to:
- Too low room temperature
- Reagents not equilibrated to room temperature (20-22°C)
- Hybridization solutions not pre-warmed
- Too high or too low incubation temperature
- No or too little amount of CON-C and/or SUB-C used
Solution: Repeat reverse hybridization.

Figure: No Signal including CC Zone
Points to Note
- A higher incubation temperature may prevent the binding of the amplicons to the probes.
- A higher temperature during the stringent wash step may result in weak intensities of the banding patterns.
- The temperature of the hybridizer should be monitored if such problems are seen.
- If the problem persists and the thermostat on the hybridizer gives an appropriate reading of 45ºC, and a digital thermometer reads a different temperature that is above or below 45ºC; the problem is likely with the machine’s internal temperature probe and should be reported to the manufacturer and corrected.
Do’s and Don'ts to Avoid Weak or No Signals
- Perform LPA at the appropriate room temperature.
- Bring reagents to room temperature before use (20-22°C).
- The green and red hybridization solutions must be pre-warmed to 45ºC.
- Follow instructions to add the exact volume of reagents.
- The central heating/cooling thermostat must be appropriately adjusted.
- Do not use pipettes that are not calibrated.
- Do not miss any step in the hybridization process.
Resources
- GenoType MTBDR plus ver 2.0 Kit, Instructions for Use.
- GenoType MTBDRsl VER 2.0 Kit, Instructions for Use.
- GLI Training Package on LPA.
Kindly provide your valuable feedback on the page to the link provided HERE
LPA Troubleshooting for No Signal Except Conjugate Control [CC]
ContentThere could be overall weak or no signals on the strip, including or except, the Conjugate Control (CC) zone.

Figure: LPA showing No Signal Except CC
Reasons and Troubleshooting for No Signal Except CC are given in the table below:
Table: Reasons and Troubleshooting for No Signal Except CC
REASON FOR ERROR
SOLUTION
The quality of extracted DNA does not allow efficient amplification
Repeat the extraction step
Amplification Mixes (AM-A and AM-B) were either not mixed properly or were added in the wrong amounts
Prepare a new master mix and repeat the test
The incubation temperature was too high
Repeat reverse hybridization
The extracted bacterial species cannot be detected by the Universal Control
Use an alternative identification method Resources
- GenoType MTBDR plus ver 2.0 kit, Instructions for Use.
- GenoType MTBDRsl VER 2.0 kit, Instructions for Use.
Kindly provide your valuable feedback on the page to the link provided HERE
LPA Troubleshooting for Uneven Staining
ContentDuring hybridization, single-stranded amplicons bind to probes and highly specific binding is ensured to produce even staining in the presence of stringent buffer and temperature conditions. However, uneven staining can occur due to the following reasons:
- Strips not completely immersed in reagents during incubation steps.
- Tray not shaken properly.
- Denatured amplicons were not properly mixed with the hybridization buffer before adding the strip to the well.
- The reusable tray had not been properly cleaned so residual amplicons remained.
Solution: Repeat reverse hybridization step.

Figure: Uneven Staining of the Strip
Points to Note
- The strips must be checked to ensure that they are fully immersed after the addition of each reagent. If necessary, a pipette tip can be placed on top of a strip to keep it submerged. Care must be taken so that buffer from a well with a problematic strip does not spill into any of the other wells.
- Before adding the strip to the well, the purple solution containing the denatured amplicons should be completely diffused into the green hybridization buffer.
- The instruments should be checked to ensure that the Twincubator is shaking at 300 rpm and the GT-Blot 48 is oscillating properly.
- The trays must be thoroughly washed and rinsed after each use.
Do’s and Don’ts
- Gently shake the tray until the solution has homogenous colour.
- Do not spill solution into the neighboring wells.
- Tray must be dipped into the water to at least 1/3rd of its height.
- Use washed and clean trays.
Resources
- GenoType MTBDR plus ver 2.0 Kit, Instructions for Use.
- GenoType MTBDRsl VER 2.0 Kit, Instructions for Use.
- GLI Training Package on LPA.
Kindly provide your valuable feedback on the page to the link provided HERE
LPA Troubleshooting for High Background Colour
ContentDuring hybridization, single-stranded amplicons bind to probes and highly specific binding is ensured to produce even staining in the presence of stringent buffer and temperature conditions. However, high/ dark backgrounds in strips may be due to the following reasons:
- CON-C and/or SUB-C used too concentrated
- Washing steps not performed with necessary care
- Wash solutions were too cold
Solution: Repeat reverse hybridization step.

Figure: Dark background in the LPA Strip
Points to Note
- The rinse step should be done carefully to remove excess conjugate buffer followed by a wash with deionized water to remove salts in the rinse buffer.
- Post-substrate development, wash with deionized water is essential to stop colorimetric reaction and to remove excess substrate buffer.
- Reagents should always be warmed before use.
Resources
- GenoType MTBDR plus ver 2.0 Kit, Instructions for Use.
- GenoType MTBDRsl VER 2.0 Kit, Instructions for Use.
- GLI Training Package on LPA.
Kindly provide your valuable feedback on the page to the link provided HERE
LPA Troubleshooting for Other Possible Reasons
ContentIssue #1:
Absence of Conjugate Control (CC) and Amplification Control (AC) in a negative control (Figure 1).

Figure 1: Absence of CC and AC in a Negative Control
Table 1 below lists the reasons and troubleshooting for the absence of CC and AC in a negative control.
Table 1: Reasons and troubleshooting for the absence of CC and AC in a Negative Control
REASONS
TROUBLESHOOTING
Mistakes during setup
The test is invalid – Repeat test
Performance of amplification reaction
Presence of amplification inhibitors
Issue 2:
Absence of locus control for a specific drug, with presence of CC and M. tuberculosis complex (TUB) band (Figure 2).

Figure 2: Absence of locus control for a specific drug, with presence of CC and TUB band
Table 2 below lists the reasons and troubleshooting for the absence of locus control for a specific drug, with the presence of CC and TUB band.
Table 2: Reasons and troubleshooting for the absence of locus control for a specific drug, with the presence of CC and TUB band
REASONS
TROUBLESHOOTING
Mutation or deletions in locus control region
- The test is indeterminant - Repeat test
- Sequencing may be requested to identify the specific mutation
Complete or partial deletion of a target gene
Resources
- GenoType MTBDR plus ver 2.0 kit, Instructions for Use.
- GenoType MTBDRsl VER 2.0 kit, Instructions for Use.
Kindly provide your valuable feedback on the page to the link provided HERE
LPA Quality Assurance [QA] Including Quality Control
ContentThe quality concepts of the Line Probe Assay (LPA) laboratory include:
- Infrastructure
- Dedicated areas for different steps of the procedure.
- Colour code/ label for different rooms:
- Red for pre-amplification area
- Green for DNA extraction area
- Blue for amplification area
- Yellow for post-amplification area.
- Unidirectional workflow for reduced risk of contamination. Under no circumstances should:
- Anything from the specimen preparation area be taken into the reagent preparation area
- Anything from amplification and hybridization/detection areas be taken into specimen or reagent preparation areas.
- Safety in the laboratory.
- Proper functioning instruments.
- Manpower
- Trained and competent staff.
- Maintained laboratory turn-around-time (sample receipt to reporting results).
- Documentation and Records: There is a need to have documents/records on the following:
- Standard Operating Procedures (SOPs)
- Laboratory Information Management System (LIMS): Worksheet, recording and reporting results
- Reagent manuals: Manufacturers’ instructions and specifications manuals
- Daily usage logs, corrective action logs, calibration, repair and maintenance records for instruments
- Safety aspects.
Quality Assurance including Quality Control (QC) includes:
Reagent QC: The following should be done:
- Testing of all lots of reagents
- Integrity testing upon receipt (e.g., Tag polymerase).
- Stock rotation
- Storage at the appropriate temperature
- Supply chain and inventory management.
- Expiry prevention
Equipment QC: This includes:
- Calibration
- Maintenance
- Validation
- Corrective actions for QC failures
- Knowledge to operate
- Service and repairs
- Manuals.
Resources
Kindly provide your valuable feedback on the page to the link provided HERE
- Infrastructure
LPA Procedural Quality Control
ContentA batch of samples is defined as a group of samples that are processed, amplified and hybridized:
- At the same time
- Under the same conditions
- Using the same PCR master mix, thermal cycler and hybridization solutions
- On the same hybridization platform.
QC during the DNA extraction procedure
- Use two sets of 1.5 ml tubes are foreach specimen.
- Mark and label the tubes according to the organization of the batch on the worksheet.
- The first tube in every batch should be labelled with a coloured sticker.
- Check the functionality of the instruments prior to processing.
- Use calibrated pipettes.
QC during the preparation of the master mix
Use homogenous reagents and thaw them properly to ensure even distribution of contents.
- Use calibrated pipettes.
- Set functional refrigerator/freezer at -20ºC.
- Verify addition of DNA polymerase visually.
- Document lot numbers and expiration dates of reagents.
- Test quality control specimens with a new lot of DNA polymerase.
QC during DNA template addition
- Select thermal cycler program based on the type of specimen to be amplified.
- Check that the caps of PCR tubes do not contain any liquid when loaded into the thermal cycler (to prevent dilution of the reaction mixture).
- Check the PCR reaction tubes for any bubbles (prevent uneven temperature distribution).
QC during the hybridization and detection procedure
- Maintain consistency in the numbering process. For example, strip marked number 1 must correspond with the first specimen extracted, amplified and added to denaturing buffer in hybridization well.
- Use dedicated pair of forceps to handle unhybridized strips.
- Avoid strips sticking together into the same well.
- If an automated hybridiser is used for less than 48 specimens, the rest of the wells should be filled with distilled water to ensure an even temperature across the heating platform.
- TwinCubator (12 strip capacity) should be used with one or two hybridization runs depending on the number of specimens.
- Use a clean tray in the TwinCubator.
Use of positive and negative controls
To demonstrate competency for the line probe assay (LPA), positive and negative quality control (QC) samples must be performed on a routine basis, for each batch of specimens as shown in Figure 1. The overview of the use of positive and negative quality control is shown in Figure 2.
Each batch of specimens tested with the LPA must have an “extraction positive control” (ATCC strain H37Rv), an “extraction negative control”, and a “PCR master mix negative control” (Figure 1).
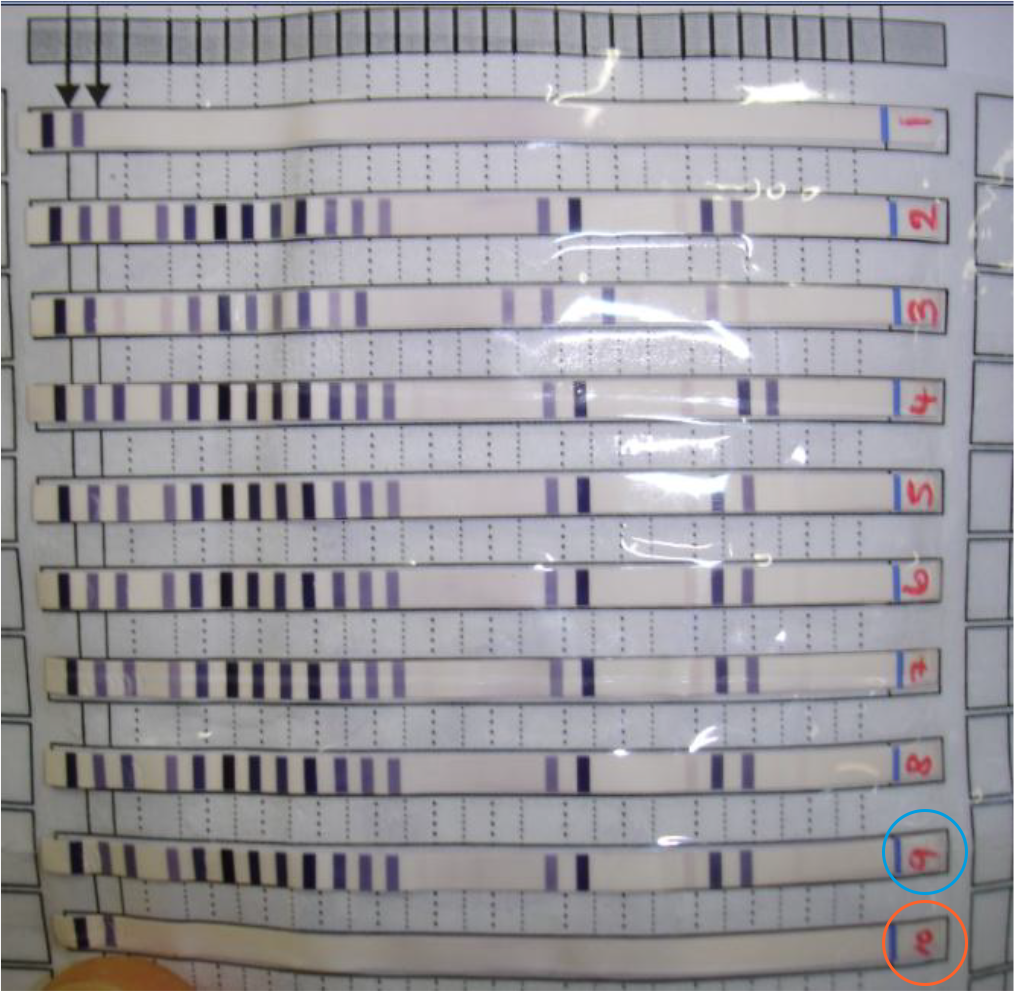
Figure 1: The H37Rv extraction positive control shown in strip number 9 (circled in blue) and the extraction negative control is shown in strip number 10 (circled in red); Source: LPA Laboratory Manual, FIND
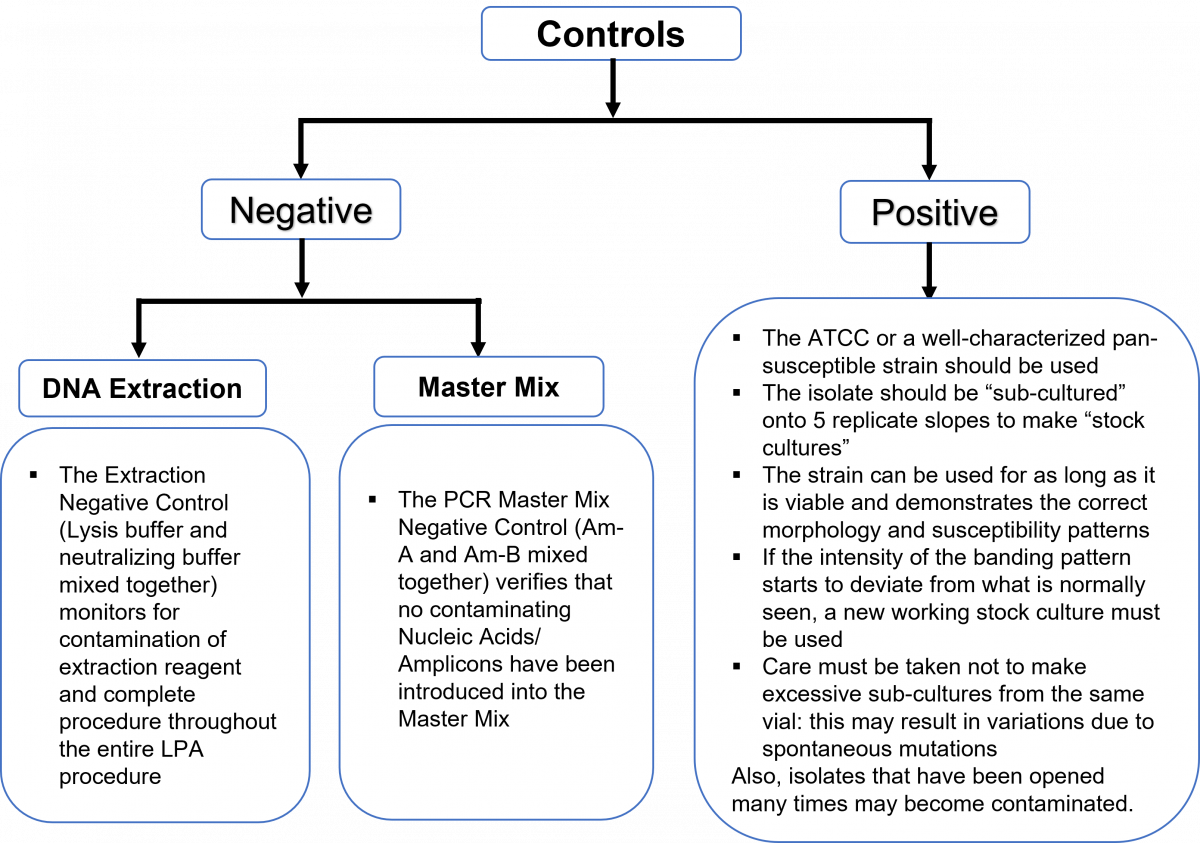
Figure 2: Overview of positive and negative controls
Amplification Control (AC) on the LPA strip functions as both:
The internal “PCR Positive Control”
Amplification control (AC) band indicates that the DNA extraction and PCR procedures were carried out successfully (Figure 3).
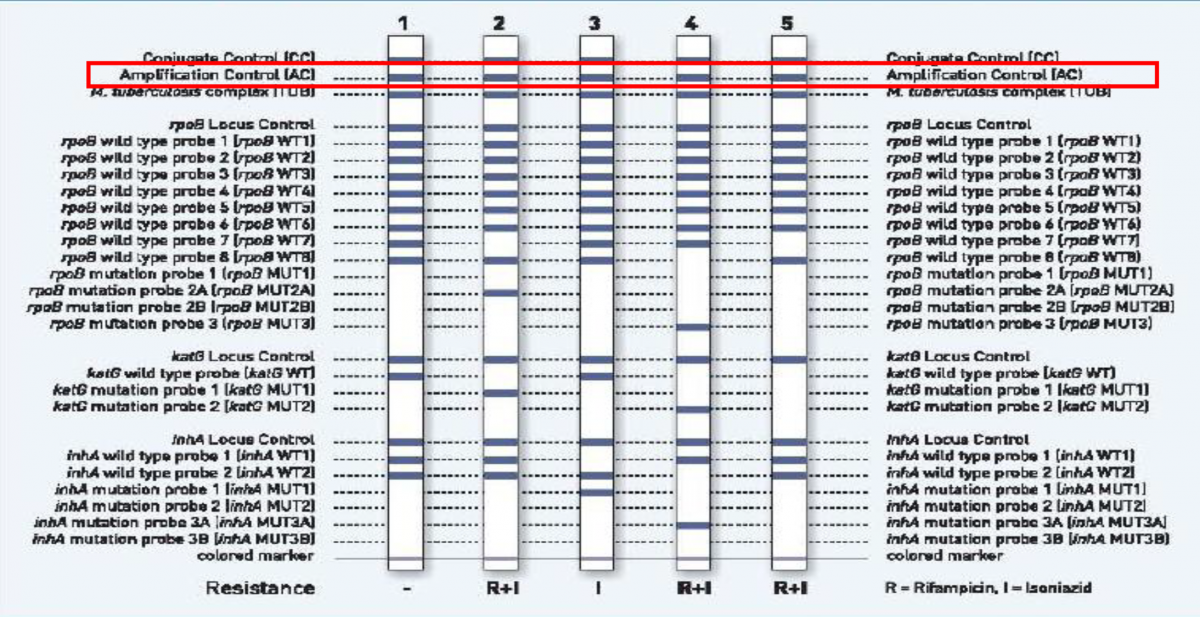
Figure 3: Amplification Control (highlighted in red) as seen on the Genotype MTBDRplus test strip; Source: LPA Laboratory Manual, FIND.
The “Inhibition Positive Control”
- The AC band will not appear if there are PCR inhibitors in the extracted material.
- The strips for the two negative controls must be positive only at the Conjugate Control (CC) and AC bands.
Resources
Kindly provide your valuable feedback on the page to the link provided HERE
LPA Quality Assurance: Proficiency Testing
ContentSteps Involved in Proficiency Testing (PT):
- Each new laboratory undertakes line probe assay (LPA) testing for 50 smear-positive TB affected patients.
- The specimen is anonymized (stripped of name and any personal identifiers), assigned a number, and processed by N-acetyl L-cysteine- Sodium Hydroxide (NALC-NaOH) method.
- Processed sputum deposit, DNA extracts and PCR products are stored at -20oC.
- High resolution scanned images of the ‘line probe result form’ and the line probe assay result strips (scotch-taped onto separate LPA – run form) are sent to the Central TB Division/National Reference Laboratory (NRL).
- 20 DNA extracts are randomly selected by the NRL for testing concordance.
- The extracts are sent by express courier to the NRL.
- Blinded LPA testing on the 20 DNA extracts is done at NRL.
- Once the pilot and proficiency phase has been satisfactorily completed, the LPA laboratory is assessed for proficiency, based on the following indicators:
- The proportion of invalid LPA results; PT benchmark: less than 10%
- Contamination of negative controls; PT benchmark: Clean in all runs
- Internal concordance: concordance of results between 1st and 2nd tested parts for each specimen; PT benchmark: should be >95%
- External concordance: concordance of results of randomly selected specimens with the reference site; PT benchmark: should be >95%.
Steps involved in Annual Proficiency Testing:
- Every NRL sends 30 cultures to the LPA laboratory.
- Cultures are taken for LPA procedures. DNA extraction is followed by:
- Master mix preparation, amplification and hybridisation.
- The results are then shared with the respective NRL, who asses the results based on the following indicators:
- The proportion of invalid LPA results; PT benchmark: less than 10%
- Contamination of negative controls; PT benchmark: Clean in all runs
- External concordance; PT benchmark: should be >95%.
Resources
Kindly provide your valuable feedback on the page to the link provided HERE
- Each new laboratory undertakes line probe assay (LPA) testing for 50 smear-positive TB affected patients.
LPA Quality Assurance: Cleaning of Lab
ContentGeneral Instructions
- Dedicated cleaning supplies, brooms required for different areas.
- Cleaning should be done by trained Polymerase Chain Reaction (PCR) laboratory staff, not by general cleaning personnel.
- Meticulous cleaning of the work area, surfaces, racks, pipettes and instruments should be done before and after performing each procedure with disinfectants (freshly prepared 1% sodium hypochlorite, followed by 70% alcohol).
- Use dedicated spray flasks/ containers for disinfectants.
- Clean paper towels (not cloth) should be used to decontaminate surfaces and equipment.
- Walls should have high-gloss enamel/ gloss-based paint for easy cleaning.
- Floors must be covered with vinyl, linoleum or ceramic tiles.
- Bench-tops must be made of impermeable melamine to eliminate crevices.
- Instruments should be cleaned and maintained daily/ weekly as described in the equipment training content.
- Cleaning and maintenance log sheets of all areas should be maintained.
Area-wise Cleaning
Weekly meticulous cleaning once; clean top-to-bottom, starting with bench tops and finishing with mopping the floor with disinfectants.
Area 1: DNA extraction room
Clean and maintain instruments (pipettes, biosafety cabinet, centrifuge and water bath) daily/ weekly.
Area 2: Pre-amplification room
Clean and maintain instruments (pipettes, PCR equipment) daily/ weekly.
Area 3: Amplification room
Clean and maintain instruments (thermal cycler, pipettes, PCR equipment) daily/ weekly.
Area 4: Hybridization room
Clean and maintain instruments (GT-Blot, Twincubator, pipettes, GT-Blot hybridization machine) daily/ weekly.
Resources
- Line Probe Assays for Drug-resistant Tuberculosis Detection, GLI.
- Molecular Detection of Drug-resistant Tuberculosis by Line Probe Assay, FIND.
Kindly provide your valuable feedback on the page to the link provided HERE
-
Fullscreen


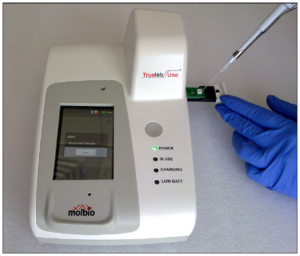


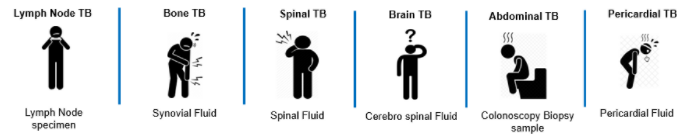


