Specimen Preparation for LC and LPA Labs
ContentLiquid Culture (LC) and Line Probe Assay (LPA) specimen processing involves pre-treatment of the sputum specimens.
Digestion and decontamination are usually done using N-acetyl-l-cysteine–sodium hydroxide (NALC- NaOH) method:
- The process is essential to free TB bacilli from the mucus cells/ tissue.
- This also helps in decontamination by killing normal flora that grows more rapidly than the TB bacilli.
NALC-NaOH Method for Sample Processing
Materials required:
• Disposable 50 ml plastic tubes (Falcon tubes)
• Sterile NaOH-NALC-sodium citrate solution/ commercial MycoPrep
• Phosphate buffer pH 6.8 (0.067M)
• Refrigerated centrifuge
• Vortex mixer
• Timer
• Transfer pipettesSteps:
- To the sputum sample in the 50 ml centrifuge tube, add equal volume NaOH-NALC-sodium citrate solution.
- Tighten the cap.
- Vortex lightly or hand mix (15-30 seconds); keep for 15-20 minutes with mixing/ vortexing gently every 5-10 minutes to completely liquify.
- Add phosphate buffer (pH 6.8) up to 50 ml mark of tube; mix well (invert mix/ vortex).
- Centrifuge at 3000 g (15-20 minutes), 4ºC.
- Wait 5 minutes for aerosols to settle, decant supernatant and discard.
- Resuspend sediment in 1-2 ml phosphate buffer (pH 6.8).
- After decontamination, resuspend the pellet in phosphate buffer (1-1.5 ml) and homogenize samples for proper mixing. This should be followed by the preparation of aliquots.
- Use aliquot/ sediment to inoculate Mycobacteria Growth Indicator Tube (MGIT) tubes and for DNA extraction for LPA.
Resources
Kindly provide your valuable feedback on the page to the link provided HERE
Extraction of DNA from Smear Positive Clinical Specimen, LJ and Liquid Media in LPA Lab Settings
ContentPurpose of DNA extraction
- Extract DNA from cellular components
For Line Probe Assay (LPA), DNA is extracted from:
- Clinical specimen
- Culture isolates on Loewenstein-Jensen (LJ) solid medium
- Bacteria growth in liquid media (Mycobacteria Growth Indicator Tube (MGIT), BD Diagnostics)
Extraction of DNA from a clinical specimen and culture isolates (LJ, liquid) is shown in the figure below:
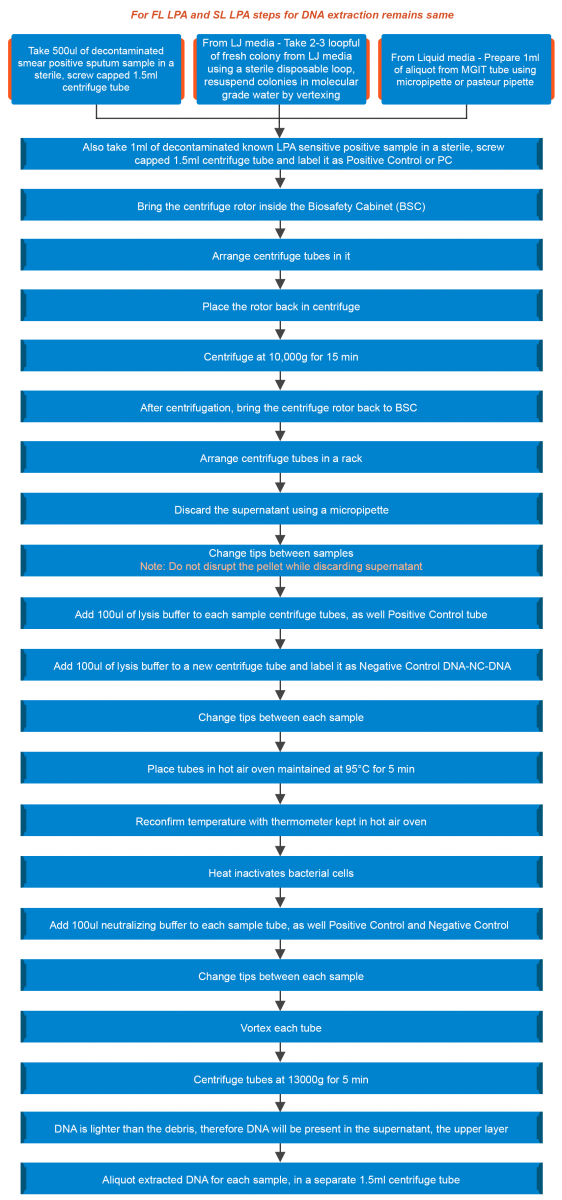
Figure: Extraction of DNA from a Clinical Specimen and Culture Isolates
Resources
- Guidelines for PMDT in India, 2021.
- Challenge TB: LPA - Introduction to Molecular Biology.
- GenoType MTBDR plus ver 2.0 kit, Instructions for Use.
Kindly provide your valuable feedback on the page to the link provided HERE
Contamination Control During DNA Extraction in LPA Lab Settings
ContentContamination of the Polymerase Chain Reaction (PCR) can occur from previously processed specimens. Hence, it is important to take precautions to avoid contamination.
To ensure contamination control during DNA extraction in a Line Probe Assay (LPA) setting, follow the do's and don’ts elaborated below.
DO's
- Label tools and instruments “For use in LPA laboratory only”.
- Do specimen preparation on a separate day (earlier) and store extracted DNA at 2-4°C.
- Proceed with reagent preparation and amplification/detection on the following day.
- Always use Biosafety Cabinet (BSC) for DNA extraction.
- Always use filtered tips.
- Change gloves if contaminated by specimens.
- Clean and disinfect the work area before and after use with disinfectant.
- Establish regular (e.g., weekly) and thorough laboratory cleaning protocols for floors, doors, walls.
DON’Ts
- Instruments used in the LPA laboratory should not be used elsewhere.
- Never take any tools/ instruments used for DNA extraction to Reagent Preparation Area.
- Do not try to put cotton plugs into unfiltered tips.
- Do not use flip-cap tubes, always use screwcap tubes.
Resources
- Molecular Detection of Drug-resistant Tuberculosis by Line Probe Assay.
- GLI Training Package on LPA.
Kindly provide your valuable feedback on the page to the link provided HERE
LPA PCR Reagent Preparation: Test Reagents Kit
ContentTest Reagents Kits Used for First Line (FL) and Second Line (SL) Line Probe Assay (LPA)
- For FL LPA- kit used is MTBDR plus version 2.0
- For SL LPA- kit used is MTBDRsl version 2.0
Components of kits are shown in the following table.
Table: Components of MTBDR plus version 2.0 (FL LPA) and MTBDRsl version 2.0 (SL LPA) kits
COMPONENTS OF FL LPA KIT
COMPONENTS OF SL LPA KIT
Membrane strips coated with specific probes
(MTBDRplus VER 2.0 STRIPS)
Membrane strips coated with specific probes (MTBDRsl VER 2.0 STRIPS)
Denaturation Solution (DEN)
Denaturation Solution (DEN)
Hybridization Buffer (HYB)
Hybridization Buffer (HYB)
Stringent Wash Solution (STR)
Stringent Wash Solution (STR)
Rinse Solution (RIN)
Rinse Solution (RIN)
Conjugate Concentrate (CON-C)
Conjugate Concentrate (CON-C)
Conjugate Buffer (CON-D)
Conjugate Buffer (CON-D)
Substrate Concentrate (SUB-C)
Substrate Concentrate (SUB-C)
Substrate Buffer (SUB-D)
Substrate Buffer (SUB-D)
Tray
Tray
Evaluation sheet
Evaluation sheet
Instructions for use
Instructions for use
Template
Template
Amplification Mix A (AM-A GT MTBDRplus VER 2) contains buffer, nucleotides, Taq polymerase
Amplification Mix A (AM-A GT MTBDRsl VER 2.0) contains buffer, specific primers, nucleotides, Taq polymerase
Amplification Mix B (AM-B GT MTBDRplus VER 2.0) contains salts, specific primers, dye
Amplification Mix B (AM-B GT MTBDRsl VER 2.0) contains buffer, salts, dye
All kits are stored at 2-8°C while Amplification Mix A and B (both kits) are stored at -20°C.
Resources
- GenoType MTBDR plus ver 2.0 kit, Instructions for Use.
- GenoType MTBDRsl VER 2.0 kit, Instructions for Use.
Kindly provide your valuable feedback on the page to the link provided HERE
PCR Reagent Preparation Procedure in the LPA Lab
ContentIn a Line Probe Assay (LPA) lab, subsequent to DNA extraction, reagents are prepared for PCR amplification using the checklist and worksheets.
Preparation Steps
- Prepare a written checklist of materials and tools needed.
- Prepare a worksheet with a list of specimens (identifiers) to be tested.
- Prepare worksheet to calculate the volume master mix ingredients (put on the wall near work area).
Setting up the Workplace
- Put on gloves and lab coat.
- Decontaminate biosafety cabinet and work area (1% Sodium hypochlorite solution, followed by 70% alcohol).
- Cover work area in a biosafety cabinet with clean paper towels.
Calculations for Master Mix Preparation
- Determine the number of specimens and controls.
- Use this number “+” 1 to calculate the volume of different components of the master mix.
- The volume of the master mix is 45 μl per specimen:
- 10 μl AM-A
- 35 μl AM-B
- Prepare the number of tubes required.
Polymerase Chain Reaction (PCR) Reagent Preparation Procedure in Master Mix Room
- Reagent preparation for both First Line - Line Probe Assay (FL-LPA) and Second Line - Line Probe Assay (SL-LPA) remains the same with only difference in the kits used. The master mix must be freshly prepared.

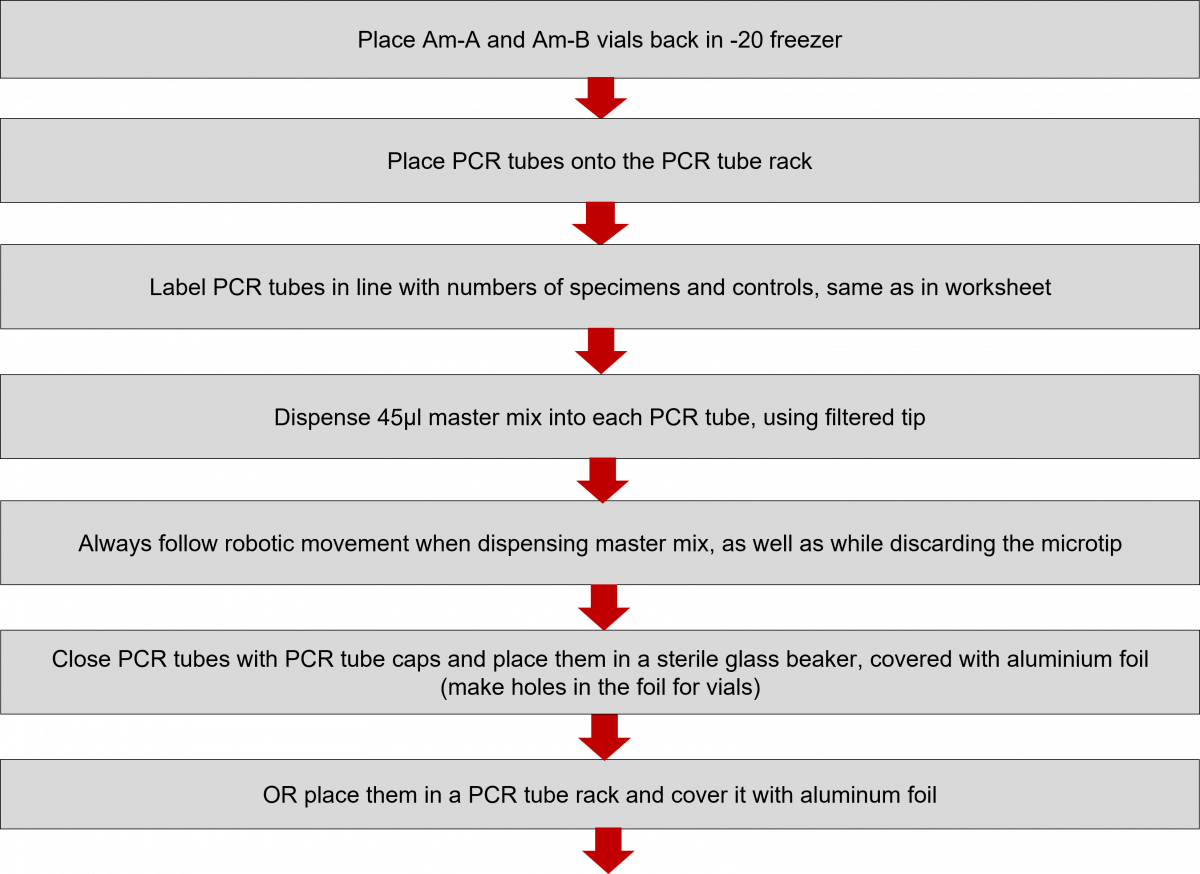

Click the video below to see how to prepare the Master Mix.
Resources
- GenoType MTBDR plus ver 2.0 Kit, Instructions for Use.
- GenoType MTBDRsl VER 2.0 Kit, Instructions for Use.
- GLI Training Package on LPA.
Kindly provide your valuable feedback on the page to the link provided HERE
Contamination Control During PCR Reagent Preparation in the LPA Lab
ContentDuring PCR Reagent preparation, if DNA fragments from the lab environment, such as a DNA template amplified in a previous qPCR experiment, enter the qPCR reaction or reagents (even in small quantities), they can be amplified during the reaction. This contamination and non-specific amplification can cause misleading results, such as false positives. Hence, contamination needs to be rigorously controlled.
Do’s and Don’ts for Contamination Control during PCR Reagent Preparation
Do’s
- Change shoes or use shoe covers, before entering the Reagent Preparation/ Master Mix Room.
- Always clean the work area properly before and after completing the work, using disinfectants.
- Keep master mix reagents in -20°C freezer.
- Label tools and instruments to be used only in Master Mix Room.
- Use 0.5 ml individual PCR tubes.
- Use a PCR hood.
- Decontaminate and calibrate pipettes regularly.
- Always prepare fresh disinfectant (1% sodium hypochlorite solution).
- Establish regular (e.g., weekly) and thorough laboratory cleaning protocols for floors, doors, walls.
Don’ts
- Tools and instruments used in Master Mix Room should not be used elsewhere.
- After working in other areas, do not come back and clean the reagent preparation area.
Resources
- GenoType MTBDR plus ver 2.0 Kit, Instructions for Use.
- GenoType MTBDRsl VER 2.0 Kit, Instructions for Use.
- GLI Training Package on LPA.
Kindly provide your valuable feedback on the page to the link provided HERE
Amplification of Extracted DNA in the LPA Lab
ContentIn the Line Probe Assay (LPA) labs, subsequent to the preparation of the Polymerase Chain Reaction (PCR) Master mix, DNA amplification is carried out.
The DNA amplification steps remain the same in both First Line - Line Probe Assay (FL-LPA) and Second Line - Line Probe Assay (SL-LPA). In DNA amplification, there is the addition of DNA to the master mix, and the amplification of DNA using PCR machine.
The procedure for amplification is shown below. Play the video below to know more.
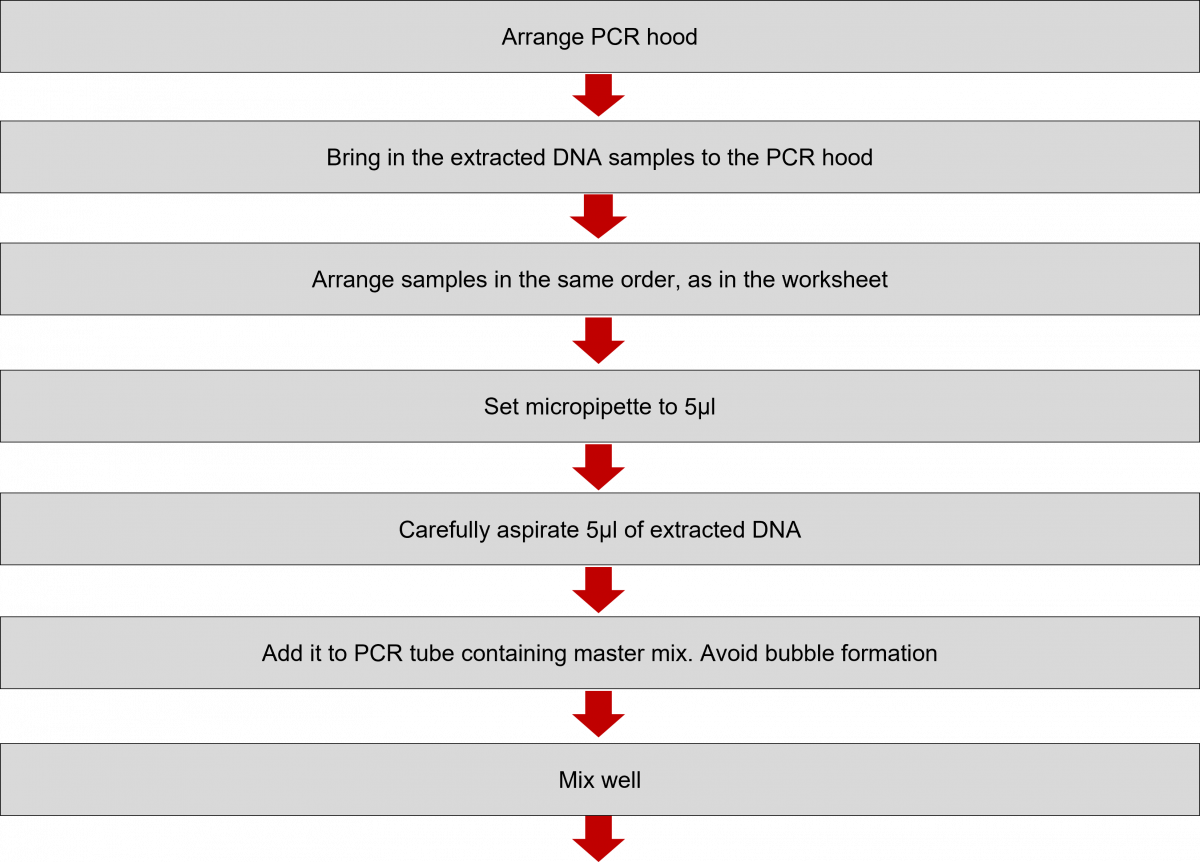
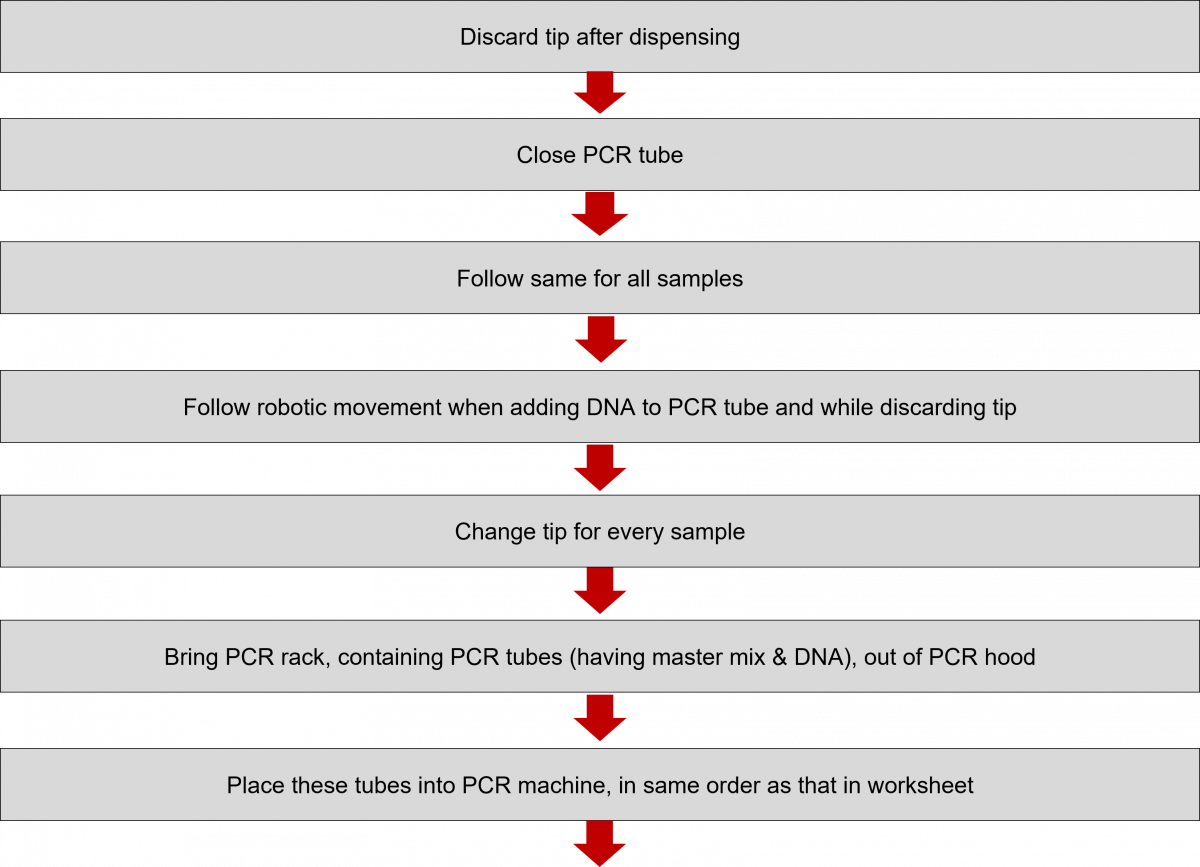
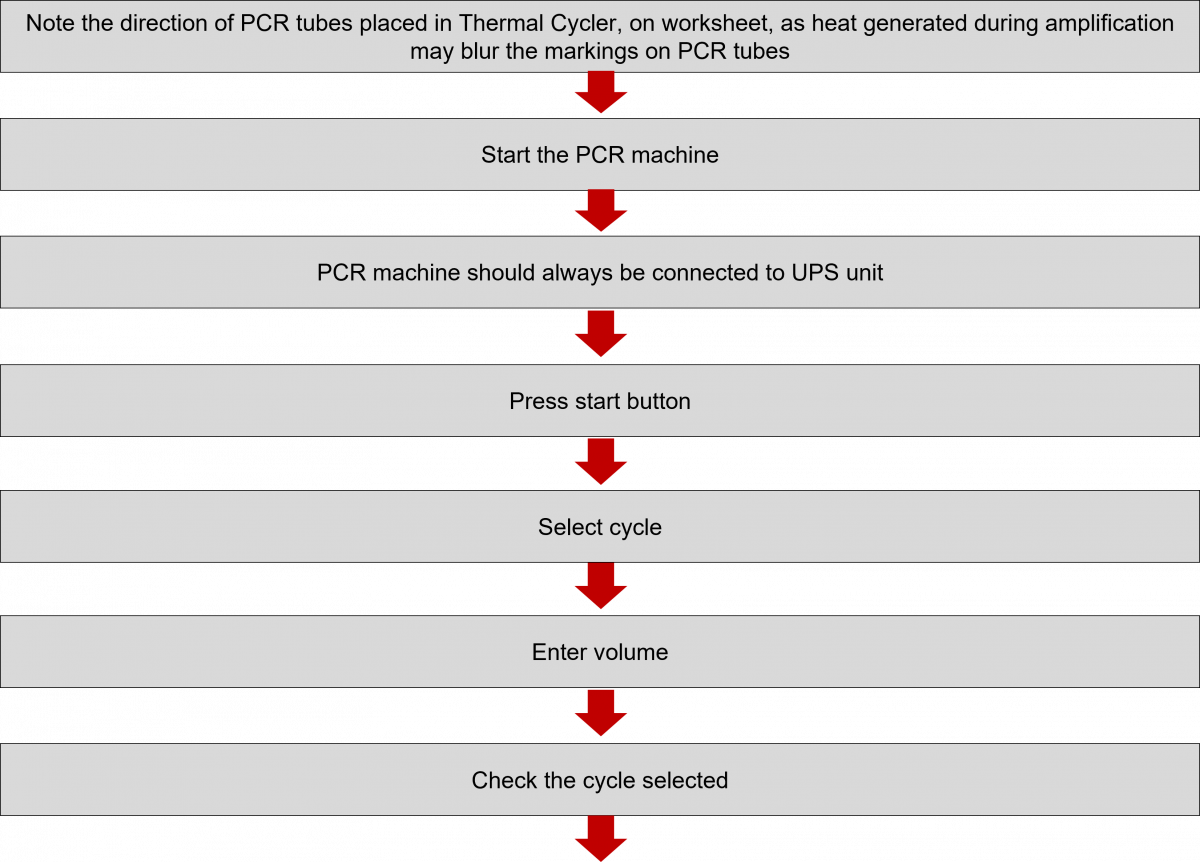

Click the video below to see the procedure for PCR amplification.
Resources
- GenoType MTBDR plus ver 2.0 Kit, Instructions for Use.
- GenoType MTBDRsl VER 2.0 Kit, Instructions for Use.
- GLI Training Package on LPA.
Kindly provide your valuable feedback on the page to the link provided HERE
Contamination Control in the Amplification Room in the LPA Lab
ContentContamination can happen in the amplification room due to exogenous DNA and spillover from last amplification or contaminants or inhibitors entering the reaction tubes.
Do’s and Don’ts for Contamination Control in the Amplification Room
Do’s
- Label tools and instruments “For use in Amplification Room Only”.
- Follow unidirectional work flow.
- Add DNA extract to PCR tubes in PCR hood.
- Change gloves if they get contaminated with amplicons.
- Always clean work area properly before and after completion of tasks.
- Establish a regular (e.g., weekly) and thorough laboratory cleaning protocol (floors, doors, walls).
Don’ts
- Tools and instruments used in the amplification room cannot be used elsewhere.
- Never take anything from the amplification room to the reagent preparation area.
Resources
- GenoType MTBDR plus ver 2.0 Kit, Instructions for Use.
- GenoType MTBDRsl VER 2.0 Kit, Instructions for Use.
- GLI Training Package on LPA.
Kindly provide your valuable feedback on the page to the link provided HERE
Overview of Hybridization in Line Probe Assay and Genotypic Drug Sensitivity Testing
ContentDeoxyribonucleic Acid (DNA) hybridization is based on complementary strands of single-stranded DNA (ssDNA) hybridizing or binding to each other to form double-stranded DNA (dsDNA).
- Line Probe Assay (LPA) is based on reverse hybridization between amplicons derived from a multiplex PCR and nitrocellulose-bound probes covering wild-type sequences and specific mutations in Mycobacterium tuberculosis.
- Biotin-labelled amplicons (amplified DNA of the genes of interest generated during amplification of the target DNA) are in a fluidic state.
- Wild-type and/ or mutated probes (reaction zones) are unlabeled and immobilized as bands onto nitrocellulose membrane strips.
- LPA results are based on banding patterns detected on a strip following hybridization with PCR products amplified from target DNA in clinical specimens.
The figure below shows the steps involved in hybridization.
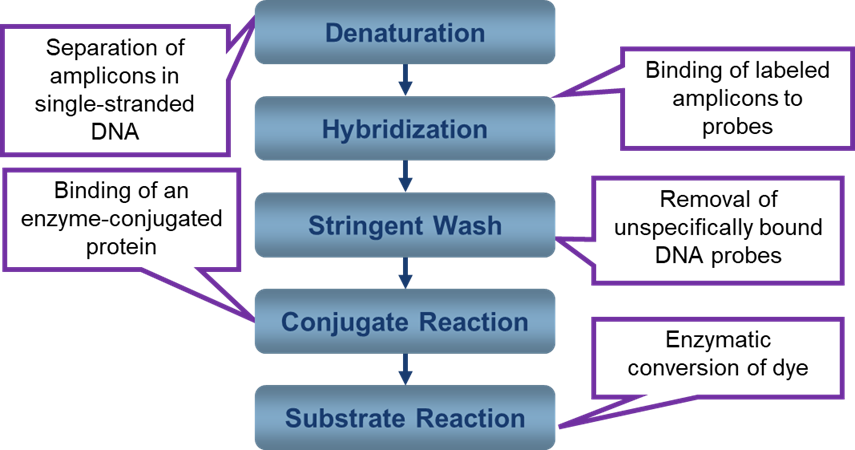
Figure: Steps involved in Hybridization
Resources
- GenoType MTBDR plus ver 2.0 Kit, Instructions for Use.
- GenoType MTBDRsl VER 2.0 Kit, Instructions for Use.
- GLI Training Package on LPA.
Kindly provide your valuable feedback on the page to the link provided HERE
Hybridization Setup in LPA and Genotypic DST
ContentThe steps listed below need to be followed when setting up for the hybridisation procedure.
Workstation Set-up
- Compile all the tools and reagents required for the step.
- Switch on all the equipment and check whether they are in working condition.
- Always connect the Twincubator and GT blot to the UPS.
- Thoroughly clean the workbench and tools with appropriate disinfectant.
- Clean the equipment as suggested by the manufacturer.
- Place an absorbent sheet.
- Bring out the hybridization reagents from the refrigerator.
Reagent Preparation
- Kit Component 1 is used for this step.
- Hybridization reagent preparation and steps involved in hybridization procedure remains the same in First Line (FL) and Second Line (SL) Line Probe Assay (LPA).
- Bring out the reagent kit from the refrigerator.
- Pre-warm the hybridisation and stringent solution in a water bath, as these 2 solutions form crystals due to the kit’s storage at 2 - 8ºC.
Reagents Required for Hybridization
- Hybridization Solution - HYB
- Stringent Solution - STR
- Conjugate Solution - CON
- Substrate Solution - SUB
- RIN Solution - RIN
- Distilled Water - DW
The steps for preparing these reagents are shown in the tables below.
Table 1: Preparation of Hybridization and Stringent Solutions
PREPARATION OF HYBRIDIZATION SOLUTION PREPARATION OF STRINGENT SOLUTION - Pre-warm hybridization solution in a water bath.
- Check the hybridization solution for precipitate.
- If the solution is consistent, without any precipitate, aliquot the calculated amount to a falcon tube and label it as “HYB".
- Remember: Hybridization solution should be warm when adding it to the Hybridization tray.
- Pre-warm stringent solution in a water bath.
- Check the stringent bottle for precipitate.
- If the solution is consistent, without any precipitate, aliquot the calculated amount to a falcon tube and label it as “STR”.
Table 2: Preparation of Conjugate and Substrate Solutions
PREPARATION OF CONJUGATE SOLUTION PREPARATION OF SUBSTRATE SOLUTION - Aliquot calculated conjugate diluent to a 50 ml falcon using a micropipette.
- Add calculated conjugate concentrate to it, using a micropipette.
- Mix well.
- Label it as “CONJUGATE”.
- Aliquot calculated substrate diluent to a 50 ml falcon using a micropipette.
- Add calculated substrate concentrate to it, using a micropipette.
- Mix well.
- Cover the falcon tube with aluminium foil as the substrate is photosensitive.
Table 3: Preparation of RIN Solution and Distilled Water
PREPARATION OF RIN SOLUTION FOR DISTILLED WATER - Aliquot calculated RIN solution to a 50 ml falcon tube.
- Label it as "RIN".
- Aliquot the calculated amount of distilled water required in a falcon tube.
- Label it as "DW".
Please click the video below to see more on hybridization.
Resources
- GenoType MTBDR plus ver 2.0 Kit, Instructions for Use.
- GenoType MTBDRsl VER 2.0 Kit, Instructions for Use.
- GLI Training package on LPA.
Kindly provide your valuable feedback on the page to the link provided HERE
Hybridization Using Twincubator in LPA Lab Settings
ContentGeneral instructions when conducting hybridization using a twincubator are:
- Thoroughly clean the workbench with disinfectant (1% sodium hypochlorite).
- Prepare reagents as per the calculation table.
- Using clean/ new tweezers place strips onto a clean sheet of paper and label them as in the worksheet.
- Use a clean/ new tray.
Steps of Hybridization Using Twincubator
Step-1
- Dispense 20 μl denaturation (DEN) solution in the corner of each trough.
Note: No need to change tips between samples.
Step-2
- Add 20 µl Amplicon to DEN and carefully mix by pipetting up and down.
- Incubate for 5 minutes.
Note: Change tips between samples.
Step-3
- Carefully add 1 ml of pre-warmed hybridization (HYB) buffer to each well, using filtered tips.
Note: Change tips between samples.
- Gently shake the tray to homogenously mix HYB with amplicon.
- Do not spill into neighbouring troughs.
Step-4
- Carefully place numbered strips in each well, strip face side up using clean/ new plastic tweezers.
- Strips must be completely immersed in HYB.
- If strips turn over, reposition them with a fresh pipette tip.
Step-5
- Place tray onto Twincubator and press START.
- Twincubator will then start shaking with a temperature of 45°C.
- This step will be of 30 minutes.
- After 30 minutes, the Twincubator will set off an alarm.
- When the alarm goes off, press the right arrow to stop.
Step-6
- Completely aspirate HYB using transfer pipettes.
Note:
Change pipettes for every sample.
Do not decant the contents of the tray into a sink or jar as this can contaminate the work area.
Wipe off the condensation that forms on the lid of the incubator before every incubation step.
Step-7
- Add 1 ml of STR solution to each well.
- Press start.
- This step will be of 15 minutes at 45°C.
- After 15 minutes, the Twincubator will set off an alarm.
- When the alarm goes off, press the right arrow to stop
Step-8
- Completely aspirate STR solution by transfer pipette.
Note:
Change pipettes for every sample.
Do not decant the contents of the tray into a sink or jar; this can contaminate the work area.
Step-9
- Add 1ml of RIN solution to each well.
- Press start.
- This step will be for 1 minute.
- After 1 minute, the machine will set off an alarm.
- Once the alarm goes off, press the right arrow to stop.
Step-10
- Completely aspirate the RIN solution by transfer pipette.
Note: No need to change pipette between wells.
- From this step, the content of the tray may be decanted into a container with 1% sodium hypochlorite solution.
Step-11
- Add 1 ml of conjugate solution to each well using a micropipette.
Note: No need to change tips for every sample.
- Press start.
- This step will be of 30 minutes.
- After 30 minutes, the machine will set off an alarm.
- Once the alarm goes off, press the right arrow to stop.
Step-12
- Completely aspirate conjugate solution using a transfer pipette, or the content of the tray may be decanted into a container with 1% freshly prepared sodium hypochlorite solution.
Step-13
- Work at room temperature from this step.
- Add 1 ml of RIN solution to each well.
- Press start.
- This step will be for 1 minute.
- After 1 minute, the machine will set off an alarm.
- Once the alarm goes off, press the right arrow to stop.
Step-14
- Completely aspirate the RIN solution using a transfer pipette, or the content of the tray may be decanted into a container with 1% freshly prepared sodium hypochlorite solution.
Step-15
- Repeat step-13.
Step-16
- Repeat step-14
Step-17
- Add 1 ml of distilled water to each well.
- Press start.
- This step will be for 1 minute.
- After 1 minute, the machine will set off an alarm.
- Once the alarm goes off, press the right arrow to stop.
Step-18
- Completely aspirate distilled water using a transfer pipette, or the content of the tray may be decanted into a container with 1% freshly prepared sodium hypochlorite solution.
Step-19
- Add 1 ml of substrate solution to each well.
Note: No need to change tip.
- Cover the machine with aluminium foil as the substrate solution is photosensitive.
- Press start.
- This step may be for 3-5 minutes (depending on the colour that develops).
- The machine will set off an alarm.
- Once the alarm goes off, press the right arrow to stop.
Step-20
- Completely aspirate the substrate solution using a transfer pipette, or the content of the tray may be decanted into a container with 1% freshly prepared sodium hypochlorite solution.
Step-21
- Add 1 ml of distilled water to each well.
- Press start.
- This step will be for 1 minute.
- After 1 minute, the machine will set off an alarm.
- Once the alarm goes off, press the right arrow to stop.
Step-22
- Completely aspirate distilled water using a transfer pipette, or the content of the tray may be decanted into a container with 1% freshly prepared sodium hypochlorite solution.
Step-23
- Repeat step-21.
Step-24
- Do not aspirate distilled water from wells.
Step-25
- Using clean tweezers, remove the strips from the tray and dry them between two layers of absorbent paper
Step-26
- Align strips and paste them on a reporting sheet using cello tape/ scotch tape.
Resources
- GenoType MTBDR plus ver 2.0 Kit, Instructions for Use.
- GenoType MTBDRsl VER 2.0 Kit, Instructions for Use.
- GLI Training Package on LPA.
Kindly provide your valuable feedback on the page to the link provided HERE
Hybridization Using GT BLOT in LPA Lab Settings
ContentGeneral Instructions
- Thoroughly clean the work bench with 1% sodium hypochlorite solution.
- Run the wash cycle A and B in GT Blot.
- After cleaning, prepare reagents as per the calculation table.
- Pour prepared reagents into reagent bottles provided with GT Blot.
- Place GT Blot reagent bottles back to machine.
- Cover the bottles with a tubed lid.
- Using clean/ new tweezers, place strips onto a clean sheet of paper and label them same as that in the work sheet.
- Use a clean/ new tray, check for any wear/ tear.
Steps for hybridization using twincubator are shown in the table below.
Table: Hybridization Steps using Twincubator
STEP-1
DISPENSE 20ΜL DENATURATION (DEN) SOLUTION IN A CORNER OF EACH WELL
NOTE: NO NEED TO CHANGE TIPS
Step-2
- Add 20µl amplicon to DEN and carefully mix by pipetting up and down
- Incubate for 5 min
- Change tips for every sample
- Carefully place the tray in GT Blot
- Close the GT Blot lid
- Press start
- Select no. of wells (always in even numbers)
- Press start
Note: Change tips between samples
Step-3
- The instrument will automatically dispense hybridization solution to each well selected
- Message – ‘Add amplicon’ will be displayed
Step-4
- Carefully place numbered strips in each well, up (face-side), using clean/ new plastic tweezers
- Close the lid of GT Blot
- Press start
- All the subsequent steps will be carried out automatically in a fully automated GT Blot machine
Resources
- GenoType MTBDR plus ver 2.0 kit, Instructions for Use.
- GenoType MTBDRsl VER 2.0 kit, Instructions for Use.
Kindly provide your valuable feedback on the page to the link provided HERE
Contamination Control in the Hybridization Area in LPA Lab Settings
ContentDo’s and Don’ts for Contamination Control
DO’s
- Label the tools and instruments “For use in Hybridization Area”.
- Change gloves if they get contaminated amplicon.
- Decontaminate trays before reuse.
- Keep cleaned strip trays and tweezers in a clean and sealed plastic bag.
- Always clean work bench and tools with 1% freshly prepared sodium hypochlorite solution followed by 70% alcohol.
- Establish weekly laboratory cleaning protocols for floors, doors, walls.
DON’Ts
- Tools and instruments used in hybridization area should not be used elsewhere.
- Never take anything from hybridization area to reagent or specimen preparation area.
- Do not reuse falcon tubes for conjugate and substrate preparation.
- Do not decant the content of the strip tray into the sink or any other container during the Hybridisation (HYB) and Stringent (STR) steps. This will contaminate the work area.
Resources
- GenoType MTBDR plus ver 2.0 kit, Instructions for Use.
- GenoType MTBDRsl VER 2.0 kit, Instructions for Use.
Kindly provide your valuable feedback on the page to the link provided HERE
Fullscreen